background image

MultiQ Digital Signage – DSMS 3 User’s Manual Ver. 2, 2010-06-08 

 143 

Appendix 7 – Rights management 

 
At delivery each account comes with an administrator username and password. It is strongly 
recommended that the initial password is replaced before starting to use the system. 
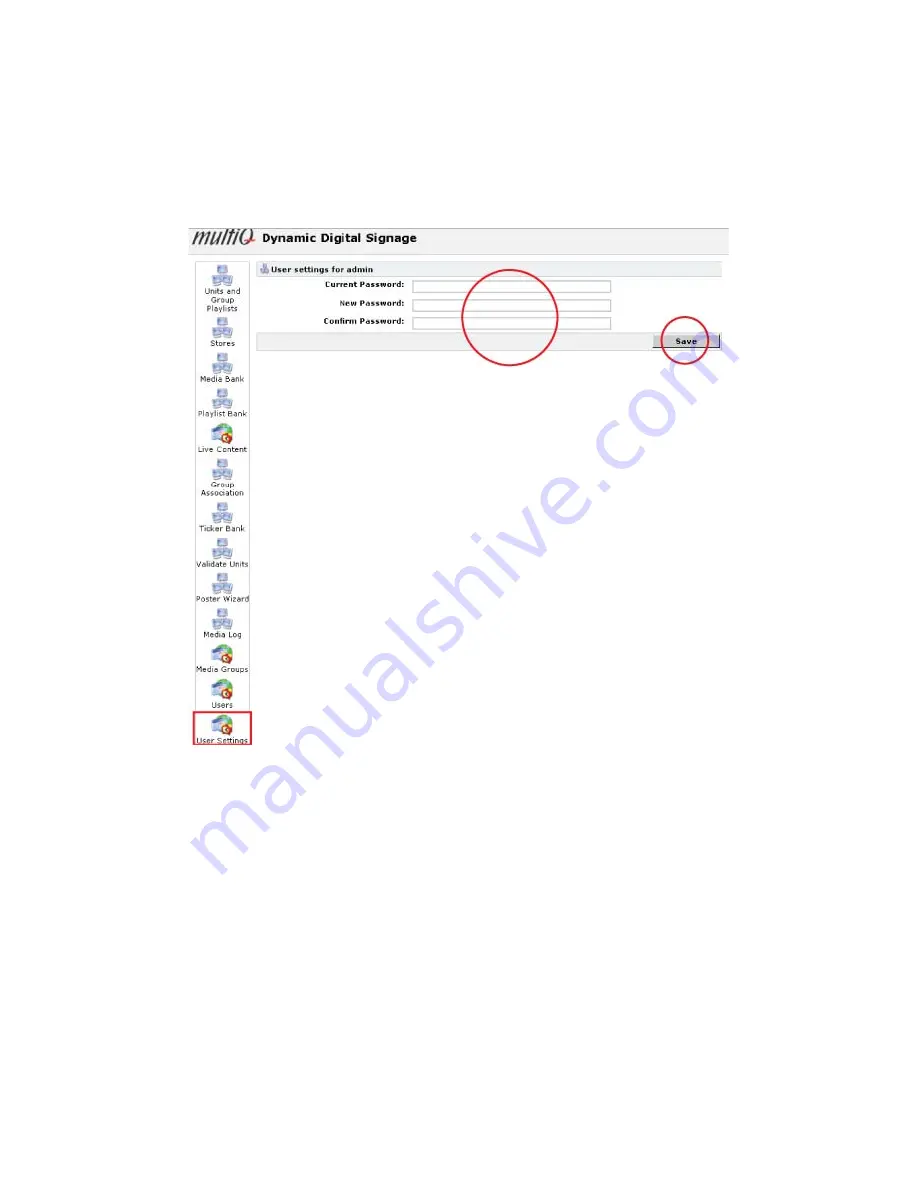
The password for each user is easily replaced in the “User Settings” menu. 


Figure A7-1. To change the password. 


As an administrator you can create new users with equal or restricted rights. In the “User” menu new 
users may be added. This is practical when splitting work between different parties such as content 
providers that may only be allowed to upload media files to the Media Bank, publishers focused on 
creating and editing playlists and channels, and an operational only responsible for monitoring the 
system. 
 
In the “Add user” menu the individual rights for each user may be selected. By choosing “Administrator” 
the user will have full rights to handle the system.  

Summary of Contents for DSMS 3

Page 1: ...MultiQ Digital Signage DSMS 3 User s Manual ...

Page 2: ...n 20 Troubleshooting 20 Testing the web client and defining your first media player 22 To find confirmation that the media player is connected to the DSMS 25 Decreasing the media player report interval 25 Content Management basics 27 Organizing playlists into channels 28 Image retention 29 Exercise 1 Create a simple full screen digital poster or an in store TV channel 30 To upload content to the D...

Page 3: ...119 Getting tickers from RSS feeds 119 Exercise 5 The Stores feature Scalability 124 Scalability and how to handle multiple stores 130 To control the display hours in the stores 131 Appendix 1 Monitoring and logging the units 133 Appendix 2 Controlling the default playlists 134 Scheduling default playlists 134 Setting the time to revert to the default playlists 135 Appendix 3 Mixing local play wit...

Page 4: ...ll four generations of media players administrated in the same account It is also possible to manage the media monitors and media players in standalone mode without any central server To implement interactive applications for media players 1 and 2 Java script interactivity is used Media players 4 5 and media monitors 4 5 6 and 7 support Java script interactivity as well but it is recommended to us...

Page 5: ...e to that there are no restrictions in your firewall preventing you from using the content management server The content and tool files required for your exercises can be downloaded from the MultiQ website www multiq com A web page creation tool according to your preferences Serif Web Plus SE is a suitable choice and is used in this manual can be downloaded for free from http www freeserifsoftware...

Page 6: ...MultiQ Digital Signage DSMS 3 User s Manual Ver 2 2010 06 08 6 Figure 1 MultiQ Media player and Media monitor product range ...

Page 7: ...dia monitor or media player for test To be able to do all of the exercises including interactivity it is preferable to use a Media monitor 5 or 7 Media players 4 and 5 can be used but this requires a separate monitor to be used To do the interactive parts of the exercises the monitor needs to include a touch panel with a USB interface that is to be connected to one of the USB ports of the media pl...

Page 8: ...ting Mounting and attachment hardware is not included The monitor has a VESA 75 x 75 mm interface Please contact your MultiQ reseller if you wish to mount your media monitor on the wall or on other kinds of stands Mounting instructions are provided with each separate mount Connections The media monitor has connections for Audio digital and analogue LAN and USB I O are to be found behind the lid on...

Page 9: ...buttons and indication LEDs Buttons Power on button buttons to adjust brightness LED indications Power This led will be lit when the media monitor is on Blue Status This led indicates activities and result of activities Flashing between red and green ongoing activity as starting up shutting down or download in progress Green download succeeded Red communication with digital signage management serv...

Page 10: ... only Audio digital and analogue LAN and USB I O Figure 4 Media player back panel connections Hardware Installation Connect the DVI D output to the monitor to be used If the monitor has an HDMI input a conversion cable should be used A monitor must be used when configuring the media player The audio outputs may be connected to analogue or digital inputs on external audio systems The LAN port must ...

Page 11: ...down or download in progress Green download succeeded Red communication with the digital signage management server failed or download failed HDD Indicates hard drive activity Yellow LAN Flashes when there is activity on the LAN port Not lit no network access Constantly lit in green Link up at 100 Mb s or 1000 Mb s Flashing in green Network activity at 100 Mb s or 1000 Mb s Constantly lit in red Li...

Page 12: ...ay be corrected by simultaneously pressing the and buttons on the back of the monitor It is crucial that this adjustment is done before calibrating the touch screen This adjustment will secure that the content is presented at the correct location on the screen and the setting will be automatically stored in the monitor To calibrate the touch panel Next step is to calibrate the touch panel to ensur...

Page 13: ...tored in the media player and no further calibration is needed as long as the same media player is connected to the monitor If the monitor or the media player is replaced the calibration procedure has to be done once more Figure 7 Follow the instructions at the center of the screen to calibrate the touch panel ...

Page 14: ... orientation of the monitor Figure 8 By pressing the centre button the configuration menu can be rotated When the proper orientation of the menu system has been chosen the language setting menu will appear By choosing the language also the language keyboard setting is selected Figure 9 The language settings menu Next is the setup menu login page You will find see the virtual keyboard at the bottom...

Page 15: ...he Basic setup menu is chosen If you intend to use the media monitor as a standalone unit without access to a central managing system press the Standalone button default In most cases media players are connected to a local network that provides an IP address automatically If so press DHCP Then press Test connection Figure 11 Standalone setup with DHCP selected ...

Page 16: ...igure 12 The connection test will provide you with the IP address of the media monitor After pressing the Next button you will find yourself in the digital signage management system main menu As an alternative to acquiring an IP address automatically the IP address can be set manually In such case you must obtain IP addressing parameters from your network administrator Figure 13 As an alternative ...

Page 17: ...s To remove the web server lock you need to click the Users icon to the left The Disable remote access to web server check box should be unchecked Then click Save After a while the media monitor will be available for inbound requests Figure 14 In the Security menu reached by clicking the Users icon to the left the web server lock can be removed and the password can be changed Another thing that sh...

Page 18: ...is included in appendix 1 If you intend to use your unit in standalone mode please go there now The remaining part of this manual describes how to handle a centrally managed system Centrally managed network setup If the media monitor is to be used in a centrally managed digital signage network you should choose Managed in the configuration menu Add the media monitor ID and the URL of the server Ac...

Page 19: ...tly set Also check the LAN cabling When everything is working correctly press Next to save the settings After the reboot the media monitor will automatically start downloading the files decided by the digital signage management system While downloading files the Status LED will flash between red and green Downloading content After the reboot the media monitor will automatically start downloading t...

Page 20: ... media monitor doesn t power up Check the LED on the power supply If not lit make sure it s properly connected to a wall socket If the power supply LED is lit but the media monitor still doesn t power up Check the cable between the power supply and the media monitor The media monitor shows an IDLE message Check the status LED if flashing between red and green the media monitor is downloading conte...

Page 21: ... between media monitors or other devices do not work Check the IP addresses for each device and see to that they are set according to the instructions provided by the digital signage management system operator Additional information on the media monitors and media players is to be found in the support section of the MultiQ website We have now installed our first media monitor or media player and i...

Page 22: ... the Server account starting license document Figure 18 Start by logging in to the server account It is recommended that you change password before putting the system into operation How to change password is described in Appendix 1 where you also learn how to add users with individually selected rights When you have logged into the system you will first find yourself in the Units and Group Playlis...

Page 23: ... to the DSMS you will find that there are no media players Define your first media player Click the Add button at the lower right of the Units portion of the menu Figure 19 You will now get into the Add unit menu shown in figure 20 Figure 20 How to define your first media player in the Add unit menu ...

Page 24: ...ion Description and address details are optional At this stage the Video Mode shall be chosen The video mode defines how the screen is to be used when it comes to screen orientation and resolution The video mode also defines how a screen can be split into regions which will be covered later on Select SXGA Full Screen without ticker landscape 0 Finally click the Add button at the lower right of the...

Page 25: ...lists menu it is easy to see when a media player did its most recent request to the DSMS Decreasing the media player report interval By clicking on the media player icon in the Units menu we get into the configuration menu for that particular media player By clicking the Settings tab we can make a number of settings One of these setting is to change the video mode as we already set when defining t...

Page 26: ...MultiQ Digital Signage DSMS 3 User s Manual Ver 2 2010 06 08 26 Figure 22 Decreasing the report interval for the media player ...

Page 27: ...e the files on the screens This can be done either by scheduling or by some interactive command to the media player as if someone is pressing a button on a touch screen D The time it would take for a content file to be transferred from the web client of the content administrator handling the DSMS account until it gets on the screens may vary from seconds to months due to the application The transf...

Page 28: ...a bit too ambitious It is possible to associate a particular spot or playlist directly to a media player to have it played instantly However this is a very complicated way of handling content when it comes to updating a large number of media players If you associate a media specific file to a media player and you want to have it replaced you either will need to manually associate another file to e...

Page 29: ...s Especially static images containing hard contrast transitions may cause image retention Therefore it is recommended not to display the configuration menu or other static content during a long period of time In applications where static images are inevitable as in kiosk applications with buttons hard contrast transitions should be avoided and screen saver videos are recommended After this brief i...

Page 30: ...ster and in store TV techniques To proceed with the exercises we need content On the MultiQ website www multiq com you will find the content files and other tools that are needed for the exercises Download the files and place them in a Content and tools folder on your PC Figure 27 The training content can be downloaded from the MultiQ website and contains the files and tools needed for the exercis...

Page 31: ...o the Media Bank menu At first startup you will find that the Media Bank is empty To start uploading files to the system press the Upload button Figure 28 Press the Upload button to start uploading files to the DSMS Single file upload If single files are to be uploaded to the DSMS then just press the Browse button and browse for the file to be uploaded from the content folder on your PC After sele...

Page 32: ... add a 16 9 widescreen image file to the Media Bank Since we intend to use a 5 4 SXGA monitor it is preferable to tick the Keep Aspect Ratio box and the click Save Figure 30 In the Modify uploaded media menu tick Keep Aspect Ratio Figure 31 shows the effects of the Keep Aspect Ratio parameter Black borders will be added whenever needed to keep the correct aspect ratio of the image Figure 31 The ef...

Page 33: ...le Files upload tool This is a Java script based tools that requires Java to be installed on your computer You also need to allow your system to use the Java extension Browse to the folder where the desired files are kept and then mark and attach them to the tool You can set the preferences for your files already in the upload tool So tick the Keep Aspect Ratio boxes for each of the files Figure 3...

Page 34: ...ading several larger video clip files While making an upload you may not go to another menu in the DSMS because this will stop the uploading process If you want to perform other tasks in the DSMS while uploading you must open a second instance of your web browser and login separately to the DSMS Creating playlists To add a playlist The playlists are stored in the Playlist Bank Click the Playlist B...

Page 35: ...d to use region 0 which is the region allowing for video files Finally click Save to create the playlist The new playlist now appears in the Playlist Bank The reason for having special playlists for Movies and Images is because we can split the screen in two three or four separate regions However only one region can support hardware video decoding since there is only one video decoding chip in the...

Page 36: ...MultiQ Digital Signage DSMS 3 User s Manual Ver 2 2010 06 08 36 Figure 34 How to create a new playlist ...

Page 37: ...thumbnails The list is divided into one Image one video and one Html section Right now we only have image files in the media Bank When the files are selected click Save Figure 35 To add media files to the playlist Editing the playlists If you click a playlist in the Playlist Bank you will get into the playlist editing menu for that particular playlist By licking the arrows to the left of the spots...

Page 38: ...n the screen To create a channel Group Playlist To create a channel Group Playlist click the Units and Group Playlists icon In the Group Playlists section of the menu press the Add button Figure 25 Figure 37 To add a channel Group Playlist to the account In the Add Group Playlist menu Figure 37 name the channel by filling out the Descriptions box with Channel 1 In principle you are free to choose ...

Page 39: ...el is to house video clips as well as the other types of media as images and web pages This will decide in what regions you can use the channel Press the Add button to have the channel Group Playlist created An empty channel will appear in the Group Playlists menu Figure 38 To add a new channel to the Group Playlists menu ...

Page 40: ...e channel In the Group Playlists section of the Units and Group Playlists menu click on Channel 1 You will now get into the Channel 1 editing menu Click Add and scroll to the bottom of the Media Bank content SubPlaylist Video Image and tick Banking Then click Save Now Channel 1 has got its first playlist Figure 39 Add the previously made playlist to your channel ...

Page 41: ... is available in this video mode Click Add in the Media from groups part of the menu Finally tich Channel 100 to have it added to the full screen region Soon the channel including playlist 101 will be playing on the screen Figure 40 To associate a channel with a media player Since the group playlist named Channel 1 is now associated with Media Player 1 we do not have to bother more about the media...

Page 42: ...1 and that Channel 1 consists of the three pictures with Banking theme To add more playlists and content to the channel Now we have one playlist playing in our channel But we would like to have more playlists added Therefore we will proceed by uploading more content to the Media Bank Figure 42 Currently there is only one playlist Banking in the Playlist Bank ...

Page 43: ...ual Ver 2 2010 06 08 43 To create a second playlist In figure 43 a second playlist Gaming is added Then there are three images added to the playlist In figure 44 the playlist is edited Figure 43 A second playlist is added to the Playlist Bank ...

Page 44: ...8 44 Figure 44 The second playlist Gaming is edited The next step is to add Gaming to Channel 1 In the Units and Group playlists menu click on Channel 1 to get into its editing menu Figure 45 Click Channel 1 to get into the Channel 1 group playlist editing menu ...

Page 45: ...dd to add one more playlist Figure 47 Scroll to the lower part of the list and select Playlist Gaming Now Channel 1 has two playlists Banking and Gaming If no scheduling is done it is always the playlist on top that will be played Try to move the Gaming playlist to the top position ...

Page 46: ...g will be played instead of Banking To play playlists in sequence Sometimes it is desirable to play several playlists in sequence This way it becomes possible to mix global playlists with local content and I also facilitate reuse of existing playlists Figure 49 It is possible to play playlists in sequence by disabling playlist looping ...

Page 47: ...ooping is disabled by setting the Is Looping parameter to No for all playlists In this example you need to do the same to both Banking and Gaming Scheduling Before proceeding with the scheduling exercises please reset the Is Looping parameter to Yes for both Banking and Gaming Also move Banking to the top position in Channel 1 By using scheduling it is possible to use different playlists at differ...

Page 48: ... scheduling tool allows you to add start and stop dates of campaigns as well as to enter daily or weekly active periods for the playlist If the playlist on top is not active the player will check for active hours in the playlists below Figure 52 In the scheduling menu you can set start and stop of campaigns and select weekly or daily schedules ...

Page 49: ... Signage DSMS 3 User s Manual Ver 2 2010 06 08 49 Figure 53 Enter active hours 0900 1200 for Banking playlist and press Update Display then select Save Figure 54 Select active hours 1200 2100 for playlist 101 Banking ...

Page 50: ...n the list Figure 55 Scheduling always overrides the position in the list More complex scheduling conditions may be added by clicking the button at the lower end of the tick boxes This way you may have different schedules for different days of the week Conditions may be removed by clicking the x buttons A second active interval for the Gaming playlist can be inserted as is shown in figure 56 Figur...

Page 51: ...e scheduling conditions may be added by clicking the button Clicking the x button to the left of a condition makes that condition to be removed Figure 58 By pressing the Group Schedule button in the Group Playlist menu it is possible to get an overview of the scheduled playlists ...

Page 52: ...playlist with a movie file We have already uploaded the Movie MPG file when we did the multiple file upload of the content files for the exercises Now we will create an additional playlist to use with the movie file Figure 59 Go to the Playlist Bank and click the Add Playlist button to add another playlist Just as for the other two playlists the Movie playlist should be a Movies and Images playlis...

Page 53: ...e 60 Name the playlist Movie You will now find the Movie playlist in the Playlist Bank Figure 61 There are now three playlists in the Playlist Bank Now click the Movie playlist to get into the Movie playlist menu Press Add to get into the selection part of the Media Bank ...

Page 54: ... that will be played over and over in a loop If you at a later stage should find that you need to change the parameters of the video clip you can go to the Media Bank and click on the file to get into the parameter dialog Selecting Anamorphic means that the video will be stretched to fill the entire width of the screen By selecting Allow Ticker to Yes you will have the ticker activated Ticker desc...

Page 55: ...ed Note With Media Players 1 through 3 video exceeding 720 x 576 pixels should not be used With these media players preferably use MPEG 2 encoded files MPEG 4 is supported but requires an AVI container to be used Using a web link URL as a media spot in playlists As a next step we will add a playlist that will be used to house a web spot Go to the Playlist Bank and click Add Playlist and name the n...

Page 56: ... playlists and group playlists Figure 67 Click on Add external to get into the Add external media to the media bank menu menu The Add external media to the media bank menu is divided into several sections The top section is used to add links to web sites that may be available on the Internet or stored inside the media players Insert a name of the link and fill out the address line in the box below...

Page 57: ...ection of the menu Then press Save at the bottom of the menu Click on the Media Bank icon to see the web spot in the Html section of the Media Bank Figure 69 The Google link is now visible as a web spot in the Html section of the Media Bank The web spot is now visible in the Html section of the Media Bank ...

Page 58: ...th an SWF Flash file The MultiQ media players can treat Flash animation files just as any other file format This means that the files can be put right into a playlist without being a part of a web page This means that there is full support for untagged SWF files in the system The duration of each file is set just as for an image file and the animation is repeated for the entire duration of the spe...

Page 59: ...tiQ Digital Signage DSMS 3 User s Manual Ver 2 2010 06 08 59 Figure 72 In the Playlist Bank click Add Playlist to add another playlist named Logo Figure 73 Click on Logo to get into the Logo playlist menu ...

Page 60: ...ltiQ Digital Signage DSMS 3 User s Manual Ver 2 2010 06 08 60 Figure 74 Click on Add to get into the selection menu Figure 75 Select the Logo swf file and click Save to have it added to the logo playlist ...

Page 61: ...the interval that is specified in the playlist menu A live stream treated as a media spot Just as a web link can be used as a conventional media spot also a stream can be treated the same way Figure 77 Add a playlist named Livet TV that can be used to house a live broadcast stream or a live feed from a surveillance camera ...

Page 62: ... once more In the external links menu tick the Stream box and add Live TV to the description line Then paste the URL that addresses the streamer or the surveillance camera For Live TV purposes a separate streamer is often used to obtain the IP stream The syntax of the stream varies depending on what device is used and what signal is wanted from the device In this example the address rtsp 192 168 1...

Page 63: ...1 clock 0 date 0 fps 0 audio 0 keyframe_interval 32 maxframesize 0 Before leaving the menu click Save Figure 80 Add the URL of the streaming device to the Stream portion of the external media menu then click Save at the bottom of the menu Finally add the streaming spot to the Live TV playlist by clicking Add in the Live TV playlist menu Figure 81 Click Add in the Live TV playlist menu to add the n...

Page 64: ...e Live TV spot in the Stream section Figure 83 Now we have six playlists each containing various kinds of media files or media links Finally we have six playlists that contain various kinds of media files or media links However it is also possible to combine different kinds of spots in the same playlist ...

Page 65: ...tal Signage DSMS 3 User s Manual Ver 2 2010 06 08 65 Figure 84 Click on Channel 1 in the Group Playlists section of the menu to get into the Channel 1 menu Figure 85 Click Add to get into the media selection menu ...

Page 66: ...MultiQ Digital Signage DSMS 3 User s Manual Ver 2 2010 06 08 66 Figure 86 Now tick the remaining 4 playlists and click Save Figure 87 Channel 1 now contains the 6 playlists ...

Page 67: ...a web server on the Internet The content we have prepared so far can easily be adapted to a web kiosk In this case we will use a media monitor as a web kiosk with a touch panel and a virtual keyboard Figure 88 A web kiosk fetch information from websites that are available on the Internet Figure 89 Move the Web playlist to the top position using the tiny arrows to the left ...

Page 68: ...te appears on the screen The original size of the Google site is quite small when using a touch panel A way to improve this is to use the built in zoom feature In the Media Bank click the Google web spot to get into the Google spot menu Figure 91 Click the Google web link to get into its menu ...

Page 69: ...ears on the screen Figure 93 The zoom feature improves touch panel manoeuvrability Adding a virtual keyboard The next thing needed is to add a virtual keyboard that allows for transactions to be carried out by the user In the Browser Library Extensions there are two virtual keyboards available the StdGrey and the StdBlack keyboards as is shown in ...

Page 70: ...and a black one To use a virtual keyboard the desired keyboard needs to be assigned to the media player or media monitor To assign the keyboard to the player you need to go to the Settings menu of the media player This is done by first going to the Units and Group Playlist menu and then selecting the media player by clicking on its name ...

Page 71: ...6 08 71 Figure 95 Go to the Units and Group Playlist menu and click on the media player Figure 96 Select the Settings tab in the Media Player menu and scroll to Browser Settings and click Add The Language setting will decide what language keyboard to be used ...

Page 72: ...nage DSMS 3 User s Manual Ver 2 2010 06 08 72 Figure 97 Select the StdGrey xpi file and click Save Figure 98 After a restart the keyboard will appear on the screen Figure 99 You can also try to select the black keyboard ...

Page 73: ...he black keyboard will appear Figure 101 The system comes with keyboards in UK English French German and the Scandinavian languages Additional languages and colour schemes adapted to branding can be made by developers please download further information and tools from www multiq com ...

Page 74: ...ty it also provides extremely quick response when watching video clips and other larger files Figure 102 Local interactivity lets the user to choose between content that is already available in the media player Local Play Local interactivity is very much about building dashboards that are used by the user to select between playlists and to move around within the playlists The only difference betwe...

Page 75: ...s images and even web pages The lower region is used for the dashboard which could be an image with a Java script attached or a web page The first step is to create a video mode with a 16 9 widescreen movie image web region on top 1280 x 720 pixels and an image web region at the bottom 1280 x 208 pixels It is essential to understand that the media player can handle up to one movie image web region...

Page 76: ...wo more regions on the screen besides the Primary region You can design your own screen layouts by using the Mode Editor To evoke the mode editor you first press the Settings icon at the bottom left In the Settings menu click Open Mode Editor Figure 104 Click the Settings icon at the bottom left Figure 105 Click the Open Mode Editor button to start the Mode Editor ...

Page 77: ...cal values at the lower left of the interface In this case the Primary region should cover the upper part of the screen and have the dimensions 1280 x 1024 pixels This corresponds to the 720p format Figure 107 Next add a Ticker region by clicking the Ticker button and dragging the corner of the region to the desired size and position For this exercise we choose the maximum height of the ticker whi...

Page 78: ... 107 Add the Primary region by clicking the primary button and dragging the lower left corner of the region Figure 108 Add a Ticker region by clicking the Ticker button and then dragging it to the desired position Select the maximum height 96 pixels Drag to the lower left ...

Page 79: ...06 08 79 Figure 109 Add an Image region at the bottom of the screen by dragging it across to the desired size and location Figure 110 The final design of the video mode Before saving change the name to Ticker press Enter and then press the Save icon on top ...

Page 80: ...to assign our custom video mode to the media player Click the Units and Group Playlists icon and then click the media player to get into its menu Figure 112 Next choose the Settings tab of the playlist menu and choose the new video mode Ticker from the video mode pull down menu Do not forget to click the Save button at the further down the media player Settings menu Click the Settings icon to upda...

Page 81: ...al Ver 2 2010 06 08 81 Figure 112 Click the desired menu player to get into its menu Figure 113 Choose the Settings tab and then choose the new custom video mode Ticker from the pull down menu then click Save at the bottom of the Settings menu ...

Page 82: ...08 82 Figure 114 The final video mode is saved by clicking the Save icon on top right Figure 115 The final video mode as it appears on the monitor screen The Two idle areas are there because we have not yet assigned any content to the ticker nor the image area ...

Page 83: ...ep to master this is to log in to the media player web server However there are a few things that must be fulfilled in order to do this The first thing is to see to that you are on the same subnet as the media player or the media monitor A good way to solve this is to use a separate router that is connected to the Internet on its WAN port and you simply connect your PC or MAC as well as your media...

Page 84: ...y keep track of your devices using the management system Figure 117 In the Status tab of your media player or monitor you can find the current IP address of your unit The third thing to see to is that your media player is open for incoming requests As a security measure by default the media players and media monitors are always locked for inbound requests In order to address your media player you ...

Page 85: ...r web server from outside After the media player has restarted we are ready to go In the address field of Mozilla Firefox recommended enter the IP address of your media player followed by multiq You will now get to the index page of the multiq folder of the web server Figure 119 Once you have logged into the web server you should click the example html hyperlink Uncheck this box ...

Page 86: ... building the applications To user the tool we need to fill out the textboxes Add Primary to the Area Name textbox Then try to click the next area name hyperlink at the top of the tool You will now see that you are able to step through the current playlist on the screen that should be the Banking playlist You can also try to step backwards by using the previous area name hyperlink Figure 120 The e...

Page 87: ... name area name playlist name hyperlink marked in red As you do this the media player will change to the Gaming playlist and the corresponding API commands are presented accordingly Note that the API commands can be entered in the address field of a web browser to send a command to the media player I e that the API commands are common web URL s So we use the same kind of addressing techniques when...

Page 88: ...121 By pressing the goto playlist name area name playlist name hyperlink marked in red you can make the media player to move to another playlist In the following pages we will produce an html dashboard using the API commands that we can produce with the tool just described ...

Page 89: ...es it is suitable to create a folder named Image Dashboard In this folder you should create two subfolders one named Dashboard and the other Dashboard_ext Figure 122 Create a folder named Image Dashboard on your hard drive Web designers have their own favourite tools In this exercise we have selected a very simple tool that is available for download on the Internet and that is well suited for demo...

Page 90: ...ge In our Ticker video mode we have an image area at the bottom of the page that is 1280 x 208 pixels Therefore we want to produce a web page that has these dimensions First select Edit Page Properties Figure 123 In the Page Properties menu deselect master and select none Figure 124 Once in the Properties menu you select Width 1280 pixels and Height 208 pixels Figure 125 The result is the strange ...

Page 91: ...tal Signage DSMS 3 User s Manual Ver 2 2010 06 08 91 Figure 124 Select Edit Page Properties to get to the Properties menu Figure 125 Deselect Master and select none to be able to freely select the page dimensions ...

Page 92: ...nage DSMS 3 User s Manual Ver 2 2010 06 08 92 Figure 126 In the Properties menu select Width 1280 pixels and Height 208 pixels Figure 127 The result is a quite strange looking web page But it is well suited for its cause ...

Page 93: ...re we can target the web pages that we get as responses to our commands Click the document frame icon in the toolbox and place the document frame somewhere in the web page You do not have to set any parameters for the document frame Its sole existence in the web page is enough Figure 128 By inserting a document frame in our web page we get somewhere to target the web pages that are sent back to th...

Page 94: ... Digital Signage DSMS 3 User s Manual Ver 2 2010 06 08 94 Figure 129 Import the Dashboard png file using the Import Picture tool Figure 130 Drag the Dashboard png image to get it to cover the entire web page ...

Page 95: ...ng Figure 131 The visual appearance of the dashboard We will use the URL commands that we can get from the example tool that we used before to get interactivity However to get it working we need to add some Hot spots to the image to house our hyperlinks First copy a hyperlink from the example tool Figure 131 shows how to copy the URL command that addresses the Banking playlist ...

Page 96: ...the buttons in the image Once you have generated a hotspot you select Internet page and then you paste the hyperlink into the URL address box Next thing is to select the document frame that you previously created to act s target for the response web page that you will get when using the hyperlink If you fail this step you will get the dashboard replaced by a white web page and the application will...

Page 97: ...he response you will get when using the hyperlink Now we need to add hotspots to the other buttons as well A simple way of doing this is to copy the first hootspot Banking and then just adapt the hyperlink to each button accordingly Figure 134 Copy the hotspot of the Banking button Paste the hyperlink that you copied from the example tool in the media player web server Select the document frame as...

Page 98: ...Digital Signage DSMS 3 User s Manual Ver 2 2010 06 08 98 Figure 135 Paste the copied hotspot and place it on top of the Gaming button Figure 136 Edit the hyperlink URL address by replacing Banking with Gaming ...

Page 99: ...he other buttons as well Edit the hyperlinks by replacing Banking by Movie Logo and Web When getting to the Live TV button we need to go back to the example tool in the media player web server The thing is that we have a space in the Live TV playlist name In the tool you can see that the syntax for the Live TV playlist name becomes Live 20TV which we need to take into account when modifying the hy...

Page 100: ...tax for the name of the playlist Live TV becomes Live 20TV Finally we need to add hotspots for the copy the and buttons and to copy and insert the Goto Previous see Figure 120 and Goto Next commands from the example tool to the Figure 139 summarizes the API hyperlinks that are required to complete the dashboard web page ...

Page 101: ... that we can test the dashboard in a very simple way Just select the Preview Site Preview in Window commands from the File menu In the preview you can check that each of the buttons work as they are intended to do By scrolling to the right you will get access to all buttons As you press the buttons you will be able to change between the playlist and to move around within each playlist using the an...

Page 102: ...User s Manual Ver 2 2010 06 08 102 Figure 140 Test the dashboard web page by previewing the page in a window inside the Serif Web Plus SE application Figure 141 In the preview the buttons can be directly tested with the media player ...

Page 103: ...hboard website to a folder on your hard drive Select Publish Site Publish to Disk Folder from the File menu Figure 142 Publish the dashboard web site to a folder on your hard drive In the previously created Dashboard_ext folder see Figure 121 create a new subfolder having the same name Dashboard_ext Use this folder as the target folder where you publish your site ...

Page 104: ...MultiQ Digital Signage DSMS 3 User s Manual Ver 2 2010 06 08 104 Figure 143 Create a new folder to which you publish your Dashboard_ext website Figure 144 Name the folder Dashboard_ext ...

Page 105: ...u can try your external Dashboard website in a web browser by clicking the index html file inside the Dashboard_ext folder You now have a separate web based dashboard that allows you to choose any of the playlists Figure 146 Click the index html file to go to the Dashboard_ext site Figure 147 When running the Dashboard_ext website you have an external dashboard giving you full control of all conte...

Page 106: ... let the dashboard control the media monitor or media player where it is hosted Open the Dashboard wpp project once more in Serif Web Plus SE and save it under the new name Dashboard wpp in the Dashboard folder Then right click on each of the hotspots of the application and replace the external IP address as 192 168 118 103 with the local host address 127 0 0 1 Figure 148 The dashboard is adapted ...

Page 107: ...er s Manual Ver 2 2010 06 08 107 Figure 149 Publish the Dashboard site to a subfolder inside this folder also named Dashboard To be able to upload the Dashboard folder to the system we need to add the Dashboard folder to a zip folder ...

Page 108: ...3 User s Manual Ver 2 2010 06 08 108 Figure 150 In the Dashboard content folder see above right click and select New Compressed zipped Folder Figure 151 Drag the Dashboard folder into the Dashboard zip folder to have it compressed ...

Page 109: ...to put into the lower part of the screen To upload the Dashboard to the media player The first step is to upload the zipped website to the management server To do this first click the Browser Library icon Figure 152 Select add in the Local Storage Files section of the Browser Library Figure 153 Now browse to the zipped file on your PC ...

Page 110: ...4 Select the zipped file and click Open Figure 155 Click Upload to get the zipped website stored on the management server When the file has been uploaded to the server you can see that it is listed in the list of local storage files that are available in the management server ...

Page 111: ...and then click the media player to get into its menu Figure 156 Select the Settings tab of the media player and scroll down to the Local Storage Files in use section where you choose add and tick the checkbox besides the Dashboard zip file and click Save in the next dialog box What happens now is that the zip file will get downloaded into the lsf local storage files folder on in the media player w...

Page 112: ...Q Digital Signage DSMS 3 User s Manual Ver 2 2010 06 08 112 Figure 157 In the Units and Group Playlists menu click the media player to get into its menu Figure 158 Click the Settings menu of the media player ...

Page 113: ...re you click Add Figure 160 Tick the Dashboard zip checkbox and then click Save to get the Dashboard zip file stored in the media player Now that the Dashboard folder is in store in the media player we need to fix a local link to where it is stored before we can use it Figure 161 Click Add External in the Media Bank to add the local link ...

Page 114: ...ed in this folder It is practical to use separate sub folders for each website since you may have several websites stored in the same media player Figure 162 Add a local link to the Dashboard folder To have the media player actually play the local storage site we need to associate the link to the Image region at the bottom of the screen But in order to use all benefits of the system when it comes ...

Page 115: ...e to copy media players and complete stores it is a requirement that all content is placed inside group playlists This is the reason why we use a group playlist even though we only need to house just one Dashboard website Now there are only two manoeuvres left before we get the dashboard on the screen and that is to add the link to the dashboard to the Channel 2 group playlists and to assign the C...

Page 116: ...0 06 08 116 Figure 166 Click Add in the Channel 2 menu Figure 167 Select the Dashboard link from the Media Bank The dashboard is now a part of the Channel 2 group playlist By default the reload interval is set to 15 seconds but it can easily be increased ...

Page 117: ... Channel 2 with the Image 1 region of the media player Click Add in the Media from groups section of the Image 1 menu of the media player Figure 169 Click Add in the Media from Groups section of the Media player 1 menu Figure 170 Now tick the Channel 2 box and click Add group to get the group playlist associated with the region on the media player ...

Page 118: ...MultiQ Digital Signage DSMS 3 User s Manual Ver 2 2010 06 08 118 Figure 171 The dashboard in operation inside the media monitor ...

Page 119: ...e changes By using the Allow ticker yes or no property on the media spots you can control and schedule its appearance Figure 172 The simplest way of adding a ticker is to write your on manual text into the Ticker tab Getting tickers from RSS feeds A popular way of getting ticker content is to use RSS feeds RSS feeds are widely available on the Internet and cover most areas of interest when it come...

Page 120: ...the one in figure 175 Figure 174 Choose a feed of interest Copy the link in the address field This link can be used in the digital signage system as a source of information for the RSS feed The next few pages show how to use an RSS feed as a source of information for a ticker Figure 175 The link to the RSS feed can be used as an external link for ticker in the digital signage system ...

Page 121: ... 06 08 121 Figure 176 In the Ticker Bank you can store a number of links to RSS feeds Click Add to store more feeds Figure 177 In the Ticker Bank Add ticker to ticker bank menu you add a description along with the link that you copied from your web browser ...

Page 122: ... 3 User s Manual Ver 2 2010 06 08 122 Figure 178 Tick Ticker from source and select the ticker source you like Figure 179 After a while can take up to 10 15 minutes the text will be available in the Ticker Bank and on the screen ...

Page 123: ...MultiQ Digital Signage DSMS 3 User s Manual Ver 2 2010 06 08 123 Figure 180 Tickers can be combined with any kind of media ...

Page 124: ...figure 181 a second media player has been added to the system This unit has unit id 2 By using the Stores feature of the management server it is possible to create and manage a very large number of media players in an efficient way Figure 181 A second media player has been added to the system The two media players in figure 180 are considered to be located in the same store So it may be possible t...

Page 125: ...010 06 08 125 Figure 182 In the Stores menu click Add to add your first store Once in the Stores menu set the first store_id as 0 However any kind of number can be used here Figure 183 In the Stores menu various details about each location can be stored ...

Page 126: ...king on the Add unit button Figure 185 Tick both media players and click Add to have them added to the store Figure 186 Your first store is now a done The nice thing about the Stores feature is that it is possible to make a template based on the store This template can be used to create copies of the first store including all settings and references to content used ...

Page 127: ...l Ver 2 2010 06 08 127 Figure 187 At the bottom of the Stores menu there is a Store templates section Click Add to add a template Figure 188 In the drop down menu choose Store Model as name and HQ Store as origin for the template Then click Add ...

Page 128: ...r 2 2010 06 08 128 Figure 189 Now there is a template in the template section Click Add to add another store Figure 190 In the Add Store menu name the store London Store 1 and let the store id be 1 Choose the Store Model as template Then click Add ...

Page 129: ...r s Manual Ver 2 2010 06 08 129 Figure 191 In the copy made from the store model there has been an increment of 100 so the unit id s in this store are now 101 and 102 respectively Figure 192 Click Add once more to create a third store ...

Page 130: ...unit id s 201 and 202 Scalability and how to handle multiple stores Thus there is a built in structure that allows us to copy a compete store Each time you use a template to copy a store there Unit_ID is increased by 100 So if the store model on which the template is based has unit numbers 1 2 3 4 etc then the first copy will get Unit_Id s 101 102 103 104 and so on For the second copy of the store...

Page 131: ...here can be an unlimited number of channels each containing up to 99 playlists To control the display hours in the stores The store feature makes it easy to add a large number of media players organized in stores Having the media players organized in stores also makes them easier to monitor Yet another interesting feature is the Display Interval setting that can be made for each store separately T...

Page 132: ...132 Figure 196 In the Settings tab of a store you can set the display hours for the monitors The exercises in this user s manual cover most features and possibilities offered by the system In the following appendices some additional areas of interest are covered ...

Page 133: ...ertain amount of time Figure A1 1 Monitoring the units directly in the Units and Group Playlists menu Unit 4 was heard from 4 seconds ago It is possible to log the play out of files from each individual unit To initiate this tick the Log Media Files box in the Settings tab for the unit Then the logs can be found in the Status tab The text information can be retrieved by copy and paste the informat...

Page 134: ...sed as default Also this feature allows for several playlists to be used during different weekdays and during various hours of the day Scheduling default playlists To schedule what playlists to be used as default follow these procedures Select the desired channel in the Units and Group Playlists menu Figure A2 1 To control default playlists select the desired channel in the Units and Groups Playli...

Page 135: ...insert scheduling for each of the desired default playlists Setting the time to revert to the default playlists To set the time to revert to default playlist select the Settings menu and set the number of seconds after which the application is to return to the scheduled default playlist after the most recent touch was initiated ...

Page 136: ...ital Signage DSMS 3 User s Manual Ver 2 2010 06 08 136 Figure A2 3 In the Settings menu the time to revert to the default playlist can be set This time setting is common for all channels and units in the account ...

Page 137: ...ges In some cases a ticker is put on top Web is usually a part of interactive kiosk and interactive sign applications However these elements may also be used in in store TV and digital poster applications Here we will build a 19 non interactive bank information screen consisting of one movie region for high performance video one image region to present the queuing numbers which is a client API app...

Page 138: ...r SXGA training monitor in landscape mode This monitor has the aspect ratio 5 4 If it had been an application to be used in an actual bank it would probably have been presented on a widescreen 16 9 monitor and a WXGA 1366 x 768 pixels video mode is the best to use It is not recommended to use resolutions above 720 x 576 pixels with media player 3 Figure A3 3 The media player has four regions custo...

Page 139: ...at can be used by each store individually Sing a simple program as Web Plus SE makes it easy for anyone to learn how to edit and update the region on the screen in minutes It is however also possible to have a spot in a full screen playlist that is locally controlled in the same way Figure A4 1 A region on the screen is dedicated to locally controlled content Figure A4 2 Simple web tools like Web ...

Page 140: ...al IP addresses You do not have to set the media player to these addresses In the NAT you can reserve certain IP addresses to specific media player MAC addresses This might seem complicated but actually it is not The media players will report their MAC addresses to the NAT box and it is a quite simple procedure to associate the devices with their IP addresses Also the gateway router except from be...

Page 141: ... Digital Signage DSMS 3 User s Manual Ver 2 2010 06 08 141 Figure A5 2 Using a gateway router including a NAT Network Address Translation table makes it easy to have standardized IP addresses at all locations ...

Page 142: ...ing media players By sending synchronized commands to the media player it is possible to make them show the same thing in a synchronized manner or to have them to present synchronized video clips This makes a great impression Figure A6 1 Synchronized media player makes a great impression ...

Page 143: ...the password As an administrator you can create new users with equal or restricted rights In the User menu new users may be added This is practical when splitting work between different parties such as content providers that may only be allowed to upload media files to the Media Bank publishers focused on creating and editing playlists and channels and an operational only responsible for monitorin...

Page 144: ...MultiQ Digital Signage DSMS 3 User s Manual Ver 2 2010 06 08 144 Figure A7 2 Adding users with individual rights Figure A7 3 Setting specific rights for each user ...

Page 145: ...nd all communication across the Internet is based on media players making requests from the inside of the firewall towards the digital signage management server If you use a media player that is not located behind a firewall you can still protect it by disabling the built in web server from accepting any communication from being initiated from the outside This is done by enabling the web server lo...

Page 146: ... use Power Point This well known tool is available in most computers and most people have at least a brief knowledge of the program There are a few settings in Power Point that makes the tool very appropriate to make digital signage applications The most important setting is setting the presentation format printout format to the 16 9 widescreen format Another important part is to learn how to use ...

Page 147: ...MultiQ Digital Signage DSMS 3 User s Manual Ver 2 2010 06 08 147 Figure A9 1 Recommended settings when using the Moyea PPT to video converter ...

Page 148: ...e a dynamic force in the growing European market for digital signage where it offers hardware software and peripherals as well as screen technology MultiQ has its headquarters in Malmö and sales offices in Stockholm Germany Norway and the UK The company is listed on the Small Cap list of the NASDAQ OMX Nordic Exchange www multiq com DOC100408R2 ENG 201006 ...

Reviews: