


8
OPERATING INSTRUCTIONS
DSD 660
5
Tune the TV to the test signal from the VCR. Switch off the VCR
test signal.
6
On the TV, select any unused channel on which you wish to view
your satellite programmes. Once selected, all your satellite
services will be viewed on this channel, selection of the service
being made using the RCU.
7
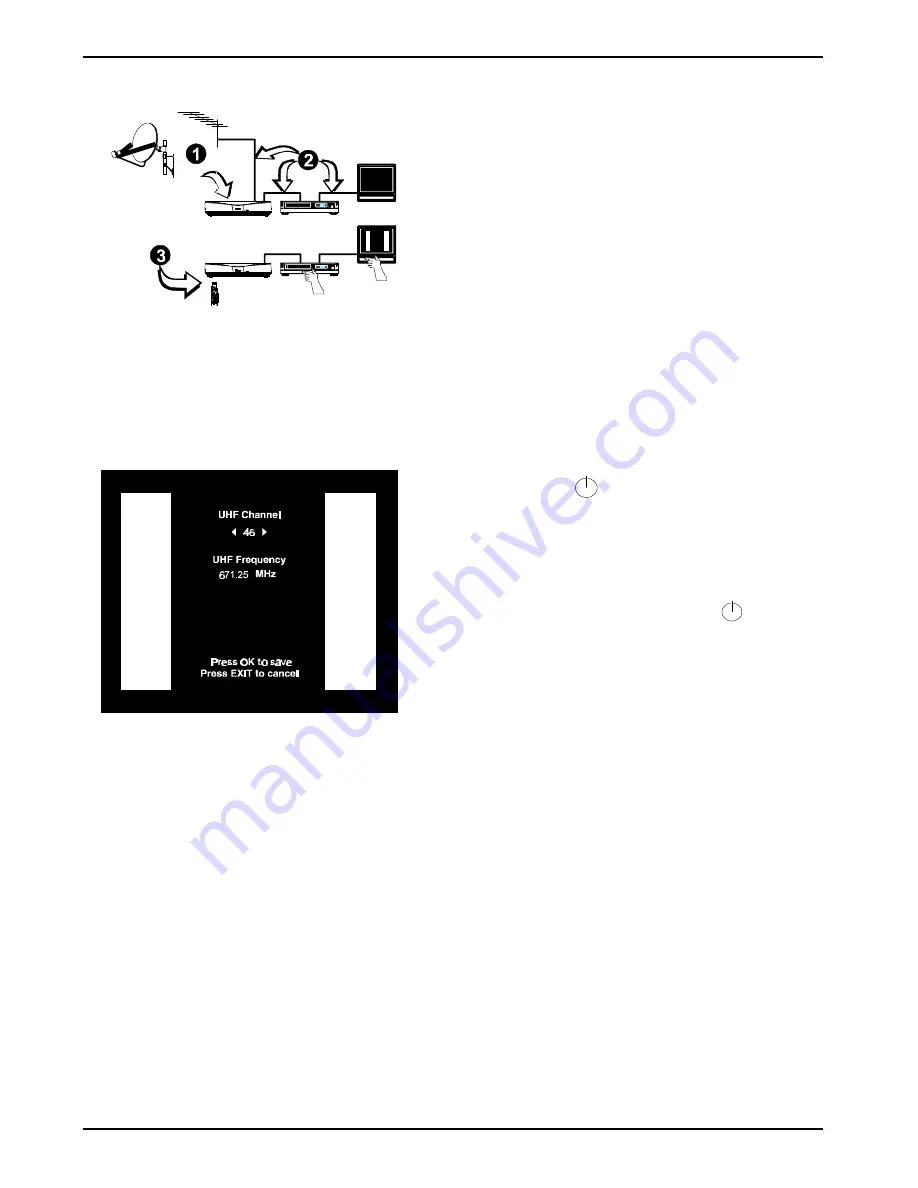
Press and hold
UHF on the RCU for approx. 5 seconds until
UHF is displayed on the decoder display. Tune your TV set to
receive the decoder test signal display (see following figure).
A Channel number (initially 46) will be displayed on the decoder
front panel display.
Press UHF on the RCU to remove the test signal.
Check that any noise from the decoder does not interfere with
signals received on the VCR.
Check all tuned channels on the TV for interference.
8
If any interference is noticed, change the UHF channel number
as follows:
Press and hold UHF on the RCU to display UHF on the decoder
display and the UHF test screen on the TV.
Change the channel number to 2 more or 2 less than the existing
number (44 or 48) by pressing
=
or
<
twice on the RCU. Press
OK to save. The following will happen as soon as
=
or
<
is
pressed:
a.
The TV display is lost because the TV is not tuned to the
new channel.
b.
The new channel number is displayed on the front panel
of the decoder.
On the TV, retune the channel allocated to the decoder until the
decoder test pattern is clearly visible.
Repeat step 8 until interference on all channels is eliminated.
NOTE:
After changes have been made, the decoder must not be
switched off for at least 3 minutes to allow for the new
setting to be saved.
If interference is still present, it is recommended that good quality
screened cables (preferably double screened) are used for
interconnecting all other equipments to the decoder.
Adding a Modem
Many exciting interactive features will be available in the future (Impulse Pay
Per View, Video on Demand, etc.). The decoder is ready for these features
as it can accommodate an optional built-in modem. A modem port for
connection to your telephone line via an external (faster) modem is provided
on the rear panel.
Standby and Normal Modes
The decoder does not have a mains power on/off switch and it is
recommended that, for normal viewing, it remains connected to the mains
after installation.
When the decoder is not in use, it should be switched to the standby
mode using the
symbol on the front panel or on the RCU.
The standby mode is indicated by a constant small green dot on the right of
the decoder display panel. To use the decoder after the initial installation:
1
Switch on the TV and any other equipment included in the system.
2
Select the channel on the TV that you have allocated for viewing the
satellite services.
3
If the decoder is in the standby mode, press
on either the
RCU or decoder front panel, to return to the normal viewing mode. A
service number will be displayed on the front panel indicator.
4
Press TV on the RCU. A Bouquet selection box is then displayed on
the TV screen (see page 13). Select the bouquet you have subscribed
to (e.g., DSTV), then press OK.
5
If you wish to select the Audio Services, press the
+
key on the RCU,
or
+
on the decoder front panel. If subscribed to, an audio service will
be heard, and the audio programme information box will be displayed
on the TV. A green indicator on the front panel display is illuminated
while the decoder is in the Audio Services mode.
Some audio services are free-to-air and do not require a subscription.
TV Services are restored by pressing TV on the RCU, or TV on
the decoder front panel.
NOTE: When switching from normal to standby then back to
normal, the decoder automatically returns to the
previously selected service.
If a SCART VCR is connected, it is not necessary to
take the decoder out of standby to view VCR play back.
6
The decoder is set up to the local default settings by the
manufacturer. If it becomes necessary to change the installation
parameters consult your local installer.
The decoder is now ready for normal use.
Summary of Contents for 50645
Page 1: ......


