MTE Matrix Filter D Series User Manual Download Page 31

Matrix Series D Users Manual


Installation Instructions Continued 

 30 

Part No.


INSTR-025   REL. 071207 


Power Wiring Connection  


WARNING


Input and output power wiring to the filter 
should be performed by authorized 
personnel in accordance with the NEC and 
all local electrical codes and regulations. 
Cable lugs and mounting hardware are 
provided by the customer. 

 
Verify that the power source to which the 
filter is to be connected is in agreement with 
the nameplate data on the filter. A fused 
disconnect switch or circuit breaker should 
be installed between the filter and its source 
of power in accordance with the 
requirements of the NEC and all local 
electrical codes and regulations. Refer to 
the drive user manual for selection of the 
correct fuse rating and class.  
 
The filter is suitable for use on a circuit 
capable of delivering not more than 100K 
RMS symmetrical amperes at 480 volts 
maximum when protected by type J, T or 
RK1 class fuses or a circuit breaker having 
a interrupting rating not less than 100K 
RMS symmetrical amperes, 480 volts 
maximum. 
 
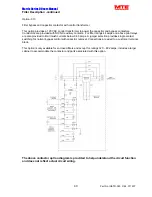
For panel mounted filter applications 
interconnection between the filter, its power 
source the cappanels and the drive is 
shown in Figure 19.  Table 10 lists the wire 
range and terminal torque requirements as 
a function of filter current ratings.  Use table 
10 for selecting conductors that interconnect 
the HMR and capacitor assemblies. Filters 
that use multiple cappanels share total cap 
current shown on table 3.  
 
Refer to the drive user manual for 
instructions on interconnecting the drive and 
motor and the correct start-up procedures 
for the drive.   
 
The filter is designed for use with copper 
conductors with a minimum temperature 
rating of 75 degrees C.  

 
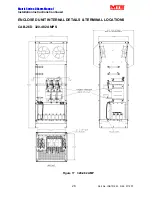
For filters supplied in general purpose 
NEMA, 2 & 3R cabinets, interconnection 
between the filter, its power source, and the 
drive is shown in Figure 20. Refer to Figures 
14 to 18 for the location of input, output, and 
ground and over temperature switch 
terminals. Table 10 lists the wire range and 
terminal torque requirements as a function 
of filter current ratings. Refer to the drive 
user manual for instructions on 
interconnecting the drive and motor and the 
correct start-up procedures for the drive. 


Grounding and Ground Fault Protection 

 
The filter must always be grounded with a 
grounding conductor connected to all 
ground terminals. 
 
Due to high leakage currents associated 
with variable frequency drives, ground fault 
protective devices do not necessarily 
operate correctly when placed ahead of a 
Matrix Filter® feeding a drive. When using 
this type of device, its function should be 
tested in the actual installation. 


Over Temperature Switch  
 

The temperature switch is provided to 
annunciate adverse filter heating. Damage 
to the filter or drive may be avoided by 
interlocking this switch to shutdown the 
drive or illuminate a service light; see 
figures 19 and 20 for connection diagrams. 
Read the vendor drive manual for details in 
using interlock inputs. 


Summary of Contents for Matrix Filter D Series

Page 1: ...MATRIX FILTER SERIES D 380 415 Volts 50HZ USER MANUAL PART NO INSTR 025 REL 071207 2007 MTE Corporation...

Page 2: ...ation must therefore be determined by the customer In no event will MTE Corporation assume responsibility or liability for any direct or consequential damages resulting from the use or application of...

Page 3: ...DERATING CURVE 15 INSTALLATION INSTRUCTIONS 16 HMR BOLT HOLE MOUNTING PATTERNS 17 CAP PANEL BOLT HOLE MOUNTING PATTERNS 18 HMR MOUNTING TERMINAL LOCATIONS 19 HMR 6 44 Amps 19 HMR 52 103 Amp 20 HMR 12...

Page 4: ...f the branch circuit protective device may be an indication that a fault current has been interrupted To reduce the risk of fire or electrical shock current carrying parts and other components of the...

Page 5: ...r The MTE Matrix Filter has been subjected to demanding factory tests before shipment Carefully inspect the shipping container for damage that may have occurred in transit Then unpack the filter and c...

Page 6: ...Hz BLANK for Options shows none selected ENCLOSURE OPTIONS 0 None 1 3R White paint 2 3R Stainless White paint 3 Standard grey rodent screen 4 3R white paint rodent screen 5 3R Stainless White rodent...

Page 7: ...90 degrees C Altitude 0 to 3300 Feet above sea level Refer to figure 4 for altitude de rating Relative Humidity 0 to 95 non condensing Agency Approvals UL and cUL listed to UL508 Type MX and CSA C22 2...

Page 8: ...S Efficiency Typical Power Dissipation Rated Current Typical Watts 6 97 4 132 8 97 6 161 11 97 8 197 14 98 0 232 21 98 3 294 27 98 5 343 34 98 6 399 44 98 7 472 52 98 8 533 66 98 9 621 83 98 9 735 103...

Page 9: ...n table Table 2 FILTER VOLTAGE REGULATION 380 415 VAC MAXIMUM OUTPUT VOLTAGE AT NO LOAD RMS PEAK 397 560 MINIMUM OUTPUT VOLTAGE AT FULL LOAD RMS PEAK 364 475 MAXIMUM PCC VOLTAGE WITH 6 SOURCE IMPEDANC...

Page 10: ...or Currents Table 3 Capacitor Current at Full Load Filter Current Rating Amps Rms Capacitor Current Typical Amps RMS 6 2 3 8 3 1 11 4 2 14 5 4 21 8 1 27 10 4 34 13 1 44 16 9 52 20 0 66 25 3 83 31 9 10...

Page 11: ...5 REL 071207 Over Temperature Switch Ratings Table 6 NC Switch opens at 180 Deg 5 deg C Current Amps Voltage Contact Load 6 120 AC Resistive Loads 3 120 AC Inductive Loads 3 240 AC Resistive Loads 2 5...

Page 12: ...5 H x 12 3 W x 10 7 D Figure 6 228 5 6 H x 5 6 W x 8 2 D Figure 10 83 MDP0083C 176 16 5 H x 12 3 W x 11 3 D Figure 6 229 8 H x 7 3 W x 12 D Figure 11 103 MDP0103C 180 16 5 H x 12 3 W x 11 D Figure 6 2...

Page 13: ...4 52 MDG0052C CAB 17C2 190 MDW0052C CAB 17C3 199 Figure 15 66 MDG0066C CAB 17C2 215 MDW0066C CAB 17C3 224 Figure 15 83 MDG0083C CAB 17C2 241 MDW0083C CAB 17C3 250 Figure 15 103 MDG0103C CAB 17C2 244 M...

Page 14: ...ormance Data Figure 1 Load effect on THID Figure 2 Harmonic Spectrum 100 Load 5 Matrix Filter Typical Harmonic Spectrum For 100 Load 0 1 2 3 4 5 7 11 13 17 19 23 25 Harmonic order Harmonic Current 5 F...

Page 15: ...Nominal Values and Worse Case Service Conditions 100 Load Nominal THID 3 93 1 Unbalance 4 06 2 Unbalance 4 47 3 Unbalance 5 10 30 Load Nominal THID 7 06 1 Unbalance 7 45 2 Unbalance 8 21 3 Unbalance...

Page 16: ...titude Feet Current De Rating Factor Temperature Derating Curve Figure 4A Series D Matrix Filter Temperature Derating Table 0 9 0 91 0 92 0 93 0 94 0 95 0 96 0 97 0 98 0 99 1 0 2 4 6 8 10 12 14 16 18...

Page 17: ...Harmonic Mitigating Reactor in a location where the ambient temperature does not exceed 50 degrees C Allow a minimum side clearance of four 4 inches and a vertical clearance of six 6 inches for prope...

Page 18: ...x 11 B 6 5 C x 11 E 0 413 DIA Figure 6 MDP0066C 90 16 5 H x 12 3 W x 10 7 D 12 14 A x 11 B 6 5 C x 11 E 0 413 DIA Figure 6 MDP0083C 101 16 5 H x 12 3 W x 11 3 D 12 15 A x 11 B 6 5 C x 11 E 0 413 DIA...

Page 19: ...5 8 H x 8 1 W x 12 D 7 25 A x 4 5 B 0 218 Figure 11 MDP0128C 231 7 5 8 H x 9 1 W x 12 D 7 25 A x 4 5 B 0 218 Figure 11 MDP0165C 232 11 25 12 H x 8 1 W x 12 D 11 25 A x 4 5 B 0 218 Figure 12 MDP0208C...

Page 20: ...Matrix Series D Users Manual Installation Instructions Continued 19 Part No INSTR 025 REL 071207 HMR MOUNTING TERMINAL LOCATIONS HMR 6 44 Amps Figure 5 6 44 AMP...

Page 21: ...Matrix Series D Users Manual Installation Instructions Continued 20 Part No INSTR 025 REL 071207 HMR MOUNTING TERMINAL LOCATIONS HMR 52 103 Amp Figure 6 52 103 AMP...

Page 22: ...Matrix Series D Users Manual Installation Instructions Continued 21 Part No INSTR 025 REL 071207 HMR MOUNTING TERMINAL LOCATIONS HMR 128 240 Amp Figure 7 128 240 AMP...

Page 23: ...Matrix Series D Users Manual Installation Instructions Continued 22 Part No INSTR 025 REL 071207 HMR MOUNTING TERMINAL LOCATIONS HMR 320 482 Amp Figure 8 320 482 AMP...

Page 24: ...Matrix Series D Users Manual Installation Instructions Continued 23 Part No INSTR 025 REL 071207 HMR MOUNTING TERMINAL LOCATIONS HMR 636 786 Amp Figure 9 636 786 AMP...

Page 25: ...rix Series D Users Manual Installation Instructions Continued 24 Part No INSTR 025 REL 071207 CAP ASSEMBLY MOUNTING TERMINAL LOCATIONS Figure 10 3 Caps Figure 12 9 Caps Figure 11 6 Caps Figure 13 12 C...

Page 26: ...Matrix Series D Users Manual Installation Instructions Continued 25 Part No INSTR 025 REL 071207 ENCLOSED UNIT INTERNAL DETAILS TERMINAL LOCATIONS CAB 12C 6 44 AMPS Figure 14 6 44 AMP...

Page 27: ...Matrix Series D Users Manual Installation Instructions Continued 26 Part No INSTR 025 REL 071207 ENCLOSED UNIT INTERNAL DETAILS TERMINAL LOCATIONS CAB 17C 52 103 AMPS Figure 15 52 103 AMP...

Page 28: ...Matrix Series D Users Manual Installation Instructions Continued 27 Part No INSTR 025 REL 071207 ENCLOSED UNIT INTERNAL DETAILS TERMINAL LOCATIONS CAB 26C 128 240 AMPS Figure 16 128 240 AMP...

Page 29: ...Matrix Series D Users Manual Installation Instructions Continued 28 Part No INSTR 025 REL 071207 ENCLOSED UNIT INTERNAL DETAILS TERMINAL LOCATIONS CAB 26D 320 482 AMPS Figure 17 320 482 AMP...

Page 30: ...Matrix Series D Users Manual Installation Instructions Continued 29 Part No INSTR 025 REL 071207 ENCLOSED UNIT INTERNAL DETAILS TERMINAL LOCATIONS CAB 30D 636 786 AMPS Figure 18 636 786 AMP...

Page 31: ...emblies Filters that use multiple cappanels share total cap current shown on table 3 Refer to the drive user manual for instructions on interconnecting the drive and motor and the correct start up pro...

Page 32: ...6 225 14 16 34 14 6 16 20 208 14 20 44 18 4 16 20 226 14 20 52 Flat copper tab N A 20 227 14 20 66 Flat copper tab N A 50 228 10 50 83 Flat copper tab N A 50 229 8 50 103 Flat copper tab N A 50 230 8...

Page 33: ...Matrix Series D Users Manual Installation Instructions Continued 32 Part No INSTR 025 REL 071207 Open Panel Unit Interconnection Diagram Figure 19...

Page 34: ...Matrix Series D Users Manual Installation Instructions Continued 33 Part No INSTR 025 REL 071207 Enclosed Unit interconnection Diagram Figure 20...

Page 35: ...is not available use the NEC motor current rating Filters for variable torque AC drives rated 2 5 Hp should be selected for a filter output current rating greater than or equal to 105 of the motor cu...

Page 36: ...Matrix Series D Users Manual Filter Description continued 35 Part No INSTR 025 REL 071207 Figure 21 Block Diagram...

Page 37: ...to disconnect the filter capacitor bank when the drive is not running The contactor is supplied with NO NC auxiliary contacts The contactor coil and auxiliary contacts are wired to a customer termina...

Page 38: ...nt Two current operated switches provide independent adjustment of the pick up and drop current levels The switches are preset at the factory for pick up at 35 and drop out at 20 of the filter output...

Page 39: ...or contactor The contractor is provided with NO NC auxiliary contacts For filter ratings 165 amps and above a pilot relay is also provided to limit inrush current below 0 60 amps Connections are wired...

Page 40: ...cludes a larger cabinet to accommodate the contactor and parts associated with this option Option 011 Filter Bypass with transformer The filter bypass option is designed to provide filter bypass for d...

Page 41: ...nd above pilot relays are also provided to limit inrush currents below 0 60 amps A jumper selection provides single contact switching for normal bypass control with capacitor removal Connections are w...

Page 42: ...ing on drive utility branch circuits Design For low current Matrix Filter s a single contactor CR1 provides the dual function switching to accomplish bypassing the Matrix Filter and removal of the fil...

Page 43: ...urrents for 120 VAC 50 Hz coils Capacitor Contactor Option 002 AMPS Maximum Filter Bypass Options 010 011 AMPS Maximum Matrix Filter current Rating AMPS INRUSH SEALED INRUSH SEALED 6 0 54 0 10 0 54 0...

Page 44: ...round terminals are connected to ground Power wiring to the utility drive and motor is in accordance with the power wiring connection diagrams shown in installation instructions section Use the guidel...

Page 45: ...st of potential problems and solutions are listed below WARNING High voltage is used in the operation of this filter Use Extreme caution to avoid contact with high voltage when operating installing or...

Page 46: ...d Possible cause The capacitor assembly has not been connected Solution Check interconnection of capacitor assembly with HMR Figure 19 20 Possible cause A capacitor has failed Solution Inspect the top...

Page 47: ...thin specification Solution Check the AC input line voltage and verify that it is within tolerance Refer to the filter service conditions and performance specifications for tolerances Possible cause S...

Page 48: ...Karl Hink ISO Section 7 2 3 INSTR 025 Revision Date Revision History 8 1106 New document written by Wayne Walcott 001 9 12 06 Revised by Wayne Walcott correct page 11 and 18 to show two 273 CAPPANELS...

Reviews: