background image


9

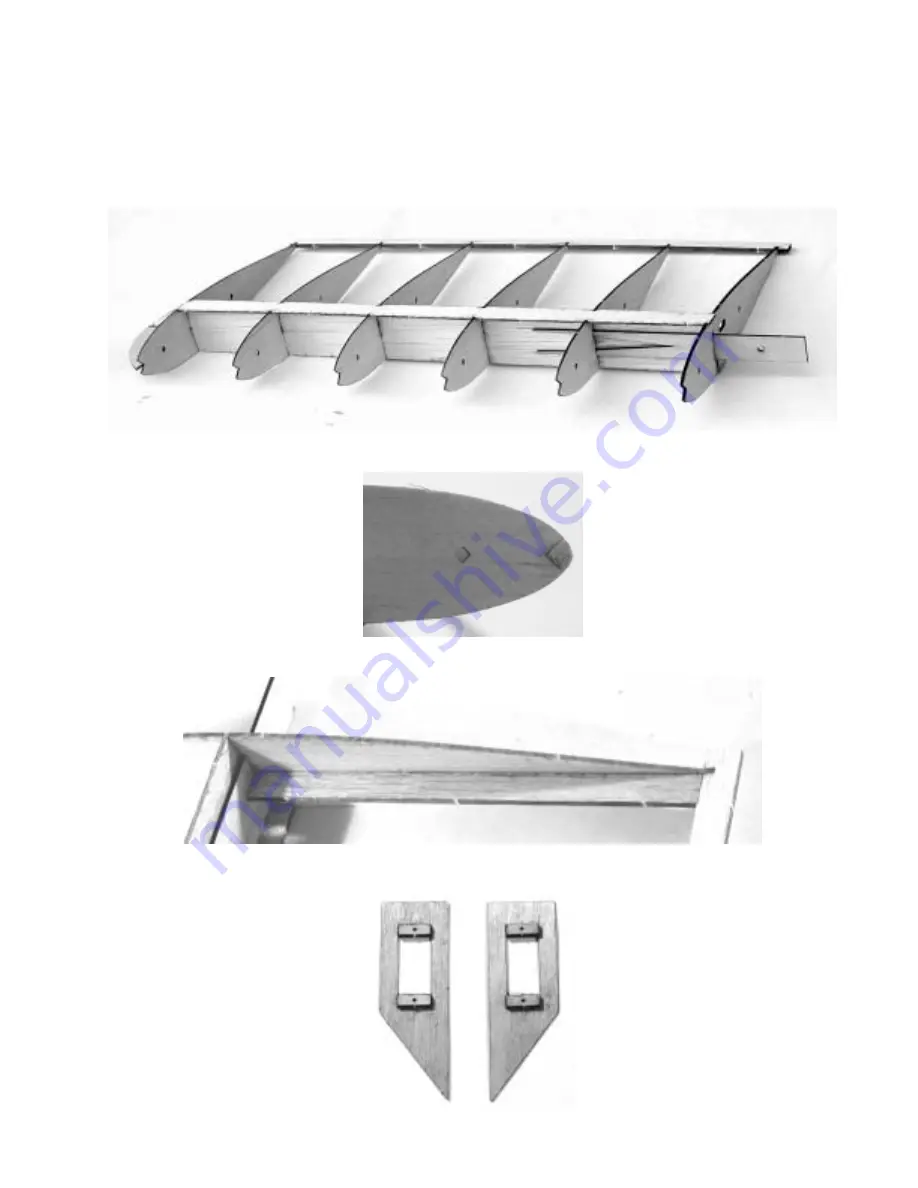
Place the cap spar over the vertical spar and press it into place. 

Install the trailing edge, noting the orientation.  The angled end is the outer end and will be on the 
same side as the pointed end of the vertical spar. 

Slide the wing tip into the vertical spar. 

Once everything is straight and true, flow some thin CA into all the joints. 

Position the 1/16” plywood center spar through the innermost rib and butted against the second 
rib.  Ensure it is parallel with the wing and glue in place.  Note that one center spar goes in front of 
the vertical spar and one goes behind the vertical spar.  It doesn’t matter which is which. 


Measure and cut the ¼” square balsa leading edge stick and glue it to the ribs.  Sand it to a blunt 
rounded shape as shown in the photo. 


Position the 3/32” balsa inner rib reinforcement into place and glue.  This reinforcement is to 
prevent the rib from bowing in when you shrink the covering. 


Glue the two 1/16” ply servo backing plates to each wing servo mount.  Make sure that you make 
a left and right side. 


Summary of Contents for MiniFlash

Page 1: ...lot who wants a plane with outstanding performance that will fly in a very limited space Specifications Wingspan 32 Wing Area 305 sq in Weight 10 11 ounces without battery Wing Loading 8 oz sq ft depending on battery September 26 2002 Last revised January 5 2003 Copyright 2002 2003 Douglas Binder Mountain Models www mountainmodels com ...

Page 2: ...16 laser cut plywood sheet 3 ea 1 32 laser cut balsa sheets 5 ea 1 16 laser cut balsa sheets 2 ea 3 32 laser cut balsa sheets 1 ea 1 8 laser cut balsa sheets 1 ea 1 64 plywood wing servo mounts 2 ea cowl balsa 2 ea 1 4 square x 18 balsa leading edge 3 ea 1 32 x 18 thin music wire for tailwheel and pushrods 1 ea Plastic Canopy 1 ea Covering Bagged Parts 1 ea Motor Mount 1 16 ply sheet 2 ea 3 32 x 7...

Page 3: ...moving only that part from the balsa sheet so that you don t mix the parts up I strongly recommend using disposable needle type tips for the CA Assemble the landing gear leg support before gluing the bulkheads to the fuselage base The landing gear support is constructed by sandwiching 3 32 balsa framing between 1 16 plywood bulkheads F2 and F3 Glue the 3 32 balsa framing to bulkhead F2 as shown in...

Page 4: ...r and glue in place After gluing one side of the stringers to the fuselage bulkheads glue the canopy braces F4 and F7 into place After F4 and F7 are installed position and glue the other top side stringer Glue F1 into place Glue the 1 16 plywood motor mounts into place with thick CA Gently bend the front of the bottom sheet up to the stringers and F1 and glue with thin CA Glue the motor mount part...

Page 5: ...age sides to the fuselage frame assembly I use thin CA and flow it into the joints Do not glue the left fuselage side to the top stringer between F4 and F7 You will add two Tyvek canopy hinges when you attach the canopy The Tyvek hinges will slide between the stringer and the fuselage side Place the servo tray between bulkheads F5 and F6 and allow it to rest on top of the lower stringers Push it b...

Page 6: ...lue one side in to place with thin CA as shown Carefully shape the turtle deck over the fuselage formers Start gluing from the center between F8 and F9 and work your way out to the ends The balsa will have swelled from the soaking so will not fit flush with F7 You can pull it in with a rubber band or wait for it to dry Glue the 1 16 balsa rear fuselage top into place This piece contains two cut no...

Page 7: ...the legs Sand the end of the gear legs for a good glue joint Cut a 1 8 piece off the heatshrink tubing Slide the tubing over the end of the gear leg and glue with thick CA taking care to not glue the wheels Canopy Assembly Align the 3 32 balsa canopy base with the cockpit cavity Sand the ends to the correct angle to match bulkheads F4 and F7 and to get a good fit Position the front and rear canopy...

Page 8: ...e this near the back of the fuselage cavity on the opposite side of the Tyvek canopy hinges When satisfied with the positioning glue into place with CA Align the Neodymium magnet with the balsa stick and glue to the bottom side of the canopy assembly Press the tack partially into the 1 4 stick so that the magnet will be aligned with the tack Apply a drop of thin CA where the tack meets the stick B...

Page 9: ...ed against the second rib Ensure it is parallel with the wing and glue in place Note that one center spar goes in front of the vertical spar and one goes behind the vertical spar It doesn t matter which is which Measure and cut the square balsa leading edge stick and glue it to the ribs Sand it to a blunt rounded shape as shown in the photo Position the 3 32 balsa inner rib reinforcement into plac...

Page 10: ...he covering is tight Pull the covering tight and straight then tack the two corners of the leading edge Tack down the entire leading and trailing edge Wrap the covering around the back of the trailing edge and tack it down across the back of the trailing edge Pull the covering tight across the high point of the wingtip and tack Here s the fun part work the covering around the curve of the wingtip ...

Page 11: ... part at a time removing only that part from the balsa sheet so that you don t mix the parts up Assemble each half of the elevator and then join them with the 1 8 x 2 75 hardwood dowel Sand a 45 degree bevel in the leading edge of the rudder Also sand a 45 degree bevel in the trailing edges of the horizontal stabilizer Paint the tail assemblies if desired The vertical stabilizer rests on the rear ...

Page 12: ... in the base of the back edge of the fuselage Insert the loop into the hole so that is sticks out 1 16 and the hole in the loop is aligned vertically Glue with CA Feed the wire on the rudder through the loop as shown Hinge the rudder to the vertical stabilizer with packing tape Glue the two 1 16 laser cut plywood tail wheel halves together Wrap the strip of foam rubber around the tail wheel and cu...

Page 13: ... control horn Aileron Servo Install the aileron servos Feed the wire lead through the oval hole in the side of the wing and into the fuselage If you have a computer radio where you can trim the individual aileron servos you can make the aileron pushrods out of a single piece of 1 32 music wire If you don t have a computer radio make the pushrods out of two pieces of wire so that they overlap in th...

Page 14: ...ly Install the speed control so that it hangs from the bottom of the fuselage through the two front cooling holes This is to keep the ESC cool Mount the receiver with Velcro inside the fuselage cavity behind the wing spar If you don t have a computer radio that allows aileron and flap mixing you will need a Y cable to connect the two aileron servos to the receiver On the bottom of the plywood batt...

Page 15: ...ould be as follows Low Rates High Rates Ailerons 1 2 1 Elevator 3 4 1 1 2 Rudder 1 1 1 2 60 exp on Ailerons and elevator Throws are measured center to one end For your first flight be patient and wait for a calm day Choose a large field where you have a smooth surface to use as a runway Set the plane down pointing away from you I would say to point it into the wind but it s a calm day right If eve...

Reviews: