background image

8

• 

To narrow the search, highlight 

OPTIONS

 and press 

OK

. The following filters are available:

• 

ALL RESULTS 

– Displays people, program titles, and Video on Demand programs

• 

TITLES

 – Titles from Live TV and VOD display (“VIDEO” indicates VOD titles)

• 

VIDEO ON DEMAND

 – Only VOD programs display

• 

PEOPLE

 – Only programs with the person appear

• 

Use the 

ARROW

 buttons to highlight the title or name from the list on the right, then press 

OK

.

• 

If the filter is set to 

TITLE

, times when the program is playing displays along with program details at the bottom 

of the screen 

• 

If the filter is set to 

PEOPLE

, programs featuring that person appear along with program details at the bottom of 

the screen 

• 

If the filter is set to 

VIDEO ON DEMAND

, the Program Info Summary screen appears with program detail along 

with rental information

User Tip:

  A quick way to access search options is to press the Enter/Aspect button on your remote while the search 

menu is open.

• 

Press 

EXIT

 to return to Live TV 

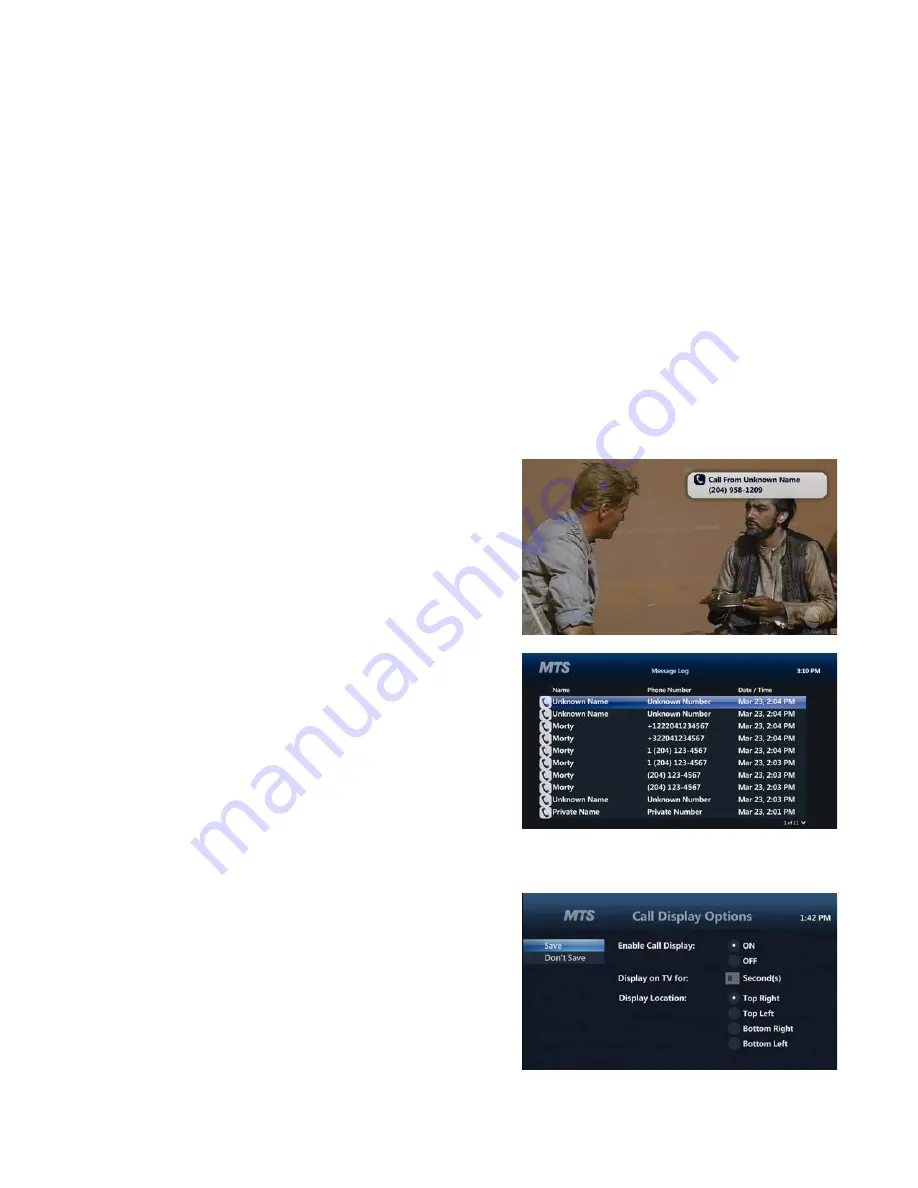
Call Display on TV

See who’s calling right on your TV screen with MTS Ultimate TV  
Message Centre. TV Call Display is free when you subscribe to  
MTS Call Display on your MTS home phone. This feature is not 
 available in Steinbach.

Accessing the Last Call Received

• 

Press the 

MENU

 button on your MTS TV remote control 

• 

Press the 

RIGHT ARROW

 button to navigate to Message  

Centre 

• 

Press the 

DOWN ARROW

 button to navigate to Call Display  

Log, press 

OK

• 

Your call log will be displayed. The last call received will display  
first in the list 

• 

Press 

EXIT

 until you return to TV viewing

How to Personalize Your Call Display Settings

• 

Press the 

MENU

 button on your MTS TV remote control 

• 

Press the 

RIGHT ARROW

 button to navigate to Message  

Centre 

• 

Press the 

DOWN ARROW

 button to navigate to the Call Display Options, press 

OK

Once in Call Display Settings, you can:

A. Disable TV Call Display
–  To turn TV Call Display off, use the 

ARROW

 button to  

navigate to enable 

TV CALL DISPLAY OFF

 and press  

OK

. TV Call Display will continue to display on other TVs  

until disabled

B. Change How Long TV Call Display shows On Your TV Screen
–  Use the 

ARROW

 button to access 

DISPLAY ON TV


FOR


option 

–  Using the number buttons on the remote, type in the number of seconds you’d like TV Call Display to appear 

on the screen (between 1 and 99. 

Summary of Contents for VIP 1216

Page 1: ...MTS Ultimate TV Service User Guide ...

Page 2: ...ordings 12 View Upcoming Scheduled Recordings 15 Play Back Recorded Programs 15 Cancel Stop Erase Recordings 16 Conflicts 16 Resolving Recording Conflicts 17 MyPVR 18 MTS Video on Demand 18 Accessing MTS Video on Demand 18 Play Video on Demand Programs 18 Controlling Video on Demand Programs 19 You are Unsure of the Expiration Date for a Video 19 The Video Expires While Playing 19 A Rented Video O...

Page 3: ...ceiver or Other Devices 28 Power Control for Multiple Devices 30 Learning 30 Set Volume Options for Multiple Devices 32 Reset the Remote 34 Connections and Devices 35 Connecting the MTS Ultimate TV Set Top Box 34 Troubleshooting 45 General Troubleshooting 45 Audio and Picture Troubleshooting 46 Guide Troubleshooting 49 PVR Troubleshooting 50 Remote Troubleshooting 51 Quick TV Fixes 51 ...

Page 4: ... TV channel package online 24 7 Customize your TV channel package with HD channels premium movie networks and more Changes take ef fect in minutes Visit mts ca myaccount MyPVR service Set your PVR to record using a computer or mobile device You can also browse the program guide and even delete recordings to free up space All you need is to set up your MTS MyAccount MyPicks Ultimate Picks Did you k...

Page 5: ...are not blocked Do not place on a rug or bed as it may overheat Do not stack equipment on it Maintain at least two inches of free space above it Never place near or on a heater or radiator Ensure adequate ventilation For manufacturer information see mts ca tvmanufacturerinfo Note set top box models may vary VIP 1216 PVR VIP 2262 PVR ...

Page 6: ...t programming instructions but the buttons on each remote operate in the same way Look for the LEARN button Ultimate MXv3 Black Remote no MTS logo Ultimate MXv4 Black Remote with MTS logo and writing on back Ultimate Silver or Charcoal Ultimate Black RF Look for the Motorola symbol on back RF remotes come with a converter ...

Page 7: ...d library Note On DEMAND button may be called VIDEO ON DEMAND on some remotes Pause Live TV Change video input Must be in TV mode for TV service to work Skip forward in 30 second increments Note FWD button may be called SKIP FORWARD on some remotes Go to list of recorded TV programs Access your personalized Menu App MyMenu Navigate channels menus and screens using arrows Go to PROGRAM INFO screen ...

Page 8: ...ghlight an item such as Guide under the heading Press OK to select the item Press EXIT to return to TV viewing The Program Guide Press GUIDE Press the UP DOWN ARROWS or the CH PG to scroll vertically through the Guide Press and hold the CH PG button to go through a whole page of the Guide at a time Press the RIGHT LEFT ARROW buttons to scroll horizontally through the Guide to see what is playing a...

Page 9: ...ch TV can have its own customized Guide Press MENU Press the RIGHT ARROW button to highlight SETTINGS Press the DOWN ARROW to highlight TELEVISION and press OK Highlight CUSTOMIZE CHANNEL GUIDE and press OK Channels currently displayed in the Guide have a check mark in front of them Channels that are not currently displayed in Guide do not have a check mark in front of them Use the UP DOWN ARROW b...

Page 10: ...L and press OK Press the LEFT ARROW to move to the left side of the screen highlight SAVE and press OK To cancel the changes highlight DON T SAVE and press OK View Favourites Press MENU Under LIVE TV highlight FAVOURITES and press OK See SETUP FAVOURITES to choose which channels are to appear in the Guide The Favourite Guide appears showing all selected channels under SETUP FAVOURITES Favourite ch...

Page 11: ...TS Ultimate TV Message Centre TV Call Display is free when you subscribe to MTS Call Display on your MTS home phone This feature is not available in Steinbach Accessing the Last Call Received Press the MENU button on your MTS TV remote control Press the RIGHT ARROW button to navigate to Message Centre Press the DOWN ARROW button to navigate to Call Display Log press OK Your call log will be displa...

Page 12: ...ss OK from any Call Log You will default to DELETE ITEM on the next window press the DOWN ARROW button to navigate to DELETE press OK You will default to YES on the next window press OK If at any time you do NOT wish to delete all items the user may select NO from this window and press OK User will be directed back to Call Log screen Press EXIT until you return to TV viewing User Tip When deleting...

Page 13: ...acturer Descriptive Video Descriptive video lets visually impaired people access a second stream of audio describing non verbal actions in a program The most up to date list is always available at mts ca descriptivevideo Set up Descriptive Video using MyRemote If you use descriptive video on a regular basis you should use MyRemote to set your B or C button on your remote to turn descriptive video ...

Page 14: ...95 Press OK to start the Lobby Camera Access You will be presented with a video stream of your building s lobby camera To tune away from the Lobby Camera Access change the channel User Tip The Lobby Camera does not require a television stream so accessing the Lobby Camera will not cause a conflict with any programming that you may be watching or recording ...

Page 15: ... Tip If two TVs are tuned to the same live channel it counts as one live show User Tip Video on Demand counts as a live TV show not a previously recorded show Control Live TV Control live TV using the PAUSE FAST FORWARD and REWIND buttons REPLAY skips back 7 seconds and FWD skips forward 30 seconds Recording Live TV starts from the point at which RECORD is pressed not from the beginning of the pro...

Page 16: ...it is erased manually Or highlight DON T CHANGE and press OK to keep current setting Use the ARROW buttons to highlight SAVE CHANGES and press OK RECORDING UPDATED message appears for a few seconds Highlight WATCH and press OK to return to Live TV How to Record a Series Record recurring programs such as episodes in a series Once scheduled a series recording occurs until cancelled Scheduled recordi...

Page 17: ...r the time to start recording RIGHT ARROW and press OK to change to AM or PM Highlight the text entry box under STOP Use the NUMERIC KEYPAD to enter the time to stop recording RIGHT ARROW and press OK to change to AM or PM To set how long the recording is to be stored highlight the text under KEEP UNTIL and press OK Highlight one of the following options and press OK SPACE NEEDED Automatically era...

Page 18: ...or CH PG to scroll through the list How to View Series Recordings Press RECORDED TV The Recorded TV screen appears Press the RIGHT ARROW button to highlight SERIES on the horizontal menu bar The Recorded TV screen lists the series scheduled to record Use the ARROW buttons or CH PG to scroll through the list Playback Recorded Programs Press RECORDED TV The Recorded TV screen lists available recordi...

Page 19: ...m Info screen appears Highlight ERASE and press OK A confirmation message appears Highlight ERASE again and press OK The message Recording Erased appears and the program is permanently erased Select DON T ERASE to keep the program The Recorded TV screen appears Press EXIT to return to live TV Conflicts A Conflict Resolution message will appear on your screen when you exceed the number of simultane...

Page 20: ...cording or Clearing an Overridden Recording An individual conflict icon the crossed out red dot in the Guide marks an individual recording that was cancelled in favour of another recording A series conflict icon crossed out three overlapping red dots in the Guide marks a series episode that was cancelled in favour of another recording Press GUIDE Use the ARROW buttons or CH PG to highlight the ove...

Page 21: ...l displays subcategories of included movies and TV shows WINNIPEG ON DEMAND Displays subcategories of free local MTS TV exclusive programs TREEHOUSE ON DEMAND If you subscribe to Treehouse displays included programs FREE STUFF AND MORE Displays subcategories of free programs SUPER CHANNEL ON DEMAND If you subscribe to Super Channel displays subcategories of included programs Renting MTS Video on D...

Page 22: ...t the bottom of the screen When a video expires the system deletes it from the Current Rentals screen The Video Expires While Playing If a video expires while being played it stops playing A Rented Video On Demand Program is Not in the Current Rentals List The video probably expired When a video expires it is deleted from the Current Rentals screen MTS Pay Per View Events Get front row seats to so...

Page 23: ...ences All ages admitted E Exempt from rating Includes news sports documentaries and other information programming as well as talk shows videos music and variety programming TV Parental Guidelines A Adult only Content is sexually explicit or graphically and excessively violent 18 Adult programming intended for viewers 18 years and older Might contain depictions of violence graphic language or expli...

Page 24: ... lock icons are removed To only show the locked channels highlight VIEW LOCKED ONLY and press OK The VIEW LOCKED ONLY option becomes VIEW ALL CHANNELS Highlight SAVE to keep changes or DON T SAVE to cancel changes Lock Movie Rating or TV Parental Guidelines Block programming based on ratings All rating levels are displayed Use the UP DOWN ARROW buttons to move through the list press OK to lock or ...

Page 25: ... lock image in the picture in picture tile To access a locked program select the channel and press OK The screen fills with the lock image with the message Press OK to Unlock press OK The message Enter your 4 digit PIN to unlock appears Using the NUMERIC KEYPAD enter the four digit PIN The option to DON T UNLOCK and UNLOCK are displayed highlight and press OK Changing the PIN Press MENU Press the ...

Page 26: ...red to view recorded locked programs Parental locking can be applied to recordings even after a program has been recorded For example if an R rated movie is recorded before parental locking is in effect and then a lock is applied to R rated content you cannot view the R rated recording without entering the correct PIN Children Can View a Hidden Channel Hiding a channel does not lock the channel Hi...

Page 27: ...ow and press OK Use the CH PG button to scroll through pages of available channels and the UP DOWN buttons to highlight the channel you want Press OK to add or remove channels and use the RIGHT ARROW to highlight the on screen NEXT arrow and press OK Use the CH PG button to scroll through pages of available channels and the UP DOWN buttons to highlight the up or down indicator next to a channel Pr...

Page 28: ...catalogue of PIPs picture in picture using the ARROWS To select a channel for viewing in full screen highlight the PIP and press OK For Premium Movies Picks scroll through your catalogue of PIPs using the ARROWS To select a channel for viewing highlight the PIP and press OK Press the BACK button on your remote at any time to return to the previous screen Press the EXIT button on your remote at any...

Page 29: ... The last message received will be at the top of the list To view a message use the ARROW keys to select a message and press OK If there is more than one page to view use the ARROWS on your remote to select NEXT PAGE or PREVIOUS PAGE and press OK To exit the log press EXIT until you return to TV viewing How do I disable entertainment news pop up notifications on my TV NOTE Disabling entertainment ...

Page 30: ...set amount of time How do I know which Messages in the Log have been viewed The read unread status of the messages are easy to see Messages that have been read will have an open envelope icon Messages that have not yet been read will have a new envelope icon Purchasing Add Ons MTS TV will let you know when there is an opportunity to purchase add ons such as specialty channels through your TV To co...

Page 31: ...ce you want to program Locate the 4 digit set up code for the device you want to program from the Manufacturer Code List 2 Press and hold the appropriate mode key TV DVD or AUX on the remote control Black MXv4 with MTS logo Remote Only 3 Enter the first code for your brand from the code list using the number pad on the remote 4 Press POWER key to test with your device If the device turns off setup...

Page 32: ...key Press and hold the number key assigned to the brand of device you are trying to program Release the key when your device turns off Setup for that device is complete 2 Blinks of the TV DVD or AUX mode key Success 1 Blink of the TV DVD or AUX mode key Failure Program the TV DVD or AUX Mode Keys Using the Code Search If you can t find a 4 digit code for your device try using the search function S...

Page 33: ...e selected mode key will flash three times and return to normal operation 8 If no valid code is found the green backlight will flash twice and the remote control will return to normal operation 9 Turn the device back on and use the remote to control your device Now that your devices are programmed you can press the appropriate mode key on the remote control to work with the selected device To use ...

Page 34: ...ARN key for one second then release both keys 2 All of the mode keys will flash and then the selected mode key light remains on 3 On your MTS TV black remote press and release the key that you want to teach 4 While pointing your original remote at the bottom of your MTS TV Black remote approximately 1 inch apart press and hold the original remote key until the mode key light blinks once and stays ...

Page 35: ...mode the volume will still control the set top box Volume Control Set Up Options for Multiple Devices The volume commands are sent to the set top box unless the TV mode key has been programmed If the TV mode key has been programmed the volume commands are sent to the TV from all mode keys If you d like the volume commands to be sent to just one device for example to your home theatre set up and no...

Page 36: ...ndicating successful assignment and return to normal operations Black MXv3 Remote 1 Press the TV key and while holding it pressed press the OK key for 1 second 2 Release both keys all of the mode keys will flash followed by the TV mode key light remaining on 3 Press and hold the MUTE key for 3 seconds until the TV mode key light briefly turns off then remains on then release the MUTE key 4 Press a...

Page 37: ...e you will need to start over Black MXv3 Remote 1 Press the TV key and while holding it pressed press the OK key for 1 second and release both keys at the same time 2 All the mode keys will flash and the TV mode key light will stay on 3 Press and hold the DELETE key for 3 seconds until the TV mode key blinks and stays off The remote control is now reset to factory default settings If you want to u...

Page 38: ...wer cord from the MTS Ultimate TV set top box and other components Set top boxes with hard drives and those without hard drives have identical front panels and rear panel connectors only the size varies Ultimate TV has two PVRs set top boxes Set up instructions for both are included here 160GB PVR 500GB PVR Key Item Function Cable Ends 1 TO WALL VIDEO IN Coaxial input for home video network HPNA 2...

Page 39: ...hest quality standard video output If your standard TV has an S Video input connect it to the S VIDEO output on your set top box using an S Video cable Very Good RCA type Video only If your standard TV does not have an S Video input connect it to the VIDEO OUT connector on your set top box using a RCA type video cable Good RF coaxial Video and audio If your TV only has a coaxial RF input use a coa...

Page 40: ...t to an HDTV Audio Only If you are connecting to a home theatre receiver refer to Connect to a Home Theatre Audio Only HDMI Y Pb Pr Set top box These connections serve the same purpose use only one Video in Sample HDTV TO WALL VIDEO IN HDMI NETWORK Pb Pr Y S VIDEO OPTICAL L R VIDEO OUT AUDIO OUT TO TV VIDEO OUT USB POWER 12V DC HDMI CABLE ANTENNA IN Component Video Input Y Pb Pr VIP 1216 PVR VIP 2...

Page 41: ...DTV Audio Only If you are connecting to a home theatre receiver refer to Connect to a Home Theatre Audio Only Set top box Optical S PDIF RCA type Audio These connections serve the same purpose use only one Video in Sample HDTV Audio Inputs TO WALL VIDEO IN HDMI NETWORK Pb Pr Y S VIDEO OPTICAL L R VIDEO OUT AUDIO OUT TO TV VIDEO OUT USB POWER 12V DC OPTICAL S PDIF INPUT AUDIO LEFT AUDIO RIGHT VIP 2...

Page 42: ...t support HD video For more information see Connect an HDTV Audio Only Set top box Optical S PDIF RCA type Audio These connections serve the same purpose use only one Video in Sample HDTV Audio Inputs TO WALL VIDEO IN HDMI NETWORK Pb Pr Y S VIDEO OPTICAL L R VIDEO OUT AUDIO OUT TO TV VIDEO OUT USB POWER 12V DC OPTICAL SPDIF INPUT AUDIO LEFT AUDIO RIGHT VIP 1216 ...

Page 43: ...40 VIP 2262 Option 1 VIP 2262 Option 2 ...

Page 44: ...onnections serve the same purpose use only one Video in Sample Stereo TV TO WALL VIDEO IN HDMI NETWORK Pb Pr Y S VIDEO OPTICAL L R VIDEO OUT AUDIO OUT TO TV VIDEO OUT USB POWER 12V DC CABLE ANTENNA IN INPUT S VIDEO VIDEO AUDIO LEFT AUDIO RIGHT Optical S PDIF RCA type Audio S Video RCA type Video VIP 1216 VIP 2262 ...

Page 45: ...n see Connect an HDTV Video Only RCA type Audio RCA type Video Set top box Video in Sample Stereo VCR Sample Stereo TV TO WALL VIDEO IN HDMI NETWORK Pb Pr Y S VIDEO OPTICAL L R VIDEO OUT AUDIO OUT TO TV VIDEO OUT USB POWER 12V DC INPUT OUTPUT VIDEO VIDEO CABLE ANTENNA IN TO TV AUDIO AUDIO L L R R CABLE ANTENNA IN INPUT S VIDEO VIDEO AUDIO LEFT AUDIO RIGHT VIP 1216 VIP 2262 Option 1 ...

Page 46: ...43 VIP 2262 Option 2 ...

Page 47: ...NPUT S VIDEO VIDEO AUDIO LEFT AUDIO RIGHT Sample Home Theatre Receiver L VIDEO R S VIDEO AUDIO VIDEO DVD CABLE TV VIDEO 2 IN OUT VCR OPTICAL SPEAKER CONNECTIONS TV MONITOR OUTPUT VIDEO S VIDEO Connect to a Home Theatre Receiver TV and VCR To determine your best connection refer to Video Connection Options This video connection method does not support HD video For more information see Connect an HD...

Page 48: ...f the remote control the batteries in the remote control may need to be changed The MTS Ultimate TV Set Top Box is Making a Humming Noise The set top box includes an integrated hard drive and a fan for cooling During normal operation it makes a quiet humming noise similar to a personal computer The noise varies in volume occasionally when the speed of the internal fan adjusts to changes in the tem...

Page 49: ...o output is connected to the TV or home theatre receiver If the set top box audio output is connected to the TV verify the MUTE button on the TV has not been pressed If the set top box audio output is connected to a home theatre receiver verify the home theatre receiver is set to the appropriate input source and its MUTE button has not been pressed Volume Ensure the volume on the TV is turned up C...

Page 50: ...ets are live Test by plugging in a lamp or some other device known to work Ensure that the Internet network connection is operational Restart the set top box by unplugging it and plugging it back in Pull the plug from the wall not from the back of the set top box PIPs Are Not Displayed in Any Screen or Menu Picture In Pictures PIPs appear only for live TV programs and videos PIPs do not appear for...

Page 51: ... CHANGES and press OK to exit from this screen without changing the aspect ratio User Tip To change aspect ratio of SD programming on an HDTV press the aspect enter button while watching a television program and a sub menu will appear letting you select different aspect ratios including normal stretch and zoom This aspect ratio will remain for all SD channels until it is changed again Turning Syst...

Page 52: ...check mark appears in front of the channel To see all channels in the guide highlight CHECK ALL and press OK Check marks appear in all the check boxes To display only the unchecked boxes hidden channels highlight VIEW UNCHECKED and press OK The SHOW UNCHECKED option becomes SHOW ALL To restore the entire list highlight SHOW ALL and press OK To save the settings highlight SAVE and press OK Select D...

Page 53: ...es Not Record Press RECORDED TV If the program recorded this screen lists the program Do one of the following If the Recorded TV screen lists the program select the program in the list and play it With the program highlighted press OK Highlight PLAY and press OK If there is no indication the program recorded continue with the following A Different Program Recorded Press RECORDED TV Does the Record...

Page 54: ...remotes this button is labelled MTS Make sure you are within 20 feet of your set top box and have a clear line of sight with no obstructions including glass doors Check the batteries in the remote control and replace them if needed On some TVs the brightness settings can interfere with the signal from your remote to your set top box Try adjusting the brightness on your TV set Check that there is p...

Reviews: