background image

14

 SURFboard

®

 SBV4200 VoIP Cable Modem User Guide

Setting Up a USB Driver in Windows 98, continued

Introduction

Before You Begin

Installation & Configuration

FAQ

Troubleshooting

Glossary

License

X

Home

Print

Exit

8

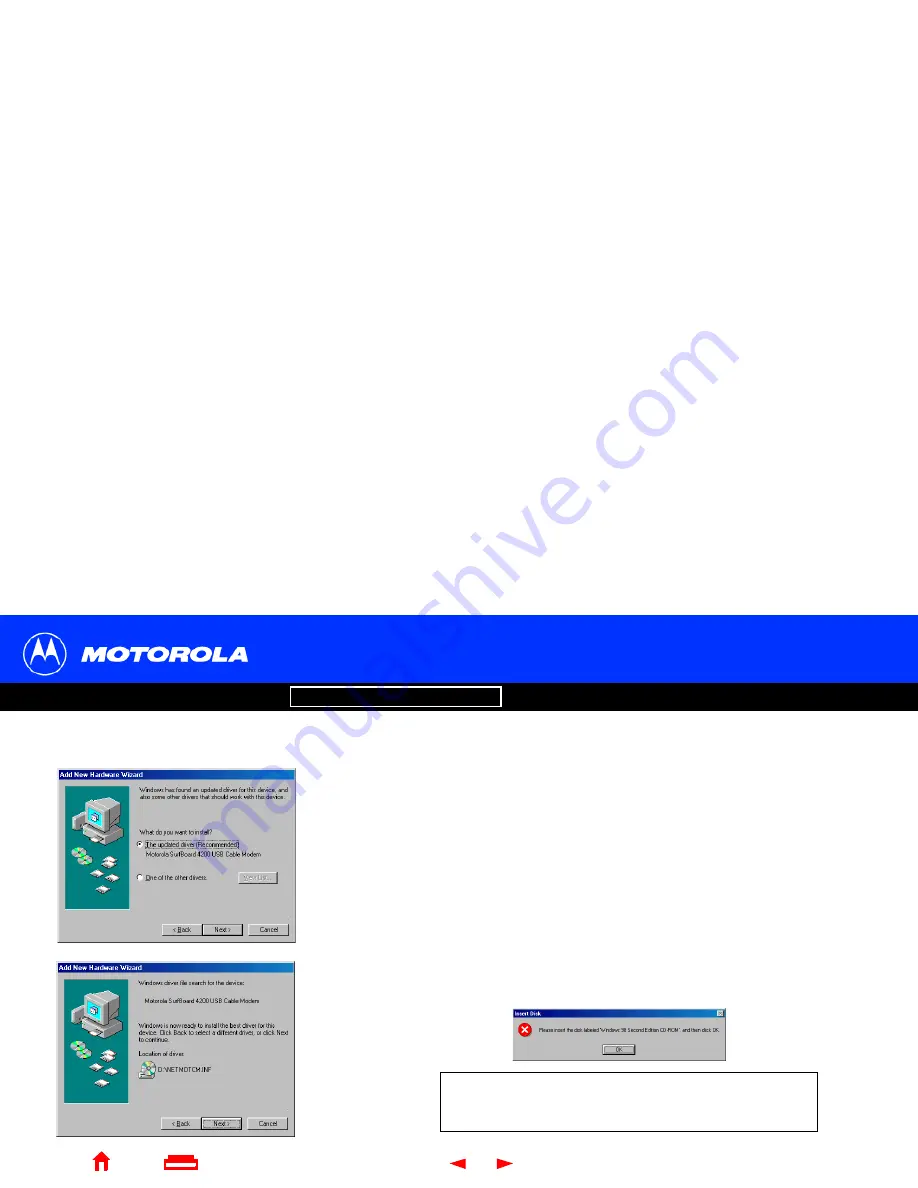
Select The updated driver... and click Next.

If this window is not displayed, verify that the SURFboard VoIP Cable Modem 
CD-ROM is properly inserted in the CD-ROM drive. If you still cannot find the correct 
driver file, click Cancel to cancel the installation and perform the procedure for 

“Removing the USB Driver from Windows 98 or Me”

 on page 44. Then repeat this 

procedure.

9

After the window at bottom left is displayed, click Next.

If a window with the message Copying Files... displays and asks for your CD-ROM 
drive, type your CD-ROM drive letter (for example, “D:”) and click OK.

If an Insert Disk window similar to the one below is displayed, Windows 98 system 
files are needed to complete the installation. To install the files, insert your 
Windows 98 CD-ROM is in the CD-ROM drive and click OK.

Although your SURFboard VoIP cable modem model number 
may be different than in the images in this guide, the 
procedure is the same.

Summary of Contents for SURFboard SBV4200

Page 1: ...nd Rear Panel Before You Begin Lists the items needed to install your SURFboard VoIP cable modem and describes Precautions Signing Up for Service and Computer System Requirements Installation and Configuration Overview Provides an overview and links to cable and configure your SURFboard VoIP cable modem including Setting Up a USB Driver Troubleshooting Provides suggestions to fix common problems C...

Page 2: ...ing strikes and other electrical surges This product was qualified under test conditions that included the use of the supplied cable between system components To be in compliance with regulations the user must use this cable and install it properly Different types of cord sets may be used for connections to the main supply circuit Use only a main line cord that complies with all applicable product...

Page 3: ...ation or adaptation without written permission from Motorola Inc Motorola reserves the right to revise this publication and to make changes in content from time to time without obligation on the part of Motorola to provide notification of such revision or change Motorola provides this guide without warranty of any kind either implied or expressed including but not limited to the implied warranties...

Page 4: ...or Service 6 Computer System Requirements 7 Ethernet Card 7 USB Connection 7 Installation and Configuration Overview 8 Cabling and Startup for a Single User 9 Setting Up a USB Driver 11 Setting Up a USB Driver in Windows 98 12 Setting Up a USB Driver in Windows 2000 16 Setting Up a USB Driver in Windows Me 20 Setting Up a USB Driver in Windows XP 21 Configuring TCP IP 22 ...

Page 5: ...in Windows 95 98 or Me 36 Verifying the IP Address in Windows 2000 or XP 37 Cabling for Multiple Users 39 Ethernet and USB 39 Ethernet 40 Troubleshooting 41 Front Panel Lights and Error Conditions 43 Removing the USB Driver from Windows 98 or Me 44 Removing the USB Driver from Windows 2000 48 Removing the USB Driver from Windows XP 53 Contact Us 60 Frequently Asked Questions 61 Glossary 64 Softwar...

Page 6: ...gle computer equipped with an Ethernet adapter directly to the Ethernet port on the SURFboard VoIP cable modem Two computers one to the USB port and one to the Ethernet port Up to 31 computers to a single SURFboard VoIP cable modem using an Ethernet hub as shown in Cabling for Multiple Users on page 39 You can connect up to two standard telephone lines using your SURFboard VoIP cable modem which s...

Page 7: ...es when the VoIP cable modem is transferring data Key Light Flashing On 2 Power Startup diagnostics in progress The VoIP cable modem is powered on 3 Receive Scanning for a receive downstream channel connection The downstream channel is connected 4 Send Scanning for a send upstream channel connection The upstream channel is connected 5 Online Scanning for a network connection The startup process is...

Page 8: ... connector provides a connection to Ethernet equipped computers using a cable terminated with an RJ 45 connector For the SBV4200E the cable length must be 3 meters or less 5 The POWER connector provides a connection to the power adapter or uninterruptible power source UPS 6 If you experience a problem you can push this recessed button to reset the VoIP cable modem see Troubleshooting on page 41 Re...

Page 9: ... a 5 900 MHz RF splitter and two additional coaxial cables to use both the TV and the VoIP cable modem The coaxial cable and RF splitter are available at consumer electronic stores Item Description Power adapter or cable The SBV4200 is supplied with one of the following powering options A power adapter to connect to the power outlet A power cable to connect to an UPS 10 100Base T Ethernet cable Co...

Page 10: ...se any static charges To prevent overheating the VoIP cable modem do not block the ventilation holes on its sides Do not open the VoIP cable modem Refer all service to your cable service provider Wipe the VoIP cable modem with a clean dry cloth Never use cleaning fluid or similar chemicals Do not spray cleaners directly on the unit or use forced air to remove dust Caution Contact your cable servic...

Page 11: ...u can record it here 00 ______ ______ ______ ______ ______ To receive telephone service you need to provide the MAC address marked MTA MAC ID You can record it here 00 ______ ______ ______ ______ ______ You should ask your cable service provider the following questions Do you have any special system requirements When can I begin to use my VoIP cable modem Are there any files I need to download aft...

Page 12: ...modem If it is not installed follow the installation instructions provided with your Ethernet card USB Connection You can use the USB connection with any PC running Windows 98 Windows 2000 Windows Me or Windows XP that has a USB interface The USB connection requires special USB driver software that is supplied on the SURFboard VoIP Cable Modem CD ROM You can upgrade the USB drivers from the Intern...

Page 13: ...for a Single User on page 9 Cabling for Multiple Users on page 39 2 If you are using the USB port only go to Setting Up a USB Driver on page 11 Ethernet users can skip this step 3 Configure TCP IP and verify the IP address for your computer following one of Configuring TCP IP on page 22 Your Macintosh or UNIX user manual To connect a single PC running Microsoft Windows to a SURFboard VoIP cable mo...

Page 14: ... an UPS plug the cord into the POWER connector on the VoIP cable modem and the UPS and plug the UPS into the electrical outlet This turns the SURFboard VoIP cable modem on You do not need to unplug it when not in use 5 Check that the lights on the VoIP cable modem front cycle through this sequence Power flashes during the self test and changes to solid green when the self test is successfully comp...

Page 15: ... computer Ethernet users do not need to set up USB 7 Perform the procedures for Configuring TCP IP on page 22 8 To connect the telephone line plug a phone wire into the phone 1 connector You can also connect a second telephone line to the phone 2 connector Caution Contact your cable service provider before connecting your VoIP cable modem to your existing telephone wiring Do not connect the teleph...

Page 16: ... for your Windows version Setting Up a USB Driver in Windows 98 on page 12 Setting Up a USB Driver in Windows 2000 on page 16 Setting Up a USB Driver in Windows Me on page 20 Setting Up a USB Driver in Windows XP on page 21 The SURFboard VoIP cable modem USB driver does not support Macintosh or UNIX computers For those systems you can connect through Ethernet only Be sure the SURFboard VoIP Cable ...

Page 17: ...able Modem CD ROM is inserted in your CD ROM drive before you plug in the USB cable This CD contains the USB drivers and must be inserted and read by the PC before you connect the VoIP cable modem to the PC A few seconds after you complete the USB connection the Add New Hardware Wizard window is displayed 1 Click Next 2 Be sure Search for the best driver for your device is selected as in the windo...

Page 18: ...left 5 Click Next The message Please wait while Windows searches for a new driver for this device is displayed If your computer successfully locates the driver skip to step 8 6 If your computer does not locate the driver the previous window is displayed again Select Specify a location and type the location of your CD ROM drive as shown at bottom left To load the driver successfully you may need to...

Page 19: ...tion and perform the procedure for Removing the USB Driver from Windows 98 or Me on page 44 Then repeat this procedure 9 After the window at bottom left is displayed click Next If a window with the message Copying Files displays and asks for your CD ROM drive type your CD ROM drive letter for example D and click OK If an Insert Disk window similar to the one below is displayed Windows 98 system fi...

Page 20: ...lick Finish The window at bottom left is displayed 11 Click Yes to restart your computer When you finish setting up the USB driver you can continue with Configuring TCP IP on page 22 If you have difficulties setting up the USB driver perform Removing the USB Driver from Windows 98 or Me on page 44 and repeat this procedure If that does not correct your problem see the Regulatory Safety Software Li...

Page 21: ...URFboard VoIP Cable Modem CD ROM is inserted into the CD ROM drive before you plug in the USB cable A few seconds after you complete the USB connection the Found New Hardware window is displayed 1 Click Next 2 Be sure Search for a suitable driver for my device is selected 3 Click Next Although your SURFboard VoIP cable modem model number may be different than in the images in this guide the proced...

Page 22: ...n FAQ Troubleshooting Glossary License X Home Print Exit 4 Be sure CD ROM drives is the only box checked as in the window at top left 5 Click Next The lower window is displayed 6 Click Next If the Insert Disk window is displayed be sure the SURFboard VoIP Cable Modem CD ROM is in the CD ROM drive and follow steps 7 to 12 Otherwise you can skip to step 13 ...

Page 23: ...ry License X Home Print Exit 7 On the Insert Disk window click OK The Files Needed window is displayed 8 If necessary select your CD ROM drive in the Copy files from list 9 Click Browse 10 Locate the NetMotCM sys file in the CD ROM root directory 11 Double click the NetMotCM sys file The Files Needed window is displayed 12 Click OK The Found New Hardware Wizard window is displayed ...

Page 24: ...figuration FAQ Troubleshooting Glossary License X Home Print Exit 13 Click Finish to complete the installation When you finish setting up the USB driver you can continue with Configuring TCP IP on page 22 If you have any difficulties setting up the USB driver perform Removing the USB Driver from Windows 2000 on page 48 and repeat this procedure ...

Page 25: ...Hardware Wizard window is displayed 1 Click Next Windows automatically searches for the correct USB drivers and installs them If the installation is successful the window at bottom left is displayed 2 If the window at bottom left is displayed click Finish Otherwise be sure the SURFboard VoIP Cable Modem CD ROM is correctly inserted in your CD ROM drive When you finish setting up the USB driver you...

Page 26: ...w is displayed 1 Be sure Install the software automatically is selected 2 Click Next Windows automatically searches for the correct USB drivers and installs them If the installation is successful the window at bottom left is displayed 3 Click Finish to complete the installation Otherwise be sure the SURFboard VoIP Cable Modem CD ROM is correctly inserted in your CD ROM drive When you finish settin...

Page 27: ...n between computers Perform one of Configuring TCP IP in Windows 95 98 or Me on page 23 Configuring TCP IP in Windows 2000 on page 26 Configuring TCP IP in Windows XP on page 30 Follow the instructions in your Macintosh or UNIX user manual After configuring TCP IP perform one of the following to verify the IP address Verifying the IP Address in Windows 95 98 or Me on page 36 Verifying the IP Addre...

Page 28: ...ings and then Control Panel from the pop up menus 3 Double click the Network icon on the Control Panel window 4 Select the Configuration tab on the Network window 5 If TCP IP is displayed in the list of network components it is installed and you can skip to step 10 If TCP IP is not displayed on the list continue with step 6 Although your SURFboard VoIP cable modem model number may be different tha...

Page 29: ...e You Begin Installation Configuration FAQ Troubleshooting Glossary License X Home Print Exit 6 Click Add 7 Double click the Protocol option on Select Network Component Type window 8 Click Microsoft in the Manufacturers section and click TCP IP in the Network Protocol section of Select Network Protocol window 9 Click OK ...

Page 30: ...e TCP IP entry choose the one for the Ethernet card or USB port connected to the VoIP cable modem 11 Click Properties The TCP IP window is displayed 12 Click the IP Address tab 13 Click Obtain an IP address automatically 14 Click OK to accept the TCP IP settings 15 Click OK to close the Network window 16 Click OK when prompted to restart your computer and click OK again When you complete TCP IP co...

Page 31: ...ndows 2000 1 On the Windows Desktop click Start 2 Select Settings and then Control Panel from the pop up menus 3 Double click the Network and Dial up Connections icon on the Control Panel window 4 On the Network and Dial up Connections window click Local Area Connection number The value of number varies from system to system The Local Area Connection number Status window is displayed ...

Page 32: ...oubleshooting Glossary License X Home Print Exit 5 Click Properties Information similar to the lower window is displayed 6 If Internet Protocol TCP IP is in the list of components TCP IP is installed You can skip to step 10 If Internet Protocol TCP IP is not in the list click Install The Select Network Component Type window is displayed Continue with step 7 ...

Page 33: ... Troubleshooting Glossary License X Home Print Exit 7 Click Protocol on the Select Network Component Type window and click Add The Select Network Protocol window is displayed 8 Click Internet Protocol TCP IP in the Network Protocol section on the Select Network Protocol window 9 Click OK The Local Area Connection number Properties window is re displayed ...

Page 34: ... IP is checked 11 Click Properties The Internet Protocol TCP IP Properties window is displayed as shown at bottom left 12 Be sure Obtain IP address automatically and Obtain DNS server address automatically are selected 13 Click OK to accept the TCP IP settings 14 Click OK to close the Local Area Connection number Properties window 15 Click OK when prompted to restart your computer and click OK aga...

Page 35: ... XP 1 On the Windows desktop click Start to display the Start window shown at left 2 Click Control Panel to display the Control Panel window The display varies depending on your Windows XP view options If the display is a Category view as shown below continue with step 3 Otherwise skip to step 5 3 Click Network and Internet Connections to display the Network and Internet Connections window ...

Page 36: ...XP continued Introduction Before You Begin Installation Configuration FAQ Troubleshooting Glossary License X Home Print Exit 4 On the Network and Internet Connections Pick a task window click Network Connections to display the LAN or High speed Internet connections Skip to step 6 ...

Page 37: ... in Windows XP continued Introduction Before You Begin Installation Configuration FAQ Troubleshooting Glossary License X Home Print Exit 5 If a classic view similar to at left is displayed click Network Connections to display the LAN or High speed Internet connections ...

Page 38: ...Begin Installation Configuration FAQ Troubleshooting Glossary License X Home Print Exit 6 Right click on your network connection If more than one connection is displayed be sure to select the one for your network interface 7 Select Properties from the pop up menu to display the Local Area Connection Properties window ...

Page 39: ...in Installation Configuration FAQ Troubleshooting Glossary License X Home Print Exit 8 On the Local Area Connection Properties window be sure Internet Protocol TCP IP is checked If it is not checked check it 9 Select Internet Protocol TCP IP and click Properties to display the Internet Protocol TCP IP Properties window ...

Page 40: ...ing Glossary License X Home Print Exit 10 On the Internet Protocol TCP IP Properties window verify that the settings are correct as shown at left 11 Click OK to close the TCP IP Properties window 12 Click OK to close the Local Area Connection Properties window When you complete the TCP IP configuration go to Verifying the IP Address in Windows 2000 or XP on page 37 ...

Page 41: ...address 1 On the Windows Desktop click Start 2 Select Run The Run window is displayed 3 Type winipcfg exe and click OK A window similar to the example at top left is displayed 4 Select your adapter name the Ethernet card or USB device 5 Click Renew 6 Click OK after the system displays an IP address If after performing this procedure your computer cannot access the Internet call your cable service ...

Page 42: ...n the Windows Desktop click Start 2 Select Run The Run window is displayed 3 Type cmd and click OK A window like the one at upper left is displayed 4 Type ipconfig and press ENTER to display your IP configuration A display like the window at upper left indicates a normal configuration If an Autoconfiguration IP Address is displayed as in the window at bottom left there is an incorrect connection b...

Page 43: ...Troubleshooting Glossary License X Home Print Exit To renew your IP address 1 Type ipconfig renew and press ENTER If a valid IP address is displayed as shown at left Internet access should be available 2 Type exit and press ENTER to return to Windows If after performing this procedure your computer cannot access the Internet call your cable service provider for help ...

Page 44: ...ider Ethernet and USB You can connect the USB port on one computer and the Ethernet port on another computer directly to the VoIP cable modem as shown at top left Caution You can connect a single computer to the USB port and from one to 30 remaining users to an Ethernet hub as shown at bottom left You cannot connect more than one computer to the VoIP cable modem through the USB port Do not connect...

Page 45: ...llation Configuration FAQ Troubleshooting Glossary License X Home Print Exit Ethernet You can connect up to 31 computers to an Ethernet hub connected to a SURFboard VoIP cable modem as shown at left Cable outlet Coaxial cable Ethernet cable Ethernet hub Computer Computer Computer Ethernet cable SURFboard VoIP cable modem ...

Page 46: ...on the rear panel Resetting the VoIP cable modem may take 5 to 30 minutes Your service provider may ask for the status of the front panel lights as described in Front Panel Lights and Error Conditions on page 43 Problem Possible Solutions Green POWER light is off Check that the power cord is properly plugged into the electrical outlet and the VoIP cable modem Check that the electrical outlet is wo...

Page 47: ...re is clear If you cannot receive your regular TV channels your data service will not function Check the coaxial cable at the VoIP cable modem and wall outlet Hand tighten if necessary Check the IP address Follow the steps in Verifying the IP Address in Windows 95 98 or Me on page 36 or Verifying the IP Address in Windows 2000 or XP on page 37 Call your cable service provider if you need an IP add...

Page 48: ... Front Panel on page 2 Light Turns Off During Startup If Turns Off During Normal Operation If Receive The receive channel cannot be acquired The receive channel is lost Send The send channel cannot be acquired The send channel is lost Online IP registration is unsuccessful The IP registration is lost Power The VoIP cable modem is not properly plugged into the power outlet The VoIP cable modem is u...

Page 49: ...Glossary Removing the USB Driver from Windows 98 or Me 1 On your Windows Desktop right click the Network Neighborhood icon and select Properties The Network window is displayed 2 Click the Motorola SurfBoard USB Cable Modem Although your SURFboard VoIP cable modem model number may be different than in the images in this guide the procedure is the same ...

Page 50: ...Installation Configuration FAQ Troubleshooting Glossary License X Home Print Exit 3 Click Remove The Network window no longer displays Motorola SurfBoard USB Cable Modem in the list 4 Click OK The System Settings Change window is displayed 5 Disconnect the USB cable from your PC or VoIP cable modem 6 Click Yes to restart your computer ...

Page 51: ...oard to exit the start up screens 9 To start Windows Explorer click Start and select Run 10 In the Run window type explorer and click OK The Exploring window is displayed 11 Select your CD ROM drive D in the image at left 12 Double click remove or remove exe to run the Remove utility from the SURFboard VoIP Cable Modem CD ROM The SURFboard Cable Modem USB Driver Removal window is displayed Your Wi...

Page 52: ...iguration FAQ Troubleshooting Glossary License X Home Print Exit 13 Click Remove Driver to remove the USB driver After you remove the USB driver re install the USB driver on your computer Setting Up a USB Driver in Windows 98 on page 12 Setting Up a USB Driver in Windows Me on page 20 If you continue to have problems contact your cable service provider ...

Page 53: ...Before You Begin Installation Configuration FAQ Troubleshooting Glossary Removing the USB Driver from Windows 2000 1 On your Windows desktop click Start 2 Click Settings 3 Click Control Panel to display the Control Panel window 4 Double click System to display the System Properties window ...

Page 54: ...ver from Windows 2000 continued Introduction Before You Begin Installation Configuration FAQ Troubleshooting Glossary License X Home Print Exit 5 On the System Properties window click the Hardware tab 6 Click the Device Manager button to display the Device Manager window ...

Page 55: ...Print Exit 7 On the Device Manager window double click Network Adapters 8 Click the Motorola SurfBoard USB Cable Modem The Uninstall icon is displayed on the window near the top 9 Click the Uninstall icon 10 Close the Device Manager window 11 Close the Control Panel window Although your SURFboard VoIP cable modem model number may be different than in the images in this guide the procedure is the s...

Page 56: ...board to exit the start up screens 14 To start Windows Explorer click Start and select Run 15 In the Run window type explorer and click OK 16 Double click My Computer 17 Double click the Motorola CD icon D in the image 18 Double click remove or remove exe to run the Remove utility from the SURFboard VoIP Cable Modem CD ROM The SURFboard Cable Modem USB Driver Removal window is displayed Your Windo...

Page 57: ... 19 The window on the left is displayed Be sure the USB cable is disconnected 20 Click Remove Driver Informational messages similar to the ones shown at left are displayed on the SURFboard Cable Modem USB Driver Removal window After you remove the USB driver re install the USB driver following Setting Up a USB Driver in Windows 2000 on page 16 If you continue to have problems contact your cable se...

Page 58: ...lossary Removing the USB Driver from Windows XP 1 On the Windows desktop click Start to display the Start window shown at left 2 Click Control Panel to display the Control Panel window The display varies depending on your Windows XP view options 3 If a Category view similar to below is displayed click Performance and Maintenance Otherwise skip to step 5 ...

Page 59: ...e USB Driver from Windows XP continued Introduction Before You Begin Installation Configuration FAQ Troubleshooting Glossary License X Home Print Exit 4 On the Performance and Maintenance window click System to display the System Properties window Skip to step 6 ...

Page 60: ... the USB Driver from Windows XP continued Introduction Before You Begin Installation Configuration FAQ Troubleshooting Glossary License X Home Print Exit 5 If a classic view similar to at left is displayed click System to display the System Properties window ...

Page 61: ... from Windows XP continued Introduction Before You Begin Installation Configuration FAQ Troubleshooting Glossary License X Home Print Exit 6 On the System Properties window click the Hardware tab 7 Double click the Device Manager button to display the Device Manager window ...

Page 62: ...rint Exit 8 On the Device Manager window double click Network adapters 9 Click the Motorola SurfBoard USB Cable Modem The Uninstall icon is displayed on the window near the top 10 Click the Uninstall icon 11 Close the Device Manager window 12 Close the Control Panel window Although your SURFboard VoIP cable modem model number may be different than in the images in this guide the procedure is the s...

Page 63: ...oard to exit the start up screens 15 To start Windows Explorer click Start and select Run 16 In the Run window type explorer and click OK 17 Double click My Computer 18 Double click the Motorola CD icon D in the image 19 Double click remove or remove exe to run the Remove utility from the SURFboard VoIP Cable Modem CD ROM The SURFboard Cable Modem USB Driver Removal window is displayed Your Window...

Page 64: ... 20 The window on the left is displayed Be sure the USB cable is disconnected 21 Click Remove Driver Informational messages similar to the ones shown at left are displayed on the SURFboard Cable Modem USB Driver Removal window After you remove the USB driver re install the USB driver following Setting Up a USB Driver in Windows XP on page 21 If you continue to have problems contact your cable serv...

Page 65: ...nformation about customer service technical support or warranty claims see the Regulatory Safety Software License and Warranty Information card provided with your SURFboard VoIP cable modem For answers to typical questions see Frequently Asked Questions on page 61 For information about Motorola consumer cable products education and support visit http www motorola com broadband ...

Page 66: ...r outgoing calls and faxes Q What is Voice over Internet Protocol VoIP A VoIP uses cable television wires instead of traditional telephone lines to provide voice and fax service Q How fast are VoIP cable modems A Cable modems offer Internet access at speeds up to 100 times faster than a traditional phone modem You can experience speeds of over 1 000 Kbps Due to network condition such as traffic vo...

Page 67: ...advanced real time multimedia services over cable for example VoIP multimedia conferencing and interactive gaming Q If I have a VoIP cable modem can I still use my old 28 8 Kbps or 56 Kbps modem A Yes Although once you ve experienced the speed of cable Internet access you ll never again want to wait for traditional dial up services Q I have more than one computer Do I need more than one SURFboard ...

Page 68: ...asic service before you can get Internet access and or offer a discount when you use your own VoIP cable modem Check with your local cable company for specific information Q What type of technical support is available A For questions about your Internet service connection or VoIP cable modem call your cable service provider Q What do I do if my SURFboard VoIP cable modem stops working A Troublesho...

Page 69: ...g start up downstream In a cable data network downstream describes the direction of data received by your computer from the Internet Ethernet The most widely used type of local area network LAN The most commonly installed Ethernet networks are called 10Base T 10Base T provides transmission speeds up to 10 megabits per second Mbps usually over twisted pair wire Fast Ethernet 100Base T provides tran...

Page 70: ...en two or more signals each carrying a selected frequency range TCP IP Transmission Control Protocol Internet Protocol is a set of protocols that provides standards and rules for communication between networks upstream In a cable data network upstream describes the direction of data sent from your computer to the Internet UPS An uninterruptible power source is a power supply designed to protect mi...

Page 71: ...NENTS DOCUMENTATION AND ANY OTHER MATERIALS PROVIDED WITH THE PRODUCT TO YOUR POINT OF PURCHASE OR SERVICE PROVIDER AS THE CASE MAY BE FOR A FULL REFUND The Software includes associated media any printed materials and any on line or electronic documentation Software provided by third parties may be subject to separate end user license agreements from the manufacturers of such Software The Software...

Page 72: ...ications of the foregoing shall at all times remain with Motorola and its 3rd party licensors Motorola retains all rights not expressly licensed under this License The Software including any images graphics photographs animation video audio music and text incorporated therein is owned by Motorola or its 3rd party licensors and is protected by United States copyright laws and international treaty p...

Page 73: ...506254 001 7 03 MGBI Visit our website at www motorola com ...

Reviews: