background image

 Installation

27

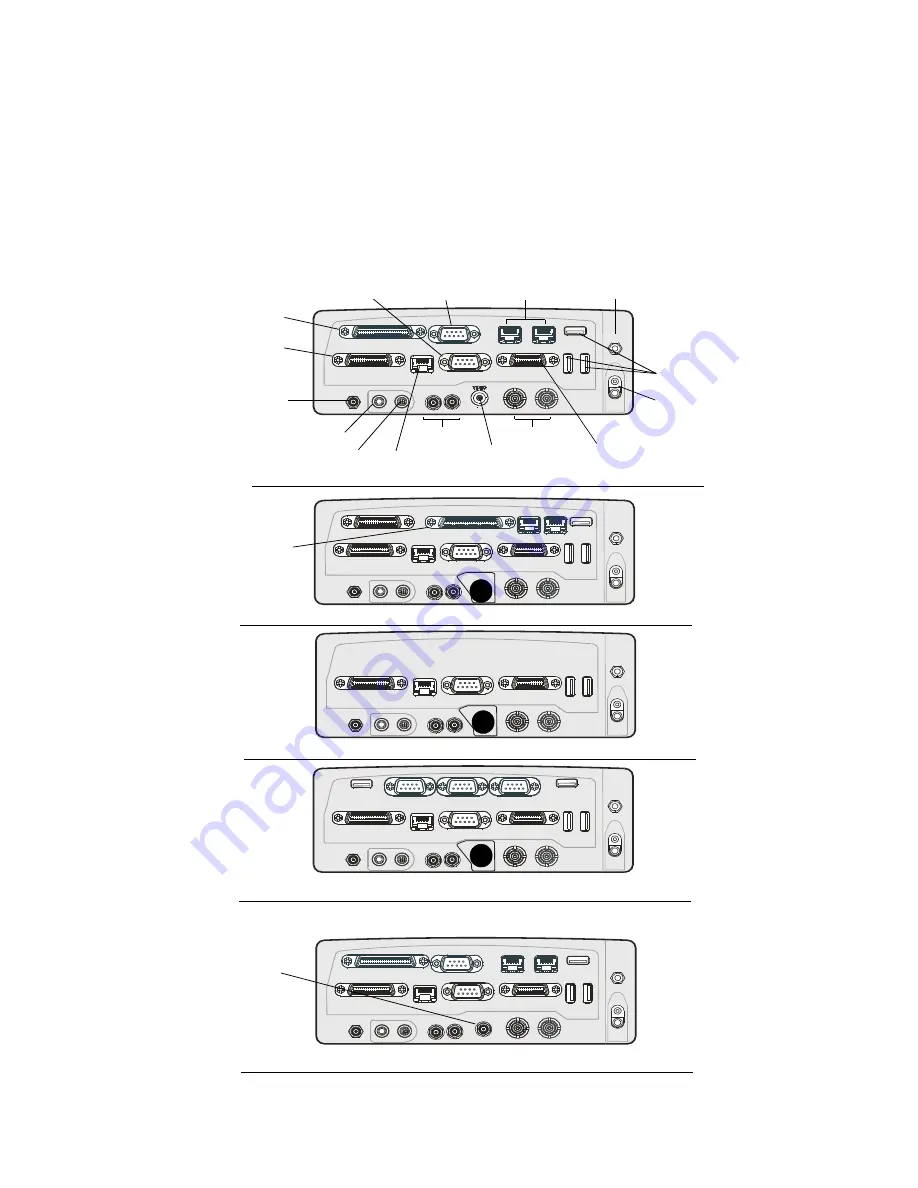
Interface to the MW810 Mobile Workstation CPU Box

With the mechanical installation complete, hook up the optional antennas and other 
peripheral devices to the CPU Box and Display.

The MW810 Mobile Workstation offers multiple expansion board options each with a 
different rear panels, so you can add more ports for external modems, video cameras, or other 
vehicle peripherals as needed (see Figure 23). 

USB

AUX

AUX

W-WAN

MAIN

SERIAL 1

MAIN

AUX

W-LAN

LAN

DISPLAY 1

GPS

ON

OFF

PWR

Mic In

Audio Out

USB

AUX

AUX

W-WAN

MAIN

SERIAL 1

MAIN

AUX

W-LAN

LAN

DISPLAY 1

GPS

ON

OFF

PWR

Mic In

Audio Out

DISPLAY 2

SERIAL 2

USB

LAN

LAN

USB

AUX

AUX

W-WAN

MAIN

SERIAL 1

MAIN

AUX

W-LAN

LAN

DISPLAY 1

GPS

ON

OFF

PWR

Mic In

Audio Out

USB

SERIAL

SERIAL

SERIAL

USB

USB

AUX

AUX

W-WAN

MAIN

SERIAL 1

MAIN

AUX

W-LAN

LAN

DISPLAY 1

GPS

ON

OFF

PWR

Mic In

Audio Out

ALPR

USB

LAN

LAN

DISPLAY 2

W-LAN

W-LAN

W-LAN

USB

AUX

AUX

W-WAN

MAIN

SERIAL 1

MAIN

AUX

W-LAN

LAN

DISPLAY 1

GPS

ON

OFF

PWR

Mic In

Audio Out

DISPLAY 2

SERIAL 2

USB

LAN

LAN

AUX2

Main Power Switch

LAN 2 & 3

LAN 1

WLAN 

Audio Out

Mic In

GPS

WWAN 

Video In

Serial 1

Serial 2

Display 2

Display 1

USB 

Power Inlet

CPU Box - ALPR Expansion Board Option 

CPU Box - No I/O Expansion Board Option

Auxiliary 

CPU Box - COMM & Video I/O Expansion


Board


Option

Figure 23


CPU Box - Expansion Board Options

ALPR 

CPU Box - Serial & USB I/O Expansion Board Option

CPU Box - COMM & 3x3 WLAN Expansion


I/O


Board Option

WLAN 

To secure the 

connector, turn 

counterclockwise

Summary of Contents for MW810

Page 1: ...MW810 Mobile Workstation Model F5208 Release 1 2 Installation Manual ...

Page 2: ......

Page 3: ...purchase price of the Prod uct during the warranty period provided purchaser notifies Motorola according to the terms of this warranty Repaired or replaced Product is warranted for the balance of the original applicable warranty period All replaced parts of the Product shall become the property of Motorola This express limited warranty is extended by Motorola to the original end user purchaser pur...

Page 4: ...a Motorola Part Number in the form of an alphanu meric number i e TDE6030B N Lift trucks if required for installation removal replacement or repair of the Motorola supplied products O Dispatch to remote site locations P Loading of software upgrades or fixes into the devices V GOVERNING LAW In the case of a Product sold in the United States and Canada this Warranty is governed by the laws of the St...

Page 5: ...s pertaining to Class A and Class B computing devices must contain warnings about possible interference with local residential radio and TV reception This warning reads as follows NOTE This equipment has been tested and found to comply with limits for a Class B digital device pursuant to Part 90 of the FCC Rules These limits are designed to provide reasonable protection against harmful interferenc...

Page 6: ...3C01 Motorola MW810 Mobile Workstation Product Safety and RF Exposure for mobile workstation with two way radios installed in vehicles leaflet multilingual 6802981C80 Motorola MW810 Mobile Workstation User Guide 6802982C85 Motorola MW810 Mobile Workstation 12 1 Display Owner s Guide included on the FIELD SUPPORT KIT Software CD FVN5613 6802982C81 Motorola MW810 Mobile Workstation CPU Owner s Guide...

Page 7: ...e use of warnings cautions and notes These notations are used to emphasize that safety hazards exist and care must be taken Do not proceed beyond a WARNING or CAUTION until the indicated conditions are fully understood and met Warning Caution Note Indicates a potentially hazardous situation which if not avoided COULD result in death or serious injury Warning Indicates a potentially hazardous situa...

Page 8: ...vi This Page Intentionally Left Blank ...

Page 9: ...on v Note v Introduction 1 How to identify the workstation release number 2 Installation 3 Unpacking 3 Preparing to Install the MW810 Mobile Workstation Inside the Vehicle 3 Tools 3 Planning 4 MW810 Mobile Workstation Mounting Location 4 Air Bag Considerations 5 Environmental Considerations 7 Equipment Ventilation 7 Drilling Holes 7 Electrical Guidelines 7 Cable Routing 10 12 1 Display 11 8 4 Disp...

Page 10: ...ry Port to Vehicle Wiring 42 Connection of ALPR Cameras 43 Table 8 details the pin layout of the ALPR Connector 44 Turning On the MW810 45 Turn on Modes 45 Turning Off the MW810 46 Storage 47 Appendix A Installation Configuration and Calibration of GPS Dead Reckoning 49 Installing the GPS Gyro 49 Vertical Installation front panel facing up 50 Vertical Installation back panel facing up 51 Vertical ...

Page 11: ...s Mechanical connections to Fixed Mount System for Vehicles Sealed housing Protection against extreme temperatures automatic heating when temperature drops below freezing point automatic heat reducing measures when temperature exceeds high operational limit Protection against extreme shock and vibration for confidence in mobile environments and under stressful conditions Withstand vehicle cranking...

Page 12: ... to the shipping package To identify the release number after installing the workstation When using Windows 7 click Start In the search box and enter msinfo32 Your workstation s CPU type will appear in the processor description When using Windows xp click the Start menu and select Run and enter msinfo32 Your workstation s CPU type will appear in the processor description For release 1 1 one of the...

Page 13: ...ion components from physical and electrostatic damage The following optional parts can be used to mount the MW810 Display Mount assembly See 12 1 Display on page 11 and 8 4 Display on page 14 CPU Box mount trunnion for the MW810 Mobile Workstation CPU See CPU Box Mount Trunnion on page 25 Gamber Johnson Mounts See http concept gamberjohnson com catalog category docking motorola 15 Preparing to Ins...

Page 14: ...0 Mobile Workstation meets the following requirements It is within easy reach of the driver operator more difficult due to air bag constraints It will not injure the operator or passenger in case of an accident It does not interfere with the driver s vision The workstation parts are properly ventilated Place the MW810 Mobile Workstation so that it can be easily removed for servicing Do not mount t...

Page 15: ...installations An air bag s size shape and deployment area can vary depending on vehicle make model and front compartment configuration e g bench seat vs bucket seats Contact the vehicle manufacturer s corporate headquarters if necessary for specific air bag information for the vehicle make model and front compartment configuration involved in your equipment installation Provided for your reference...

Page 16: ...6 MW810 Mobile Workstation Vehicle Installation Manual Figure 1 Air Bag Deployment Zones Crown Victoria Figure 2 Air Bag Deployment Zones Caprice Figure 3 Air Bag Deployment Zones Lumina ...

Page 17: ...the channels above or beneath the doors Run cables parallel to existing car cables if appropriate When holes must be drilled verify that other wiring break lines or gas lines are not damaged When drilling a hole in the roof take care not to snag the roof liner To prevent rusting after drilling remove all metal burrs and residue and completely clean the area to ensure that all steel dust is removed...

Page 18: ...ause GROUND potential differences between these locations and damage the MW810 Mobile Workstation or any other installed equipment FIRST CHECK that the vehicle chassis point to which you are about to connect the negative lead is properly connected to the battery negative terminal If the chassis is not properly grounded connect the negative lead directly to the battery s negative terminal When the ...

Page 19: ...er cable through the fire wall and into the engine compartment locate an existing hole with a grommet in the vehicle fire wall or drill a 10 mm 0 4 inch access hole at the desired location Insert a grommet with a 5 mm 0 2 inch inner diameter into the access hole to avoid damage to the cable see Figure 6 Take special care not to damage any existing vehicle wires 3 From inside the vehicle route the ...

Page 20: ...d to the red lead of the main power cable 10 Plug the fuse into the fuse holder Cable Routing Before a wire is run or a hole is drilled inspect the vehicle and determine how and where you intend to mount the antenna CPU Box and display Plan wire and cable routing to provide maximum protection from overheating battery acid moving parts and sharp edges Keep cables away from ignition circuits to redu...

Page 21: ...along its whole length 12 1 Display The 12 1 display is attached to the display mount by Phillips screws M4 supplied in the display shipping package The CPU to Display Signal Cable is routed from the CPU Box through the mount and connected to the lower back side of the display see Figure 8 Form a service loop for the Power and Display Signal Cables to reduce cable tension Use plastic cable ties to...

Page 22: ... 34 2 61 10 7 1 92 CPU to Display Signal Cable USB Keyboard Cable Allow Service Loop Power Cable Figure 8 12 1 Display Size and Cable Route on Gamber Johnson Mount Gamber Johnson Mount To comply with safety regulations the distance between the display mounting location and people sitting inside the vehicle must be more than 8 inches 20cm Warning ...

Page 23: ...e film must be removed to avoid damage to the touch screen during operation Caution Connector Description RGB or DVI RGB or DVI signals from the personal computer to display USB 2 0 USB communication with the personal computer This communication enables operation of the function buttons emergency button and Power button for turning the workstation On Off Speaker Jack Audio signal from the personal...

Page 24: ...al Mount The CPU box to Display cable can be ordered in two basic configurations with various lengths 1 Right side driving countries driver s seat on left hand side Seen from the front cable exits to the right away from the driver see Figure 10 2 Left side driving countries driver s seat on right hand side Seen from the front cable exits to the left away from the driver 7 1 9 1 3 93 3 93 W 1 7 Fig...

Page 25: ...ay Proper planning will help to ensure that the installation is completed without difficulty and that no damage occurs to the units or the vehicle To install the Free standing Pedestal Mount perform the following steps see Figure 12 Step 1 Select the location to achieve optimal functionality and use of the 8 4 Display The 8 4 Display is a reliable product when installed correctly However performan...

Page 26: ...play to the pedestal Mount Step 7 Adjust the display position Step 8 Route the Display Signal and Power cables down to the CPU Box Ensure that the cables have enough slack to move when the display is tilted up down or swiveled For cable connections refer to steps 5 to 7 of To Assumable and Install the Display DIN Mount perform the following steps see Figure 15 on page 19 Be careful not to drill or...

Page 27: ...t and mounting adjustments see Figure 13 Swivel up to 13 Tilt up to 35 Vertical up to 70 mm Horizontal up to 30 mm Extension out up to 48 mm The In dash DIN Mount has no parts that can be adjusted by the user Mount readjustment can only be performed by service technicians Figure 13 8 4 Display In dash DIN Mount 35 Tilt 13 Swivel Swivel Adjustment Screws Tilt Adjustment Screws Vertical Mounting Hol...

Page 28: ...the front edge or lip is seated secure the sleeve to the radio slot by bending the tabs on the sleeve behind the plastic of the dash The DIN mount can only be adjusted during installation and may require reinstallation before the final position is determined No end user adjustment is available The following installation steps may change according to your specific vehicle model and application requ...

Page 29: ...t up down to determine the display tilt position and secure the four screws Step 3 Route the display signal cable and the power cable through the opening in the Tilt Bracket Step 4 Use four screws to connect the Swivel Bracket to the Display Bracket Use the line of holes on the Display Bracket enable to determine the display height position and connect the display using four screws Vehicle vibrati...

Page 30: ...Box To avoid damage to the display and CPU Box verify that the Main Power switch located on the back panel of the CPU Box is turned Off before connecting cables to the display The maximum current load from USB 2 0 port is 500mA Use the rubber plug provided with this product to seal the port when not in use The display is powered directly from the vehicle power system The display software uses powe...

Page 31: ... 8 4 Display to Laptop or Standard Personal Computer Connector Description RGB or DVI RGB or DVI signals from the personal computer to display USB 2 0 USB communication with the personal computer This communication enables operation of the function buttons emergency button and Power button for turning the workstation On Off Speaker Jack Audio signal from the personal computer to display speaker On...

Page 32: ... of the display signal cable is 5 meter 16 4 feet Whenever one of the MW810 Mobile Workstation receptacles is not in use it is recommended to leave the receptacle plug Use the supplied rubber plugs to cover the unused receptacles see Figure 18 PCMCIA card radio modems The PCMCIA Card Slot can be used to connect a memory storage card or radio modem The card can be installed inside the CPU Box in th...

Page 33: ...Place the SIM card inside the drawer Make sure that the gold plate of the SIM card is facing up and the cut corner of the SIM card fits in the proper direction in the drawer Do not remove the seals from the PCMCIA card door The seals press against the antenna cable when the door is closed Before installing the SIM Card turn off the MW810 Inserting removing the SIM card when MW810 Mobile Workstatio...

Page 34: ...board inside the console or under the seat not in the direct path of the vehicle heater air flow The CPU Box mount trunnion See The CPU Box Mount Trunnion on page 24 should be used if the CPU Box is mounted on a base plate or any other flat surface The CPU Box mount trunnion is attached to the CPU Box by four bolts supplied with the mount trunnion The mount trunnion can be affixed to a flat surfac...

Page 35: ...lt angle from one or more of the vehicle axis may result in gyro reading error while in DR mode For GPS Dead Reckoning installation refer to Appendix A Installation Configuration and Calibration of GPS Dead Reckoning on page 49 Motorola recommends the use of the CPU Box mount trunnion Failure to do so may result in hard drive damage due to vibration Figure 21 CPU Box Mount Trunnion 10 6 270 mm 8 1...

Page 36: ... the lap The all Displays have a standard Universal Serial Bus USB type A receptacle to which is generally used for QWERTY style keyboard The maximum current load from USB 2 0 port is 500mA When a keyboard is used the keyboard cable connector must be secured to the display by thumb screws Use the rubber plug provided with this product to seal the port when not in use All auxiliary devices connecte...

Page 37: ...AUX AUX W WAN MAIN SERIAL 1 MAIN AUX W LAN LAN DISPLAY 1 GPS ON OFF PWR Mic In Audio Out USB SERIAL SERIAL SERIAL USB USB AUX AUX W WAN MAIN SERIAL 1 MAIN AUX W LAN LAN DISPLAY 1 GPS ON OFF PWR Mic In Audio Out ALPR USB LAN LAN DISPLAY 2 W LAN W LAN W LAN USB AUX AUX W WAN MAIN SERIAL 1 MAIN AUX W LAN LAN DISPLAY 1 GPS ON OFF PWR Mic In Audio Out DISPLAY 2 SERIAL 2 USB LAN LAN AUX2 Main Power Swit...

Page 38: ...n Board Optio Video Camera Vehicle Power System GPS Antenna Ignition Sense Input Wireless LAN Antennas V Battery 5VDC 1 Amp Max Power Output Display 1 Display 2 Wireless WAN Antenna Headset Data Storage Device External Radio 1000 BASE T LAN1 Network Bluetooth USB 2 USB 1 USB 2 USB 1 Bluetooth RS232 Radio interface Display Signal Cable Display Signal Cable Power Cable Power Cable Digital I Os GPIO ...

Page 39: ...electing an Antenna Site Location on a Metal Body Vehicle 1 External installation Check the requirements of the antenna supplier and install the vehicle antenna external to a metal body vehicle in accordance with those requirements 2 Roof top For optimum performance and compliance with RF Energy Safety standards mount the antenna in the center area of the roof 3 Ensure that the installation surfac...

Page 40: ...sed SMA of the vehicle RF antenna if internal Wireless Local Area Network WLAN radio is installed For best 802 11b g communication performance connect two antennas to AUX and MAIN W LAN connectors For best 802 11n communication performance connect three antennas to all W LAN connectors For installation guidelines See WWAN Antenna Connection on page 29 Recommended antenna Maxrad Z1961 WLAN Low Prof...

Page 41: ...es The CPU Box USB connection is for general purpose USB 2 0 devices and the display USB receptacles are for connecting a QWERTY style keyboard and any USB device USB devices are hot pluggable This means you can connect and disconnect devices while your operating system is running Using USB ports you can connect external low high and full speed USB devices The USB ports support maximum transfer ra...

Page 42: ...32 MW810 Mobile Workstation Vehicle Installation Manual Table 1 details the pin layout of the USB connection Table 1 USB Connection Pin Layout Pin No Signal 1 VCC 2 USB 3 USB 4 GND ...

Page 43: ...nnections are used for communication with Ethernet devices such as network cards access points storage etc The two LAN1 ports support data transfer rate up to 10 100 Mbps and the LAN2 port supports data transfer rate of up to 1000 Mbps To connect the CPU Box to the network connect one end of the LAN cable to the RJ 45 receptacle on the CPU Box and the other end to a network hub When the CPU Box is...

Page 44: ...ion Audio Line In Connection The MW810 Mobile Workstation is equipped with a Audio In connector to which an external microphone can be connected Table 3 1000 Base T Ethernet Connection Pin Layout Pin No Signal 1 DA 2 DA 3 DB 4 DC 5 DC 6 DB 7 DD 8 DD Table 4 10 100 Base T Ethernet Connection Pin Layout Pin No Signal 1 TX 2 TX 3 RX 4 NC 5 NC 6 RX 7 NC 8 NC 1 2 3 4 5 IN and VREF NC Audio Line In ...

Page 45: ...2982C81 AUX Port Connection The AUX port provides ignition sense connection to the MW810 This port is also used for power supply of 5VDC at maximum current of 1A and vehicle battery power supply at maximum current of 1A The AUX port provides four digital bits GPIO that may be programmed for 5V or vehicle battery I O usage For complete pin assignment of the AUX port refer to Table 5 Ignition Sense ...

Page 46: ...ow signal Used to boot the CPU Box from an external drive that connects to any of the USB ports 10 PROG_ENTER Enable input signal for programming the embedded controller inside the CPU Box 11 GND Ground 12 GND Ground 13 GND Ground 14 BATT OUT Output power Maximum 1 Amps Output inhibits when CPU Box temperature is above operating range The output power corresponds to the power that operates the CPU...

Page 47: ...utput Maximum 1 Amps Output is automatically disconnected when CPU Box temperature is exceeds operating range 26 5V 5V Power output Maximum 1 Amps Output is automatically disconnected when CPU Box temperature is exceeds operating range Pin No Signal Description ...

Page 48: ...tion display or to 3rd party LCD CRT or Flat Screen displays The MW810 Mobile Workstation displays have available USB 2 0 ports supporting transfer rates up to 480 MB s When the CPU is connected to the old MW800 display only USB 1 1 performance can be provided Table 6 details the pin layout of the DISPLAY 1 connection The CPU Box graphic controller supports resolutions up to 1280x1024 When using M...

Page 49: ...22 HSYNC 23 GND 24 N C 25 LINE_OUT_L 26 LINE_OUT_R 27 MIC2 28 GND 29 GND 30 GND 31 1_W 32 N C 33 N C 34 N C 35 N C 36 GND Table 7 DISPLAY 2 Connection Pin Layout Pin No Signal 1 TDC2 2 TDC2 3 GND 4 TDC1 5 TDC1 6 GND 7 TDC0 8 TDC0 9 GND 10 HSYNC Table 6 DISPLAY 1 Connection Pin Layout Pin No Signal ...

Page 50: ..._DATA0 17 GND 18 SECONDERY_MDR 19 GND 20 MDR2_SPARE1 21 GND 22 1_W 23 GND 24 SEC_DISP_ON_BTN 25 GND 26 TLC 27 TLC 28 GND 29 USB7 30 USB7 31 GND 32 V_5SUS 33 GND 34 GND 35 RED 36 GND 37 BLUE 38 GND 39 GREEN 40 GND 41 HPDET_5V 42 SEC_DISPLAY_LID 43 GND 44 MIC3 45 MIC3 Table 7 DISPLAY 2 Connection Pin Layout ...

Page 51: ...ile Workstation CPU Box to a standard DVI or RGB display For cable connection refer to Figure 17 46 GND 47 LINE_OUT_L 48 LINE_OUT_L 49 LINE_OUT_R 50 LINE_OUT_R Table 7 DISPLAY 2 Connection Pin Layout USB Connector Female type Speaker Jack Standard RGB or DVI Display MW810 Mobile Workstation CPU Box to Standard Display Cable RGB or DVI Connector Figure 27 Connection of MW810 Mobile Workstation CPU ...

Page 52: ...ock FKN8533 enables you to interface the MW810 Mobile Workstation CPU Box to the Vehicle Wiring For terminal connections refer to AUX Connection Pin Layout on page 36 Figure 28 Auxiliary cable with terminal block FKN8533 To Auxiliary Port Note The Auxiliary Port pin layout associate with the terminal numbers marked on the terminal block Additional Ground terminals ...

Page 53: ... 29 USB AUX AUX W WAN MAIN SERIAL 1 MAIN AUX W LAN LAN DISPLAY 1 GPS ON OFF PWR Mic In Mic In Audio Out Audio Out ALPR USB LAN LAN DISPLAY 2 Figure 29 Connection of MW810 Mobile Workstation Auxiliary Port to Vehicle Wiring J1 P1 MW810 Mobile Workstation CPU Box Use the Light bar cable route to route the camera cables ALPR Splitter Cable Twisted pair cable not included with overall shield with meta...

Page 54: ...44 MW810 Mobile Workstation Vehicle Installation Manual Table 8 details the pin layout of the ALPR Connector Table 8 ALPR Connector Pin layout ...

Page 55: ... an optional turn on mode is performed by software application Using the Power Button or Ignition Key to Start the MW810 This mode is the default workstation setting The MW810 Mobile Workstation can be turned ON by either one of the following methods 1 Press the Power button of the CPU Box or Display regardless of the ignition key position 2 Turn ON the ignition switch The MW810 Mobile Workstation...

Page 56: ...e disabled The MW810 Mobile Workstation can be turned OFF by either one of the following methods 1 Turn OFF the ignition key Turn OFF the MW810 Mobile Workstation via the OS Note that in order to turn ON the MW810 the ignition key should be turned to OFF position and switched back to ON Turning Off the MW810 To turn Off the workstation press the CPU Box or display Power button momentarily The work...

Page 57: ...7 Storage Important Note Maximum storage period in shipping package is six months To refresh storage assemble the workstation and run Disk Defragmenter Go to Start Programs Accessories System Tools Disk Defragmenter ...

Page 58: ...48 MW810 Mobile Workstation Vehicle Installation Manual This Page Intentionally Left Blank ...

Page 59: ...he factory However an angle mounted CPU Box can not track turns if the gyro is not set properly When the MW810 is ordered with a GPS Dead Reckoning option the gyro wired to the U blox GPS module needs to be situated in accordance to the installation position of the CPU Box The gyro sensor should be mounted perpendicular to the navigation plane The following sections show 4 optional gyro orientatio...

Page 60: ...Step 1 Remove the six screws that secure the top cover of the CPU Box Gyro Unit Step 2 Orient and mount the Gyro unit as shown in the picture Step 3 Fasten the six screws Torque 5 Inch Pound that secure the top cover of the CPU Box CPU Box Front Figure 30 GPS Dead Reckoning vertical Installation front panel facing up ...

Page 61: ...ep 1 Remove the six screws that secure the top cover of the CPU Box Gyro Unit Step 2 Orient and mount the Gyro unit as shown in the picture Step 3 Fasten the six screws Torque 5 Inch Pound that secure the top cover of the CPU Box Vehicle s Floor CPU Box Front Panel Figure 31 GPS Dead Reckoning Vertical Installation back panel facing up ...

Page 62: ...e six screws that secure the top cover of the CPU Box Gyro Unit Step 2 Orient and mount the Gyro unit as shown in the picture Step 3 Fasten the six screws 5 Inch Pound that secure the top cover of the CPU Box Vehicle s Floor CPU Box Front Panel Figure 32 GPS Dead Reckoning Vertical Installation CPU back panel facing sideways ...

Page 63: ...screws that secure the top cover of the CPU Box Step 2 Orient the Gyro unit as shown the picture Step 2 Orient and mount the Gyro unit as shown in the picture Step 3 Fasten the six screws Torque 5 Inch Pound that secure the top cover of the CPU Box CPU Box Front Panel Vehicle s floor Figure 33 GPS Dead Reckoning Horizontal installation of CPU Box ...

Page 64: ...allation Manual Unsupported CPU Box positions IMPORTANT Do not install the CPU Box in the following orientations when using the GPS Dead Reckoning option in the MW8100 Vehicle s floor Figure 34 GPS Dead Reckoning Unsupported CPU Box positions ...

Page 65: ...d signals This connection signals the navigation system when the vehicle is traveling forward or in reverse See GPS Dead Reckoning Vehicle wire connections on page 49 Reverse Light Bulb Reverse Light Signal N C Type Relay 5VDC FWR FWR N C N O SPEED SPEED Figure 35 GPS Dead Reckoning Vehicle wire connections To Vehicle Odometer When no negative terminal on odometer connect SPEED to vehicle Ground P...

Page 66: ...ownload the U Center application from http www u blox com products u_center html Step 2 Install the U Center application on the MW810 Step 3 Click START Programs U Blox Products Tools U Center Application to run the U Center application Step 4 From the application toolbar click the Configuration View Window button The left window pane enables to navigate to the configuration setting screens Step 5...

Page 67: ...RT Ports Step 8 Set Protocol in and Protocol out to 0 1 UBX NMEA Step 9 From the left window pane select UBX CFG Config MSG Messages Step 10 Check UART1 and UART2 options Step 11 Select the first NMEA message from the Message drop list and click the button to save Step 12 Repeat Step 11 for all remaining NMEA messages in the drop list ...

Page 68: ...UBX CFG Config CFG Configuration Step 15 Check Save current configuration and Devices options and click the button to save Step 16 From the left window pane select UBX CFG Config EKF EKF Settings Step 17 Check the Clear the Calibration Data option and click the button to save see See Check the EKF Enabled Clear Calibration Data Clear Temperature Table options and click the button to save on page 5...

Page 69: ...on on page 54 Step 19 To verify calibration view the percentage values on the below screen When clearing calibration see Step 17 the screen should show 0 00 click on Poll icon for the updated value After a successful calibration the percentage value should show 80 or higher Step 20 Before loading the user application set the unit for NMEA messages as follows From the left window pane select UBX CF...

Page 70: ... vehicle the accuracy is only moderately good until sufficient calibration data has been collected e g during a first drive With the time continuous calibration results in continuous improvement of dead reckoning accuracy Small discontinuities Small discontinuities like deviating wheel diameters from exchanging tires summer vs snow tires will be balanced out by ongoing automatic calibration Signif...

Page 71: ...ccuracy after a short period of time The above instructions result in a calibration status within the shortest period of time Should traffic road and regulatory conditions not allow achieving this track the time until optimum calibration will increase However navigation results are already satisfactory after a relatively short driving distance and time The above instructions shall not be made a ru...

Page 72: ...56 MW810 Mobile Workstation Vehicle Installation Manual This Page Intentionally Left Blank ...

Page 73: ...3 5 m 16 4 ft Display to CPU Cable DVI FKN8454 3 5 m 11 5 ft Laptop to MW810 DVI Display 8 4 RGB Display Cables FKN8455 3 5 m 11 5 ft MW810 8 4 Display to CPU RGB Cable right side driver FKN8456 5 m 16 4 ft MW810 8 4 Display to CPU RGB Cable right side driver FKN8555 5 m 16 4 ft MW810 8 4 Display to CPU RGB Cable left side driver FKN8546 3 5m 11 5ft 8 4 Laptop to MW810 RGB Display FKN8655 5 m 16 4...

Page 74: ...acklit Cyrillic English FTN7476 USB Keyboard with Backlit Swedish QWERTY FTN7477 USB Keyboard with Backlit Turkish English FTN7478 USB Keyboard with Backlit Czech FTN7549 USB Keyboard with Backlit Arabic English FTN7550 USB Keyboard with Backlit Belgian French FTN7551 USB Keyboard with Backlit Spanish FTN7552 USB Keyboard with Backlit Italian External Microphone FLN3676 External Microphone 3 5 m M...

Page 75: ...ndard DVI display FKN8460 MODS Adapter Cable FKN8532 Y Cable for MW810 for indoor use only Not for vehicle installation FPN1655 Power supply with Y Cable FKN8544 3 5m 11 5ft 50 pin Cable CPU to Standard Display DVI FKN8564 Hsync Vsync level shifter cable 36 to 36 pin active FKN8565 Hsync Vsync level shifter cable 50 to 36 pin active FKN8533 Auxiliary Cable with Terminal Block FTN7489 Keyboard Cabl...

Page 76: ...66 MW810 Mobile Workstation Vehicle Installation Manual This Page Intentionally Left Blank ...

Page 77: ...c DC Direct Current DRAM Dynamic Random Access Memory DVI Digital Video Interface FCC Federal Communications Commission GHz GigaHertz GPIO General Purpose Input Output GPRS General Packet Radio Service GPS Global Positioning System I O Input Output LAN Local Area Network LCD Liquid Crystal Display LP Liquid Propane MB Megabyte MDR Mini D Ribbon MW Mobile Workstation ...

Page 78: ...A Personal Computer Memory Card International Association PCI Peripheral Component Interconnect PRM Portable Radio Modem PWR Power RF Radio Frequency RFI Radio Frequency Interference SIM Subscriber Identity Module TTL Transistor Transistor Logic UHF Ultra High Frequency UL Underwriter s Laboratories USB Universal Serial Bus V Volt VDC Volts Direct Current WLAN Wireless Local Area Network WWAN Wire...

Page 79: ......

Page 80: ...ter at 1 800 221 7144 For Europe the Middle East and Africa call 420 533 336 123 MOTOROLA and the Stylized M Logo are registered in the U S Patent and Trademark Office All other product or service names are the property of their respective owners Motorola Inc 2010 AB Technology that s second nature 6802982C80 D 6802982C80 ...

Reviews: