Assembly Instructions
according to Annex VI of the Machinery Directive 89/392 EEC in the version 2006/42/EC
Notes:
Please read the operating instructions through carefully before using the recording compression tester.
They contain important guidance and information which must be followed before and during assembly and
will help to avoid misunderstandings and accidents through improper use.
MOTOMETER GmbH recommends that all work should be carried out by a specialist workshop. If there is
anything you are unsure of, please contact our Service department before using the recording compression
tester.
Their number is: +49(0)7231 42909-300
These operating instructions and the declaration of incorporation which it contains are integral parts of the
recording compression tester; should the recording compression tester ever be sold they must be handed to
the new owner as a matter of course!
Hand these assembly instructions to your customer!
Procedure:
Check that the product is undamaged and complete before you use it.
It can be connected to the engine in different ways:
Rubber cone / Screw adapter / Clamp adapter
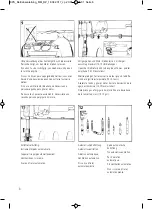
When testing the compression using a
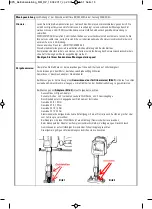
Rubber cone
(petrol engines only) (Figure 1)
make sure that
sufficient closing force is applied to guarantee the seal at the spark plug hole.
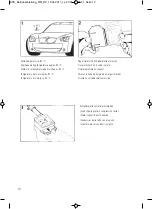
The following points should be noted when testing the compression with
adapters
(Figure 2)
:
-
Select the right adapter
-
Correct fitting: do not skew, ensure clean sealing face, min. 5 thread turns
-
Tighten screw adapter to the torque indicated
Thread M 8: 10 Nm
Thread M 9: 12 Nm
Thread M 10: 15 Nm
Thread M 12: 22 Nm
-
Clamp adapters require the correct attachment using a lug (use in a set or from the vehicle, depending
on type)
-
A seal (flame spreader) must be used with adapters that have a flat sealing face
-
When connecting adapters to the recording compression tester, extensions, pressure tubing, rubber
cones etc. ensure that the quick-release coupling engages fully.
-
The generally accepted accident prevention regulations must be complied with
Figure 1
Figure 2
KPS_Betriebsanleitung_MM_RZ_18.04.2017_cp 20.04.17 08:31 Seite 20

