background image

6

In use • Durante su utilización

5

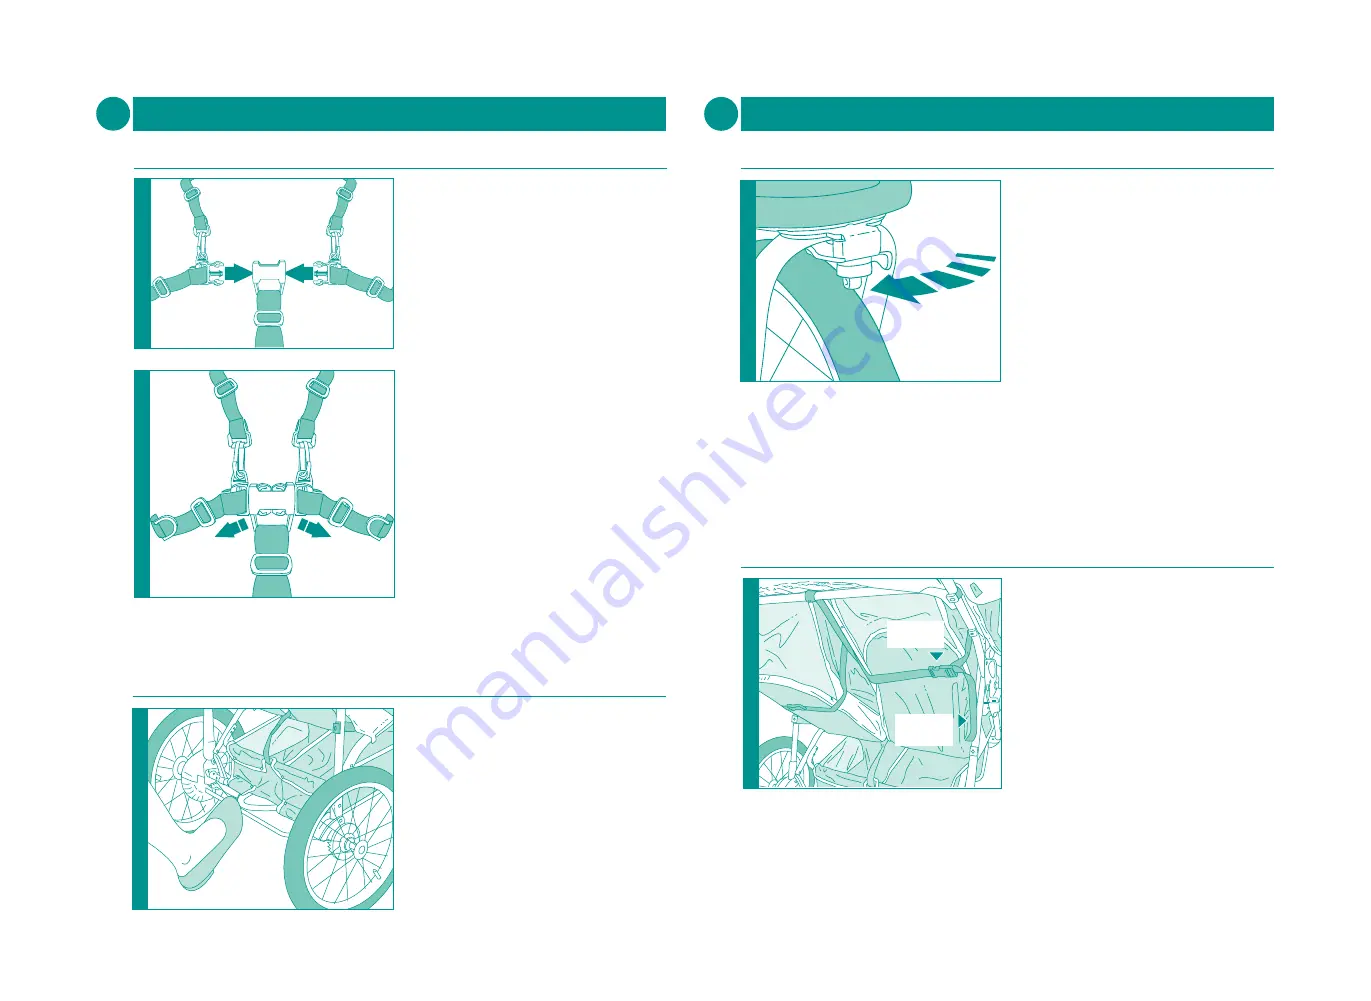
TO ATTACH THE HARNESS
Insert both fasteners securely into the
clasp. Adjust each strap length with 
buckles A.

ABROCHAR EL ARNÉS
Insertar ambos cierres en el broche de
modo que queden fijos.
Ajustar la longitud de cada correa con las
hebillas A.

TO UNDO THE HARNESS
Press the fastener prongs and pull apart.
‘D’ rings (B) are provided for fitting a 
separate harness complying with BS
6684. Your child should always be 
harnessed in and should  never be left
unattended even for short periods. 

DESABROCHAR EL ARNÉS
Presionar las púas de los cierres y 
separar. Se suministran unos aros en
forma de 'D' (B) para ajustar un arnés 
adicional que cumpla con la norma BS
6684. El niño siempre debe llevar el arnés
abrochado y no hay que dejar nunca
desatendido al bebé, ni tan sólo durante
unos instantes.

Harness  

El arnés

1

2

A

A

A

A

CROTCH STRAP

TIRA DE LA
ENTREPIERNA

B

B

Push down firmly on the brake bar to
engage the brake. Check the brake is on
by pushing the Three-wheeler.
Pull the brake bar up to release it.

Empuje hacia abajo con firmeza la barra
del freno para enclavar el freno.
Compruebe que la barra de freno está
activada empujando la sillita. Tire de la
barra de freno hacia arriba para soltarlo.

Operating the brake

Accionar el freno

In use • Durante su utilización

5

Both seat backs can be lowered by
pressing the buttons on the clasps and
releasing the straps. To raise the seats,
hold the clasps and pull the straps until
the desired seat height has been reached.

Pueden bajarse ambos respaldos
presionando los botones en los broches y
soltando las correas. Para subir los
asientos, sujete los broches hasta que se
haya alcanzado la altura deseada del
asiento.

Reclining the seats 

Reclinar el asientos

STRAP

CORREA

CLASP
BROCHE

7

The front wheel can be unlocked to allow
it to rotate, giving greater mobility. Push
the lever at the top of the front wheel fork
across to the left. This releases the
wheel. To lock the wheel push the lever in
the opposite direction and rotate the
wheel until it locks into position. 

La rueda delantera se puede desbloquear
para permitir que pivote, lo que
proporciona mayor movilidad. Empuje
lateralmente, hacia la izquierda, la palanca
en la parte superior de la horquilla de la
rueda delantera. Esto liberará la rueda.
Para bloquear el pivotamiento de la rueda,
empuje la palanca en sentido opuesto y
mueva la horquilla hasta que quede
bloqueada en su posición.

Adjusting the front wheel swivel

La rueda delantera

Summary of Contents for Twin Alpine

Page 1: ...ercare Customer Care Line on 01923 210 210 Alternatively write to Customer Care Mothercare Cherry Tree Road Watford Herts WD24 6SH La seguridad de su ni o es su responsabilidad Si surgiera alg n probl...

Page 2: ...ercas Parts check list Cat logo de piezas 2 Bomba de aire Find the folding latch there is only one Unclip the latch Busque el pestillo de plegadizo S lo hay uno Su ltelo Lay the chassis down flat with...

Page 3: ...pretadas Tire de la rueda para asegurarse que est montada firmemente Coloque el guardabarros en su lugar introduciendo las 4 puntas de pl stico por los agujeros del chasis Apriete los 4 tornillos firm...

Page 4: ...o est activada empujando la sillita Tire de la barra de freno hacia arriba para soltarlo Operating the brake Accionar el freno In use Durante su utilizaci n 5 Both seat backs can be lowered by pressin...

Page 5: ...s de los hombros y suelte el broche de manera que las cinco correas del arn s queden libres Abra la cremallera y separe la funda delantera Coloque el forro de rizo sobre el asiento con la aleta de fij...

Page 6: ...ra que resulte sencillo quitarlas y que la sillita plegada ocupe menos sitio Levante las leng etas de los dos extremos del eje mientras tira de las ruedas 4 Engage the brake and remove the Weathershie...

Page 7: ...a su tama o reducido cuanto m s peque os son m s r pido se vac an de aire al producirse un pinchazo Pueden adquirirse accesorios postventa en tiendas de ciclismo para reducir la probabilidad de un pin...

Page 8: ...s palancas para neum ticos bajo cada uno de los lados del neum tico dejando varios cent metros de diferencia entre ellos 5 One by one pull each lever down toward the spokes of the wheels The tyre will...

Page 9: ...atch from the strip and remove the FOIL backing only Corte un parche de la tira y separe solamente el dorsal met lico 5 Press the patch firmly over the hole and onto the touch dry rubber solution Then...

Page 10: ...nd the life of your Three wheeler and make opening and folding easier Plastic and metal parts may be sponged clean with warm water and a mild detergent The seat may be cleaned by sponging lightly usin...

Page 11: ...s de utilizaci n lo que ocurra primero Su tienda Mothercare puede ocuparse de ello Medidas de seguridad No dejar que el beb intente subir al cochecito sin ayuda Ponga el freno antes de colocar al beb...

Page 12: ...placement parts listed below are available for your product In the event that you require any of these parts please contact your local Mothercare store or contact Customer Care on 01923 210210 Other p...

Reviews: