Remove the plastic packing from the front forks and dispose of safely.
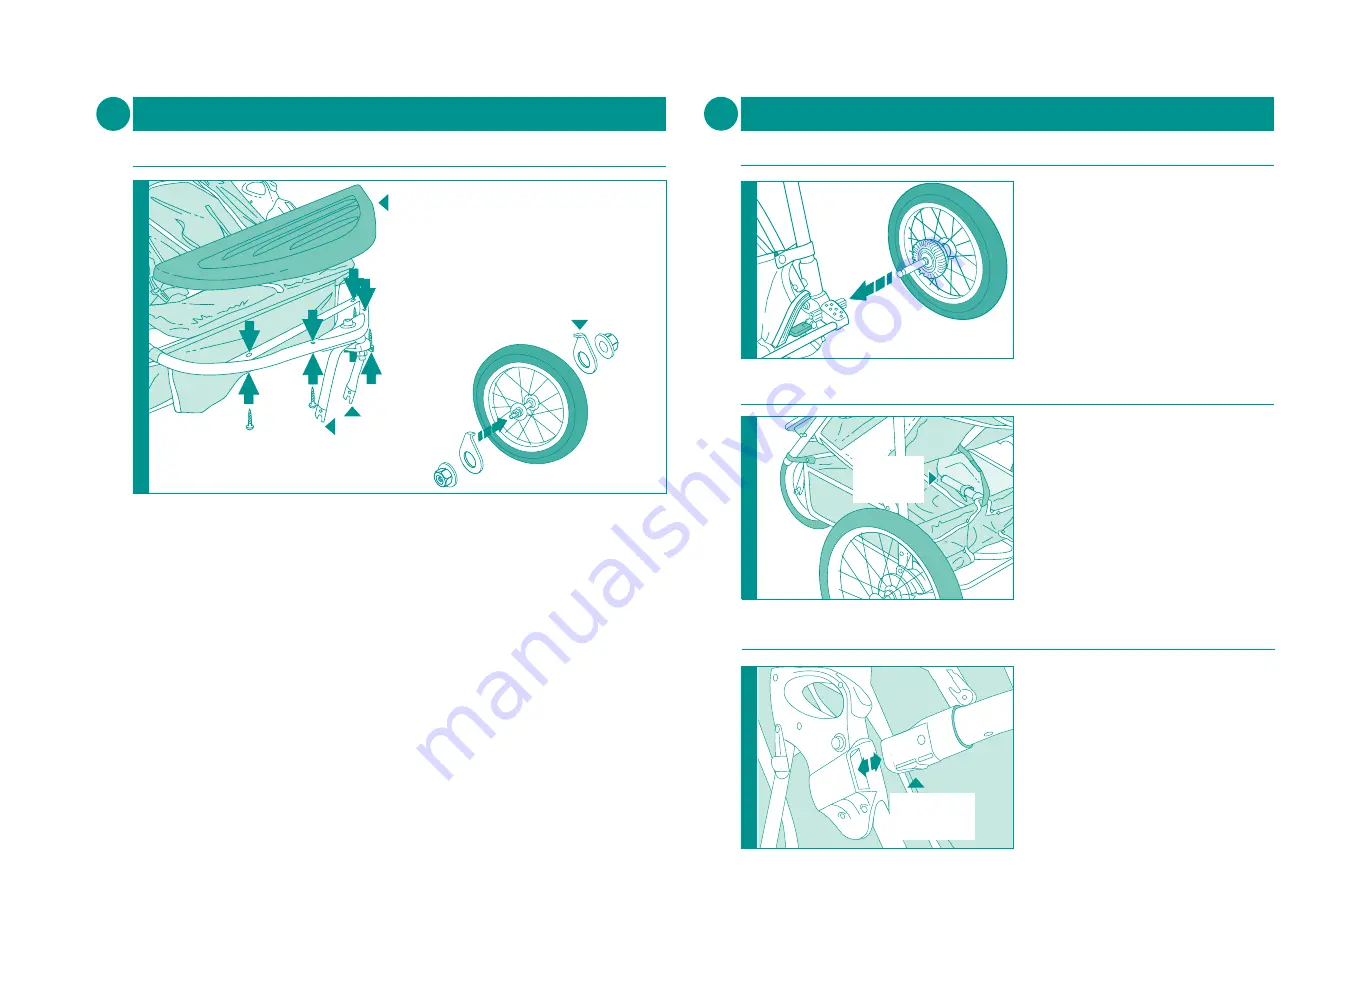
Remove the outer nuts and washers from the wheel’s axle. Fit the front wheel into the
slots on the front forks. Slide the washers onto the axle, fitting the pins into the holes on
the forks.
Screw the nuts onto each end of the wheel’s axle with the flat side of the nut against
the washers. Tighten both nuts using the spanner provided. Before the nuts are
tightened please ensure that the front wheel is fitted parallel to the two rear wheels.
Incorrect alignment could cause the Three-wheeler to veer to one side.
Make sure both nuts are tight. Pull the wheel to ensure it is fitted securely.
Fit the mudguard into place by pushing the 4 plastic spikes into the holes in the
chassis. Screw the 4 screws firmly into place.
Retire la envoltura de plástico de las horquillas delanteras y deséchela de manera
segura. Quite las tuercas y arandelas exteriores del eje de la rueda. Monte la rueda
delantera en las ranuras de las horquillas delanteras. Coloque las arandelas en el eje,
montando las espigas en los agujeros de las horquillas. Atornille las dos tuercas en
ambos extremos del eje de la rueda con el lado plano de la tuerca contra las arandelas.
Apriete las dos tuercas con la llave que se suministra. Antes de apretar las tuercas,
asegúrese que la rueda delantera está montada paralela a las dos ruedas traseras.
Una alineación incorrecta haría que la sillita se desviara hacia un lado.
Asegúrese que las tuercas están apretadas. Tire de la rueda para asegurarse que está
montada firmemente.
Coloque el guardabarros en su lugar introduciendo las 4 puntas de plástico por los
agujeros del chasis. Apriete los 4 tornillos firmemente en su lugar.
Preparation for use • Preparación para el uso
4
4
Fitting the front wheel
Cómo montar la rueda delantera
4
PIN
ESPIGA
FORKS
HORQUILLAS
FOOTPLATE
GUARDABARROS
Preparation for use • Preparación para el uso
4
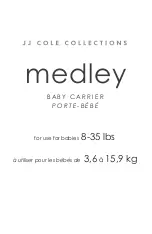
Pumping up the tyres
Cómo inflar las ruedas
Attaching the bumper bar
Barra parachoques separable
The tyre pump is secured in the
shopping basket. The Three-wheeler’s
tyres are semi-inflated. You should pump
them until they are inflated to 35psi.
Do not over inflate them.
La bomba de aire está enganchada en
la cesta portaobjetos. Las ruedas de la
sillita están a medio inflar. Debe
bombear aire hasta que estén a 35 psi
(2,4 bar). No las infle en exceso.
6
Fitting the rear wheels
Cómo colocar las ruedas traseras
Push each wheel’s axle into the
chassis. Check the wheels are firmly
in place by pulling them.
Encaje el eje de cada rueda en el
chasis. Asegúrese de que las ruedas
están correctamente ajustadas tirando
de ellas.
5
Insert the ends of the bumper bar into
the slots on the frame, with the release
clips underneath. Check the bar is
securely in place by pulling it. To
remove the bar push in the release
clips on both sides and pull the bar out.
Introduzca los extremos de la barra
parachoques en las ranuras del bastidor,
con el clip de liberación hacia abajo.
Compruebe que la barra está firme en
su sitio tirando de ella. Para quitar la
barra, empuje los clips de liberación, a
ambos lados, y tire de la barra.
7
PUMP
BOMBA DE
AIRE
5
RELEASE CLIP
CLIP DE
LIBERACIÓN


