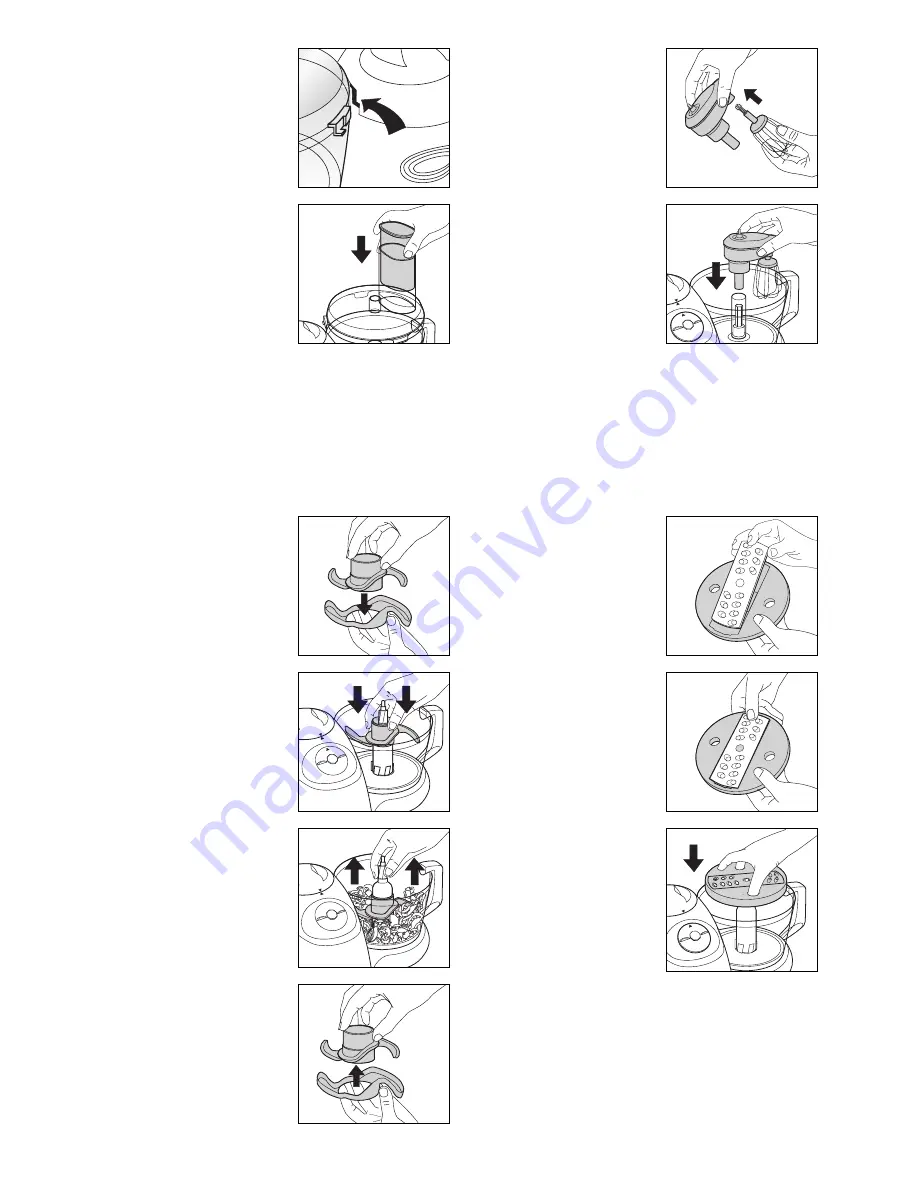
7 Ensure that the lid tab has
‘clicked’ into place and the
arrows are lined up.
8 Plug in the processor and
switch on. If the processor
does not come on, check that
the machine cover and
processor lid are both
correctly fitted.
FOR SAFETY, ALWAYS USE
THE PUSHER WHEN
PUTTING FOOD INTO THE
FEEDER TUBE. NEVER FEED
BY HAND.
F
Fiittttiin
ng
g a
an
nd
d
u
us
siin
ng
g tth
he
e tto
oo
olls
s
In general, all attachments
which are fitted within the
processor bowl must be firmly
attached to the spindle
Â
. Always
adjust the attachments until you
are sure that they are correctly
fitted.
C
Ch
ho
op
pp
piin
ng
g b
blla
ad
de
e
Ó
1 Fit the processor bowl and
spindle as detailed previously.
2 Remove the protective cover
Ô
from the metal chopping
blade.
3 Fit the blade over the spindle
and press firmly into place.
WARNING: USE
EXTREME CAUTION -
BLADES ARE SHARP.
ALWAYS HANDLE THE
CHOPPING BLADE BY
ITS CENTRAL PLASTIC
SECTION.
4 Place the food into the bowl.
5 Fit the lid and click into place
as detailed in the ‘Setting up’
section.
6 Plug in the processor.
7 Use the food pusher
Á
to add
food into the processor bowl
through the feeder tube.
8 When the processing is
complete, remove the spindle
and blade from the bowl
before removing the processed
food.
9 AFTER CLEANING, ALWAYS
REPLACE THE PROTECTIVE
COVER
Ô
ON THE METAL
CHOPPING BLADE
Ó
.
W
Wh
hiis
sk
k a
arrm
m
a
an
nd
d w
wh
hiis
sk
k
h
he
ea
ad
d
Ò
1 Fit the processor bowl as
detailed previously.
2 Click the whisk head into the
short extension of the whisk
arm.
3 Place the long extension of the
whisking arm onto the motor
shaft
fl
.
4 Add ingredients into the bowl.
5 Fit the lid and click into place
as detailed in the ‘Setting up’
section.
6 Plug in the processor.
7 Turn the processor on
selecting maximum speed
NEVER USE THE WHISK
ATTACHMENT FOR DOUGH
KNEADING.
DO NOT IMMERSE THE WHISK
ARM
IN LIQUID.
To clean the whisk head
remove it from the whisk arm and
wash. Wipe the whisk arm clean
with a damp cloth.
S
Slliic
ciin
ng
g a
an
nd
d s
sh
hrre
ed
dd
diin
ng
g b
blla
ad
de
es
s
1 Place the blade of your choice
on the blade holder
Í
,
inserting the longer tab on the
side on the blade first.
2 Press the other end of the
blade until it ‘clicks’ into place.
3 Fit the processor bowl and
spindle as detailed previously.
4 Using the finger holes in the
blade holder, fit it over the
spindle and press firmly into
place as indicated.
WARNING: USE
EXTREME CAUTION -
BLADES ARE SHARP.
5 Fit the lid and click into place
as detailed in the ‘Setting up’
section.
6 Plug in the processor.
7 Use the food pusher
Á
to add
food into the processor bowl
through the feeder tube.
6


