6
7
w w w. D e u b a
X X L
. d e
w w w. D e u b a
X X L
. d e
•
Wear suitable gloves while working.
•
Unplug when not in use or during prolonged
work breaks (more than 30 min).
•
Protruding glue residues are easily removed
with a heated knife. Always disconnect the plug
first.
• Repairs may only be carried out by a qualified
person.
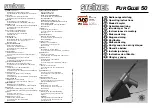
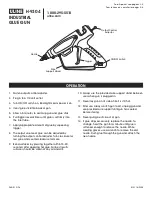
W1 Stand
W2 Foldaway Stand Mounting
W3 Stand Gun Power Connector
W4 Glue Window
W5 Stand Power Socket
W6 Mains Cable
W7 Glue Stick Socket
W8 Power Light
W9 GunPower Socket
W10 Trigger
W11 Gun Foldaway Stand
W12 Nozzle
W13 Glue Sticks
SPECIFICATION
Input voltage: 220 - 240V ~ 5
0
Hz
Input power:
35
W
Peak input power:
80
W
Pre-heating time: 5min
Flow of glue: 9 -16g|min
Glue stick dia: 11.2mm
Glue type: Hot me
lt
Protection class:
II
Operating lnstuctions
Before starting work, be sure to wait 5 minutes
for the hot glue gun to reach its operating
temperature. Do not attempt to work with a
glue gun that is not fully heated, as this may
damage or destroy it.
1. Attach the Gun Foldaway Stand (11) to the
Foldaway Stand Mounting (2).
2. Connect the Mains Cable (6) to the Stand
Power Socket (5).
3. Insert one of the Glue Sticks (13) into the
Glue Stick Socket (7). Push forward until slight
resistance is felt.
4.
Fit gun to the Stand ensuring the Gun Power
Socket is securely inserted in to the Stand Gun
Power Connector (3).
5.
Ensure stand is positioned on a stable, flat
surface close to where glue is required.
6. Insert mains cable plug into a mains socket and
switch on power.
7.
Wait 5 minutes for gun to reach normal
operating temperature.
8.
Remove gun from stand and position the
Nozzle (12) over the location that requires
glue.
9. Gently squeeze Trigger (10) to advance glue
stick and expel molten adhesive.
If the lever is sluggish, it means the glue is not
hot enough to be processed. Do not use force
so as not to damage the unit. Wait a moment
until more adhesive has liquefied.
10.
Release trigger to stop gluing.
11.
Once gluing is complete, return gun to the
stand. Never lay the gun on its side whilst still
connected to power.
12. After use switch off mains socket and remove
plug.
Notes:
• Do not attempt to remove the glue stick. Any
unused glue stick can remain in the tool.
• Always practice applying adhesive to scrap
materials until confident.
•
As with all adhesives, performance depends on
atmospheric conditions of the work area.
• Recommendations are for guidance only;
actualconditions of use will vary.
•
Ensure surfaces tobe bonded are dry, free from
dust, grease andloose particles.
•
Apply adhesive to one surface only. Bring the
two surfaces together immediately Hold the
joint together for 20-30 seconds to complete
the bond.
• When gluing different materials, apply the
adhesive to the least porous material.
• On cold materials, a better bond can be achieved
by pre-warming before applying adhesive.
•
Applying adhesive in wavy lines is recommended
when gluing textilesor similar materials.
Storage
•
Ensure all parts of tool are completely cool
before storing. Never wrap the power cord
around a tool that has not completely cooled.
•
Store this tool carefully in asecure, dry place out
of the reachof children.
W3
W2
W1
W4 W5
W6
W7
W8
W-12
W11
W13
W9
W10