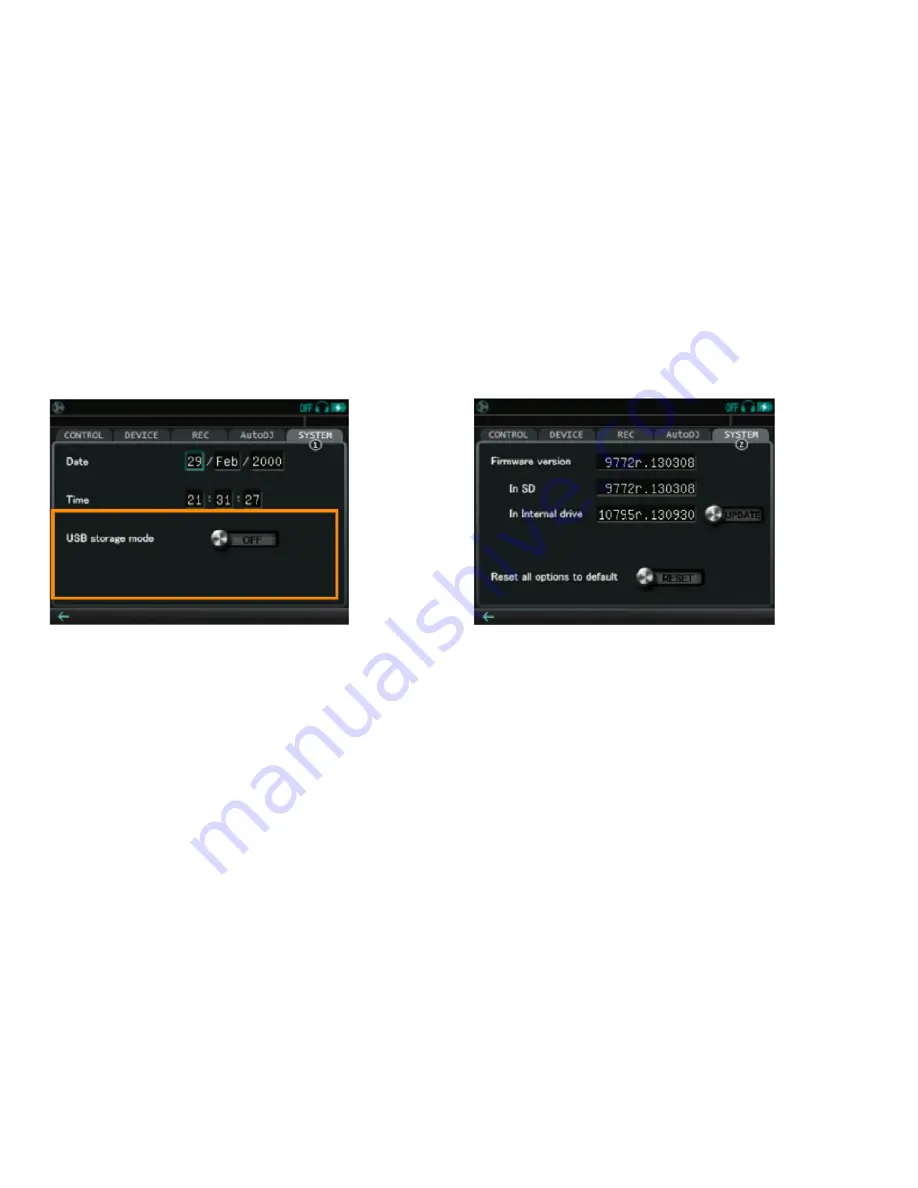
Monster Go-DJ Manual And Warranty Download Page 71

66

SYSTeM Tab

SYSTEM (1)

Date / Time 

Sets date and time.

USB storage mode 

When this is set to the ON position, the Monster

®

 GO-DJ

 enters into USB 

Storage Mode and starts to wait for the USB connection to a computer.

Please note:

 All DJ and production-related functions are disabled when in the 

USB Storage Mode.

SYSTEM (2)

Firmware version 

Shows the currently installed firmware version.

In SD / In internal drive 

When the firmware update file is uploaded to and exists in the SD card or the 
internal drive, the firmware version is displayed. In the case that it differs from 
the currently installed version, the UPDATE switch appears on the right. If you 
slide the UPDATE switch, the firmware is updated.

Reset all options to default 

All the settings in the option screen are initialized and set to the default settings.

OPTIONS SCREEN

Summary of Contents for Go-DJ

Page 1: ...Manual and Warranty...

Page 2: ...n the Power OFF State 12 In the Power ON State 12 In the Standby State 12 Information Bar 13 GETTING STARTED 14 How to Turn On 14 How to Charge 14 Screen Modes 14 Available On Screen Information 14 Mi...

Page 3: ...ist 27 How to Change Track Order in a Playlist 28 How to Delete an Item in a Playlist 28 How to Play Tracks via the Playlist 28 How to Search Playlist Tracks 29 How to Use Playlists with the AutoDJ 29...

Page 4: ...ch Panel Operation 53 Function Knob Operation 53 Assigning Samples to the Beat Sequencer 54 Assigning Samples to Specific Positions 54 Assignment Priorities 55 External Inputs 56 Assign Audio from Lin...

Page 5: ...ecording time 64 Current recording time 64 AutoDJ Tab 65 AutoDJ 65 Playing order 65 Transition timing 65 Mix style 65 SYSTEM Tab 66 SYSTEM 1 66 Date Time 66 USB storage mode 66 SYSTEM 2 66 Firmware Ve...

Page 6: ...uded in the firmware You can find a copy in the Monster GO DJ by searching the GO DJ Manual directory You can also download the latest version of the Monster GO DJ User Manual from the official websit...

Page 7: ...available Gain control is available via the Gain Slider in the Equalizer Screen Update Description Tempo Slider updated Touch and hold the tempo slider on the Digital Turntable screen while rotating t...

Page 8: ...Battery Life Max 12 hours Input Terminals MIC 1 inch HEADPHONE 1 inch AUXILIARY LINE IN 1 inch Output Terminals MASTER LINE OUT 1 inch Sound I O 3 5mm Stereo Jack 4 Line out Headphones Line in Microp...

Page 9: ...utomatic synchronization BPM adjustment and beat matching Recorder Records Line out sound to the internal memory in WAV format Recording Time 2 hours maximum Records up to 100 files up to 2 hours Make...

Page 10: ...cer Editable preset pattern 4 per channel 2 User pattern storage 4 per channel 2 18 instrument sources BPM controller Stock samples included Upload custom samples AUTO DJ Normal Mix Mode Simple Mix Mo...

Page 11: ...ter GO DJ Power Adapter You can also use your Monster GO DJ Connector Cable to connect your Monster GO DJ to your computer PC or Apple to both charge and transfer data Monster GO DJ Power Adapter Use...

Page 12: ...e of the Monster GO DJ c SD Card Slot d Power Button Upper Side of the Monster GO DJ e USB Connector MINI B USB f LINE OUT g LINE IN Back Side of the Monster GO DJ h Reset Button Lower Side of the Mon...

Page 13: ...fader Please be aware that these are multi function and multi layered buttons also known as soft keys They have different functions depending on how they are handled There are four ways to adjust the...

Page 14: ...olume Control Press hold and turn the button while turning to toggle the microphone volume 1 VOLUME B Turn the button in order to toggle the volume of Track B The track level is indicated by the LED m...

Page 15: ...FX OFF press hold and turn the FX LEVEL knob to choose what channel to route the selected FX function s to VOLUME A VOLUME B or both tracks 3 FX SELECT Turn and click to select one or more effects FX...

Page 16: ...eturn Track A to the cue point unless PLAY is pressed 6 CUE Press to set a cue point on Track B Press and hold to begin playing Track B from the cue point Releasing the CUE button will stop playback a...

Page 17: ...arging Battery level 90 Blinking Purple Analyzing Files Blinking Orange Converting Files Beat LED Light Status Description Turned Off Track paused Blinking Blue Track playing Blinking Red Synchronizin...

Page 18: ...le Shortcut Tap to automatically go to the Digital Turntable screen Headphone Monitor Toggle Displays that the current track on the respective channel is cued and playing on both sides of the headphon...

Page 19: ...to two 2 seconds The power button is located at the right side of the Monster GO DJ If the battery power is too low for the Monster GO DJ to power on you will see a message that states Low Battery Po...

Page 20: ...15 Digital Turntable Equalizer Musical Pad Beat Sequencer Options File Browser Screen Advanced Mode The Monster GO DJ has six 6 screens in Advanced Mode GETTING STARTED...

Page 21: ...the upper left hand corner of the screen To access the Digital Turntable Screen from the Volume Control Options Screen either swipe right across the Monster logo at the bottom of the screen or click...

Page 22: ...T jack of your Monster GO DJ Connect headphones or earbuds to the PHONES jack For a simple sound check you can connect your headphones or earbuds to the LINE OUT jack and test to see if the sound is o...

Page 23: ...und the VOLUME B button Headphone Volume To change the Headphone Volume press down hold and rotate the VOLUME B button The level is indicated by the LED lights that surround the VOLUME B button while...

Page 24: ...l the volume of Track A Rotate the VOLUME B knob to control the volume of Track B Track A and Track B individually Output of the Digital Turntable s to LINE OUT Optional In the Options Screen when the...

Page 25: ...GO DJ from your computer Note It is recommended to properly eject the Monster GO DJ drive from your computer first before turning off the connection on your Monster GO DJ How to Use the SD Card Drive...

Page 26: ...the Monster GO DJ is in the process of analyzing the new file s When the purple Beat LED light turns off the file s have been analyzed completely Automatic File Conversion The Monster GO DJ has dedic...

Page 27: ...s icon The GO DJ Drive directory is located in the internal memory of the Monster GO DJ You can read browse load and edit your files located in the internal drive The GO DJ Rec directory is displayed...

Page 28: ...lect files using two 2 methods analog operation with the FUNCTION knob and touch screen operation Using the FUNCTION Knob To select a file using the FUNCTION knob rotate the FUNCTION knob to move the...

Page 29: ...imes the Play Count will remain four 4 If Passed Time is selected in the Options Screen The number of dots indicates the recentness of play specifically showing how much time has passed since the trac...

Page 30: ...History option is turned ON which can be done in the Options Screen X Times This information displays the total play count of the track This is only active when the Remember History option is turned O...

Page 31: ...to delete the file or Copy to copy the file to the SD memory card You cannot delete or copy a recorded file when the track is recording while the track is playing or while deleting or copying the fil...

Page 32: ...e FUNCTION knob and the touch screens Function Knob Rotate Rotate the FUNCTION knob to choose a character or command Press Press the FUNCTION knob to enter the selected character If the left arrow or...

Page 33: ...con How to Change Track Order in a Playlist You can change the track position in a playlist by using the FUNCTION knob Select the track in the playlist Then press hold and rotate the FUNCTION knob whi...

Page 34: ...d Track name simply switches the labels of the tracks without sorting How to Use Playlists with the AutoDJ You can load a track with a playlist right before or during the AutoDJ function and the playl...

Page 35: ...eturn to the Playlist Selection Screen How to Clear All Playlists You can delete all the playlists at the same time by following these directions Select Playlists on the Media Selection Tab Press and...

Page 36: ...track labeled File Not Found is selected the File Properties window will open but the track will not be loaded and played If the original file is restored in the original file location then History w...

Page 37: ...e the Reset function is processing the Reset action is canceled but the finished data are not restored and some data can be partially lost If you execute the Discard BPM command then the beat position...

Page 38: ...that correspond to the file location For sample files the preferred format is a WAV file 8 48 kHz 8 24 bit such as the files for used for playback But if files other than 44 1 kHz 16 bit stereo are lo...

Page 39: ...f a hot cue point labeled with colored text other than white pressing the FUNCTION knob enables you to jump to the recorded hot cue point How to ControlTracks In the Digital Turntable screen you can c...

Page 40: ...n Loop Any portion of the track can be looped by using the loop function in the Arc Selector by following these directions Use the FUNCTION knob to select the specific loop range that you want to acti...

Page 41: ...CUE 3 or CUE 4 when white in color Record the current track position as a hot cue point for the corresponding cue point CUE 1 CUE 2 CUE 3 or CUE 4 when in color other than white Jump to the recorded h...

Page 42: ...usually activated when matching beats and synchronizing tracks Search Mode When the highlight bar in the Arc Selector is positioned over the Cue Clear command and the track is paused you can use the h...

Page 43: ...en the highlight bar in the Arc Selector is positioned over any of the Loop commands and the Loop function is active you can adjust the position of a loop section by touching the turntable When you to...

Page 44: ...wn the measured value of BPM is abandoned Break Mode When the highlight bar in the Arc Selector is positioned over any of the Loop commands while the track is playing the Break mode is activated In Br...

Page 45: ...bar in the Arc Selector is positioned over any of the Cue commands CUE 1 CUE 2 CUE 3 or CUE 4 between the Tap command and the Cue Clear command the user can scratch the track by rotating the Digital T...

Page 46: ...off the original beat When you return to normal playback if you release the turntable right at the moment when the three radars align you can return back to the original beat position Beat Radar The...

Page 47: ...original Pitch Lock Switch 4 When the Pitch Lock switch is set to the ON position the original pitch based upon the original BPM is maintained even when the tempo is changed Tempo Controllers Tempo S...

Page 48: ...In the Equalizer screen you can adjust the output levels of the 3 bands i e low middle and high on each track You can also change the gain level of each track Basic Operations of the Equalizer Touch...

Page 49: ...remains LINK Switch When LINK switch is set to the ON position operations controlled by the FUNCTION knob and the crossfader are active When the position is set to the OFF position only the touchscree...

Page 50: ...the FUNCTION knob for fine tuning Touching the Gain Slider and rotating the FUNCTION knob will adjust the gain level Pressing the FUNCTION knob will reset the gain level to 0 dB Saving and Loading Gai...

Page 51: ...Each Gain File option if the Keep for Each File option is selected the previously saved gain level is loaded If a gain level was not previously saved the gain level will be set to 0 dB If the Reset o...

Page 52: ...ays a sample once from the beginning to the end of the sample Loop Plays a sample iteratively in a given BPM while being touched If a track is currently being played the BPM is usually synchronized to...

Page 53: ...assignment Disconnect the Monster GO DJ from the computer properly set USB Mode to the OFF position in the Options screen and reboot the Monster GO DJ Samplers SCREEN Loading and Assigning Samples Ded...

Page 54: ...the file names are properly labeled with assignment number the correctly numbered files are each allocated accordingly to the corresponding sampler pad position If any filename is used without the sa...

Page 55: ...is set as the default instrument Synthesizer Keyboard The Synthesizer Keyboard is activated when the Keys option is selected at the bottom of the Musical Pad screen The Synthesizer Keyboard operates...

Page 56: ...es below indicate the correspondence between the keys and numbers NN Disconnect the Monster GO DJ from the computer properly set USB Mode to the OFF position in the Options screen and reboot the Monst...

Page 57: ...e each assigned to the corresponding key If any filename is used without the numbered assignment the uploaded sample files in the folder are assigned to unoccupied keys in alphabetical order of the fi...

Page 58: ...corresponds to each sample and the horizontal axis corresponded to the beat positions The Beat Sequencer is formatted as 4 beats divided into 16 rows You can operate the Beat Sequencer with both the...

Page 59: ...rom the computer properly set USB Mode to the OFF position in the Options screen and reboot the Monster GO DJ Assigning Samples to the Beat Sequencer Dedicated folders that store sample files for the...

Page 60: ...the following order The correctly numbered files are each allocated at its corresponding position If any filename is used the other sample files in the folder are assigned to the other parts of the Be...

Page 61: ...rom the microphone Scratch Loop Beat Sequencer FX Record Limited Functionality of Line In and MIC The Monster GO DJ cannot control the music stream coming from the LINE IN MIC Due to this the CUE hot...

Page 62: ...terminal In this case the microphone volume and the line in volume are both applied to the input from the MIC jack Real Time BPM Analysis When the LINE IN or MIC is assigned to a Digital Turntable the...

Page 63: ...bend depth Sets the depth of pitch bend Options Screen You can change the optional settings in the Options screen The Options screen is categorized into five 5 tabs that have multiple pages The pages...

Page 64: ...e as follows Keep for each file Preserves the tempo setting for each file and restores them when the file is loaded again Please note While in AutoDJ mode the settings are restored but not newly prese...

Page 65: ...the touch is released Then it returns to the original playback position Sync Beat Sequencer to music When this is set to the ON position the Beat Sequencer is synchronized to the beat positions of th...

Page 66: ...options are as follows Play count Represents the play count of the file up The maximum count is four 4 times Recently Played Represents the time that has passed since the file was played the last tim...

Page 67: ...djusts the Line in volume which is applied to the input from the Line In terminal In addition when Line is selected as Microphone type this volume is applied also to the input from the MIC terminal Se...

Page 68: ...no operation Wake up shutdown on USB power When this is set to the ON position the Monster GO DJ is awake if there is a USB power activation Otherwise the Monster GO DJ automatically shuts down Auto...

Page 69: ...gnal is produced i e sound is mute then the Monster GO DJ waits until the first audio signal comes before initializing the digital recording function Available recording time Shows how long you can re...

Page 70: ...ll AutoDJ If this is set to the ON position the AutoDJ starts The mixing style of the AutoDJ follows the settings below Playing order Selects the order in which the files are played from the target di...

Page 71: ...2 Firmware version Shows the currently installed firmware version In SD In internal drive When the firmware update file is uploaded to and exists in the SD card or the internal drive the firmware ver...

Page 72: ...lease note the following If you format a storage medium all data including those not displayed on the Monster GO DJ are discarded In the case of formatting an SD card the volume label of the SD card i...

Page 73: ...the steps below Preparation for Mandatory Firmware Update Download the latest firmware from the Monster GO DJ official website http monsterproducts com godj Place the file to an SD card using an SD c...

Page 74: ...ware version is shown on the right side of the menu item Firmware The other menu item functions include the following Normal Boot Boots normally with the firmware currently installed Recovery from GO...

Page 75: ...DJ logo are trademarks or registered trademarks of Monster Inc and its subsidiaries in the U S and other countries Used under license Manufactured and Distributed by JD Sound Inc JD SOUND Inc 85412 C...

Reviews: