MONOPRICE
Blackbird™ HDBaseT™ 5x1 Seamless
Presentation Scaler/Switch
P/N 21875
User's Manual
Page 1: ...MONOPRICE Blackbird HDBaseT 5x1 Seamless Presentation Scaler Switch P N 21875 User s Manual...
Page 2: ...nel 7 Rear Panel 9 IR Remote Control 10 INSTALLATION 11 CONFIGURING FOR TCP IP CONTROL 15 VGA INPUT 16 AUDIO OUT CONNECTION 16 MICROPHONE CONNECTION 17 Condenser Microphones 17 Dynamic Microphones 17...
Page 3: ...3 WEB BASED GUI UPDATING 45 TECHNICAL SUPPORT 45 SPECIFICATIONS 46 REGULATORY COMPLIANCE 47 Notice for FCC 47 Notice for Industry Canada 48...
Page 4: ...not leave it in direct sunlight Prior to operation check the unit and power cord for physical damage Do not use if physical damage has occurred Before plugging the unit into a power outlet ensure that...
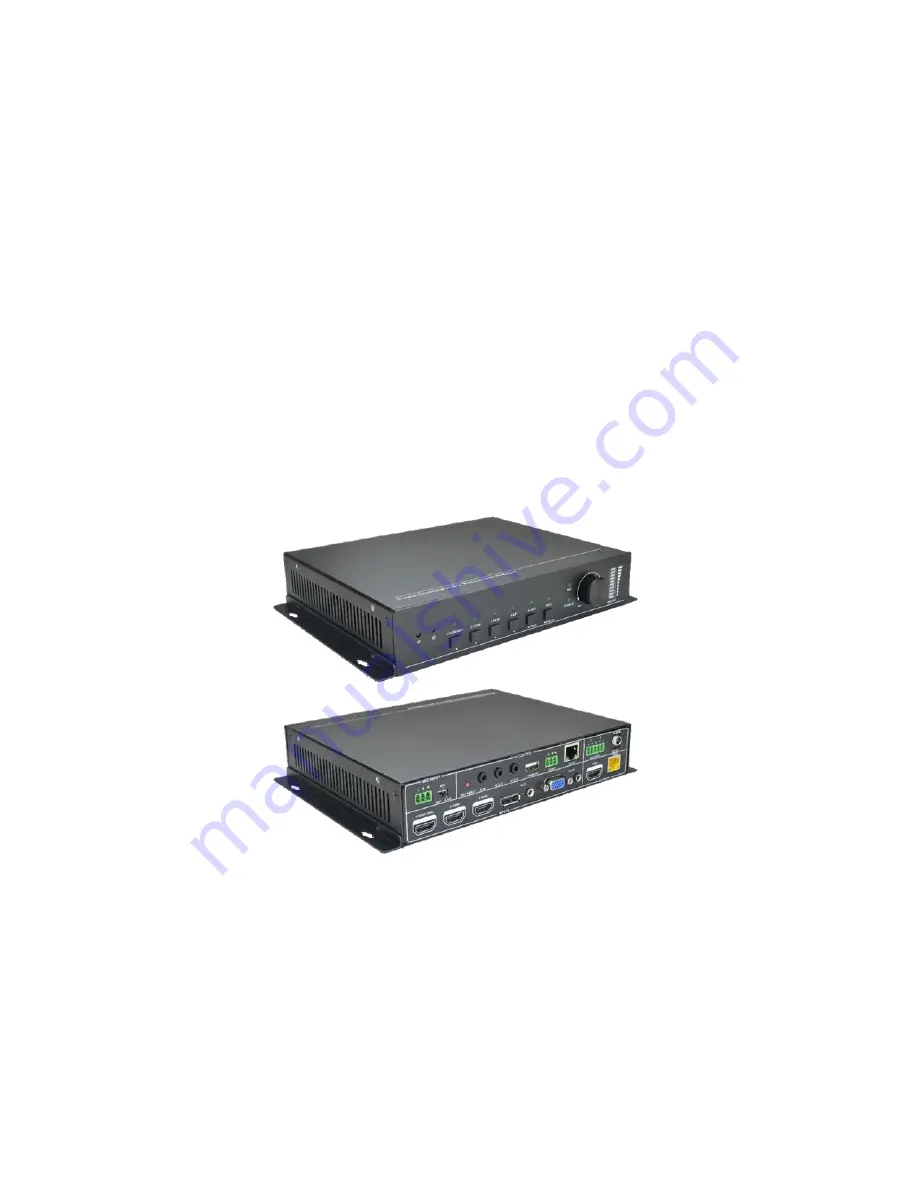
Page 5: ...front panel buttons the included IR remote control a web browser over a TCP IP connection or a computer using the RS232 control option FEATURES Two HDMI one HDMI MHL one DisplayPort and one combinati...
Page 6: ...g brackets for scaler switch 4x Short mounting bracket screws 2x Long mounting brackets for scaler switch 6x Long mounting bracket screws 2x Mounting brackets for receiver 4x Receiver mounting bracket...
Page 7: ...2 POWER LED The LED illuminates red when the unit is powered on It illuminates red when in standby and is off when there is no power applied 3 HDMI MHL LEFT BUTTON AND LED Press the button to select t...
Page 8: ...ng the OSD menu press the button to simulate the OK button on the included remote control 8 AUTO SWITCHING MENU BUTTON AND LED Press the button to enable or disable Auto Switching Press and hold the b...
Page 9: ...evice Place the switch in the 48V position if a condenser microphone that requires Phantom Power is connected Place it in the MIC position when a dynamic microphone is connected and put it in the LINE...
Page 10: ...nbalanced connections 6 DC 24V DC barrel connector for connecting the included AC power adapter IR Remote Control 1 STANDBY BUTTON Press the button to power the unit on or to put it into standby mode...
Page 11: ...ess the built in OSD menu INSTALLATION Perform the following steps to install the scaler switch and HDBaseT receiver 1 Ensure that all equipment to be connected is powered off and unplugged from its p...
Page 12: ...smitter or another wideband IR transmitter into the IR OUT jack on the scaler switch 8 Optional If you want to control the remote display from the scaler switch location plug the included IR receiver...
Page 13: ...d green and blue RCA plugs into the corresponding Component YPbPr RCA jacks on your Component video source device or plug the red RCA plug into the video RCA jack on your Composite CVBS video source d...
Page 14: ...ptional If you want to connect a microphone or line level audio device to the scaler switch wire one of the included 3 pin terminal blocks to the microphone or audio cable Next position the MIC switch...
Page 15: ...interface directly to the TCP IP jack on the matrix transmitter you will need to configure your PC s network settings to communicate with the matrix transmitter The matrix transmitter uses the followi...
Page 16: ...video outputs on your Component source device When connecting to a Composite CVBS video source plug the red connector into the video output normally yellow AUDIO OUT CONNECTION The AUDIO OUT terminal...
Page 17: ...e the microphone to the 3 pin MIC terminal block as shown below Dynamic Microphones Dynamic microphones can be connected using an unbalanced or balanced type connection When connecting a dynamic micro...
Page 18: ...ch as a wireless microphone a mixer etc Line level inputs can be made using unbalanced or balanced type connections When using a line level connection first slide the MIC switch to the LINE position t...
Page 19: ...exit Standby mode CEC OFF Standby ON Press the Standby button on the remote control to exit Standby mode All connected HDMI source devices and displays will remain in whichever mode they were in CEC...
Page 20: ...ivate the built in OSD menu When the OSD menu is active press the 1 HDMI MHL button to move the highlight left or to decrease the selected value When the OSD menu is active press the 2 HDMI button to...
Page 21: ...isplayed Press the OK 6 button to enter the highlighted submenu to edit the highlighted entry or to accept the edited value Press the EXIT 7 button to exit the displayed menu or to cancel the editing...
Page 22: ...tion Use the Options screen in the OSD system to adjust the following parameters and settings Output Adjust Allows adjustment of the following elements Image position X and Y Aspect ratio H Polarity a...
Page 23: ...when Auto Switching mode is enabled before the scaler switch automatically powers off You may set it to 0 1 2 5 or 10 minutes When set to 0 the scaler switch will not automatically power off PW On Ti...
Page 24: ...s directly You may select Cool Medium Warm and User When set to User you may set the individual amounts of the Red Green and Blue colors Aspect Ratio Allows you to set the image aspect ratio You may s...
Page 25: ...ault values You will be asked to confirm the operation Blending You may set it to Low Middle High and Off HDMI CEC Allows you to enable or disable the HDMI CEC function OSD Duration Allows you to set...
Page 26: ...ccess the built in TCP IP Graphical User Interface GUI by opening your internet browser and typing the IP address into the address field The default IP address is 192 168 0 178 After pressing ENTER yo...
Page 27: ...ource Power button to turn the selected source device on or off Display Power Click the Display Power button to turn the connected display on or off Local Power Click the Local Power button to put the...
Page 28: ...ith the EDID update file into the FIRMWARE port on the scaler switch then click the EDID Update button to perform the update Firmware Update Insert a USB flash drive with the firmware update file into...
Page 29: ...for the scaler switch DHCP Static IP Slide the switch to the DHCP position to use a dynamically assigned IP address or to the Static IP position to use a fixed IP address IP Address Displays and allo...
Page 30: ...nside the 1 HDMI MHL text field to edit the label used on screen for INPUT 1 2 HDMI Click inside the 2 HDMI text field to edit the label used on screen for INPUT 2 3 HDMI Click inside the 3 HDMI text...
Page 31: ...rate for the Local port is fixed at 9600 but the HDBaseT receiver can accept other baud rates The available baud rates for the receiver are 2400 4800 9600 19200 38400 57600 and 115200 Command Type th...
Page 32: ...rname The default is username is user User Password Displays and allows editing of the default password The default password is user GUI Displays the GUI version number Hardware Displays the hardware...
Page 33: ...om your PC using an RS232 connection you will need to use a third party RS232 control software package such as CommWatch exe whose interface is depicted below Set the communications parameters to the...
Page 34: ...accept Component YPbPr signals then switches to the 5 VGA input Input 5 Set Switch to YPbPr 50685 Sets the 5 VGA input to accept Composite CVBS signals then switches to the 5 VGA input Input 5 Set Swi...
Page 35: ...xx xx 00 60 Source Volume xx xx 00 60 50706 Sets the DisplayPort input to use embedded audio DP Audio from Embedded 50707 Sets the DisplayPort input to use audio from the 3 5mm external audio input D...
Page 36: ...User Color Temperature xx xx Cool Medium Warm or User 50608 Cycles to the next aspect ratio setting 16 9 4 3 Auto Aspect Ratio xx xx 16 9 4 3 auto 50614 Cycles to the next picture mode Dynamic Standa...
Page 37: ...able 50650 Displays the channel status Input Icon xx 50606 Auto adjusts the screen image VGA input only VGA Input Auto 50699 Displays the system version Version Vx x x 50688 Enable MIC noise detecting...
Page 38: ...788 Enables serial control mode 2 controls the scaler switch from the RS232 port on the scaler switch or the one on the HDBaseT receiver RS232 Mode 2 RS232 Control Scaler 50174 Auto Switch Mode Disabl...
Page 39: ...unction Manual Switch Mode Set no input to power off time 0 minutes 50741 Manual Switch Mode Sets the power off time to 1 minute Manual Switch Mode Set no input to power off time 1 minute 50742 Manual...
Page 40: ...the remote control Key left 50611 Simulates pressing the RIGHT arrow button on the remote control Key right 50612 Simulates pressing the UP arrow button on the remote control Key up 50613 Simulates p...
Page 41: ...Displays the contrast setting Contrast xx xx 00 99 50638 Displays the saturation setting Saturation xx xx 00 99 50639 Displays the sharpness setting Sharpness xx xx 00 99 50640 Displays the color temp...
Page 42: ...rce Volume xx MIC Volume xx Input xxxx Resolution yyyy LINE yy MIC yy Switch status zzzz VGA yy DP yy DP Audio from zz xx 00 60 yy Mute or Unmute zz Embedded or External xxxx HDMI 1 HDMI2 HDMI3 DP VGA...
Page 43: ...m the left side Output Width Adjust xx 50675 Decreases the image width by pulling to the right from the left side Output Width Adjust xx 50676 Decreases the image height by pulling up from the bottom...
Page 44: ...cmd up 50907 Sends the CEC Down command CEC cmd down 50908 Sends the CEC Left command CEC cmd left 50909 Sends the CEC Right command CEC cmd right 50910 Sends the CEC Select Confirm command CEC cmd se...
Page 45: ...Program entry 5 Click the Browse button then locate the update file on your PC 6 Click the Apply button then follow the on screen instructions TECHNICAL SUPPORT Monoprice is pleased to provide free l...
Page 46: ...A inputs Audio Outputs 1x 5 pin terminal block Audio Frequency Response 20 Hz 20 kHz Audio Input Impedance 10 kilohms Audio Output Impedance 75 ohms Stereo Channel Separation 80dB 1kHz Transmission St...
Page 47: ...ursuant to Part 15 of the FCC Rules These limits are designed to provide reasonable protection against harmful interference in a residential installation This equipment generates uses and can radiate...
Page 48: ...High Definition Multimedia Interface are trademarks or registered trademarks of HDMI Licensing LLC in the United States and other countries MHL Mobile High Definition Link and the MHL Logo are tradema...