background image

26D4720 

13

CANOPY INSTALLATION 

INSTALLING CANOPY 

A canopy is furnished with each fi rebox and MUST be installed for safe operation. 

See Figure 14.

  1.  Remove the three (3) screws from the top front frame assembly. Also remove the two (2) screws on the side frames. 

See Figure 14. 

  2.  Align the canopy with the holes in the top frame.
  3.  Replace the screws previously removed.
  4.  Tighten side screws. Make sure the canopy is level and 

secure.    

The  firebox  canopy  must  not  be 
modifi ed  or  replaced  with  a  canopy 
that may be provided with the unvented 
decorative room heater. 

W

ARNING

Close  fi replace  screen  panel  before 
operating a decorative type unvented 
room heater.

W

ARNING

Figure 14 - Installing Canopy 

Summary of Contents for MCUF36

Page 1: ...WARNINGS If the information in this manual is not followed exactly a fire or explosion may result causing property damage personal injury or loss of life Do not store or use gasoline or other flammable vapors and liquids in the vicinity of this or any other appliance WHAT TO DO IF YOU SMELL GAS Do not try to light any appliance Do not touch any electrical switch do not use any phone in your buildin...

Page 2: ...ternal Dimensions 6 Minimum Hearth Dimensions 7 Location of Fireplace 7 Clearances and Height Requirements 8 Fireplace Framing 10 Gas Line Installation 12 Canopy Installation 13 Other Optional Equipment 14 Forced Air Kit 14 Brass or Chrome Trim 14 Firebrick 14 Optional Wide Canopy 14 Illustrated Parts Breakdown 15 Warranty Back Cover ...

Page 3: ...TANT Read these instructions carefully before installing or trying to operate a vent free gas heater in this firebox IMPORTANT SAFETY INFORMATION 1 Due to high temperatures the appliance should be located out of traffic and away from furniture and draperies 2 Children and adults should be alerted to the hazard of high surface temperature and should stay away to avoid burns or clothing ignition 3 You...

Page 4: ...d be reduced 4 percent for each 1 000 feet above sea level Refer to the National Fuel Gas Code 21 The appliance and its appliance main gas valve must be disconnected from the gas supply piping system during any pressure testing of that system at test pressures in excess of 1 2 psig 3 5 kPa 22 The appliance must be isolated from the gas supply piping system by closing its equipment shutoff valve du...

Page 5: ...anopy 5 Two 2 nuts and bolts for grate 3 Installation and Operating Instructions WHAT YOU WILL NEED FOR INSTALLATION TOOLS BUILDING SUPPLIES Phillips screwdriver Square Framing materials Hammer Piping complying with local codes Wall finishing materials Saw and or sabersaw Tee joint Caulking material noncombustible Level Pipe wrench Fireplace surround materials noncombustible Measuring tape Pliers E...

Page 6: ...ing 2 Field wire main power supply to models with fan kit Electrical connections should only be performed by an experi enced licensed certified tradesman 3 Plumb gas line Gas connections should only be performed by an experienced licensed certified tradesman 4 Install vent free gas log heater per the instructions provided with the vent free gas log heater 5 Complete finish wall material surround and ...

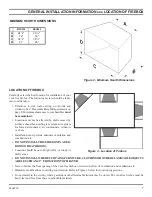
Page 7: ...ns ceiling fans return air registers for forced air furnaces air conditioners windows or doors Installation must provide adequate ventilation and combustion air DO NOT INSTALLTHIS FIREBOX IN A BED ROOM OR BATHROOM Location should be out of high traffic or windy or drafty areas DO NOT INSTALLWHERE CURTAINS FURNITURE CLOTHING OR OTHER FLAMMABLE OBJECTS ARE LESS THAN 42 FROM FRONT OF HEATER Never obst...

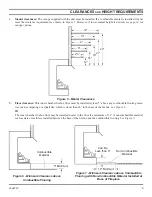
Page 8: ... to follow these requirements may create a fire hazard 1 Sidewall clearances The clearance from the inside of the appliance to any combustible wall should not be less than 9 See Figure 4 2 Ceiling clearance The ceiling must be at least 42 from the top of the firebox opening See Figure 4 3 Back wall clearnace The appliance may be placed against a combustible back wall Figure 4 Clearance and Height Re...

Page 9: ... flooring mate rial such as carpeting or asphalt tile which is closer than 14 to the base of the firebox See Figure 6 Or The inner chamber firebox floor may be installed nearer to the floor if a minimum of 14 of noncombustible material such as slate or marble is installed between the base of the firebox and the combustible flooring See Figure 7 Figure 5 Mantel Clearances Figure 6 Minimum Clearance above ...

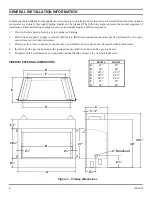
Page 10: ...led directly on carpeting tile or other combustible material other than wood flooring the firebox shall be installed on a metal or wood panel extending the full width and depth of the enclosure MCUF36 MCUF42 A 411 4 471 4 B 431 2 431 2 C 301 2 361 2 D 151 4 181 4 E 711 2 771 2 F 353 4 383 4 G 21 21 H 501 2 551 2 MCUF36 MCUF42 47 43 36 18 77 38 G 21 21 55 A 41 B 43 C 30 D 15 E 71 F 35 G 21 21 H 50 Fi...

Page 11: ...suitable fasteners See Figure 13 5 The canopy must be installed for safe operation of the heater See page 13 for canopy installation details When finishing a custom cabinet mantel or other built in enclosure the opening size to accommodate the fireplace with trim installed is as follows Figure 12 Custom Cabinet Figure 13 Location of Nailing Flanges Nail Sides Through Nailing Flanges The fireplace mus...

Page 12: ...rom passing through trap to the heater controls and burners Failure to do so could prevent the heater from operating reliably Consult applicable codes An external regulator must be used on all propane L P G heaters in addition to the regulator fitted to the heater to reduce the supply tank pressure to 13 w c maximum Any copper tubing used to supply propane L P G from the tank must be internally tin...

Page 13: ...the side frames See Figure 14 2 Align the canopy with the holes in the top frame 3 Replace the screws previously removed 4 Tighten side screws Make sure the canopy is level and secure The firebox canopy must not be modified or replaced with a canopy that may be provided with the unvented decorative room heater WARNING Close fireplace screen panel before operating a decorative type unvented room heat...

Page 14: ...NG Any of the original wire as supplied with the fireplace must be replaced Contact dealer for proper replacement wiring harness see parts list for part number 120 volts 60Hz 1 amps Electrical power cord plug can be routed to exit the MCUF36 MCUF42 on either the left side or the right side Remove cord protector from side of unit route power cord through hole opposite side Reinstall cord protector T...

Page 15: ...RC42 1 Wide Brass Canopy 1 BRC36 BRC42 1 Wide Brass Canopy 1 BRC36 BRC42 4 Blower w Rheostat 1 BLOTM BLOTM 4 Blower w Rheostat 1 BLOTM BLOTM 4 Blower w Rheostat 1 BLOTM BLOTM 4 Blower w Rheostat 1 BLOTM BLOTM 4 Blower w Rheostat 1 BLOTM BLOTM 5 Brass Trim Curved Design 1 BRTKM36 BRTKM42 5 Brass Trim Curved Design 1 BRTKM36 BRTKM42 5 Brass Trim Curved Design 1 BRTKM36 BRTKM42 5 Brass Trim Curved De...

Page 16: ... in accordance with the installation instructions The Limited Lifetime Warranty will also be void if the appliance is not operated and maintained according to the operating instructions supplied with the appliance and does not extend to 1 firebox burner assembly damage by accident neglect misuse abuse alteration negligence of others including the installation thereof by unqualified installers 2 the ...

Reviews: