/ J. OVERFLOW CONNECTION - Important
• The hose for the overflow should be cut from the white low
pressure hose supplied with the unit.
• The overflow connection is the ½” hose spigot on the rear
right-hand corner of the cabinet- no jubilee clip required.
• The overflow must be run downhill and terminate immediately
through an outside wall without kinks or restriction.
• A 22mm copper protective sleeve through the outside wall will
help prevent kinking of the hose.
/ K. TEST INSTALLATION FOR LEAKS
• Place Rapid-Fit bypass in Bypass position by pushing plunger
as per directional arrow - see Fig 3
• Open mains stopcock slowly to flush the new pipe work. This
can be done using a ‘soft’ mains tap, i.e. utility room cold tap or
wash hand basin in a bathroom.
• Check all connections for leaks.
/ L. OBTAIN YOUR WATER HARDNESS
• These instructions apply to the enclosed test kit only.
• Run hard water tap for approx. 1 minute and rinse the test
tube well.
• Fill the test tube up to the 10ml level. Add 2 drops of the dark
solution and mix gently. If the water sample contains hardness
it will turn red.
• Add the dark solution in batches of 5 drops, holding the
dropper bottle at 45 degrees.
• Mix gently after each 5 drops.
• Count the drops needed until the colour of the sample in the
test tube changes from a dark red to a dark blue/green.
• You need this figure for when SET WATER HARDNESS as per O
overleaf.
/ M. SETTING THE ELECTRONIC CONTROLLER
• Ensure battery (supplied) is fitted into the battery
compartment and the softener display will say WELCOME as
soon as battery is connected.
• The Display shows both the Time and Hardness. The Time and
Hardness will alternate every 10 seconds.
• To finalise commissioning of the softener, you need to set
both Time (24hr clock in hours and minutes) and the water
Hardness as determined by the number of drops in your water
hardness test.
/ N. SET TIME OF DAY
• Wait until display says Time of Day.
• Press Up button to show flashing Hours. Please note it is a
24hr clock.
• Press Up or Down button to set Hours.
• Press to confirm Hours.
• After confirming Hours, display will show minutes flashing.
• Use Up and Down button to set Minutes.
• Press to confirm Minutes.
Regeneration button
Scroll up and down
buttons
7
Fig 3.
Fig 4.
Battery compartment
Summary of Contents for ULTIMATE PREMIO HE
Page 1: ......
Page 10: ... REVERSIBLE CONNECTIONS Remove salt lid and side access panel 10 ...
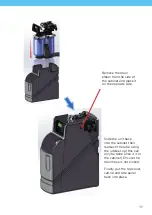
Page 11: ...Remove top cover 1 2 11 ...
Page 12: ...Remove any internal packaging 12 ...
Page 14: ...Remove the blue clip Push fit connection Release tubing 14 ...
Page 21: ... 44 0 1986 784759 monarchwater co uk info monarchwater co uk ...


