/ H. INLET & OUTLET CONNECTIONS See Fig 2
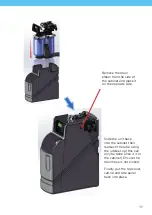
• Remove both salt lid and main cover to access inlet and outlet connections.
• Remove grey retaining clips and BSP connection points (indicated red and blue in fig 2). Connect
inlet hose to male BSP connection point (indicated red in fig 2) and connect outlet hose to BSP
connection (indicated blue in fig 2), using supplied washers and tighten to seal.
• Then reinsert BSP connection points back into valve body. Fit grey clips. The connection points
are designed to rotate once inserted in valve body. This removes any stress/pressure placed
upon the angle/direction of the hoses when connecting them to the Rapid-Fit bypass. Under no
circumstances use washing machines hoses or plumb the softener in solid copper pipe.
/ I. DRAIN CONNECTION
• 2.5mtrs of white low pressure drain hose is supplied with the unit. This is to be used for both the
drain and overflow. The drain connection is the white elbow on the side (pictured green in Fig 2).
Fix drain hose to white barbed elbow with jubilee clip (supplied).
• Run the drain hose to either an upstand or an outside drain. A minimum air gap of 20mm should
exist at the end of the drain line.
• If you need to extend the drain hose, this can be done by connecting to a 15mm copper tube for
a maximum run of 4 metres, with a minimum daytime pressure of 40 psi. Over 4 metres please use
22mm copper tube.
• Ensure that the drain hose is adequately fixed to the copper pipe.
• The drain hose must not dip or be kinked in any way, as this will lead to an overflow of the
machine.
• Uphill? The white flexible drain hose can run uphill internally, for a maximum of 3 feet, with a
minimum water pressure of 40 psi.
• Softened water will have no adverse effect on a septic tank.
• Under no circumstances should the softener drain and overflow share the same pipe. This could
lead to foul smells entering the salt cabinet from the main drain via the overflow. Also if the
common drain ever gets blocked, the regen water can re-enter the softener via the overflow pipe.
Fig 2.
Inlet
&
Outlet
connections &
drain connection
6
Summary of Contents for ULTIMATE PREMIO HE
Page 1: ......
Page 10: ... REVERSIBLE CONNECTIONS Remove salt lid and side access panel 10 ...
Page 11: ...Remove top cover 1 2 11 ...
Page 12: ...Remove any internal packaging 12 ...
Page 14: ...Remove the blue clip Push fit connection Release tubing 14 ...
Page 21: ... 44 0 1986 784759 monarchwater co uk info monarchwater co uk ...


