background image

7

English

3  Setting into Operation

IMPORTANT!

 To avoid damage by overheating, 

the soldering station must not be operated with-
out soldering tip .
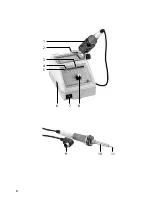
1) Connect the soldering iron to the soldering 

station: Connect the plug (9) of the soldering 
iron to the jack (6) .

2) Slide the soldering iron support (1) into the 

slot (2) .

3) Connect the mains plug of the soldering  

station to a socket (230 V/ 50 Hz) .

4) To switch on the station, press the toggle 

switch (7) . The POWER LED (5) and the HEATER 
LED (4) light up .

5) Set the desired temperature (150 – 420 °C) with 

the rotary control (8) . The temperature LEDs 
(3) show the heating-up temperature or the 
temperature of the soldering tip . During the 
heat-up phase, the HEATER LED lights up . The 
LED goes out when the adjusted temperature 
has been reached .

6) To switch off the station, press the toggle 

switch .

4  Replacement of the 

Soldering Tip

1) Prior to replacing the soldering tip, switch off 

the station with the toggle switch (7) and dis-
connect the station from the mains . Allow the 
screw sleeve (10) and the soldering tip (11) to 
cool down to room temperature .

2) Use your fingers to unscrew the screw sleeve 

from the soldering iron tube .

3) Remove any oxide residues from the solder-

ing iron tube . While blowing oxide particles 
out of the tube, provide a corresponding eye 
protection .

4) Replace the soldering tip (e . g . by soldering tips 

of the MONACOR series SIT-5 . .ROHS) and use 
your finders to fasten the screw sleeve . Make 
sure not to fasten the screw sleeve too tightly; 
the heating element may be damaged .

5  Notes on Correct Soldering

1 . Prior to operation, ensure a tight fit of the sol-

dering tip .

2 . Always keep the soldering tip clean and make 

sure that sufficient soldering tin is applied to 
the tip, especially before switching off the sol-
dering station .

3 . Prior to soldering, remove any impurities from 

the parts to be soldered .

4 . To protect the soldering station and the solder-

ing tip, do not operate the station at temper-
atures of 400 °C or higher for a longer period 
of time .

6  Cleaning the Soldering Station

Prior to cleaning, always switch off the sol-
dering station and disconnect it from the 
mains!

 For cleaning the housing of the soldering 

station and the handle of the soldering iron, use 
a damp cloth and a small quantity of cleaning 
fluid . Do not use any aggressive detergents or 
chemicals . When cleaning, make sure that no 
fluid will enter the unit!

7  Specifications

Heating power:  .  .  .  .  .  .  .  . 48 W
Power supply:  .  .  .  .  .  .  .  .  . 230 V/ 50 Hz
Power consumption:  .  .  .  . 54 VA  max .
Electronic temperature
control:  .  .  .  .  .  .  .  .  .  .  .  .  .  . 150 – 420 °C
Dimensions (W 

×

 H 

×

 D):  .   .  120 

×

 95 

×

  180 mm 

(w/o soldering iron 
support)

Weight:   .  .  .  .  .  .  .  .  .  .  .  .  . 1 .9 kg
Replacement 
soldering iron:  .  .  .  .  .  .  .  .  . SIA-548ROHS
Replacement 
soldering tips:  .  .  .  .  .  .  .  .  . SIT-501ROHS 

SIT-503ROHS 
SIT-504ROHS 
SIT-505ROHS

Subject to technical modification .

All rights reserved by MONACOR 

®

 INTERNATIONAL GmbH & Co. KG. No part of this instruction manual may be 

reproduced in any form or by any means for any commercial use.

Summary of Contents for SIC-520ROHS

Page 1: ...ISTS ELECTRONICS FOR SPECIALISTS BEDIENUNGSANLEITUNG INSTRUCTION MANUAL MODE D EMPLOI ISTRUZIONI PER L USO GEBRUIKSAANWIJZING MANUAL DE INSTRUCCIONES MANUAL DE INSTRU ES BRUGSANVISNING BRUKSANVISNING...

Page 2: ...SPECIALISTS ELECTRONICS FOR SPECIALISTS ELECTRONICS FOR SPECIALISTS 2 Deutsch Seite 4 English Page 6 Fran ais Page 8 Italiano Pagina 10 Nederlands Pagina 12 Espa ol P gina 14 Portugu s P gina 16 Dans...

Page 3: ...3 6 5 4 3 1 2 8 7 9 11 10...

Page 4: ...rfeste Unterlage ablegen Den aufgeheizten L tkolben nur am Kolben griff anfassen Bei Ber hrung der Metallteile des Kolbens besteht Verbrennungsgefahr Nach Beendigung der Arbeit den L tkolben nur an de...

Page 5: ...ten 1 Vor dem Betrieb den festen Sitz der L tspitze kontrollieren 2 Die L tspitze immer sauber halten und beson ders vor dem Ausschalten der L tstation mit ausreichend L tzinn versehen 3 Vor dem L te...

Page 6: ...fter operation allow the soldering iron to cool down in air only never use water to quench it Immediately disconnect the mains plug from the mains socket if 1 there is visible damage to the unit or to...

Page 7: ...of the MONACOR series SIT 5 ROHS and use your finders to fasten the screw sleeve Make sure not to fasten the screw sleeve too tightly the heating element may be damaged 5 Notes on Correct Soldering 1...

Page 8: ...surface ignifug e Ne saisissez le fer souder chaud que par sa poi gn e En manipulant la partie m tallique du fer vous risquez de vous br ler Une fois vos travaux termin s laissez refroidir le fer l ai...

Page 9: ...ls pour une bonne utilisation 1 Avant toute utilisation v rifiez que la panne est correctement fix e 2 Maintenez la toujours propre et pensez ra jouter de la soudure avant d teindre la station 3 Avant...

Page 10: ...ccando parti metalliche esiste il pericolo di bruciature Al termine dei lavori lasciare raffreddare il saldatore In nessun caso raffreddarlo sotto l acqua Staccare subito la spina rete se 1 l apparecc...

Page 11: ...re 3 Prima della saldatura pulire le parti da saldare 4 Per non danneggiare la stazione e la punta sconsigliabile impiegare la stazione per un tempo prolungato con temperature di 400 C e pi 6 Pulizia...

Page 12: ...ge houder rusten Neem de opgewarmde soldeerbout enkel aan de greep vast Bij aanraking van de metalen onderdelen van de soldeerbout kunt u zich ver branden Laat de soldeerbout na het solderen afkoelen...

Page 13: ...correct solderen 1 Controleer voor het gebruik of de soldeerstift goed vastzit 2 Houd de soldeerstift steeds schoon en in het bijzonder v r het uitschakelen van het soldeerstation vertin hem met vold...

Page 14: ...las partes met licas del soldador existe el riesgo de quemaduras Al finalizar el trabajo con el soldador d jelo enfriar en el aire nunca p selo por agua fr a Desconecte el aparato inmediatamente de la...

Page 15: ...la punta soldador est bien sujeta 2 Mantenga siempre la punta soldador limpia y especialmente antes de apagar la estaci n prov ala de esta o para soldar suficiente 3 Antes de soldar limpie las partes...

Page 16: ...tocar nas partes met licas pois corre se o risco de sofrer queimaduras Depois de finalizado o trabalho deixe o arrefecer ao ar e nunca o mergulhe em gua Retire imediatamente a ficha da tomada de corr...

Page 17: ...sempre a ponteira bem limpa es pecialmente antes de desligar a esta o abas te a a com bastante solda 3 Antes de soldar limpe bem os pontos a soldar 4 De forma proteger a esta o de soldadura e a pontei...

Page 18: ...arbejde skal man lade loddekolben k le ned i luft den m under ingen omst ndigheder afk les i vand Tag straks stikket ud af stikkontakten i f lgende tilf lde 1 hvis der er synlig skade p enheden eller...

Page 19: ...sen ren og tilf r den is r f r slukning af loddestationen tilstr kkeligt loddetin 3 F r lodning skal de dele der skal loddes ren g res 4 For at beskytte loddestationen og loddespidsen b r der ikke arb...

Page 20: ...ed hj lp av luften aldrig i vatten Ta omedelbart kontakten ur eluttaget om n got av f ljande fel uppst r 1 Enheten eller elsladden har synliga skador 2 Enheten r skadad av fall e d 3 Enheten har andra...

Page 21: ...3 Innan l dning reng r de delar som skall l das 4 F r att skydda l dstationen och l dspetsen b r inte enheten anv ndas vid 400 C och mer f r en l ngre tid 6 Reng ring av l d stationen St ng av statio...

Page 22: ...tomasti kielletty Irrota virtajohto pistorasiasta v litt m sti jos 1 laitteessa tai virtajohdossa on n kyv vaurio 2 putoaminen tai vastaava vaurio on saattanut aiheuttaa vian 3 laitteessa on toimintah...

Page 23: ...ist pois p lt 3 Puhdista kaikki juotettavat osat ennen juot tamista 4 Juotosaseman ja juotosk rjen suojelemiseksi ei 400 C juotosl mp tiloja tulisi k ytt pidem pi aikoja kerrallaan 6 Juotosaseman puhd...

Page 24: ...MONACOR INTERNATIONAL GmbH Co KG Zum Falsch 36 28307 Bremen Germany Copyright by MONACOR INTERNATIONAL All rights reserved A 1807 99 01 10 2016...

Reviews: