background image

6

English

Deutsch
Deutsch Seite

Français
Français Page

Italiano
Italiano Pagina

Español
Español Página

Nederlands
Nederlands Pagina

Polski
Polski Strona

Dansk
Dansk Sida

Português
Português Página

Svenska
Svenska Sidan

Suomi
Suomi Sivulta

Soldering station

These operating instructions are intended for users 
with basic knowledge in soldering technology .  
Please read the instructions carefully prior to  
operating the unit and keep them for later ref-
erence .

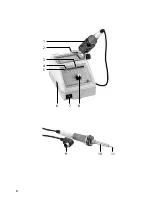
All operating elements and connections de-

scribed can be found on the fold-out page 3 .

1  Operating Elements and 

Connections

Soldering iron support

Slot to slide in the soldering iron support

Temperature LEDs 150 – 420 °C

Heating LED

Power LED 

5-pole DIN jack to connect the soldering iron

Toggle switch to switch the soldering station 
on and off

Rotary control to set the soldering temperature

Angled 5-pole DIN plug of the soldering iron

10 

Screw sleeve of the soldering iron

11 

Soldering tip

2  Safety Notes

This unit corresponds to all relevant directives of 
the EU and is therefore marked with   .

WARNING

The unit uses dangerous mains 
voltage . Leave servicing to skilled 
personnel only . Inexpert handling 
may result in electric shock .

• 

The unit is suitable for indoor use only . Protect 
it against dripping water and splash water, high 
air humidity and heat (admissible ambient tem-
perature  range  0 – 40 °C) .

• 

Do not place any vessels filled with liquid, e . g . 
drink ing glasses, on the unit .

• 

Keep the unit away from children!

• 

To prevent a fire or any other damage, always 
put the hot soldering iron into its holder or on 
a fire-proof surface .

• 

Only seize the hot soldering iron by its handle . 
Never touch the metal parts of the hot soldering 
iron – risk of burning! After operation, allow the 
soldering iron to cool down in air only, never 
use water to quench it .

• 

Immediately disconnect the mains plug from 
the mains socket if
1 . there is visible damage to the unit or to the 

mains cable,

2 . a defect might have occurred after the unit 

was dropped or suffered a similar accident,

3 . there are malfunctions .
The unit must in any case be repaired by skilled 
personnel .

• 

A damaged mains cable must be replaced by 
skilled personnel only .

• 

Never pull the mains cable to disconnect the 
mains plug from the mains socket; always seize 
the plug .

• 

For cleaning the housing, do not use any ag-
gressive detergents or chemicals . Never im-
merse the station in liquid and make sure that 
no liquid will enter the station .

• 

No guarantee claims for the unit and no liability 
for any resulting personal damage or material 
damage will be accepted if the unit is used for 
other purposes than originally intended, if it is 
not correctly connected or operated, or if it is 
not repaired in an expert way .

• 

Important for U.K. Customers!


The wires in this mains lead are coloured in 
accord ance with the following code: 


blue = neutral; brown = live 


As the colours of the wires in the mains lead 
of this appliance may not correspond with the 
coloured markings identifying the terminals in 
your plug, proceed as follows:
1 . The wire which is coloured blue must be con-

nected to the terminal in the plug which is 
mark ed with the letter N or coloured black .

2 . The wire which is coloured brown must be 

connected to the terminal which is marked 
with the letter L or coloured red .

If the unit is to be put out of operation 
definitively, take it to a local recycling 
plant for a disposal which is not harmful 
to the environment .

English
English Page

Summary of Contents for SIC-520ROHS

Page 1: ...ISTS ELECTRONICS FOR SPECIALISTS BEDIENUNGSANLEITUNG INSTRUCTION MANUAL MODE D EMPLOI ISTRUZIONI PER L USO GEBRUIKSAANWIJZING MANUAL DE INSTRUCCIONES MANUAL DE INSTRU ES BRUGSANVISNING BRUKSANVISNING...

Page 2: ...SPECIALISTS ELECTRONICS FOR SPECIALISTS ELECTRONICS FOR SPECIALISTS 2 Deutsch Seite 4 English Page 6 Fran ais Page 8 Italiano Pagina 10 Nederlands Pagina 12 Espa ol P gina 14 Portugu s P gina 16 Dans...

Page 3: ...3 6 5 4 3 1 2 8 7 9 11 10...

Page 4: ...rfeste Unterlage ablegen Den aufgeheizten L tkolben nur am Kolben griff anfassen Bei Ber hrung der Metallteile des Kolbens besteht Verbrennungsgefahr Nach Beendigung der Arbeit den L tkolben nur an de...

Page 5: ...ten 1 Vor dem Betrieb den festen Sitz der L tspitze kontrollieren 2 Die L tspitze immer sauber halten und beson ders vor dem Ausschalten der L tstation mit ausreichend L tzinn versehen 3 Vor dem L te...

Page 6: ...fter operation allow the soldering iron to cool down in air only never use water to quench it Immediately disconnect the mains plug from the mains socket if 1 there is visible damage to the unit or to...

Page 7: ...of the MONACOR series SIT 5 ROHS and use your finders to fasten the screw sleeve Make sure not to fasten the screw sleeve too tightly the heating element may be damaged 5 Notes on Correct Soldering 1...

Page 8: ...surface ignifug e Ne saisissez le fer souder chaud que par sa poi gn e En manipulant la partie m tallique du fer vous risquez de vous br ler Une fois vos travaux termin s laissez refroidir le fer l ai...

Page 9: ...ls pour une bonne utilisation 1 Avant toute utilisation v rifiez que la panne est correctement fix e 2 Maintenez la toujours propre et pensez ra jouter de la soudure avant d teindre la station 3 Avant...

Page 10: ...ccando parti metalliche esiste il pericolo di bruciature Al termine dei lavori lasciare raffreddare il saldatore In nessun caso raffreddarlo sotto l acqua Staccare subito la spina rete se 1 l apparecc...

Page 11: ...re 3 Prima della saldatura pulire le parti da saldare 4 Per non danneggiare la stazione e la punta sconsigliabile impiegare la stazione per un tempo prolungato con temperature di 400 C e pi 6 Pulizia...

Page 12: ...ge houder rusten Neem de opgewarmde soldeerbout enkel aan de greep vast Bij aanraking van de metalen onderdelen van de soldeerbout kunt u zich ver branden Laat de soldeerbout na het solderen afkoelen...

Page 13: ...correct solderen 1 Controleer voor het gebruik of de soldeerstift goed vastzit 2 Houd de soldeerstift steeds schoon en in het bijzonder v r het uitschakelen van het soldeerstation vertin hem met vold...

Page 14: ...las partes met licas del soldador existe el riesgo de quemaduras Al finalizar el trabajo con el soldador d jelo enfriar en el aire nunca p selo por agua fr a Desconecte el aparato inmediatamente de la...

Page 15: ...la punta soldador est bien sujeta 2 Mantenga siempre la punta soldador limpia y especialmente antes de apagar la estaci n prov ala de esta o para soldar suficiente 3 Antes de soldar limpie las partes...

Page 16: ...tocar nas partes met licas pois corre se o risco de sofrer queimaduras Depois de finalizado o trabalho deixe o arrefecer ao ar e nunca o mergulhe em gua Retire imediatamente a ficha da tomada de corr...

Page 17: ...sempre a ponteira bem limpa es pecialmente antes de desligar a esta o abas te a a com bastante solda 3 Antes de soldar limpe bem os pontos a soldar 4 De forma proteger a esta o de soldadura e a pontei...

Page 18: ...arbejde skal man lade loddekolben k le ned i luft den m under ingen omst ndigheder afk les i vand Tag straks stikket ud af stikkontakten i f lgende tilf lde 1 hvis der er synlig skade p enheden eller...

Page 19: ...sen ren og tilf r den is r f r slukning af loddestationen tilstr kkeligt loddetin 3 F r lodning skal de dele der skal loddes ren g res 4 For at beskytte loddestationen og loddespidsen b r der ikke arb...

Page 20: ...ed hj lp av luften aldrig i vatten Ta omedelbart kontakten ur eluttaget om n got av f ljande fel uppst r 1 Enheten eller elsladden har synliga skador 2 Enheten r skadad av fall e d 3 Enheten har andra...

Page 21: ...3 Innan l dning reng r de delar som skall l das 4 F r att skydda l dstationen och l dspetsen b r inte enheten anv ndas vid 400 C och mer f r en l ngre tid 6 Reng ring av l d stationen St ng av statio...

Page 22: ...tomasti kielletty Irrota virtajohto pistorasiasta v litt m sti jos 1 laitteessa tai virtajohdossa on n kyv vaurio 2 putoaminen tai vastaava vaurio on saattanut aiheuttaa vian 3 laitteessa on toimintah...

Page 23: ...ist pois p lt 3 Puhdista kaikki juotettavat osat ennen juot tamista 4 Juotosaseman ja juotosk rjen suojelemiseksi ei 400 C juotosl mp tiloja tulisi k ytt pidem pi aikoja kerrallaan 6 Juotosaseman puhd...

Page 24: ...MONACOR INTERNATIONAL GmbH Co KG Zum Falsch 36 28307 Bremen Germany Copyright by MONACOR INTERNATIONAL All rights reserved A 1807 99 01 10 2016...

Reviews: