


22
6-563.7
InsTAllATIon - oPerATIon
Although this unit has been assembled and fire-tested at the
factory, the following pre-operational procedures should be
performed to assure proper on-site operation.
1. Turn off power to the unit at the disconnect switch. Check
that fuses or circuit breakers are in place and sized
correctly. Turn all hand gas valves to the OFF position.
2. Remove the side control access panel.
3. Check that the supply voltage matches the unit supply
voltage listed on the Model Identification plate. Verify that all
wiring is secure and properly protected. Trace circuits to
insure that the unit has been wired according to the wiring
diagram. If installed at altitudes above 2,000' and the high
altitude kit includes a combustion air proving switch, replace
the switch in the unit with the switch provided in the kit.
Take care to ensure that the tubing and electrical
connections are securely fastened.
4. Check to insure that the venting system is installed correctly
and is free from obstructions. Before starting the unit, use
the following steps to verify that the venting system is
adequately sized:
a. Inspect the venting system for proper size and horizontal
pitch, as required in these instructions. Determine that
there is no blockage or restriction, leakage, or other
deficiencies, which could cause an unsafe condition.
b. Follow the lighting instructions. Place the appliance being
inspected in operation. Adjust thermostat so that the
appliance will operate continuously.
c. If the vent pressure switch does not close during any of
the above tests, the venting system must be corrected.
5. Check to see that there are no obstructions to the intake
and discharge of the unit.
6. Check fan clearance. Fan should not contact casing when
spun by hand.
7. Perform a visual inspection of the unit to make sure no
damage has occurred during installation. Check to ensure
all fasteners are in place and the burner openings are
properly aligned with the heat exchanger tubes and that the
gas orifices are centered in the burner inspirator tube opening.
8. Check to make sure that all filters are in place and that
they are installed properly according to direction of air flow
(if applicable).
9. Check that all horizontal deflector blades are open a
minimum of 30° as measured from vertical.
10. Turn on power to the unit at the disconnect switch. Verify
that the green light on the unit junction box is on, which
confirms power is on.
11. With the gas turned off, check the thermostat, ignition
control, gas valve, and supply fan motor for electrical
operation by creating a call for heat from the thermostat.
If these do not function, recheck the wiring diagram. Verify
that the amber light on the unit junction box is on, confirming
that there is a call for heat.
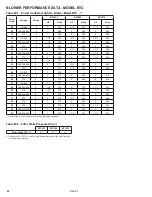
12. For blower units, check the blower speed (rpm). Refer to
“Blower Adjustments” for modification.
13. Check the motor speed (rpm).
14. Check the motor voltage.
15. Check the motor amp draw to make sure it does not exceed
the motor nameplate rating.
16. Recheck the gas supply pressure at the field installed
manual shut-off valve. The minimum inlet pressure should
be 6" W.C. on natural gas and 11" W.C. on propane gas.
ImpORTANT
Start-up and adjustment procedures must be performed by
a qualified service agency.
oPerATIon
Prior to operation
The maximum inlet pressure for either gas is 14" W.C. If
inlet pressure exceeds 14" W.C., a gas pressure regulator
must be added upstream of the combination gas valve.
17. Open the field installed manual gas shut-off valve.
18. Place the manual main gas valve on the combination gas
valve in the “On” position. Call for heat with the thermostat.
19. Check to make sure that the main gas valve opens. Check
the manifold gas pressure (see “Main Gas Adjustment”)
while the supply fan is operating. Verify that the blue light on
the unit junction box is on, confirming that the main gas
valve is open.
20. Check to insure that gas controls sequence properly (see
“Control Operating Sequence”). If unfamiliar with the unit’s
controls (i.e. combination gas control), refer to the control
manufacturer’s literature supplied with the unit.
21. Once proper operation of the unit has been verified,
remove any jumper wires that were required for testing.
22. Replace the side control access panel.
23. If installed at altitudes above 2,000', affix label included with
high altitude kit and fill in all fields with a permanent marker.
main gas Adjustment
The gas pressure regulator (integral to the combination gas
control) is adjusted at the factory for average gas conditions. It
is important that gas be supplied to the unit heater in accordance
with the input rating on the serial plate. Actual input should be
checked and necessary adjustments made after the unit heater
is installed. Over-firing, a result of too high an input, reduces
the life of the appliance and increases maintenance. Under no
circumstances should the input exceed that shown on the serial
plate.
Measuring the manifold pressure is done at the outlet pressure
tap of the gas valve.
To Adjust the manifold Pressure
1. Move the field installed manual shut-off valve to the “OFF”
position.
2. Remove the 1/8" pipe plug from the outlet pressure tap on
the gas valve and attach a water manometer of “U” tube
type which is at least 12" high.
3. Move the field installed manual gas shut-off valve to the
“ON” position.
4. Create a call for heat from the thermostat.
5. Refer to Table 14.1 to determine the correct manifold
pressure for the gas type of the unit. Pressures at 0-2,000'
elevation are 3.5" W.C. for natural gas, 10" W.C. for propane
gas, for elevations above 2,000' refer to the instructions in
“Gas Connections - High Altitude Accessory Kit” on page 12.
Adjust the main gas pressure regulator spring to achieve the
proper manifold pressure (for location, see the combination
gas control literature supplied with unit).
6. After adjustment, move the field installed manual shut-off
valve to the “OFF” position and replace the 1/8" pipe plug.
7. After the plug is in place, move the field installed manual
shut-off valve to the “ON” position and recheck pipe plugs
for gas leaks with soap solution.
ConTrol oPerATIng seQuenCe
Upon a call for heat from the thermostat, power is supplied to
the power exhauster motor. The unit will go through a purge
period and then the direct spark igniter will be energized. At the
same time, the main valve in the combination control valve will
open to allow gas to flow to the burners. If the fan motor has not
already started it will start shortly. If a flame is not sensed within
7 seconds for any reason the main valve will close and there
will be a short purge period before ignition is tried again. If the
flame is not sensed after 4 tries there will be at least a 1 hour
wait before ignition is tried again.


