MOBRIDGE M1000
-
M
-
DA SERIES |
INSTALL NOTES
PAGE
| 7
The Graphical Interface can be downloaded from our
website
, and can be used both online and offline mode.
However, in order to ‘Map the Channels’ you will need to be connected to the DA2/DA3 with power connected too.
Offline mode allows you to configure Graphic EQ settings and store them for later fine-tuning in the car if desired.
We recommend all tuning be done with a ‘Live’ System, because this way you can hear all changes being made in
real time. Graphic EQ, Crossover settings and Time Alignment changes, can all be heard as you make the
changes when ‘Live’.
Connecting and Channel Mapping
Once downloaded, we recommend you open the application and connect to your DA unit via a USB cable (not
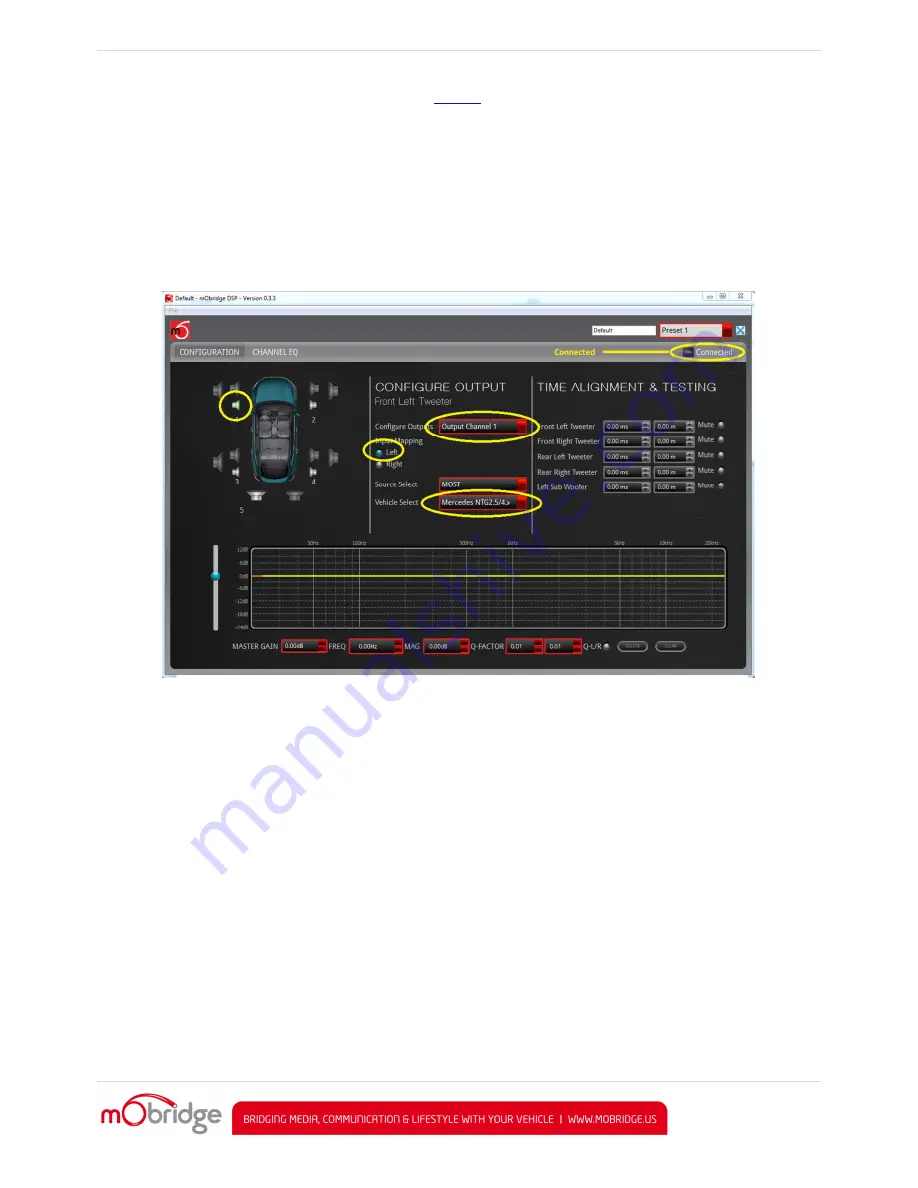
provided). If power is connected to the DA and turned on, you will see the below screen.
Figure 3 M1000-M-DA3 Connected
The first thing you will need to do is to select the vehicle the DA is being fitted to and then configure the channels
for the correct mapping of your particular system.
First select a speaker from the image of the vehicle then from the drop down menu in the middle of the screen,
select the channel output you have connected for that particular speaker. Repeat this for each speaker and its
corresponding output channel.
When running a component speaker system with a passive crossover, only select one of the speakers in the
cluster. It is not important which speaker is chosen, as this is only the mapping stage. Crossover settings will allow
for correct settings for this type of speaker system!
When connecting a Mono Subwoofer, simply select the speaker image and click the ‘Left’ & ‘Right’ buttons for the
input mapping in order for the M1000
-
M
-
DA3 to know that this is a ‘summed’ channel output, providing information
from both the left and right hand sides.
Crossover (Filter) Set up
After channel mapping, you will need to set the crossover for each of the speakers connected. To do this, first click
on the ‘Channel EQ’ TAB at the top left corner of the screen. This will open the Full EQ page for the individual
speaker selected.


