12-57
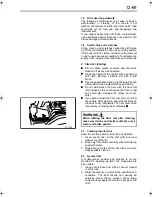
4. Lower the vehicle gently until the tire makes
contact with the ground.
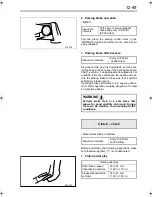
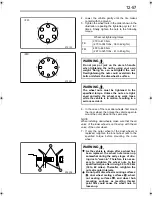
5. Tighten the wheel nuts in the order shown in the
illustration, repeating the tightening cycle 2 to 3
times. Finally, tighten the nuts to the following
torque.
6. In the case of the rear dual wheels, first mount
the inner wheel, then raise the vehicle again to
mount the outer wheel in the same way.
NOTE:
When installing dual wheels, make sure that the air
valve of the inner wheel is not lined up with the air
valve of the outer wheel.
7. If only the outer wheel of the dual wheels is
replaced, retighten the inner wheel nuts to the
specified torque before mounting the outer
wheel.
Wheel nut tightening torque
FK
370 to 410 N·m
(275 to 304 ft.lbs., 38 to 42 kgf·m)
FM
400 to 440 N·m
(297 to 325 ft.lbs., 41 to 45 kgf·m)
WARNING
Do not jump or jerk on the wrench handle
when tightening the nut by using your own
weight. Doing so can overtighten the nut.
Overtightening the nuts could overstrain the
bolts or deform the disc wheel’s surface.
WARNING
The wheel nuts must be tightened to the
specified torque. Unless the nuts are tight-
ened correctly, the wheel may work loose
while the vehicle is in motion, resulting in a
serious accident.
WARNING
•
As the vehicle is driven after a wheel has
been replaced, the wheel nuts loosen up
somewhat during the early stages of driv-
ing due to “wear-in”. Therefore, it is neces-
sary to retighten the wheel nuts to the
specified torque after driving 50 to 100 km
(30 to 60 miles). Thereafter, retighten the
nuts at regular intervals.
•
Do not paint disc wheel mounting surfaces
, dual wheel mating surfaces , wheel
nut seating surfaces , and wheel hub
mounting surfaces as resulting thicker
paint film could cause the wheel nuts to
loosen up.
Z12130
1
2
3
4
5
6
<FK>
1
2
3
5
6
7
8
4
Z10057
<FM>
Z09308
FKFM.book Page 57 Tuesday, February 1, 2005 8:21 PM
Summary of Contents for Fuso FK/FM 2006
Page 1: ...Owner s Manual Pub No Owner s Manual 2006 Model 2006 Model ...
Page 3: ......
Page 7: ......
Page 16: ...2 1 Locations in cab 2 2 Locations outside cab 2 4 2 Warning labels ...
Page 23: ......
Page 30: ...4 1 Seats 4 2 Seat belts 4 5 Steering wheel 4 9 4 Seat and steering wheel adjustments ...
Page 39: ......
Page 85: ......
Page 101: ......
Page 102: ...8 1 Anti lock brake system ABS 8 2 ABS warning lamp 8 4 8 ABS driving hints ...
Page 106: ...9 1 Heater 9 2 Air conditioner 9 5 9 Heating and air conditioning ...
Page 123: ......
Page 129: ......
Page 145: ...12 16 Simple inspection and service Z12031 Z12063 Z12065 Z12064 Z12066 ...
Page 146: ...12 17 Other than FM65F FM65F Z12067 Z11646 Z12069 Z00361 Z08242 Z12068 Z12070 Z12071 ...
Page 222: ...15 1 Maintenance schedule 15 2 Lubrication schedule 15 8 15 Maintenance schedule ...
Page 230: ...16 1 16 Alphabetical index ...
Page 233: ......


