ISTZ220019A
14
(4) IP address setting for PC
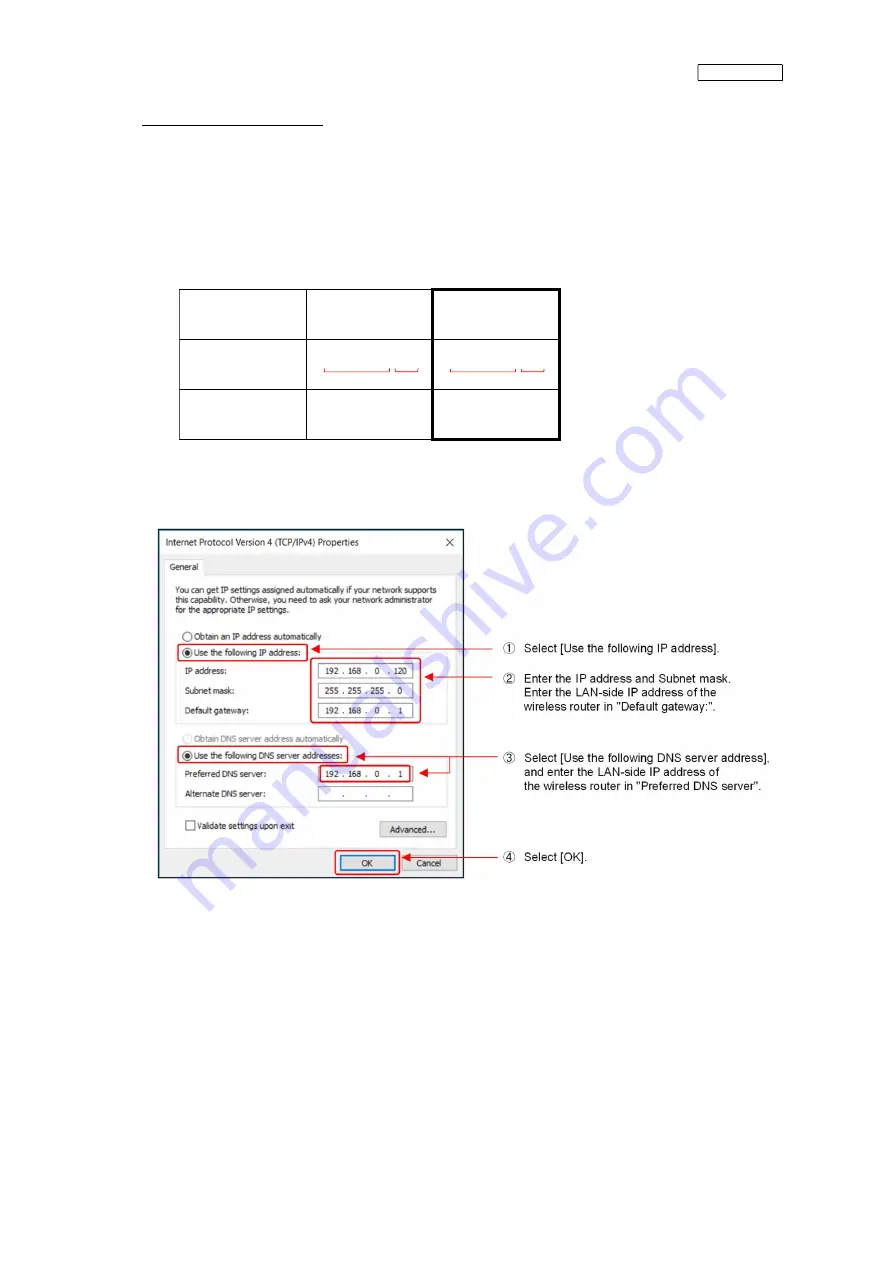
Change the IP address setting of the PC used to make settings again according to the gateway's IP
address specified in step (3-3).
In addition, you need to browse the web page on the PC in the next section (5), so set the default gateway
and DNS server. For details, refer to the following:
《IPアドレス設定例》
・IPアドレスのA部分はゲートウェイと同じ数値にしてください。
B部分は,1~254の範囲内で無線ルータ・ゲートウェイと異なる値を設定して下さい。
・サブネットマスクは,ゲートウェイと同じ数値としてください。
On the Windows desktop screen of your PC, select [Start] - [Settings] - [Network & Internet] - [Status] -
[Change adapter options] - [Ethernet] - [Properties] - [Internet Protocol Version 4 (TCP/IPv4)].
(*) For details on how to proceed on the screen, refer to step (3-1).
ゲートウェイ
パソコンの設定例
IPアドレス
192. 168. 0. 101
192. 168. 0. 121
サブネットマスク
255. 255. 255. 0
同左
A部
B部
A部
B部
<<IP address setting example>>
Set the A part of the IP address to the same value as the gateway.
For the B part, set a value different to that of the wireless router or gateway within the range
1 to 254.
Set the subnet mask to the same value as the gateway.
Gateway
PC setting example
IP address
Subnet mask
192. 168. 0. 101
A part
B part
192. 168. 0. 121
A part
B part
Same as the left.
255. 255. 255. 0
Summary of Contents for RM-CGW-E1
Page 11: ...ISTZ220019A 11 ...
Page 21: ...ISTZ220019A 21 ...
Page 22: ...ISTZ220019A 22 For PAC connected via interface ...
Page 23: ...ISTZ220019A 23 ...
Page 24: ...ISTZ220019A 24 For heat source unit ...
Page 26: ...ISTZ220019A 26 ...
Page 28: ...ISTZ220019A 28 ...
Page 36: ...ISTZ220019A 36 This completes the installation procedure ...
Page 38: ...ISTZ220019A 38 ...
Page 51: ...ISTZ220019A 51 This completes the installation procedure ...


