10
7.4. Function settings
7.4.1. By wired remote controller
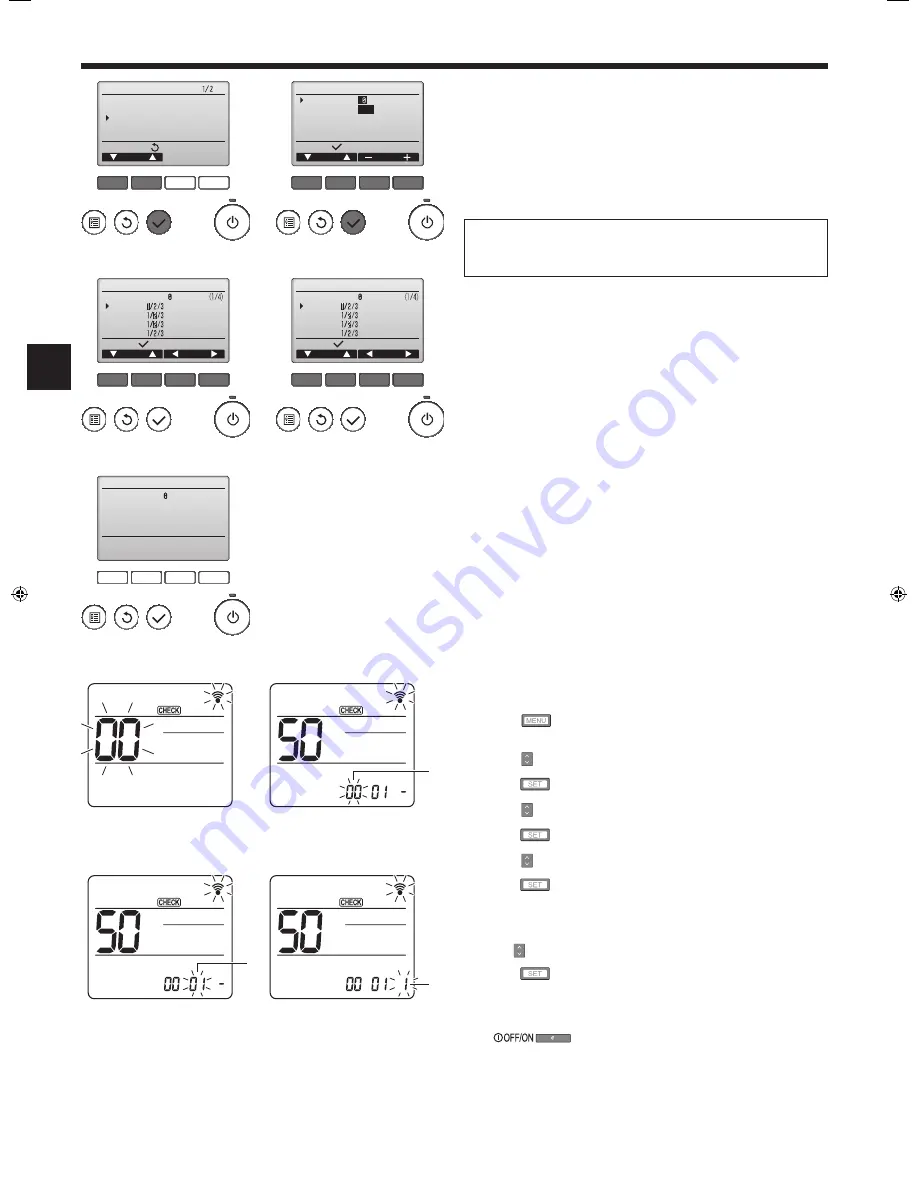
1
(Fig. 7-13)
• Select “Service” from the Main menu, and press the [SELECT] button.
• Select “Function setting” with the [F1] or [F2] button, and press the [SELECT]
button.
2
(Fig. 7-14)
• Set the indoor unit refrigerant addresses and unit numbers with the [F1]
through
[
F4
] buttons, and then press the [
SELECT
] button to confi rm the cur-
rent setting.
<Checking the Indoor unit No.>
When the
[
SELECT
] button is pressed, the target indoor unit will start fan opera-
tion. If the unit is common or when running all units, all indoor units for the se-
lected refrigerant address will start fan operation.
3
(Fig. 7-15)
• When data collection from the indoor units is completed, the current settings
appears highlighted. Non-highlighted items indicate that no function settings
are made. Screen appearance varies depending on the “Unit No.” setting.
4
(Fig. 7-16)
• Use the [
F1
]
or
[
F2
] button to move the cursor to select the mode number, and
change the setting number with the
[
F3
]
or
[
F4
]
button.
5
(Fig. 7-17)
• When the settings are completed, press the [
SELECT
] button to send the set-
ting data from the remote controller to the indoor units.
• When the transmission is successfully completed, the screen will return to the
Function setting screen.
7. Electrical work
F1
F2
F3
F4
Service menu
Cursor
Main menu:
Test run
Input maintenance info.
Function setting
Check
Self check
F1
F2
F3
F4
Function setting
Cursor
Address
Monitor:
Ref. address
Unit No.
Grp.
/1/2/3/4/All
Fig. 7-13
Fig. 7-15
Fig. 7-14
Fig. 7-16
F1
F2
F3
F4
Function setting
Cursor
Cursor
Request:
Ref. address
Mode 1
Mode 2
Mode 3
Mode 4
Grp.
F1
F2
F3
F4
Function setting
Cursor
Cursor
Request:
Ref. address
Mode 7
Mode 8
Mode 9
Mode 10
Unit # 1
Fig. 7-18
Fig. 7-20
Fig. 7-19
Fig. 7-21
F1
F2
F3
F4
Function setting
Ref. address
Sending data
Fig. 7-17
7.4.2. By wireless remote controller (Fig. 7-18, Fig. 7-19, Fig. 7-20, Fig.
7-21)
1
Going to the function select mode
Press the
button between of 5 seconds.
(Start this operation from the status of remote controller display turned off.)
[CHECK] is lighted and "00" blinks. (Fig. 7-18)
Press the button to set the "50".
Direct the wireless remote controller toward the receiver of the indoor unit and
press the
button.
2
Setting the unit number
Press the
button to set unit number
A
. (Fig. 7-19)
Direct the wireless remote controller toward the receiver of the indoor unit and
press the
button.
3
Select a mode
Press the button to set Mode number
B
. (Fig. 7-20)
Direct the wireless remote controller toward the receiver of the indoor unit and
press the
button.
Current setting number:
1=1 beep (1 second)
2=2 beep (1 second each)
3=3 beep (1 second each)
4
Selecting the setting number
Use the
button to change the Setting number
C
. (Fig. 7-21)
Direct the wireless remote controller toward the receiver of the indoor unit and
press the
button.
5
To select multiple functions continuously
Repeat select
3
and
4
to change multiple function settings continuously.
6
Complete function selection
Direct the wireless remote controller toward the sensor of the indoor unit and press
the
button.
Note:
Make the above settings on Mr. Slim units as necessary.
• Table 1 summarizes the setting options for each mode number.
• Be sure to write down the settings for all functions if any of the initial settings
has been changed after the completion of installation work.
A
B
C
BH79A235H02_en.indd 10
4/5/2016 4:39:15 PM


