background image

EN

EN-20

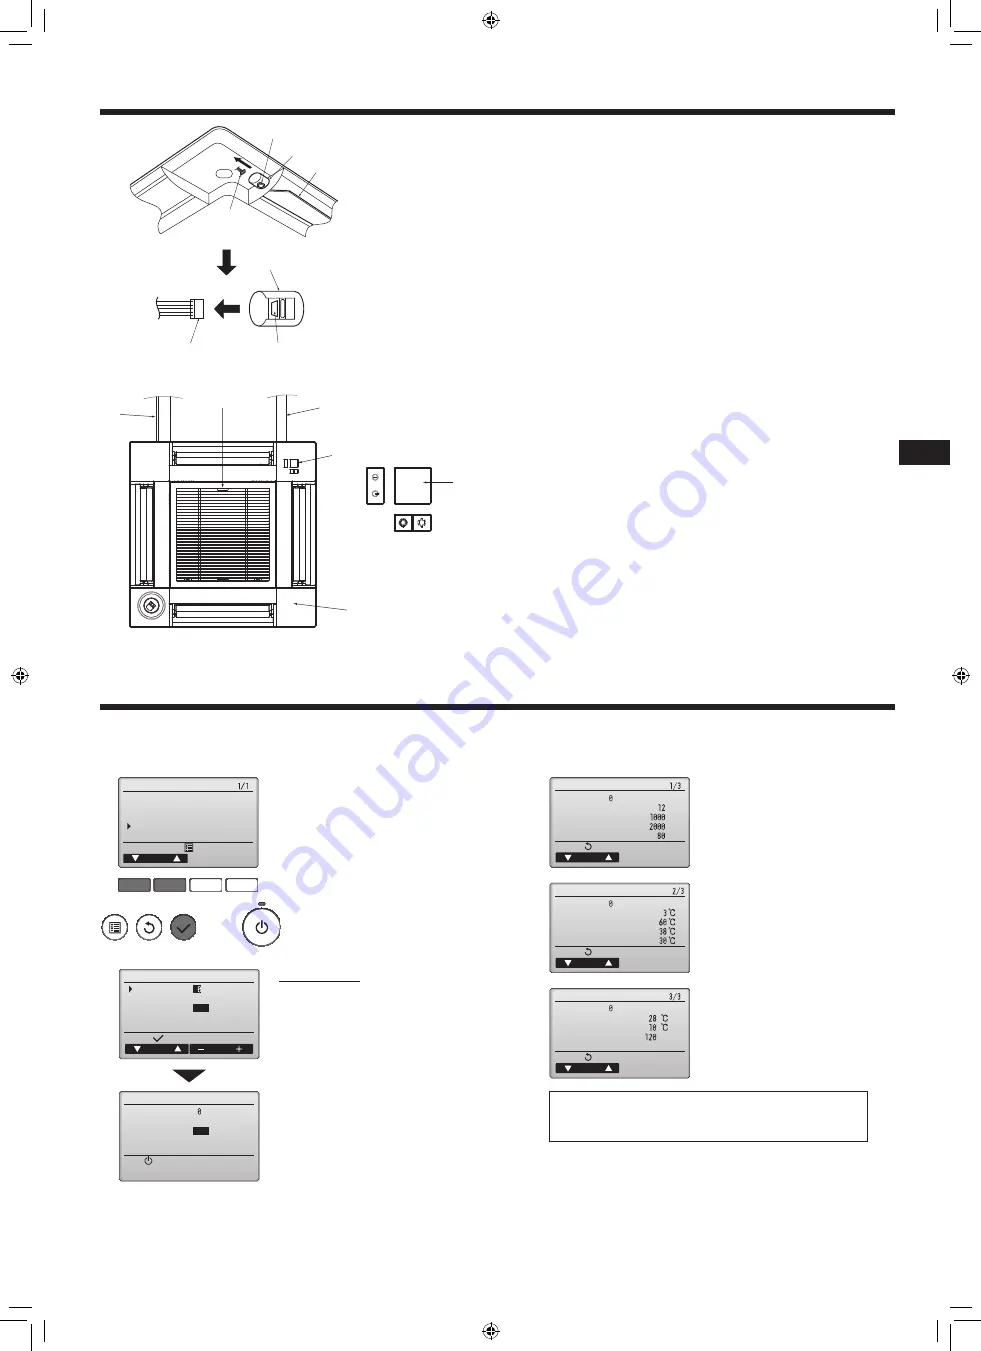
10.5.  Installing the intake grille (Fig. 10-17)

•  Perform the procedure that is described in “10.2. Preparing to attach the grille” in 

reverse order to install the intake grille and the corner panel.

A

  Refrigerant piping of the main unit

B

  Drain piping of the main unit

C

  Corner panel

D

  Position of the levers on the intake grille when sent from the factory.

* Although the clips can be installed in any of four positions.

E

 Receiver

10.6.  Check

• 

Make sure that there is no gap between the unit and the grille, or between the grille 
and the surface of the ceiling. If there is any gap between the unit and the grille, or 
between the grille and the surface of the ceiling, it may cause dew to collect.

•  Make sure that the wires have been securely connected.

•  Check that all four vanes move. If two or four vanes do not move, refer to 10.3. and 

check the connections.

•  For 3D i-See sensor corner panel, check the rotating movement. If the 3D i-See 

sensor does not rotate, review the procedure in “10.3. Installing the grille”.

Fig. 10-17

E

A

D

B

E

C

10.  Installing the grille

11.  Easy maintenance function

Maintenance data, such as the indoor/outdoor unit’s heat exchanger temperature and compressor operation current can be displayed with “Smooth maintenance”.

*  This cannot be executed during test operation.

*  Depending on the combination with the outdoor unit, this may not be supported by some models.

F1

F2

F3

F4

Check menu

Cursor

Service menu:

Error history
Refrigerant volume check
Refrigerant leak check
Smooth maintenance
Request code

Smooth maintenance

Begin:

Smooth maintenance

Exit:

Ref.address
Stable mode 

Cursor

Ref.address
Stable mode 

Stabilization→Collecting

Cool 

/ Heat/ Normal

Cool 

/ Heat/ Normal

Address

Smooth maintenance

Return:

Smooth maintenance

Return:

Smooth maintenance

Return:

Page

Page

Page

COMP. current
COMP. run time
COMP. On / Off
COMP. frequency

A

Hz

Hr
times

Hr

Ref. address

Cool

Ref.address

Cool

Ref.address

Cool

Sub cool
OU TH4 temp.
OU TH6 temp.
OU TH7 temp.

IU air temp.
IU HEX temp.
IU filter time

1

2

3

•  Select “Service” from the Main menu, and 

press the [SELECT] button.

•  Select  “Check”  with  the  [F1]  or  [F2]  but

-

ton, and press the [SELECT] button.

•  Select “Smooth maintenance” with the [F1] 

or [F2] button, and press the [SELECT] 
button.

Select each item.

•  Select the item to be changed with the [F1] or 

[F2] button.

•  Select the required setting with the [F3] or [F4] 

button.

“Ref. address” setting  ............ “0” - “15”
“Stable mode” setting  .............

“Cool” / “Heat” / 

“Normal”

•  Press the [SELECT] button, fixed operation will 

start.

*  “Stable mode” will take approx. 20 minutes.

The operation data will appear.

The Compressor-Accumulated operat-

ing  (COMP.  run)  time  is  10-hour  unit, 

and the Compressor-Number of opera-

tion  times  (COMP.  On/Off)  is  a  100-

time unit (fractions discarded)

Navigating through the screens

•  To go back to the Main menu

 ....................[MENU]  button

•  To return to the previous screen

 .......... [RETURN] button

Signal receiver

Fig. 10-16

A

 Button

B

  Vane motor

C

  Up/down vanes

D

 Connector

C

B

A

D

B

A

D

10.4.  Locking the up/down airflow direction (Fig. 10-16)

The vanes of the unit can be set and locked in on up or down orientation depending 
upon the environment of use. 

•  Set according to the preference of the customer.

  The operation of the fixed up/down vanes and all automatic controls cannot be 

performed using the remote controller. In addition, the actual position of the vanes 
may differ from the position indicated on the remote controller.

1

  Turn off the main power switch.


Injuries and or an electrical shock may occur while the fan of the unit is rotating.

2

  Disconnect the connector for the vane motor of the vent that you want to lock. 

  (While pressing the button, remove the connector in the direction indicated by the 

arrow as shown in the diagram.) After removing the connector, insulate it with tape.

BH79A367W01_01En.indd   20

2018/05/30   9:18:00

Summary of Contents for Mr. Slim SLZ-M15

Page 1: ...Air Conditioners SLZ M15 M25 M35 M50 M60FA FOR INSTALLER English INSTALLATION MANUAL BH79A367W01_cover indd 1 2018 07 26 10 16 08 ...

Page 2: ... during operation If refrigerant comes into contact with a flame poisonous gases will be released All electric work must be performed by a qualified technician according to local regulations and the instructions given in this manual Use only specified cables for wiring The wiring connections must be made securely with no tension applied on the terminal connections Also never splice the cables for ...

Page 3: ...transporting the units Two or more persons are needed to handle the unit as it weighs 20 kg or more Do not grasp the packaging bands Wear protective gloves as you can injure your hands on the fins or other parts Be sure to safely dispose of the packaging materials Packaging materials such as nails and other metal or wooden parts may cause stabs or other injuries Thermal insulation of the refrigera...

Page 4: ...nit grille A Outer side of main unit B Bolt pitch C Ceiling opening D Outer side of Grille E Grille F Ceiling G Min 500 mm Entire periphery If setting the maintenance space for G be sure to leave is a minimum of 700 mm H Maintenance space I Fresh air intake J Angle K Electric component box Leave the maintenance space at the electric component box end 1 When installing in an existing ceiling unit l...

Page 5: ...Secure the suspension bolts using the method shown or use steel or wooden hang ers etc to install the suspension bolts A Unit B Grille C Pillow D Ceiling E Rafter F Beam G Roof beam H Use inserts rated at 100 150 kg each procure locally I Suspension bolts M10 3 8 procure locally J Steel reinforcing rod 1 2 Fig 4 4 A Suspension bolt Procure locally B Ceiling C Nut Procure locally D Washer with insu...

Page 6: ...of 3 5 7 10 and 15 m are available as optional items 1 Table below shows the specifications of pipes commercially available Model Pipe Outside diameter Min wall thickness Insulation thickness Insulation material mm inch SLZ M15 SLZ M25 SLZ M35 For liquid 6 35 1 4 0 8 mm 8 mm Heat resist ing foam plastic 0 045 specific gravity For gas 9 52 3 8 0 8 mm 8 mm SLZ M50 For liquid 6 35 1 4 0 8 mm 8 mm For...

Page 7: ...ate indoor unit connections Insulate carefully following shown below 2 Heat insulation for refrigerant pipes 1 Wrap the enclosed large sized pipe cover around the gas pipe making sure that the end of the pipe cover touches the side of the unit 2 Wrap the enclosed small sized pipe cover around the liquid pipe making sure that the end of the pipe cover touches the side of the unit 3 Secure both ends...

Page 8: ... 9 mm or more insulation J Up to 850 mm 1 Connect the drain socket supplied with the unit to the drain port Fig 6 2 Affix the tube using PVC adhesive then secure it with a band 2 Install a locally purchased drain pipe PVC pipe O D ø32 Affix the pipe using PVC adhesive then secure it with a band 3 Insulate the tube and pipe PVC pipe O D ø32 and socket 4 Check that drain flows smoothly 5 Insulate th...

Page 9: ...anual for details 1 Max 45 m If 2 5 mm2 used Max 50 m If 2 5 mm2 used and S3 separated Max 80 m 2 Max 500 m When using 2 remote controllers the maximum wiring length for the remote controller cables is 200 m 3 The figures are NOT always against the ground S3 terminal has 24 VDC against S2 terminal However between S3 and S1 these terminals are not electrically insulated by the transformer or other ...

Page 10: ...gh the wire inlets in the electric component box Procure the power supply cord and indoor outdoor unit connecting cable locally 3 Securely connect the power supply cord and the indoor outdoor unit connecting cable to the terminal block 4 Secure the wires with the cable straps inside the electric component box Secure the wires with cable straps as cushioning components so that no stress is applied ...

Page 11: ... unit Fig 7 4 When routing the wires open the clamp securing the grille junction wire and then secure the grille junction wire and the wires of the i See sensor and signal receiver with the clamp 3 Remove the one screw securing the connector box cover and then open the cover Fig 7 5 4 Place the junction wire connector in the connector box 5 Install the wire cover and connector box cover Caution Wh...

Page 12: ...4 Initial setting The following settings can be made in the initial setting mode Item Setting Fig 7 10 Temperature unit ºC ºF A Time display 12 hour format 24 hour format B AUTO mode Single set point Dual set point C Pair No 0 3 D Backlight On Off E 4 1 Switching to the initial setting mode 1 Press the button 1 to stop the air conditioner 2 Press the button 2 The Function setting screen will be di...

Page 13: ...e 3 Mode 4 Grp F1 F2 F3 F4 Function setting Cursor Cursor Request Ref address Mode 7 Mode 8 Mode 9 Mode10 Unit 1 Fig 7 16 Fig 7 18 Fig 7 17 Fig 7 19 F1 F2 F3 F4 Function setting Ref address Sending data Fig 7 15 7 4 2 By wireless remote controller Fig 7 16 Fig 7 17 Fig 7 18 Fig 7 19 1 Going to the function select mode Press the button between of 5 seconds Start this operation from the status of re...

Page 14: ... 3D i See sensor corner panel position changed change this mode Refer to page 19 7 4 3 How to set the fixed up down air direction Only the particular outlet can be fixed to certain direction with the pro cedures below Once fixed only the set outlet is fixed every time air conditioner is turned on Other outlets follow UP DOWN air direction setting of the remote controller Explanation of word Refrig...

Page 15: ...al vane angle Input display Cur Address Check Ref address Unit No Identify unit Check button Confirmation procedure 1 First confirm by setting Ref address to 0 and Unit No to 1 Move the cursor to Ref address or Unit No with the F1 button to select Select the refrigerant address and the unit number for the units to whose vanes are to be fixed with the F2 or F3 button and press the SELECT button Ref...

Page 16: ... terminal block R S T and S1 S2 S3 After startup is displayed green once and red twice blink alternately F3 F5 F9 Outdoor unit s protection devise connector is open No display appears even when remote controller operation switch is turned on Operation lamp does not light up After startup is displayed green twice and red once blink alternately EA Eb Incorrect wiring between the indoor and outdoor u...

Page 17: ...he initial 2 beeps to confirm the self check start signal was received the specified refrigerant address is incorrect On wireless remote controller The continuous buzzer sounds from receiving section of indoor unit Blink of operation lamp On wired remote controller Check code displayed in the LCD Refer to the following tables for details on the check codes Wireless remote controller OPERATION IN D...

Page 18: ...ipped with the signal receiver 5 Junction wire for i See sensor 1 Included when equipped with the i See sensor 6 Fastener 2 Included when equipped with the signal receiver 7 Fastener 2 Included when equipped with the i See sensor 8 Wireless remote controller 1 Included when equipped with the wireless remote controller 9 Remote controller holder 1 Included when equipped with the wireless remote con...

Page 19: ...hat there are no gaps G Temporarily hanging hooks on the panel Caution When tightening the screw with captive washer C tighten it at a torque of 4 8 N m or less Never use an impact screwdriver It may result in parts damage After tightening the screw confirm that the two grille hooks Fig 10 5 are latched onto the hooks on the main unit E D F A 10 2 Preparing to attach the grille Fig 10 2 With the g...

Page 20: ... panel and install them Connect the junction wire connector and the wire connectors of the i See sensor and signal receiver in the connector box Close the connector box cover Secure the i See sensor and signal receiver wires to the panel with the fastener as shown in the diagram so that there is no slack in the wires and then cut off the excess end of the fastener Fig 10 12 Place the i See sensor ...

Page 21: ...ge Page Page COMP current COMP run time COMP On Off COMP frequency A Hz Hr times Hr Ref address Cool Ref address Cool Ref address Cool Sub cool OU TH4 temp OU TH6 temp OU TH7 temp IU air temp IU HEX temp IU filter time 1 2 3 Select Service from the Main menu and press the SELECT button Select Check with the F1 or F2 but ton and press the SELECT button Select Smooth maintenance with the F1 or F2 bu...

Page 22: ...1 Viale Colleoni 7 20864 Agrate Brianza MB Italy Norwegian Branch Gneisveien 2D 1914 Ytre Enebakk Norway Portuguese Branch Avda do Forte 10 2799 514 Carnaxide Lisbon Portugal Spanish Branch Carretera de Rubi 76 80 Apdo 420 08173 Sant Cugat del Valles Barcelona Spain Scandinavian Branch Hammarbacken 14 P O Box 750 SE 19127 Sollentuna Sweden UK Branch Travellers Lane Hatfield Herts AL10 8XB England ...

Reviews: