HEPA filter, pre-filter, and
dust box unit
13
E
Maintenance
When Dirty
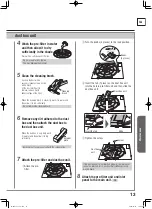
4
Wash the pre-filter in water
and then allow it to dry
sufficiently in the shade.
Wash with a soft sponge or the like.
Do not use a brush or the like.
This may damage the pre-filter.
5
Clean the cleaning brush.
Suck up the dust with a
vacuum cleaner using a nozzle
with a brush
(if the dust is difficult to
remove, remove it with
adhesive tape or the like).
When the cleaning brush is very dirty, wash it in water, and
then allow it to dry sufficiently.
Do not remove the cleaning brush.
6
Remove any dirt adhered to the dust
box and then attach the dust box to
the dust box unit.
When the dust box is very dirty, wash
it in water, and then allow it to dry
sufficiently.
Be careful not to injure yourself with the scraper plate.
7
Attach the pre-filter and dust box unit.
1
Attach the pre-
filter.
Cleaning
brush
Scraper
plate
2
Turn the knobs (4 places) to the lock position.
3
Insert the tab (1 place) on the dust box unit
into the hole in pre-filter unit and then slide the
dust box unit.
Dust box unit
Insert the tab
Slide
4
Tighten the screw.
Dust box
unit
Screw
If the dust box unit is not attached properly, the inlet panel
cannot be attached. Also, an abnormal (clattering) sound
may be heard.
8
Attach the pre-filter unit and inlet
panel to the main unit.
P.8
Knobs
(4 places)
ma-e85r-e_cs55.indb 13
2020/10/13 10:40:27
Summary of Contents for MA-E85R-E
Page 19: ...19 E Troubleshooting Note ma e85r e_cs55 indb 19 2020 10 13 10 40 29 ...
Page 39: ...19 ES Solución de problemas Notas ma e85r e_cs55 indb 19 2020 10 13 10 40 42 ...
Page 59: ...19 IT Risoluzione dei problemi Nota ma e85r e_cs55 indb 19 2020 10 13 10 40 56 ...
Page 79: ...19 Dépannage FR Remarque ma e85r e_cs55 indb 19 2020 10 13 10 41 09 ...

