background image


Safety, Operation, & Maintenance Manual 

Linear Cut Processing Systems


Replacing the Saw Blade 


001128 


26 


7


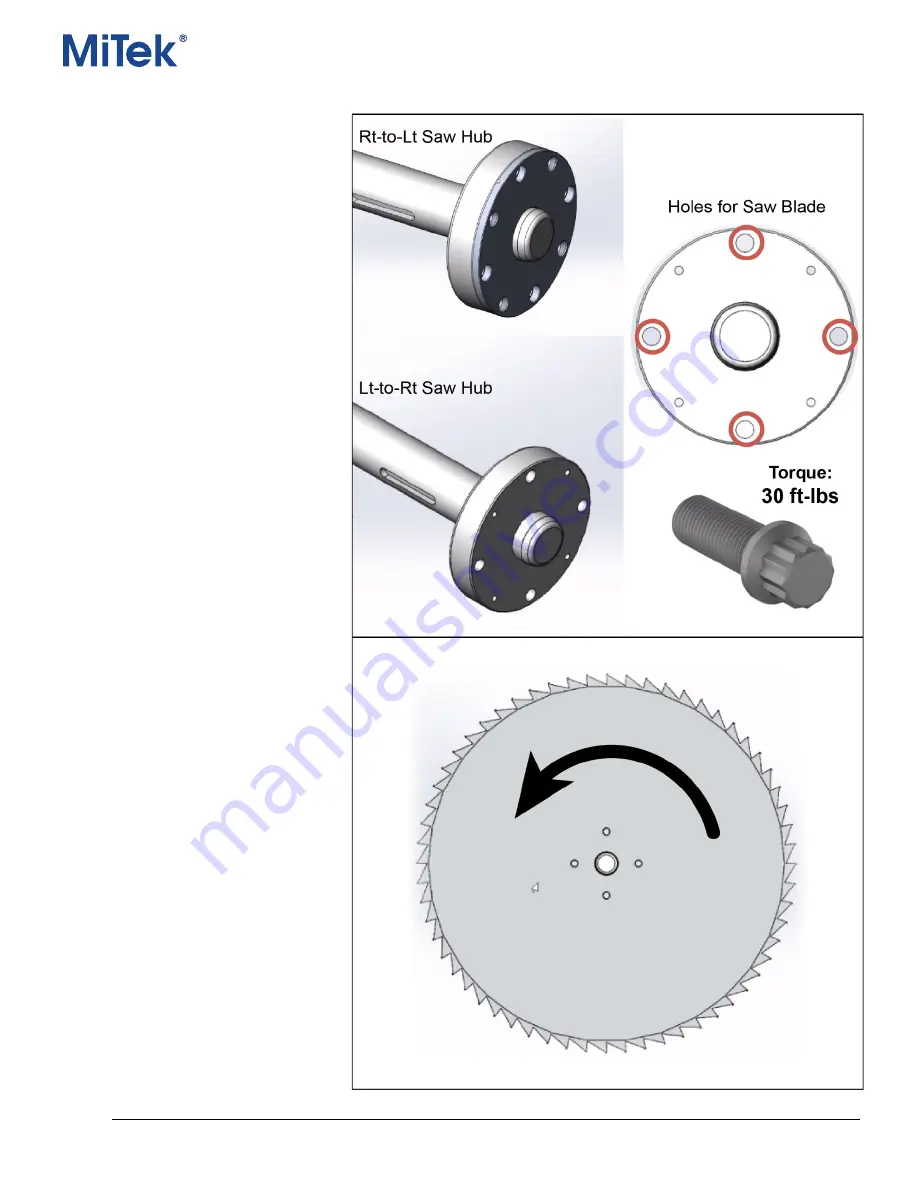
Replacing the Saw Blade 


Supplies:  


3/8” 12-point socket 


Torque wrench driver 

Frequency: 

Recommended once a week for 1-shift 

operations, but adjust as needed for your 

schedule and environment. 

Procedure: 

1.


Lockout/tagout 

2.


Open saw chamber door. 

3.


Manually turn rotational 

assembly until the blade and hub 

are at a convenient angle. 

4.


Remove 4 bolts holding saw 

blade. 

5.


Remove saw blade and set aside 

for retipping or safe disposal. 

6.


Place new or sharpened saw 

blade on arbor. 

7.


Tighten the bolts to the torque 

specification shown in the 

graphic. 


Summary of Contents for Hornet

Page 1: ...inear Cut Processing Systems MiTek Component Automation 301 Fountain Lakes Industrial Drive St Charles MO 63301 Phone 800 523 3380 Fax 636 328 9218 machinerysupport mii com PN 001128 Creation date 11 16 21 Created by R Tucker Applies to Gen 1 ...

Page 2: ...5 3 Starting the Computer CutBuilder Automation Software 5 5 4 Powering Up the Motor Controls 6 5 5 Homing the Pusher 6 5 6 Homing the Saw Angle 7 5 7 Preparing the Printer 7 6 Operation 8 6 1 Navigating the Software 8 6 2 Customizing the Home Screen Panes 9 6 3 Control Buttons Overview 10 6 4 Manual Mode 13 6 4 1 Jog Pusher Distance 13 6 4 2 Move Infeed Pusher Position 14 6 5 Cut Set Mode Optimiz...

Page 3: ...ng the Saw Blade 26 8 Preventive Maintenance 27 8 1 Lubrication 27 8 2 Belt Tensioning 28 9 Printer 29 9 1 Cleaning the Printer 29 9 2 Ink Cartridges 30 9 2 1 Storage and Environment 30 9 2 2 Ordering Replacement Ink Cartridges 30 9 2 3 Removing and Replacing Ink Cartridges 31 9 2 4 Re Using a Cartridge After an Operational Pause 32 10 Troubleshooting 33 ...

Page 4: ...y trained how to use the equipment safely and properly NEVER operate this system if there are known safety defects 1 2 2 Safety Features 2 2 1 Emergency Stop Buttons Mechanisms ENSURE all operators and other personnel around the equipment know the location of ALL safety stop Emergency Stop buttons mechanisms and the purpose and proper procedures for using them 2 2 2 Safety Guards NEVER operate equ...

Page 5: ...such as cutting manual marking routing etc Typically items are pushed from an infeed through a cutting device then onto an outfeed area Operator Interface A device used for the operator to acquire and deliver information to and from the overall process This is typically a computer monitor or touch screen device which provides such functionality as job processing machinery status executing machine ...

Page 6: ...e on and working properly 7 Feed Systems Ensure all feed systems if equipped are working properly 5 3 Starting the Computer CutBuilder Automation Software 1 If the computer is not already on start the computer by pressing its power button 2 Observe that the computer is on by any of these methods a Audibly by listening for the sound of the internal cooling fan inside the PC b Visually by seeing an ...

Page 7: ...e If this button is flashing in color this indicates homing is required and is the only option 2 The pusher will begin moving toward the homing sensor Once the pusher reaches the homing sensor it will move the opposite direction away from the sensor Then the pusher resets its internal reference and the pusher s homing is completed NOTE For efficiency always home the pusher before homing the saw ...

Page 8: ... 5 7 Preparing the Printer If the system is equipped with an inkjet printer perform the following steps to maintain the best printing quality possible 1 Visually inspect the nozzles on the front of the inkjet cartridges 2 If any noticeable damage to any cartridges is found replace the cartridge 3 Clean purge and test the printer PRINTER CARTRIDGES HAVE A SHELF LIFE OF 6 MONTHS ...

Page 9: ...Safety Operation Maintenance Manual Linear Cut Processing Systems Operation 001128 8 6 Operation 6 1 Navigating the Software ...

Page 10: ...different panes Generally the Cut Set pane should be the largest Turn pallets on or off using the View menu in the menu bar Arrange the panes by moving them to another panel and hovering over one of these pane pinning icons that appear View Save Pane Layout saves the current pane configuration as the default View Lock Panes will prevent them from being moved To move the panes select View Lock Pane...

Page 11: ...ut Set mode which is used for optimized cutting of full stock lengths into shorter cut lengths Operations Load Set Available Visible when in Cut Set mode Pressing Load Set does the following 1 Sends the push arm to a location adequate for loading the machine with the stock length of the active cut set 2 Loads the marking device with the information required for the active cut set 3 Opens the Cut S...

Page 12: ...st to the central operator of the system or the Far kickers furthest from the main operator location Outfeed Test Kickers Out In Used to for testing purposes only to check functionality of all pneumatic kicking mechanisms Pressing Test Kickers Out will execute all kickers to extend out Pressing Test Kickers In will retract the kickers back to their normal position Note The system does not allow ru...

Page 13: ...Safety Operation Maintenance Manual Linear Cut Processing Systems Operation 001128 12 Live Deck Buttons ...

Page 14: ...tance 6 4 1 Jog Pusher Distance The Jog function is used to move the pusher either forward or backward a specified distance To begin jogging press the Jog button as shown here If wanting to move to a specified position refer to the Move button The Jog Infeed Pusher window will appear Speed and distance can be set by the operator Pressing the right or left arrow buttons will move the push arm accor...

Page 15: ...ill appear Enter a distance then select Go to execute and the pusher will move to the position entered Example The push arm will move to a position of 16 2 3 8 from the cutting device blade Select Park to quickly move the infeed pusher to its park position which is at the end of the infeed conveyor farthest away from the saw blade The exact location can be adjusted using the Load Offset setting in...

Page 16: ...CutSet Mode is used for cutting entire lists of cut items from long stock lengths for optimal usage of material This section describes how to use the many features for optimizing material and easily managing jobs 6 5 1 Job Management Jobs are managed using the Job Manager window To open the Job Manager press the My Jobs button ...

Page 17: ...es 2 Manually Entering 6 5 2 1 Opening Files To start a new cutting job by opening files follow these steps referring to the diagram below 1 Select My Jobs from the menu bar 2 Press the Import Files button 3 Browse to and select the desired file s 4 Press Open to finalize and import the files Once your files are imported correctly a confirmation window displays confirming successful processing ...

Page 18: ...ly created as a batch in the software it will behave much like any other job meaning it can be optimized has print labels etc The following steps will guide you through the process of entering a manual list for cutting directly at the machine 1 Go to My Jobs 2 Tap on Manual List 3 Build a cutting list by selecting desired material and entering length quantity then tap Add To List 4 Tap Exit when f...

Page 19: ...of a house and has many different dimensional lumber in use You want to cut only the part types that are 2x4s used for Bottom Plates and Top Plates Toggles on those items as shown below and the cutting solution will only include those items in the cutting mix When you want to cut the rest of the items simply follow the same principal and toggle on the other items Toggle controls are available for ...

Page 20: ...ze one or many different stock lengths When multiple stock lengths are chosen the optimizer will use all selected lengths and produce cut sets based upon whichever stock length would produce the least waste for each cut set created If you cannot find the stock length you are looking for easily add edit the stock length library by clicking the Lengths button in the lower left of the window to acces...

Page 21: ...intenance Manual Linear Cut Processing Systems Operation 001128 20 6 5 3 2 Optimizing Material After all your selections have been made press the Optimize button and the cutting solution will appear in the Cut Sets panel ...

Page 22: ...achine To manually indicate an active cut set select it by clicking anywhere there is text in the Cut Set row 2 View Cut Part Details and Printed Image Click the board image and the Cut Part Details screen displays details about the Cut Set and shows an image of the printing that part will receive 3 Complete Incomplete During normal operation the Hornet will automatically complete each cut set as ...

Page 23: ... conveyor Can also cut 2x lumber as a single board Lumber thicker than 2x dimensional lumber can only be cut 1 board high Ensure the boards used Have no staples and no standing water on them Are tight up against the pusher when placed on the infeed conveyor Aligning the stacked boards If there is no Live Deck infeed conveyor both boards must be loaded onto infeed rail tight against the pusher If l...

Page 24: ...ely following these steps 1 Select the CUT SETS button from the software 2 Select the LOAD SET button The Cut Set Operations window appears and the next batch of Cut Sets are imported 3 Verify the correct lumber is loaded WARNING Before beginning cutting operations check that the machine is safe and clear of all personnel and objects as the infeed pusher will be activated with motion 4 Select the ...

Page 25: ...or the current Cut Set are cut then the Cut Complete button appears 6 Click Cut Complete and the next Cut Set is loaded 7 Once all Cut Sets are cut select QUIT 8 Select the RESET button in the software 9 Select the LOAD SET button again to import another batch of Cut Sets 6 7 Reading the Printed Data ...

Page 26: ... password to access The System Settings window requires the interface password to access Once in the settings window click on the left side and start typing or double click on the right side to highlight the number and replace it Recommended settings are available but be aware that there are many reasons for deviating from the recommended value There is no undo and the new settings are automatical...

Page 27: ...hift operations but adjust as needed for your schedule and environment Procedure 1 Lockout tagout 2 Open saw chamber door 3 Manually turn rotational assembly until the blade and hub are at a convenient angle 4 Remove 4 bolts holding saw blade 5 Remove saw blade and set aside for retipping or safe disposal 6 Place new or sharpened saw blade on arbor 7 Tighten the bolts to the torque specification s...

Page 28: ...peration Maintenance Manual Linear Cut Processing Systems Preventive Maintenance 001128 27 8 Preventive Maintenance 8 1 Lubrication It is recommended to lubricate on the same schedule as your saw blade changes ...

Page 29: ...n Maintenance Manual Linear Cut Processing Systems Preventive Maintenance 001128 28 8 2 Belt Tensioning Two belts need to be tensioned occasionally Saw motor belt Saw arbor belt Follow this graphic to tension the belt ...

Page 30: ... of the cartridges Be careful not to push too hard as the cartridge could become unseated from inside its stall and cause damage to the printer Let the wet cloth dissolve any dried ink by holding it gently on each nozzle When dried ink is dissolved a small amount of fresh ink should flow through the nozzles and into the wet rag via capillary action 5 Once the nozzles appear to be clean and only fr...

Page 31: ...5 F Shelf Life 6 months less if cartridge has been used Do NOT shake the cartridge Handle with care Take care never to let ink cartridges freeze Freezing will cause the water in the ink to separate and will ruin the cartridge Cartridges ordered from during the winter months must be shipped via air freight to ensure they are always kept above freezing temps 9 2 2 Ordering Replacement Ink Cartridges...

Page 32: ... Cartridges Use the C6 circuit breaker inside the electrical enclosure or lockout tagout the entire saw Never remove a cartridge from the stall assembly while the print head s green TRG light is flashing or you risk damaging the cartridge and or the print head When replacing a cartridge gently insert it at an angle where the far end drops into the carriage first C6 Circuit Breaker ...

Page 33: ...more than 1 day Remove cartridges from machine clean as described in the cleaning section and place in airtight container Clean and purge before next use o Cartridges should always be stored with the nozzles facing down 2 Upon removing the print cartridge from its container for re use clean as described in the cleaning section 3 Install the cartridge according to the instructions in the Removing a...

Page 34: ...sing Load Set or loading a cut set 1 Emergency Stop Active 2 Marking device not functioning properly or is in error state 3 Unknown Event 1 Check Emergency Stop s and or CutBuilder Automation for Emergency Stop warning and take proper actions to correct all safety issues if present 2 a Reset the printer b Replace damaged ink cartridge 3 Press Halt then press Reset then retry resuming operations ...

Reviews: