background image

GUIDE TO INSTALLATION AND OPERATION 
 

34

  |  HMP-1801 


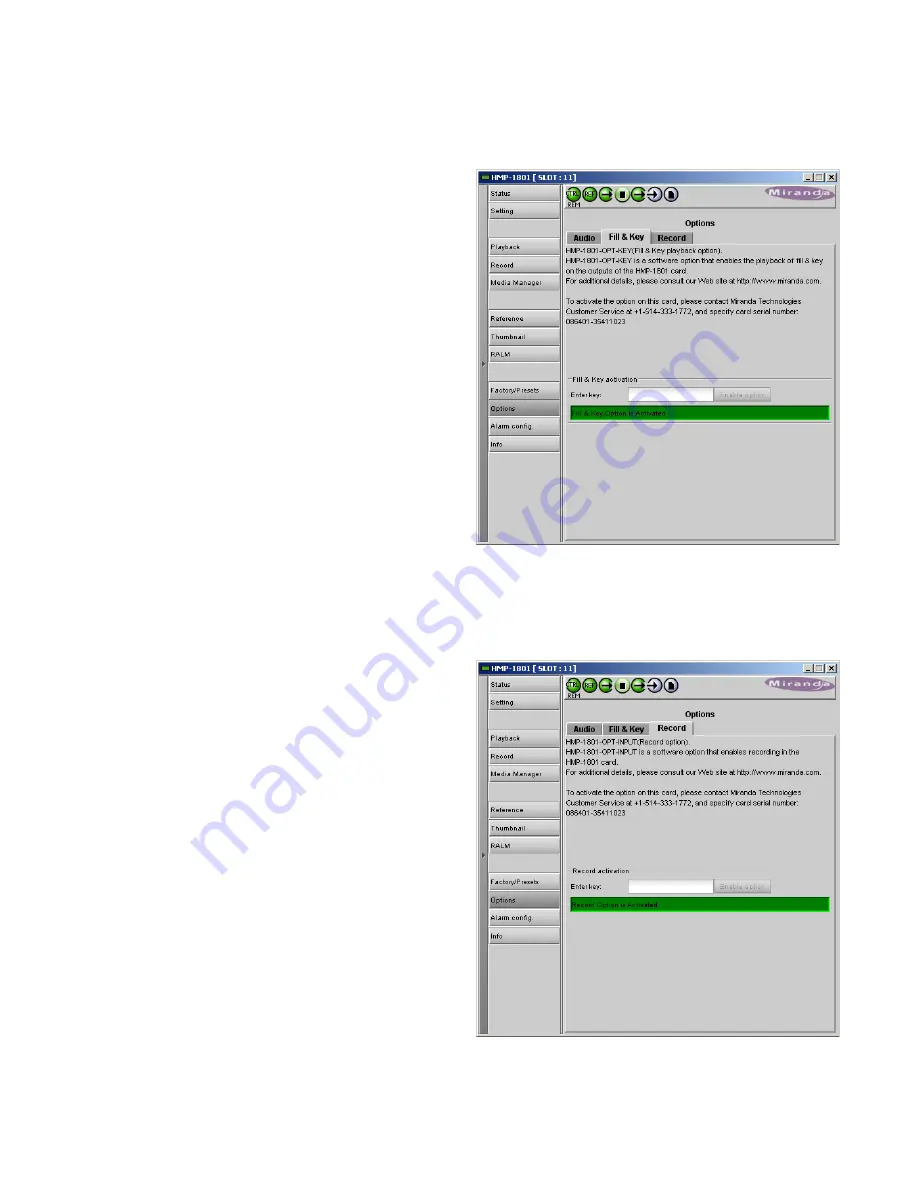
HMP-1801-OPT-KEY option (Fill & Key) 

 
This option provides the extraction of a Key signal that is 
sent to output 2 of the HMP-1801. This enables the use of 
the two HMP-1801 outputs as Fill and Key, for applications 
where the HMP-1801 is feeding a downstream keyer that will 
insert its output into a video program stream.  
 
Miranda supplies an activation key when the option is 
purchased. The panel includes a data entry box “Enter Key” 
where the activation key can be entered. 


Enter the Key in the data box, and click the 

Enable 

Option

 button to activate the feature. 

 
Once activated, the Fill/Key mode can be enabled or 
disabled using the 

Output Configuration

 buttons in the Card 

Config panel (see Section 3.4.3) 


HMP-1801-OPT-INPUT (Record) 
 

This option enables the recording feature of the HMP-1801. 
 
Miranda supplies an activation key when the option is 
purchased. The panel includes a data entry box “Enter Key” 
where the activation key can be entered. 


Enter the Key in the data box, and click the 

Enable 

Option

 button to activate the feature. 


Figure 3.30  Options panel - Fill & Key 

Figure 3.31 Options panel - Record 

Summary of Contents for HMP-1801

Page 1: ...on Media Player Guide to Installation and Operation M864 9900 108 21 Mar 2012 Miranda Technologies Inc 3499 Douglas B Floreani St Laurent Québec Canada H4S 1Y6 Tel 514 333 1772 Fax 514 333 9828 www miranda com 2012 Miranda Technologies Inc ...

Page 2: ...nce at his own expense This equipment has been tested and found to comply with the requirements of the EMC directive 2004 108 CE EN 55022 Class A radiated and conducted emissions EN 61000 3 2 Harmonic current injection EN 61000 3 3 Limitation of voltage changes voltage fluctuations and flicker EN 61000 4 2 Electrostatic discharge immunity EN 61000 4 3 Radiated electromagnetic field immunity radio ...

Page 3: ...d Rear Modules in a Densité 3 Frame 8 2 4 Rear Connector Panels 10 2 4 1 Ethernet Port Configuration 10 2 4 2 GPI Connector 11 2 4 3 VDCP Connector 12 3 Operation 13 3 1 Control options 13 3 2 Card Edge Status LED 13 3 2 1 Playback Mode 13 3 2 2 Record Mode 14 3 3 Local control using the Densité frame control panel 14 3 3 1 Overview 14 3 3 2 Menu for local control 15 3 4 Remote control using iCont...

Page 4: ...rmware Upgrade 62 4 2 1 Using the Miranda Interface Updater MIU 62 4 2 2 Using the HMP 1801 webpage 63 5 Specifications 65 ANNEX 1 HMP 1801 User Interface local menu structure 67 A HMP 1801 in PLAYBACK mode 67 B HMP 1801 in RECORD mode 69 ANNEX 2 VDCP Commands Supported by HMP 1801 71 ANNEX 2 VDCP Commands Supported by HMP 1801 71 System Commands 71 Immediate Commands 71 Preset Select Commands 72 ...

Page 5: ... or HD reference signals or run on its own timebase accurate oscillator Multiple cards installed in the same frame can be locked to an in frame reference generated by the optional REF 1801 card 1 2 Features o Capture and playback of video audio and ANC such as closed captioning timecode AFD Name dropper and Dolby E metadata o Playback of a single clip or a sequence of clips called a clip list o Su...

Page 6: ...k diagram of the HMP 1801 1 4 Front Card edge Interface The front card edge of the HMP 1801 incorporates four elements Status LED see section 3 2 Select Button see section 3 3 Compact Flash status indicator Ethernet Status indicator Select Status HMP 1801 Status LED Select Button Compact Flash Status Ethernet Status Figure 1 2 Front card edge layout ...

Page 7: ...o and 25Mbps for SD contents The HMP 1801 allows the export and import of compressed data files and it is convenient to use this approach when exchanging video essences between cards The HMP 1801 can import these file formats Sequence or still BMP Sequence or still JPG Sequence or still 24 bit TGA without alpha channel Sequence or still 32 bit TGA with alpha channel Morgan MJ2K compressed AVI Quic...

Page 8: ...ame s interface This independent interface is used to load data configure and manage clips and upgrade card s firmware This interface is described in detail in Section 4 1 5 Applications The following diagrams show some typical applications for the HMP 1801 1 5 1 Apology Clip or Full Screen Promo Playback 1 5 2 Animated Curtains into Up Down Cross ARC ...

Page 9: ...GUIDE TO INSTALLATION AND OPERATION HMP 1801 5 1 5 3 Fill Key 1 5 4 Direct Capture ...

Page 10: ...GUIDE TO INSTALLATION AND OPERATION 6 HMP 1801 1 5 5 Advanced Workflow Option ...

Page 11: ...P 1801 3SRP HMP 1801 2OUT 3SRP The Densité 2 rear panel can also be used in a Densité 3 frame with the addition of an available adapter HMP 1801 DRP DENSITE DRP 3RU All cards and rear panels can be installed with the frame power on The card has connectors which plug into a mid frame mother board for distribution of power and for connection to the controller card and a second connector which plugs ...

Page 12: ...that there is no connection to the rear panel 3 Close the front panel of the frame 2 3 Installing Densité 2 Cards and Rear Modules in a Densité 3 Frame The Densité 3 frame supports many Miranda Densité 2 series cards including the HMP 1801 Should you wish to install the HMP 1801 card in your Densité 3 frame you will need an adapter for the card You may use one of the two 3 RU rear panels that are ...

Page 13: ... the adapter at the top of the empty slots on the rear of the frame 2 Use the captive screw in the adapter to fasten it securely in position the figures show a single width adapter and rear panel but the installation procedure is identical 3 Slip the top of the 2RU rear panel into the slot at the bottom of the adapter and secure it to the frame using the captive screw at the bottom of the panel ...

Page 14: ...control over VDCP protocol 2OUT 3SRP 3RU One reference input Two video outputs One HD15 connector for GPI I O lines 6 in 6 out One RJ 45 for media transfer over Ethernet One RJ 45 RS422 for control over VDCP protocol With the double width rear panel installed in a Densité 2 frame the HMP 1801 must be installed in the right most of the two slots covered by the panel in order to mate with the panel ...

Page 15: ... panel in an iControl environment see Section 3 4 3 7 or via the Densité frame control panel using the menu shown in the Annex on page 67 The window to accept a GPI command for the next frame starts at line 1 of the current frame and ends 210 µs before the start of line 1 of the next frame To be considered as valid a GPI must stay low for at least 20 µs The GPI OUT lines are tallies for their corr...

Page 16: ... response delay of the HMP 1801 is not constant Particular attention was paid to the immediate commands where it is necessary to respond within a frame A window of validity has been defined where the response time is constant and guaranteed The chart and diagram following illustrate the concept and show the timing for various video formats 720p59 94 is the worst case For VDCP the 11 ms gray zone w...

Page 17: ...D is located on the front card edge of the HMP 1801 and is visible through the front access door of the DENSITÉ frame This multi color LED indicates the status of the HMP 1801 by color and by flashing steady illumination The chart shows how the various error conditions that can be flagged on the HMP 1801 affect the LED status If a cell is gray the error condition cannot cause the LED to assume tha...

Page 18: ...ach 16 characters in length and five pushbuttons The panel is assigned to operate any card in the frame by pushing the SELECT button on the front edge of that card Pushing the CONTROLLER button on the control panel selects the Controller card itself The STATUS LED on the selected card flashes yellow The local control panel displays a menu that can be navigated using the four pushbuttons located be...

Page 19: ... Remote control using iControl The operation of the HMP 1801 may be controlled using Miranda s iControl system This manual describes the control panels associated with the HMP 1801 and their use Please consult the iControl User s Guide for information about setting up and operating iControl In iControl Navigator or iControl Websites double click on the HMP 1801 icon to open the control panel 3 4 1...

Page 20: ...ng the menu Icon 2 Reference status Green Playback mode Locked to external reference Red Playback mode card is configured in external reference mode but no external reference is detected Yellow Playback mode card is configured in internal reference mode Gray Reference DISABLED HMP 1801 is in Record mode Icon 3 Output 1 reference mismatch Green OK no mismatch Red mismatch detected in playback mode ...

Page 21: ...ut mouse over If there are multiple errors the error messages cycle so all can be seen The icon whose status or error message is shown is highlighted with a mauve background 2 The left hand side of the panel contains a series of buttons that control the contents of the main window i e section 3 Click on one to access the indicated controls The selected button is highlighted darker and the main pan...

Page 22: ...rted here If the Auto negotiate option is chosen there then look here to see the actual status Hardware tab This tab reports on various aspects of the performance of the HMP 1801 hardware The upper section reports on usage of the CPU and the compact flash media Click the Refresh CPU Status button to update the reported values The lower portion reports the size of RAM and Compact Flash memory insta...

Page 23: ...tname Click the Cancel button to leave the old hostname unchanged IP Address Mask Gateway The three data boxes show the IP address subnet mask and gateway for the rear panel ethernet port To change any of these values type a new address directly into the data box Consult with your network manager if necessary to obtain the appropriate addresses within your LAN Click the Apply button to install the...

Page 24: ...D 100 BASE TX HD 10 BASE T FD 10 BASE T HD 3 4 3 2 The General Storage tab Use the slider in this tab to set the memory level threshold This is the threshold at which the card will flag a memory low error 3 4 3 3 The General Protocol tab Use the pulldown to select the protocol Choices Oxtel VDCP note available only for firmware versions 5 1 0 and up Figure 3 6 Settings General Storage tab Figure 3...

Page 25: ...will be loaded by default whenever no other clip is selected or the system is reset etc Output Config set the configuration of Output 2 Auto Output 2 will be the Key output when Fill Key mode is active or the right eye when stereoscopic playback is active Copy of Output 1 Always even when Fill Key mode is activated 3 4 3 6 The Playback Audio tab The HMP 1801 allows the playback of up to 8 audio ch...

Page 26: ...nd copy of the timecode into the signal nominally two lines later This makes detection of the analog time code signal more reliable Closed Caption Insertion turn closed Caption insertion into the output data stream ON or OFF Dolby Metadata Insertion turn Dolby metadata insertion into the output data stream ON or OFF Dolby Metadata Line Insert select the line into which the Dolby Metadata will be i...

Page 27: ...activated showing all available clips Select the clip that will be cued or cued and played when this GPI is triggered 3 4 3 9 The Setting Record tab The Record tab in the settings panel is only available when the HMP 1801 is in the Record mode When the HMP 1801 is in the Playback mode this tab will be gray and non functional To change over to Record mode when in Playback mode open the Record panel...

Page 28: ... be ingested Click the checkboxes in the matrix to assign input channels to destination channels 3 4 3 12 The Record ANC tab AFD Extraction If enabled the AFD code will be captured during the record process Time Code Extraction If enabled the time code will be captured during the record process Closed Caption Extraction If enabled the closed caption will be captured during the record process Dolby...

Page 29: ...utton to switch the HMP 1801 from Record mode to Playback mode The panel display will change to show the playback operating controls as described here The window lists all the Clip Lists currently available for playback on this card Click the Refresh Clip List button to update the list useful when maintenance operations are in progress Click on a Clip List in the window to select it The selected C...

Page 30: ...erties button above the window These characteristics are specified using the Ingest and Configuration Utility as described in Section 4 1 3 3 They cannot be changed here Parameter Contents AFD Insertion Gives the static AFD code of the clip Name Name of the clip Image position Location of the top left corner of the image on the screen in pixels X horizontal Y vertical Video essence Output 1 The na...

Page 31: ...o ends Metadata Indicates the presence of certain metadata types YES or NO AFD Dolby Metadata Timecode Closed Caption Name Dropper 3 4 4 1 Operating the card using this panel Figure 3 19 shows the operating controls on the Playback panel Click on a clip in the window to select it Click on the Cue button to cue the clip to the first frame The name of the clip will appear in the Cue status box when ...

Page 32: ...le in pause pressing PLAY will restart the current clip Pressing PLAY again will start the second clip 3 4 5 The Record panel This panel provides controls for operating the recording features of the HMP 1801 If the HMP 1801 is currently in PLAYBACK mode this panel will display a single button Click on this button to switch the HMP 1801 from Playback mode to Record mode The panel display will chang...

Page 33: ...ference panel 3 4 7 1 The Reference Reference tab The status icons in the Reference Presence area indicate the presence or absence of an external reference or the Densité frame s URS signal Use the radio buttons in the Reference Source area to select from the following options Auto this mode selects the first source detected in this order of priority o External reference o URS o Internal reference...

Page 34: ...OTE The sliders change the timing values for the active output format only Each format has its own set of timing values In internal mode the timing alignment feature is disabled Key Offset These controls allow the user to apply additional delay to the key output to compensate for timing differences introduced into the system by cabling differences between the key and fill paths Use the sliders or ...

Page 35: ...hese choices Output 1 Output 2 3 4 9 The RALM panel The Remote Audio Level Meter RALM panel displays audio level meters that can be assigned to the audio channels of the HMP 1801 Each of the four meters displays two audio channels Use the pulldowns in the RALM Remote Control section at the bottom of the panel to select the source for each meter display Options are OFF Embedded Ch 1 2 Embedded Ch 3...

Page 36: ...rent selected color for the upper middle and lower zones of the meter Click on the color sample of a zone to open a color selection panel to choose a different color for that zone Overload Cursor The overload cursor appears on the meter as an arrowhead in the meter scale The two pulldown boxes set the position of the overload cursor on the left and right meters If the audio level on that channel g...

Page 37: ...ents of the selected User Preset into the HMP 1801 All parameter settings and values will be replaced by the contents of the selected User Preset Click Save to store the current parameter settings and values from the HMP 1801 into the selected User Preset The existing contents of the preset will be overwritten 3 4 11 The Options panel There are three options available on the HMP 1801 HMP 1801 OPT ...

Page 38: ...r Key where the activation key can be entered Enter the Key in the data box and click the Enable Option button to activate the feature Once activated the Fill Key mode can be enabled or disabled using the Output Configuration buttons in the Card Config panel see Section 3 4 3 HMP 1801 OPT INPUT Record This option enables the recording feature of the HMP 1801 Miranda supplies an activation key when...

Page 39: ...is no arrowhead in the box there is no pulldown and the alarm is not user configurable CARD LED This column allows configuration of the behavior of the HMP 1801 s card edge Status LED Overall Alarm This column allows configuration of the contribution of each individual alarm to the Overall Alarm associated with this card The Overall Alarm is shown in the upper left corner of the iControl panel and...

Page 40: ...tatus Name column you will open a pulldown list that lets you assign a level to all alarms in that section of the column simultaneously Log Events iControl maintains a log of alarm events associated with the card The log is useful for troubleshooting and identifying event sequences Click in the checkbox to enable logging of alarm events for each individual alarm At the bottom of the window are sev...

Page 41: ...en a save dialog where you can save a file containing a list of all alarms on this card and their current values along with an Alarm Key for each The alarm keys are useful for system integration and troubleshooting The file is saved in csv format OK Apply Cancel OK accepts the settings and closes the window once the card confirms that there are no errors Apply accepts the settings but leaves the w...

Page 42: ...when it appears in iControl applications Short Label type the short form label that iControl uses in some cases 8 characters Source ID type a descriptive name for this HMP 1801 Comments type any desired text The remaining data boxes show manufacturing information about this card Three buttons give access to additional information and controls Details Reports the Firmware version service version an...

Page 43: ...ce the iControl service for this HMP 1801 to register itself on a user specified Jini lookup service using the following syntax in the Input dialog jini ip_address where ïp_address is the ip address of the server running the lookup service Remove select one of the services listed in the window by clicking on it and click Remove to delete it from the window Figure 3 39 Joining Locators window ...

Page 44: ...e Firmware Upgrade see Section 4 2 Click on the link to access the desired resource Figure 4 1 Onboard Web Server Home Page 4 1 Ingest and Configuration Utility The Ingest and Configuration Utility of the HMP 1801 can be accessed via either of two methods Navigate to the HMP 1801 s rear panel ethernet port s IP address using a browser and click on the Start the Configuration Utility link in the on...

Page 45: ... 1 1 Playback The Playback panel provides resources to select a Clip List cue it and play it If the card is currently in Record mode this window displays an Enable Playback Mode button Click the button to switch the card to Playback mode This is equivalent to switching the card mode via the iControl interface see Section 3 4 4 on page 25 This will interrupt the card s output for a few seconds Once...

Page 46: ...ee section 4 1 3 1 for a description of how to do this Click on a Clip List to select it The selected Clip List will be highlighted in the Playlists window Below the Playlists window you will see an image of the first frame in the Clip List Beside the thumbnail are given the name of the selected Clip List its video format and the number of clips it contains To see the clips contained in the select...

Page 47: ...nt time is shown numerically beside the Play button Note that the time will continue to increment when the clip reaches the end if the end clip behavior is set to Hold Last Frame When a Clip List is playing click Pause to freeze it Click Play to resume playback from the same spot Click Stop to end playback the pause location is lost When a Clip List is playing or paused click Stop to end playback ...

Page 48: ...icon at the right to exit the edit mode and leave the old name unchanged Click the accept icon at the right to exit the edit mode and use the new name Clicking in the Recording Name area has the same effect The bar chart at the bottom of the panel shows the memory usage on the HMP 1801 s flash memory Use it to determine whether there is enough free memory to complete your recording Click on the Re...

Page 49: ...Ingest and Configuration Utility Library panel The bottom portion of the screen shows the current memory allocation and availability and status for the FTP import and export and Densité frame connections The Media browser section contains the functional controls for clip media management At the top of the media browser section are tabs for selecting the type of item to manage and sub tabs to order...

Page 50: ...w the Bitrate specification AFD Code if the essence carries an AFD code as metadata the code and an appropriate graphic will be displayed If there is no AFD code a no selection icon will be shown Size Shows the size of the essence in MB Use the scroll bar to move up and down the list The total number of essences in the list is shown beside the Edit button below the main window Click anywhere in an...

Page 51: ...at it is editable The editing data box will open Use the cursor to select the current description and type in the data box to edit or replace it Click the cancel icon at the right to exit the edit mode and leave the old name unchanged Click the accept icon at the right to exit the edit mode and use the new name Clicking in the Description area has the same effect AFD The AFD is used to signal the ...

Page 52: ...ce in the window is chosen no AFD code will be inserted at the HMP 1801 output Note in Fill and Key mode the AFD associated with the Fill essence will be inserted into both Fill and Key outputs Delete remove the selected essence from the list and delete it from the HMP 1801 s memory Export export a video essence to a computer via the rear panel ethernet port Click the Export button A Select save d...

Page 53: ...croll bar to move up and down the list The total number of essences in the list is shown beside the Edit button below the main window Click anywhere in an essence row to select that essence The Audio Details of the selected essence will appear to the right of the window ID and name Below that will appear the icon ID and name of every currently defined Clip List that contains this essence Below the...

Page 54: ...ion and return to the Media Browser window Delete Click the Delete button to remove the selected essence from the list and erase it from the HMP 1801 s on board memory Export export an audio essence to the computer via the rear panel ethernet port Click the Export button A Select save directory window opens showing a tree of the files on the connected computer Navigate to the folder in which the e...

Page 55: ...the playout of this Clip List is completed Clip count Shows the number of individual clips that make up this Clip List Use the scroll bar to move up and down the list The total number of Clip Lists in the list is shown beside the Edit button below the main window Click anywhere in a Clip List row to select that Clip List The Details of the selected Clip List will appear to the right of the window ...

Page 56: ...lick anywhere along the row containing the item to open the edit window The edit window may contain a text box a pulldown list or a multi value scroll box When you have modified a value in the edit window Click the cancel icon at the right to close the edit window and leave the old value unchanged Click the accept icon at the right to close the edit window and use the new value Clicking on the par...

Page 57: ... in the video essence edit procedure X offset horizontal image position relative to the top left of the image 0 pixels to max allowed by the format e g 1920 pixels for 1920x1080 video Y offset vertical image position relative to the top left of the image 0 pixels to max allowed by the format e g 540 lines for 1920x1080 video In Out Frame Markers shows the frame numbers within the video essence of ...

Page 58: ... display editing controls that allow the clip details to be refined Note that you cannot use the advanced controls while the card is in Record mode Figure 4 12 Editing Clip List window advanced view The window shows a thumbnail of the video essence plus an icon representing the AFD code associated with it and an icon indicating that there is an associated audio essence if applicable Below the wind...

Page 59: ...OUT point selection on scene content The video corresponding to the pointer position is visible at the output when in this mode allowing the in and out points to be selected to frame accuracy based on scene content When the desired point has been found Click Set IN to set the current pointer location as the IN point Click Set OUT to set the current pointer location as the OUT point Confirm the cho...

Page 60: ...wnload to the selected folder The Jobs window will open The progress of the current export will be tracked The Clip List will be saved as an mhc file 4 1 4 Jobs The Jobs window provides resources to manage all encoding and transfer tasks for this HMP 1801 This window is available in both Online and Offline modes but note that transfers cannot be executed while offline Figure 4 15 Ingest and Config...

Page 61: ... jpeg jpf jp2 jpx A 32 bit java installation is required in conjunction with Apple Quicktime in order to be able to ingest jp2 images or image sequences It is possible to install a 32 bit java on a 64 bit system Once a list of files has been accumulated use the pulldowns to select the bit rate and field rate that will be used to encode all selected HD media in the list does not apply to SD media C...

Page 62: ...ded in error or subsequently reconsidered Click on a task in the list to select it Click Remove Task to delete the selected task from the list Click Move Task Up to move the selected task up one place in the list Hold CTL and click Move Task Up to move the selected task to the top of the list Click Move Task Down to move the selected task down one place in the list Hold CTL and click Move Task Dow...

Page 63: ...s in a preferred sequence and to remove tasks that were added in error or subsequently reconsidered Click on a task in the list to select it Click Remove Task to delete the selected task from the list Click Move Task Up to move the selected task up one place in the list Hold CTL and click Move Task Up to move the selected task to the top of the list Click Move Task Down to move the selected task d...

Page 64: ...er of GB available on the external storage medium to save the file the specified number depends on the compact flash contents 2 Click Browse to open a Save dialog 3 Navigate to the location where you wish to save the file 4 Type an appropriate file name in the data box to create a new file OR Click on an existing file if you want to replace it its name will appear in the data box HMP 1801 backup f...

Page 65: ...t Input File window and the Start Import Process button enabled Note that importing an mhb archive will first remove all the current contents of the CF card and then replace them with the contents of the archive 6 Click the Start Import Process button The status of the import will be indicated in the window beside the 5 steps on the left hand side Click Stop if you want to abort the save 4 1 6 Ref...

Page 66: ... encoding jobs as a background task but transfers cannot be done while offline 4 2 Firmware Upgrade 4 2 1 Using the Miranda Interface Updater MIU o Enter the Densite frame s IP Address o Select the Upgrade file tar gz o Check the cards to update o Press UPGRADE o Wait until the upgrade is completed Note Make sure to put the Densité Controller in Standby mode in iControl before proceeding with a ca...

Page 67: ...g the HMP 1801 webpage Step 1 Type the IP Address of the card in a web browser to get the HMP 1801 web page Step 2 Jump to the Updater webpage by clicking on the Start HMP Updater button Step 3 Select upgrade package Step 4 Wait until the upgrade is completed ...

Page 68: ...GUIDE TO INSTALLATION AND OPERATION 64 HMP 1801 Step 5 Click on the reboot the HMP 1801 link to apply the changes ...

Page 69: ...SMPTE 292M 1 485 1 485 1 001 Gbps teletext is not supported SUPPORTED FORMATS SD 480i59 94 576i50 HD SMPTE 274M 1080i59 94 1080i50 HD SMPTE 296M 720p59 94 720p50 EMBEDDED AUDIO 8 CH SMPTE 299M 277M RETURN LOSS 15 dB up to 1 5GHz JITTER 0 2 UI in both SD and HD STORAGE On board Flash memory Offered in 4GB 8GB 16GB 32GB versions Compact Flash Size 4 8 16 32 Video Bitrate 1 100 Mbps Audio 0 OFF 1 ON ...

Page 70: ...GUIDE TO INSTALLATION AND OPERATION 66 HMP 1801 OTHER MAXIMUM POWER 10 Watts Max PHYSICAL FORMAT Densité Densité 2 Densité 3 ...

Page 71: ...IMING VERTICAL xxx 0 xxx HORIZONTAL 0 xxx AUDIO SOURCE CHANNEL 1 MUTE 1 2 3 4 5 6 7 8 CHANNEL 2 MUTE 1 2 3 4 5 6 7 8 CHANNEL 3 MUTE 1 2 3 4 5 6 7 8 CHANNEL 4 MUTE 1 2 3 4 5 6 7 8 CHANNEL 5 MUTE 1 2 3 4 5 6 7 8 CHANNEL 6 MUTE 1 2 3 4 5 6 7 8 CHANNEL 7 MUTE 1 2 3 4 5 6 7 8 CHANNEL 8 MUTE 1 2 3 4 5 6 7 8 CHANNEL 9 MUTE 1 2 3 4 5 6 7 8 CHANNEL 10 MUTE 1 2 3 4 5 6 7 8 CHANNEL 11 MUTE 1 2 3 4 5 6 7 8 CH...

Page 72: ...ET TO DEFAULT CLIP PLAYBACK CUE OUTPUT 1 LIST OF CLIPS NAMES OUTPUT 2 LIST OF CLIPS NAMES PLAY OUTPUT 1 OUTPUT 2 PAUSE OUTPUT 1 OUTPUT 2 STOP OUTPUT 1 OUTPUT 2 GPI I O CONFIG IN 1 OUTPUT 1 2 CUE CLIP LIST OF CLIPS NAMES PLAY CLIP PAUSE CLIP STOP CLIP IN 2 OUTPUT 1 2 CUE LIST OF CLIPS NAMES PLAY CLIP PAUSE CLIP STOP CLIP IN 3 OUTPUT 1 2 CUE CLIP LIST OF CLIPS NAMES PLAY CLIP PAUSE CLIP STOP CLIP IN...

Page 73: ...TH STATUS 100BASETX FD 100BASETX HD 10BASET FD 10BASET HD HARDWARE FAILURE FIRMWARE FAILURE AUDIO AUDIO DETECTED NO AUDIO AFD NO AFD AFD DETECTED DOLBY METADATA DOLBY MET DETECT NO DOLBY MET TIME CODE NO TC TC DETECTED CLOSED CAPTION NO CC CC608 DETECTED CC708 DETECTED NAME DROPPER NO NAME DROPPER NAME DROP DETECT CARD MODE PLAY RECORD CARD CONFIG RECORD OPTIONS RECORD BIT RATE SD 1 25 100 Mbit s ...

Page 74: ...EWAY ADDRESS XXX XXX XXX XXX MAC ADDRESS AA BB CC DD EE FF RO HOSTNAME SPEED DUPLEX AUTONEGOTIATE 10BASET FD 10BASET HD 100BASET FD 100BASET HD RESET TO DEFAULT CONFIG ALARMS NO INPUT ALARM LEVEL GREEN YELLOW RED FLASH RED ALARM REPORT NONE GPI MEMORY LOW ALARM LEVEL GREEN YELLOW RED FLASH RED ALARM REPORT NONE GPI OUT OF MEMORY ALARM LEVEL GREEN YELLOW RED FLASH RED ALARM REPORT NONE GPI SYSTEM P...

Page 75: ...ted Not means the command will be acked and the Not Supported bit of the Port Status Request command will be set System Commands Command Name Supported Comments Full Partial Not Local Disable X Local Enable X Delete From Archive X Delete Protect ID X UnDelete Protect ID X Immediate Commands Command Name Supported Comments Full Partial Not Stop X Play X Record X Freeze X Still X Step X Continue X 2...

Page 76: ...ition and the duration parameters are ignored Delete ID X 3 3 The command is acked but no ID is deleted by the HMP 1801 Get From Archive X Clear X Send To Archive X to signal full X Record Init with Data X Select Logical Drive X System Delete ID X Preset X Vid Compr Rate X Aud Sample Rate X Aud Comp Rate X Audio IN Level X Audio OUT Level X Vid Compr Param X Select Output X Select Input X Record M...

Page 77: ...4 all 0 Status 5 all 0 Position Request X X 2 2 Will always answer with the position to zero Type 2 Active ID Request X Device Type Request X Syst Status Request X 3 3 The HMP 1801 always answers with all parameters set to 0 ID List X ID Size Request X IDs Added to Arch X ID Request X Compr Settings Request X IDs Added List X IDs Deleted List X Multi Port Status X Deferred Time Line Commands Defer...

Reviews: