GUIDE TO INSTALLATION AND OPERATION
8
| HMP-1801
To install the connector panel:
(NOTE - if you are installing a Densité-2 rear panel plus adapter in a Densité-3 frame, please go to section 2.3)
1.
If a card is installed in the slot whose rear panel is being changed, remove it as described above.
2.
Remove the existing panel (either blank or belonging to an existing card that is being changed) by releasing the
captive screw(s) at the bottom.
3.
Position the new panel and secure it in place with the captive screw(s) at the bottom.
2.2 Card Installation
Once a matching rear connector panel has been installed, install the HMP-1801 card as follows:
1.
Open the front panel of the frame.
2.
Slide the HMP-1801 card into the slot and push gently on the handle to seat the connectors.
•
If the card is used with the HMP-1801-DRP double-width rear panel, it should be inserted into the right-
hand slot. Inserting the card into the wrong slot will not damage the card, and will be flagged by the on-
card status LED flashing red to indicate that there is no connection to the rear panel.
3.
Close the front panel of the frame.
2.3 Installing Densité-2 Cards and Rear Modules in a Densité-3 Frame
The Densité-3 frame supports many Miranda Densité-2 series cards, including the HMP-1801. Should you wish to
install the HMP-1801 card in your Densité-3 frame, you will need an adapter for the card. You may use one of the two
3 RU rear panels that are available for the HMP-1801 (HMP-1801-3SRP or HMP-1801-2OUT-3SRP), or you may use
the 2 RU rear panel (HMP-1801-DRP). In the latter case, an adapter will also be required for the rear panel, as
described above. These adapters extend the height of the Densité-2 devices so that they will fit into the slots of the 3
RU Densité-3 frame.
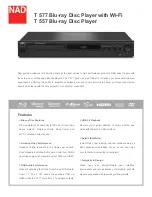
Card adapters:
There are 3 different types of adapter available,
depending on the Densité 2 card geometry, so be
sure to order the adapter designed to fit the HMP-
1801 card.
Densité 3 – EXT A
Install the adapter on the HMP-1801 as follows:
1. Fit the top edge of the card into the holding
slot along the bottom edge of the adapter.
2. Align the holes in the top of the card with the
holes on the adapter, and secure them
together with the two provided screws and
lock washers, as shown in the figure.