background image

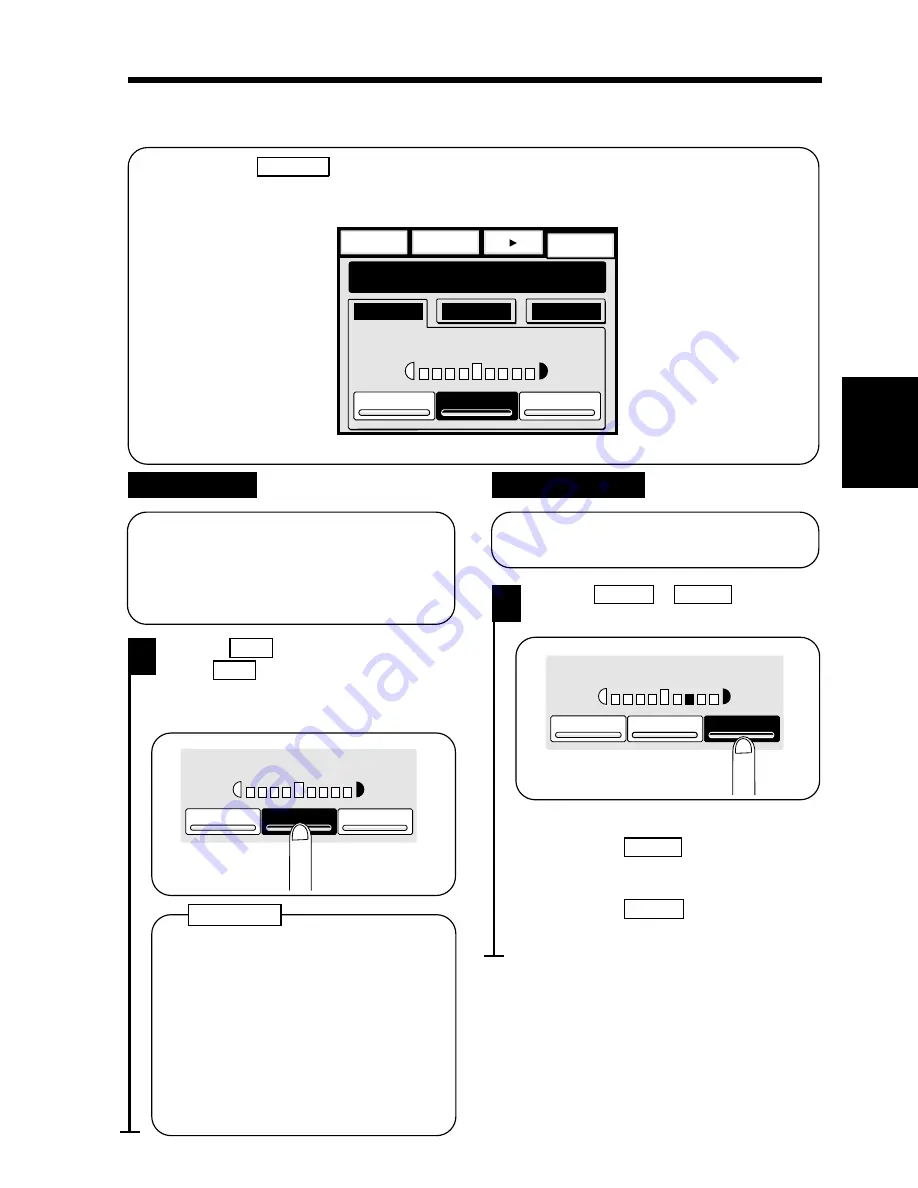
When you touch 

 Exposure 

 on the Touch Panel, a screen appears that allows you to set the

exposure level or image density. There are two ways to adjust the exposure level. Select one
according to your need.

Auxiliary

Finishing

Orig.     Copy

Ready to copy.

1134P222CA

Auto Paper

x1.000

1

Basics

Auto Expo.

Lighter

Auto

Darker

1134P222CA

Image Density

When in the Auto Exposure mode, the
copier reads the image density of the
original and automatically adjusts the
exposure level for the optimum copy
image density.

Auto Exposure

Touch 

 Auto 

 .

The 

 Auto 

 key is highlighted,

indicating that the copier is set into the
Auto Exposure mode.

1

The exposure level in the Auto
Exposure mode can be varied by using
the User’s Choice, either "Darker" or
"Lighter." 

 p. 119

The copier has been factory-set to
automatically select the Auto
Exposure mode. The User’s Choice
can be used to change this default
setting to the Manual Exposure mode.

 p. 119

Useful Tips

In the Manual Exposure mode, you can
vary the exposure level in nine steps.

Manual Exposure

Touch 

 Lighter 

 or 

 Darker 

 as

necessary.

1

<To make the image darker>
    Touch 

 Darker 

 .

<To make the image lighter>
    Touch 

 Lighter 

 .

1134P248CA

Lighter

Auto

Darker

1134P248CA

1134P249CA

Lighter

Auto

Darker

1134P249CA

Ch

a

p

te

r 3

M

aki

ng C

o

p

ies

7. Basic Functions

45

Summary of Contents for EP6000

Page 1: ...h speed copiers will be set to automatically make double sided copies An organization s paper costs can be reduce by 60 a month and the volume of paper sent into the waste stream will decline It takes 10 times more energy to produce a piece of paper than it does to make a single copy on a copier Therefore using less paper also means decreased national energy consumption Recycled Paper USA market o...

Page 2: ...ns to be observed when operating the copier To ensure the best performance and effective use of your copier read this manual carefully until you familiarize yourself thoroughly with its operation and features After you have read through the manual keep it for ready reference Please use this manual as a quick and handy reference tool for immediately clarifying any questions which may arise i ...

Page 3: ... Using This Manual Organization viii Page Organization ix Terms and Symbols for the Type of Originals and Copy Paper x Chapter 1 Safety Notes 1 1 Installing The Copier Installation Site 2 Power Source 2 Grounding 2 Space Requirements 3 2 Precautions for Use Operating Environment 4 Using the Copier Properly 4 Care of Copier Supplies 5 Moving 5 ii ...

Page 4: ...7 Using it Properly 18 5 Turning ON and OFF and Resetting the Copier Turning ON and OFF 21 When the Copier is Turned ON 21 Initial Mode and Panel Resetting 22 Auto Copy Start Function 23 Energy Saver Mode 24 Entering the Access Number 25 Chapter 1 Safety Notes Chapter 2 First Things to Know about your Copier Chapter 3 Making Copies Chapter 4 Using the User Mode Chapter 5 When a Message Appears Cha...

Page 5: ...y 45 8 Selecting the Original Copy Type 1 1 49 1 2 49 2 1 51 2 2 52 1 2 in 1 52 1 2 2 in 1 54 9 Finishing Mode Non Sort 66 Sort 66 Sort and Staple 67 Group 67 10 Auxiliary Functions Cover 79 Page Insertion 82 OHP Interleaving 90 File Margin 96 Book Copy 100 Edge Frame Erase 102 11 Mode Check 105 1 2 in 1 1 55 2 2 in 1 1 56 Mixed Original Detection Mode 58 Auto Original Count Mode 60 Hole Punch 68 ...

Page 6: ...sage The Current Paper Drawer is empty Appears 128 2 When the Message Replenish Toner Appears 132 3 When the Message The Staple Cartrige is empty Appears 134 4 When the Message Misfeed detected Appears 136 5 When the Message The section indicated by is open Appears 146 6 When Appears 149 7 What Does Each Message Mean 150 Contents Chapter 1 Safety Notes Chapter 2 First Things to Know about your Cop...

Page 7: ...y 155 2 The Copier is not functioning as designed The Touch Panel shows nothing 156 No copies are fed out when the Start Key is pressed 156 Control Panel Keys do not respond 156 The Copier is not activated when the Power Switch is turned ON 156 Chapter 7 Specifications 157 1 Copier 158 2 Duplexing Document Feeder 160 3 Large Capacity Casette 161 4 20 Bin Staple Sorter 162 5 20 Bin Sorter 163 6 Dat...

Page 8: ...opy Paper Size 175 4 Zoom Ratio Table Original Size to Copy Paper Size 176 5 Index 177 Chapter 1 Safety Notes Chapter 2 First Things to Know about your Copier Chapter 3 Making Copies Chapter 4 Using the User Mode Chapter 5 When a Message Appears Chapter 6 Troubleshooting Chapter 7 Specifications Chapter 8 Miscellaneous Contents vii ...

Page 9: ... and User s Choice It also shows how to recall a job program from the memory using the Job Recall Key Chapter 5 When Such a Message Appears About the various warning messages given on the Touch Panel and steps to take to correct these faulty conditions as well as the procedures to be used for replenishing supplies Chapter 6 Troubleshooting Instructions on how to troubleshoot copier malfunctions Ch...

Page 10: ...icular point in the procedure Section title Page number Indicates that there are more steps to follow in the next column Indicates that this is the end of the steps Chapter title Useful Tip Gives you a useful piece of advice on using a particular convenient function or device Using This Manual ix ...

Page 11: ... about these terms and symbols Feeding Direction copy paper path In this copier system copy paper is taken up from the right hand side of the copier and fed through the copier toward the left hand side out face up onto the Exit Tray In the figure below the direction in which the copy paper is fed as indicated by the arrow is called the feeding direction 1075O106CA Using This Manual x ...

Page 12: ...de B length A Width B Length Lengthwise When the original or copy has a length longer than its width we call it lengthwise and use symbol L or Terms and Symbols Used Crosswise When the original or copy has a length shorter than its width we call it crosswise and use symbol C or Using This Manual xi ...

Page 13: ...xii ...

Page 14: ...about the operating environment conditions and precautions for use 1 Installing the Copier Installation Site 2 Power Source 2 Grounding 2 Space Requirements 3 2 Precautions for Use Operating Environment 4 Using the Copier Properly 4 Care of Copier Supplies 5 Moving 5 1 ...

Page 15: ...cal equipment is sourced from the same power outlet make sure that the capacity of the outlet is not exceeded The outlet should be located near the copier and easily accessible Never connect any other appliances or machines by means of a multiple socket to the outlet being used for the copier If an extension cord is needed use one with a capacity more than the power consumption of the copier Make ...

Page 16: ...ly replacements and service maintenance adhere to the recommended space requirements detailed below 1335 150 Scale mm 1075O127CA 300 200 2844 1342 Be sure to allow a clearance of 150 mm or more at the back of the copier as there is a ventilation duct NOTE Chapter 1 Safety Notes 3 ...

Page 17: ...g all the way into the outlet ALWAYS make sure that the outlet is visible clear of the copier or copier cabinet ALWAYS ensure that the copier does not ride on the power cord or communications cable of other electrical equipment and it does not get such a cord or cable wedged into its own mechanism NEVER leave a damaged or cracked copier power cord unattended If you find any of these conditions imm...

Page 18: ...plastic bag in a cool dark place Keep supplies out of the reach of children If your hands become soiled with toner wash them with soap and water immediately Moving If you need to transport the copier over a long distance consult your Technical Representative Note on making multiple copies If the fusing temperature drops exessively during a multi copy cycle there is a possibility that the copying s...

Page 19: ...2 Precautions for Use Chapter 1 Safety Notes 6 ...

Page 20: ... Turning ON and OFF and Resetting the Copier Turning ON and OFF 21 When the Copier is Turned ON 21 Initial Mode and Panel Resetting 22 Auto Copy Start Function 23 Energy Saver Mode 24 Entering the Access Number 25 Chapter 2 First Things to Know about your Copier This chapter gives you a brief description of the system and preliminary information about the different parts of the system Chapter 2 Fi...

Page 21: ...s automatic sorting or grouping of copies into 20 copy sets or stacks 1134O088AA Staple Sorter ST 207 Option Automatically staples and or punches holes in the copy sets or stacks that are sorted or grouped in addition to the functions provided by the S 206 1136O059AA Chapter 2 First Things to Know about your Copier 8 ...

Page 22: ...e making of copies from 2 sided originals 1139O0010A Data Controller D 102 Option Capable of controlling various types of data including the number of copies made copy cost and user departments by means of specific magnetic cards 1138O525A Large Capacity Cassette C 302 Option Holds up to 3 000 sheets of copy paper 80 g m2 1134O005AA Chapter 2 First Things to Know about your Copier 9 ...

Page 23: ...See Control Panel Keys and Touch Panel p 14 5 Power Switch Use to turn the copier ON and OFF p 21 6 Multi Bypass Table Use for manual feeding of copy paper into the copier p 37 7 Multi Bypass Extender Slide this Extender out to make copies on large size copy paper 8 Total Counter Shows the total number of copies made so far 9 Front Door Open to clear a paper misfeed p 138 Closing the Front Door af...

Page 24: ...eplace the Toner Bottle 4 Misfeed Removal Guide Plate M3 Use to clear a misfed sheet of paper p 138 5 Misfeed Removal Knobs M2 M4 Use to clear a misfed sheet of paper p 138 6 Duplex Unit Turns over 1 sided copies for making 2 sided copies 7 Misfeed Removal Guide Plate D2 Use to clear a misfed sheet of paper p 141 8 Misfeed Removal Knob M1 Use to clear a misfed sheet of paper p 138 Chapter 2 First ...

Page 25: ...ate Slide the plate as necessary to the size of the originals 4 1st Drawer Holds up to 500 sheets of copy paper p 128 5 2nd Drawer Holds up to 500 sheets of copy paper p 128 6 3rd Drawer Holds up to 2 500 sheets of copy paper p 129 7 Paper Descent Key Press before sliding the Drawer out of the copier Chapter 2 First Things to Know about your Copier 2 Copier Parts and Accessories 12 ...

Page 26: ...ervice job p 144 20 Bin Sorter S 206 Staple Sorter ST 207 5 Data Controller For details see the Operator s Manual for D 102 Data Controller D 102 6 Lock Release Lever Use to unlock the Cassette from the copier for clearing a misfed sheet of paper or other service job 7 Paper Plate Descent Key Press to lower the Paper plate p 143 8 Cassette Door Open to add paper or clear a misfed sheet of paper pp...

Page 27: ...g the 10 Key Pad 5 Panel Reset Key Press to set the copier into the initial mode clearing all settings made previously on the control panel p 22 6 Interrupt Key Press to interrupt a current job with a different one Press it again to return to the previous job p 36 7 Energy Saver Key Press to set the copier into the Energy Saver Mode p 24 8 Access Mode ID Key Use to set the Access mode 9 10 Key Pad...

Page 28: ...ig 1 Exit 1134P362CA 10 User Mode Key Press to select the User Mode setting screen See Using the User Mode p 107 11 Job Recall Key Press to select the Job Recall screen on which you can recall or check a copying job program previously stored in memory See Recalling a Job from Memory See p 112 12 Mode Check Key Press to select the Mode Check screen From this screen you can access the setting screen...

Page 29: ...uxiliary Finishing Orig Copy Exposure Paper Zoom Ready to copy Auto Expo x1 000 Auto Paper 1134P429CA 1 Basics Staple Supplementary Function Keys When any of these keys is touched the corresponding Supplementary Function screen appears Message Display Shows the current copier status operating instructions and other data including the number of copies selected 1134P429CA Basic Function Key Display ...

Page 30: ...f Auto Paper touch the corresponding paper size key To go back to the Basic screen touch Basics which is one of the Supplementary Function keys You may also want to touch any other Supplementary Function key to show the corresponding Supplementary Function screen Set Function Display Shows graphic representations of functions set other than the initial ones including the Orig Copy and Finishing ty...

Page 31: ... the same time the screen changed In this case the new screen allows you to select the copy paper size It s also possible to disable the beep User s Choice p 119 Auxiliary Finishing Basics Ready to copy 1075O210DA 1 Orig Copy Auto Expo x1 000 A4 1 2 3 L 1 3 L 2 Auto Paper Auto Paper A3 A4 A4 Manual 1075O210DA Now touch A4 2 Auxiliary Finishing Basics 1075O211DA Orig Copy Auto Expo x1 000 A4 1 2 3 ...

Page 32: ...xiliary functions menu screen reappears 3 Okay now let s see how we can cancel or undo the settings made Touch Auxiliary and then touch File Margin You now see the file margin setting screen on the Touch Panel 1 Finishing Orig Copy Basics Ready to copy Auto Expo Auto Paper x1 000 Cover File Margin OHP Inter leaving Page Insertion Book Copy Edge Frame Erase 1 Auxiliary 1134P431CA Finishing Orig Cop...

Page 33: ...hown are only those functions for which settings have been made Press the Panel Reset Key on the control panel to clear all settings made restoring the copier to the initial conditions Be careful however the Key also cancels the basic function settings Alternative Methods for Canceling Mode Check Auto Expo X1 000 Auto Paper Orig Copy Finishing Cover Mixed Orig 1 Exit 1134P362CA Chapter 2 First Thi...

Page 34: ...pier now enables its auto copy start function Auto Copy Start Function p 23 Pressing the Start Key at this point does not start a copy cycle You re going to have to wait for about 2 minutes and 30 seconds at an ambient temperature of 23 C Auxiliary Finishing Orig Copy Exposure Paper Zoom Ready to copy Auto Expo x1 000 Auto Paper 1075O270CA 1 Basics 1075O270CA 1138O531AA 1138O531AA Green Light 1075...

Page 35: ...the number of copies selected and zoom ratio Panel Resetting The Panel Reset Key enables you to cancel all previous settings efficiently To avoid miscopy try to press this key before making any setting for your own job Useful Tip If no key on the control panel is pressed within about 60 seconds after a copy cycle has been completed or copying settings made the Auto Reset function is activated to r...

Page 36: ...copier has warmed up appears Not to mention the original manually placed on the Original Glass remains on the Glass 3 Do not remove the original until the copy cycle is completed NOTE As soon as the copier completes warming up which takes about 2 minutes and 30 seconds the copy cycle is automatically started Note If the copier has been set into the Energy Saver mode it takes a maximum 30 seconds f...

Page 37: ...ds 1134P337CA Start Stop 1134P337CA Entering the Energy Saver Mode Press the Energy Saver Key While the copier is in the Energy Saver mode the Energy Saver Key is lit with the Start Key lit green 1 2 3 4 5 6 7 8 9 0 C Start Stop Access Energy Saver Interrupt Panel Reset 1134O434CA Auxiliary Ready to Copy 1 Auto Exp Exposure Auto Paper Paper x1 000 Zoom Finishing Orig Copy Basic User Mode Job Recal...

Page 38: ... been canceled A copy cycle can now be started Make your copies as necessary Auxiliary Finishing Orig Copy Exposure Paper Zoom Ready to copy Auto Expo x1 000 Auto Paper 1075O270CA 1 Basics 1075O270CA The Display changes from the normal to the Access prompt screen 1134P334CA Please input your 4 digit Access Code then press the ACCESS Key Access 1134P334CA See the User s Choice to set an access numb...

Page 39: ...26 ...

Page 40: ...1 1 56 Mixed Original Detection Mode 58 Auto Original Count Mode 60 9 Finishing Mode Non Sort 66 Sort 66 Sort and Staple 67 Group 67 Hole Punch 68 Manual Staple 68 Auto Dual Function 72 10 Auxiliary Functions Cover 79 Page Insertion 82 OHP Interleaving 90 File Margin 96 Book Copy 100 Edge Frame Erase 102 11 Mode Check 105 This chapter shows you how to make copies The Basic Copying Overview offers ...

Page 41: ...R 9 1139O0210A Raise the Original Cover and place the original face down on the Original Glass 1075O015AA 2 Touch Paper p 40 3 Touch Zoom p 42 4 Touch Exposure p 45 Selecting the basic functions To change the copy paper size To change the zoom ratio To change the exposure level 5 Touch Orig Copy p 46 Selecting the original copy type To make a 1 sided copy To save the copy paper 1 Basic Copying Ove...

Page 42: ... an incorrect number press the Clear Key then set the correct number again 1 2 3 4 5 6 7 8 9 0 C 1136P114AA Start Stop 1134P337CA 9 Starting the copy cycle p 35 Press the Start Key Note To stop the copy cycle press the Stop Key Auxiliary Finishing Orig Copy Exposure Paper Zoom Ready to copy Auto Expo x1 000 Auto Paper 1075O270CA 1 Basics 1075O270CA Auxiliary Finishing Orig Copy Exposure Paper Zoom...

Page 43: ...riginals Suitable for the AFR 9 Type of Originals Sheets Type of Original Paper Plain paper weighing 50 to 110 g m2 Original Size Normal mode A3L B4L A4L A4C A5L A5C FLSL 2 in 1 Dual Original Scanning mode A4C A5C Mixed Original Detection mode A3L B4L A4L A4C FLSL Originals Not Suitable Typing paper paraffin paper and other thin paper weighing less than 50 g m2 Thick paper weighing more than 110 g...

Page 44: ...marking If you need to make copies from originals of assorted sizes select the Mixed Original Detection mode p 58 Make sure that the Document Guide Plate is in touch with the edges of the original stack If it s not pressed snugly against the the original stack skewed feeding could result NOTES 1075O017AA Swing the Document Exit Tray back again 3 The Copy cycle cannot be started unless you swing th...

Page 45: ...et of Paper Place a blank sheet of paper of the same size as the original over the original 2 Highly Transparent Originals Using transparencies and translucent paper for the original Place the original in the same way as the sheet originals 1 Gently lower the Original Cover 3 Align the rear left corner of the original with the marker on the Original Width Scale Then press the rear edge of the orig...

Page 46: ... order Do not look directly at the Original Glass surface as a strong beam of light can be emitted NOTES Be sure to raise the Original Cover 15 or more before placing the original If the Original Cover is raised to an angle less than 15 the copier may fail to select the correct copy paper size or zoom ratio Do not place an original weighing more than 3 kg on the Original Glass When placing an open...

Page 47: ...ber of copies to be made Note The maximum number that can be set is 999 1 2 3 4 5 6 7 8 9 0 C 1136P141AA 1136P141AA Correcting the Number Entry To correct or reset a number entry press the Clear Key Note This resets the Multi Copy Display to 1 1 2 3 4 5 6 7 8 9 0 C 1136P143AA 1136P143AA The User s Choice can be used to limit the maximum number of copies to be set in the range between 1 and 99 p 11...

Page 48: ...ecking that the message Ready to copy is on the Touch Panel press the Start Key Now copying 18 1134P306CA 1134P306CA Stopping a Multi Copy Cycle The message changes to Copy job has been canceled Please wait and the copier will soon stop Note The Display shows the number of copies yet to be made Start Stop 1134P338CA Now copying 18 1134P306CA 1134P306CA To stop a multi copy cycle in progress press ...

Page 49: ...job and press the Start Key 2 If the current job involves 2 sided copying Cover Page Insertion or OHP Interleaving the copier rejects an Interrupt mode If the current job involves the Sort Sort and Staple Group Non Sort is automatically selected at the same time when the copier is set into the Interrupt mode NOTES Interrupt 1139O2612A 1139O2612A When the interrupt cycle is completed press the Inte...

Page 50: ...sheets or less Heavyweight paper transparencies translucent paper 20 sheets Using the Manual Bypass Place the original on the Original Glass and make the control panel settings 1 The following functions cannot be selected for Manual Bypass Auto Paper Auto Size Finishing 2 Sided Copying Margin by Reduction and Erase NOTE Swing down the Multi Bypass Table and place a neat stack of copy paper on the ...

Page 51: ...ypass Copying Using the 10 Key Pad set the number of copies to be made 4 1 2 3 4 5 6 7 8 9 0 C 1136P141AA 1136P141AA Press the Start Key to start the copy cycle 5 Start Stop 1134P337CA Chapter 3 Making Copies 38 ...

Page 52: ...6 Manual Bypass Copying Chapter 3 Making Copies 39 ...

Page 53: ...ode in which the copy paper is automatically selected according to the size of the original being used and the zoom ratio selected for use AutoPaper Auxiliary Finishing Basics 1075O211DA Orig Copy Auto Expo x1 000 A4 1 2 3 L 3 L 2 Auto Paper A4 A3 A4 A4 Manual 1 Ready to copy 1 1075O211DA This mode is efficient when you want to make copies on paper of the same size as your originals automatically ...

Page 54: ...ke up to 3 500 copies without interruption if all three drawers are loaded with paper of the same size and in the same direction You can even make up to 6 500 copies if an optional C 302 is additionally fitted to the copier Useful Tip Special Paper Setting If the symbol S1 S2 etc appears on the paper select key shown on the Touch Panel it means that that particular Drawer has been designated for s...

Page 55: ...Auto Size to set the copier into the Auto Size mode 1 The copier provides nine most frequently used zoom ratios ready for immediately use Selecting a Ratio from among Fixed Ones Touch the appropriate original to copy size representation key You have four reduction and four enlargement ratios 1 Auxiliary Finishing Basics 1075O211DA Orig Copy Auto Expo x1 000 A4 1 2 3 L 3 L 2 Auto Paper A4 A3 A4 A4 ...

Page 56: ...ze x1 003 1075O283DA Touch the or key to change the zoom ratio 1 To save time first select the fixed zoom ratio nearest to the target ratio before using the or key Useful Tip You can use the 10 Key Pad to directly enter the zoom ratio Using the 10 Key Pad 1134P319DA User Set Auto Size Re duce B4 A4 x0 5 x2 0 En large A3 A4 A4 A5 B4 A3 A4 A3 A5 A4 Full Size 1134P319DA Touch User Set on the Touch Pa...

Page 57: ...P319DA User Set Auto Size Re duce B4 A4 x0 5 x2 0 En large A3 A4 A4 A5 B4 A3 A4 A3 A5 A4 Full Size 1134P319DA Touch User Set 1 Select the desired ratio from among the three which have previously been stored in memory 2 Auxiliary Finishing Orig Copy Basics Ready to copy 1134O133CA Auto Expo Auto Paper 1 x1 000 x1 000 x1 000 Mini Reduce 2 1 3 BackUp 10 Key Pad Input 1134O133CA 0 930 is stored in Min...

Page 58: ...e Auto key is highlighted indicating that the copier is set into the Auto Exposure mode 1 The exposure level in the Auto Exposure mode can be varied by using the User s Choice either Darker or Lighter p 119 The copier has been factory set to automatically select the Auto Exposure mode The User s Choice can be used to change this default setting to the Manual Exposure mode p 119 Useful Tips In the ...

Page 59: ...type Auxiliary Finishing Basics Ready to copy 1134P226CA Auto Expo Auto Paper x1 000 1 2 1 1 2 1 Mixed Orig 2in1 2in1 1 Orig Copy 1 2 2 1134P226CA Original Copy Types 1 1 Select 1 1 to make 1 sided copies from 1 sided originals p 49 1136P204AA 1136P204AA Originals Copies 1 2 Select 1 2 to make 2 sided copies from 1 sided originals This is the default setting Note Two originals can be copied onto o...

Page 60: ...ginals p 52 1136P207AA 1136P207AA Original Copy 1 2in1 1 sided 2 in 1 copy Select 1 2in1 to make a 1 sided copy through reduction from two 1 sided originals side by side Note You need half as many sheets of copy paper as required otherwise p 52 1136P208AA 1136P208AA Originals Copy The size of the original should be A4 crosswise or A5 crosswise for 2 in 1 NOTE Chapter 3 Making Copies 8 Selecting th...

Page 61: ...1 1 1 sided 2 in 1 separation copy Select 1 2in1 1 to make 1 sided page by page copies of a 1 sided original which is the result of 2 in 1 copying Note You need twice as many sheets of copy paper as the original p 55 1136P211AA 1136P211AA Original Copies 2 2in1 1 2 sided 2 in 1 separation copy Select 2 2in1 1 to make 1 sided page by page copies of a 2 sided original which is the result of 2 sided ...

Page 62: ... originals Even Select when you have an even number of originals Odd Select when you have an odd number of originals If Even or Odd is selected for the original count function the copier makes a copy set in correct page order Even is selected as default If the number of originals is even go to step 6 If the number of originals is odd or unknown follow these steps Useful Tip Touch of Origs 2 Finish...

Page 63: ...use AutoCount function see p 60 Touch Enter 5 If the original has a file margin touch Margin If not go to step 8 6 Finishing Basics Ready to copy 1 Auxiliary Auto Expo Auto Paper x1 000 1 2 Enter Cancel 1134P228CA Orig Copy Margin of Origs 1134P228CA Select the width of margin on the original 7 Enter Cancel 1134P320DA 10mm Orig Margin Width 1 2 15mm 20mm 1134P320DA Touch Enter 8 Chapter 3 Making C...

Page 64: ... 2 Enter Cancel 1134P258CA 2 2 Margin 1134P258CA If the original has a file margin touch Margin If not go to step 5 3 Touch 2 1 2 Enter Cancel 1134P321DA Orig Margin Width 1 2 2 2 10mm 15mm 20mm 1134P321DA Select the width of margin on the original 4 Touch Enter 5 When placing the original make sure that it is placed in the correct direction p 62 NOTE Chapter 3 Making Copies 8 Selecting the Origin...

Page 65: ...ounts the number of originals Even Select when you have an even number of originals Odd Select when you have an odd number of originals If Even or Odd is selected for the original count function the copier makes a copy set in correct page order Even is selected as default If the number of originals is even go to step 6 If the number of originals is odd or unknown follow these steps Useful Tip Touc...

Page 66: ...ch Odd 5 To use AutoCount function see p 60 Touch Enter 6 When the 2 in 1 copy function is selected the copier automatically selects a reduction ratio You can nonetheless make a full size copy Select the desired zoom ratio and paper size The default zoom ratio can be changed by using the User s Choice p 119 NOTES If the Center Erase function is selected you can eliminate shadows which would otherw...

Page 67: ... Expo Auto Paper x1 000 Enter Cancel 1134P262CA Orig Copy Input AutoCount of Originals 1 2in1 1 2 2in1 1134P262CA AutoCount The copier automatically counts the number of originals If you already know the number of originals select Input and enter the number to save time Input Enter the number of originals using the 10 Key Pad Enter Cancel 1134P264CA Input AutoCount of Originals 1 2in1 1 2 2in1 113...

Page 68: ...ction is selected you can eliminate shadows which would otherwise be produced at the center of the copy p 102 Useful Tip 1 2in1 1 Finishing Basics Ready to copy 1 Auxiliary Auto Expo Auto Paper x1 000 Enter Cancel 1134P230CA Orig Copy 1 2in1 1 2 2in1 1 1134P230CA Touch Enter 3 When the 2 in 1 separation copy function is selected the copier automatically selects an enlargement ratio You can nonethe...

Page 69: ...n1 1134P265CA Touch Enter 3 When the 2 in 1 separation copy function is selected the copier automatically selects an enlargement ratio You can nonetheless make a full size copy Select the desired zoom ratio and paper size The default zoom ratio can be changed by using the User s Choice p 119 NOTES Touch 1 1 2in1 Touch 2 1 2 2in1 Chapter 3 Making Copies 8 Selecting the Original Copy Type 56 ...

Page 70: ... Chapter 3 Making Copies 8 Selecting the Original Copy Type 57 ...

Page 71: ...e copier cannot staple together the copies of different sizes made in the Mixed Original Detection mode NOTE 1075O026AA Swing the Document Exit Tray to the left as shown Load the stack of your originals on the Document Feed Tray so that the rear edge of each original is pressed against the rear Document Guide Plate Then slide the front Document Guide Plate to the rear so that it is pressed against...

Page 72: ...Orig Copy 1 2 2 1134P226CA 1134P251CA 1 2 1 1 2 1 Mixed Orig 2in1 2in1 1 2 2 1134P251CA Touch Mixed Orig to set the copier into the Mixed Original Detection mode 4 The Mixed Original Detection mode can be set as a default setting by using the User s Choice p 119 Useful Tip Chapter 3 Making Copies 8 Selecting the Original Copy Type 59 ...

Page 73: ...sing the Auto Original Count Mode Enter Cancel Odd 1134P309CA Even AutoCount of Originals 1 2 1134P309CA Touch the AutoCount Key 1 1139O0210A Load the originals onto the AFR 9 Placing Originals p 31 2 Start Stop 1134P337CA Press the Start Key to start the original count sequence 3 The AFR 9 starts feeding the originals loaded on it to count the number of originals At this time no copy cycle is run...

Page 74: ... 1139O0210A Unload the originals ejected onto the Document Exit Tray and reload them onto the Document Feed Tray Then press the Start Key 4 Chapter 3 Making Copies 8 Selecting the Original Copy Type 61 ...

Page 75: ... Procedure Load the originals crosswise If the originals are loaded lengthwise the directions of the copy images will be mixed up Correct 2 Sided Originals Loaded Crosswise 1 Sided Copies 1075O028AA Incorrect 2 Sided Originals Loaded Lengthwise 1 Sided Copies 1075O029AA Chapter 3 Making Copies 8 Selecting the Original Copy Type 62 ...

Page 76: ... Chapter 3 Making Copies 8 Selecting the Original Copy Type 63 ...

Page 77: ... the Sorter or Staple Sorter is mounted 1st Bin 2nd Bin 3rd Bin Originals Copies 1076O146 In the Sort mode copies are sorted into complete sets of the originals p 66 Note This mode is effective when making multiple copies from multiple originals Auxiliary Finishing Orig Copy Exposure Paper Zoom Ready to copy Auto Expo x1 000 Auto Paper 1134P266CA 1 Basics Staple 1134P266CA Finishing Modes Auxiliar...

Page 78: ...nals Copies 1st Bin 2nd Bin 3rd Bin In the Hole Punch mode holes are punched in the copy sets or stacks for filing p 68 Only when Staple Sorter is mounted Originals Manual Staple Sorting or Grouping Manual Staple 1076O191 This mode allows you to staple copy sets already made in the Sort Mode or copy stacks made in the Group Mode p 68 Only when the Staple Sorter is mounted Holes can be punched only...

Page 79: ...llows NOTE 1134P268CA NonSort Sort Sort Staple Group Hole punch 1134P268CA Touch Sort 2 The maximum capacity of each Sort Bin is as follows NOTE Sorter Capacity ST 207 S 206 50 1 2 3 4 5 6 7 8 9 0 C 1136P141AA 1136P141AA Sorter No of Copy Sets ST 207 S 206 2 to 20 The maximum capacity of Non Sort Bin is as follows NOTE Type of Paper Capacity Plain paper 50 Heavyweight paper Transparencies Transluc...

Page 80: ...pacity of each Sort Bin is as follows NOTE Sorter Capacity ST 207 50 Using the 10 Key Pad enter the number per copy stack you want to have 1 Group 1134P270CA NonSort Sort Sort Staple Group Hole punch 1134P270CA The maximum capacity of each Sort Bin is as follows NOTE Sorter Capacity ST 207 S 206 50 Touch Sort Staple 2 Touch Group 2 1 2 3 4 5 6 7 8 9 0 C 1136P141AA 1136P141AA 1 2 3 4 5 6 7 8 9 0 C ...

Page 81: ... punch 1134P271CA Touch Hole Punch 3 Check that each copy set or stack has been fed into the Bin 1 Manual Staple To staple copies after they have been made Auxiliary Finishing Orig Copy Exposure Paper Zoom Ready to copy Auto Expo x1 000 Auto Paper 1134P266CA 1 Basics Staple 1134P266CA The copy set or stack in the Bin will be stapled 1134O038AA Touch Staple 2 1 2 3 4 5 6 7 8 9 0 C 1136P141AA 1136P1...

Page 82: ... sure of the stapling position and press the paper stack against the bracket Never attempt to reach for the stapling position This can be dangerous NOTES Auxiliary Finishing Orig Copy Exposure Paper Zoom Ready to copy Auto Expo x1 000 Auto Paper 1134P266CA 1 Basics Staple 1134P266CA The sheets of paper are stapled Touch Staple 3 This feature is efficient to staple originals after making copies Use...

Page 83: ... for Stapled Copies Original Direction for Stapling If the copies are to be stapled either in the Sort and Staple or Manual Staple mode load the originals crosswise in the AFR 9 Ensure also that the stapling corner is at the rear left side as indicated by the arrow Correct Originals Loaded Crosswise Copy Set Stack Stapled at Top Left Stapling Corner 1075O031AA Original Direction for Hole Punch Cor...

Page 84: ...Chapter 3 Making Copies 9 Finishing Mode 71 ...

Page 85: ...mple Making 3 copy sets of a 55 page original set using a 20 Bin Staple Sorter Each of the top three Bins contains 50 sorted copies Each of the 11th to 13th Bins contains 5 sorted copies 55 Page Original Set 1075O033AB To have a complete set from the originals place the copies from the 11th Bin on top of those from the Top Bin In the same way place the copies from the 12th Bin on top of those from...

Page 86: ... different originals into two groups when each group contains 60 copies Copies of 1st original 1st Bin 50 2nd Bin 10 Copies of 2nd original 3rd Bin 50 4th Bin 10 1075O034AB The capacity of the Non Sort Bin is 51 If more than 50 copies are made in the Non Sort mode the Sorter uses the 1st 2nd and subsequent Bins to hold those excess copies When the Number of Copies Selected Exceeds 50 in the Group ...

Page 87: ...108AA Copies Example Sorting copies into 2 copy sets and having them stapled manually Manual Stapling 1136O109AA Original Set Sorting Example Separating copies into 3 groups each group containing 2 copies and having each stapled manually Grouping Manual Stapling Original Set 1136O110AA Chapter 3 Making Copies 9 Finishing Mode 74 ...

Page 88: ...eparating copies into 2 sets stacks punching holes in them and then having each stapled manually 1136O172CA Original Set Punched Copies Sorting Manual Stapling Finishing Mode Manual Stapling Examples Sort and Staple Impossible Sort Hole Punch Group Hole Punch Possible OK Chapter 3 Making Copies 9 Finishing Mode 75 ...

Page 89: ...t convenient functions offered as the Auxiliary functions and how to set these features When the Auxiliary key on the Touch Panel is touched the Auxiliary function menu screen appears Auxiliary Functions Overview Auxiliary Finishing Orig Copy Exposure Paper Zoom Ready to copy Auto Expo x1 000 Auto Paper 1075O270CA 1 Basics 1075O270CA Finishing Orig Copy Basics Ready to copy 1134P237CB Auto Expo Au...

Page 90: ...opy Paper OHP OHP Interleaving 1136P218AA A file margin is made on the copy p 96 Original Copy 1136P218AA 1136P222AA The image of the original is reduced to make a wider file margin on the copy p 96 Original Copy 1136P222AA File Margin 1136P219AA Each page of an open book is copied onto a separate sheet p 100 1 Sided Copies Book Original 1136P219AA 1136P220AA Each page of an open book is copied on...

Page 91: ...riginal is erased on the copy p 102 Copy Original Fax Output 1136P215AA 1136P216AA The image at the center of the original is erased on the copy p 102 Copy Original Book 1136P216AA Edge Frame Erase Chapter 3 Making Copies 10 Auxiliary Functions 78 ...

Page 92: ...ed paper p 80 Separate Front Cover Cover Front Non Copied Cover Original Set Copy Set 1136O131AA A sheet of a different type of paper e g colored paper is inserted as a cover before the copy set p 80 The cover sheet does not undergo a copy process Cover Front Back Copied Cover 1136O130AA Original Set Copy Set Front Cover Back Cover The first and last pages of the original set are copied onto a dif...

Page 93: ... copier automatically counts the number of originals If you already know the number of originals select Input and enter the number to save time Input Enter the number of originals using the 10 Key Pad The maximum number of originals that can be entered is 50 Press the Clear Key to correct a number entry NOTES Touch Input if you know the number of originals you have 4 1134P280CA Enter Cancel Cover ...

Page 94: ... Bypass Table is loaded with paper for covers NOTE Place the paper for covers on the Multi Bypass Table 7 1075O025AB Load the originals onto the AFR 9 and press the Start Key Placing Originals p 31 8 Chapter 3 Making Copies 10 Auxiliary Functions 81 ...

Page 95: ...pied Inserts 1136O130AA Original Set Copy Set Insert The copier copies the page which is specified for an insert on paper for inserts e g colored paper pp 84 87 Page Insertion Non Copied Inserts Original Set Specify Insert Between Pages 1 and 2 Copy Set Insert 1136O133AA The copier inserts a blank sheet of paper for inserts e g colored paper at any specified place between pages pp 84 87 Functions ...

Page 96: ...to the AFR 9 and let the copier start the original count sequence This allows the copier to detect the places for inserts Up to 20 sheets can be inserted Original Set Copy Set Insert Setting Paper Example 2nd from top Copied Insert Non Copied Insert 1134O059AA Copy Set 10 Key Pad Input Using the 10 Key Pad define the places for inserts Up to 20 places can be defined 1134O058AA Original Set Copy Se...

Page 97: ...1134P442DA Enter Cancel Page Insertion Yes Copy onto Inserts ADF detect Sheet Placement A4 Insert Paper 1134P442DA 1134P274CB Cover OHP Inter leaving File Margin Page Insertion Edge Frame Erase Book Copy 1134P274CA Enter Copy onto Inserts YES NO 1134P283CA Touch Sheet Placement 5 1134P414DA Enter Cancel Page Insertion Yes Copy onto Inserts User set Sheet Placement A4 Insert Paper 1134P414DA Touch ...

Page 98: ... 2nd position from top Copied Insert Copy Set Original Set 1136O133AA Example 2 To place a non copied insert between pages 1 and 2 Original Copy Set Non Copied Insert For the insert setting paper use one that is a size or loaded in a direction different from the originals NOTE Load the original set containing insert setting paper onto the AFR 9 Placing Originals p 31 13 1075O035AA Insert Setting P...

Page 99: ...Unload the original set and reload it onto the Document Feed Tray 16 1075O036AA Press the Start Key 17 The copy cycle is run for page insertion Chapter 3 Making Copies 10 Auxiliary Functions 86 ...

Page 100: ...Sheet Placement 5 Using the 10 Key Pad enter the number of originals 7 Touch Enter 4 10 Key Pad Input Touch 10 Key Pad Input 6 1134P288CA Enter Sheet Placement 10 Key Pad Input ADF Detection 1134P288CA Touch Page Insertion 1 To correct a number entry press the Clear Key and then enter the new number The maximum number of originals that can be entered is 50 NOTES 1 2 3 4 5 6 7 8 9 P CA of origs 3 1...

Page 101: ...e new number The maximum number that can be entered is 50 NOTES If you want to place more inserts repeat steps 8 and 9 to enter numbers for placement position nos 2 and up 10 The positions of inserts are from 1 up to 20 NOTE Touch Enter 11 Touch Insert Paper 12 1134P415DA Enter Cancel Page Insertion Yes Copy onto Inserts User set Sheet Placement A4 Insert Paper 1134P415DA Select the paper source f...

Page 102: ... selected the functions correctly Then touch Enter again 15 1075O037AA Load the original set onto the AFR 9 Placing Originals p 31 16 Press the Start Key 17 The copy cycle is run for page insertion Chapter 3 Making Copies 10 Auxiliary Functions 89 ...

Page 103: ...OHP transparencies and after each transparency inserts a copied copy paper p 92 Copy Multiple Copy 1136O137AA Original Set Multi Copy Entry 2 Copy Sets Copied Interleaves OHP The copier sorts copies into the specified number of sets of originals The first set of copies are on OHP transparencies and the remaining sets are on the normal copy paper The copier interleaves the first copy set with copie...

Page 104: ...f sets of originals The first set of copies are on OHP transparencies and the remaining sets are on the normal copy paper The copier interleaves the first copy set with blank sheets of normal paper p 93 For the multiple copy the copier must be equipped with a Staple Sorter ST 207 or 20 Bin Sorter S 206 NOTE OHP Interleaving can be used only when the copier is loaded with A4 or A4 paper Follow the ...

Page 105: ... 1134P291CA Single Copy Touch OHP Interleaving 1 Touch Enter 3 Load the originals onto the AFR 9 Placing Originals p 31 4 1075O037AA If you make each copy through the Original Glass do so in descending order of original pages Placing Originals p 32 NOTE Load the transparencies onto the Multi Bypass Table Manual Bypass Copying p 37 5 1075O311AA Press the Start Key 6 The copy cycle is run for OHP in...

Page 106: ...er Cancel Blank Multi Copy Copy onto 1134P292CA Using the 10 Key Pad enter the number of copy sets you want 4 4 5 7 8 7 1134P293CA 1134P293CA To correct a number entry press the Clear Key then enter the new number NOTE Touch Enter 5 Make doubly sure that you have selected the functions correctly Then touch Enter again 6 Load the originals onto the AFR 9 Placing Originals p 31 7 If you make each co...

Page 107: ...ad the transparencies onto the Multi Bypass Table Manual Bypass Copying p 37 8 1075O311AA The copy cycle is run for OHP interleaving Press the Start Key 9 Chapter 3 Making Copies 10 Auxiliary Functions 94 ...

Page 108: ...Chapter 3 Making Copies 10 Auxiliary Functions 95 ...

Page 109: ...ht edge of the copy p 97 The margin width can be selected from among 10 mm 15 mm 20 mm 1134P143AA Margin by Reduction Original Copy 1134P143AA The image of the original which has almost no file margins along the sides is reduced to make a wider margin along the left edge of the copy p 97 The margin width can be selected from among 10 mm 15 mm 20 mm 1134P144AA Original Copy 1134P144AA The image of ...

Page 110: ... 10mm 15mm 20mm 1075O221DA Shown only when 2 in 1 mode is selected Select the Mode 4 1075O222DA File Margin Enter Cancel Position Mode Width A A 10mm 15mm 20mm 1075O222DA Select the Width of the margin 5 1075O223DA File Margin Enter Cancel Position Mode Width A A 10mm 15mm 20mm 1075O223DA Having a margin width larger than necessary could result in part of the image missing on the copy Try to keep ...

Page 111: ...A On the Original Glass Margin side on the right 1075O040AA Margin side on the left 1075O041AA 1134P181AA 1134P181AA 1134P182AA 1134P182AA 1134P179AA 1134P179AA 1134P180AA 1134P180AA Margin Position Original Placement Left Right Margin Position Original Placement Left Right Chapter 3 Making Copies 10 Auxiliary Functions 98 ...

Page 112: ...Chapter 3 Making Copies 10 Auxiliary Functions 99 ...

Page 113: ...er 1136P220AA 2 Sided Copy 2 Sided Book Book Original 1136P220AA Each of the two pages of an open book is copied onto each side of a sheet of paper Touch Book Copy 1 1134P277CB Cover Book Copy Edge Frame Erase File Margin Page Insertion OHP Inter leaving 1134P277CB Select whether the book is a standard type Std Book or right bound type R Bound 2 1134P298CA Book Copy Enter Cancel Original R Bound 1...

Page 114: ...299CA Touch Enter 4 If the pages to be copied extend three or more start copying with the higher numbered pair Placing Originals p 33 When Book Copy is selected the zoom ratio is automatically set to full size Select the desired zoom ratio and copy paper size NOTES Press the Start Key 5 The copy cycle is run for Book Copy Chapter 3 Making Copies 10 Auxiliary Functions 101 ...

Page 115: ... 20 mm 1134P145AA Original Right Edge Erase Copy 1136P145AA The copier erases an area of the original equivalent to a given margin from the right edge of the copy p 103 The erase width can be selected from among 10 mm 15 mm 20 mm 1136P215AA Copy Frame Erase Original Fax Output 1136P215AA The copier erases a set width along the four edges p 103 The erase width is 10 mm 1134P146AA Original Top Edge ...

Page 116: ...le Margin Page Insertion OHP Inter leaving 1134P272CA Selecting a Particular Edge Frame Erase Function Select the Position of erase from among the five 3 1134P326DA Edge Frame Erase Enter Cancel Position Width 10mm 15mm 20mm 1134P326DA Select the Width of erase 4 Touch Enter 5 To cancel the Erase settings touch Cancel Press the Start Key 6 The copy cycle is run for Edge Frame Erase Only 10 mm is a...

Page 117: ... 1134P192AA 1134P192AA Center erase band running crosswise 1075O046AA 1134P193AA 1134P193AA Loading the Originals in Edge Frame Erase Mode Using the AFR 9 The erase width represents that on the copy not on the original Example Erasing the center of a A3 size book original on a copy reduced by 50 NOTE 1136P217AA Copy A4 Book Original A3 0 5 1136P217AA 10 mm 20 mm If you want to erase the 20 mm wide...

Page 118: ...nt to change and make the necessary change 3 1134P304CA Mode Check Exit Auto Expo X1 000 Auto Paper Orig Copy Finishing Cover Mixed Orig 1 1134P304CA Press the Mode Check Key 1 To Check for Current Settings The current settings appear on the Touch Panel 2 1134P362CA Mode Check Auto Expo X1 000 Auto Paper Orig Copy Finishing Cover Mixed Orig 1 Exit 1134P362CA Touch Exit 3 The Basic screen reappears...

Page 119: ...Chapter 3 Making Copies 11 Mode Check 106 ...

Page 120: ...fier 118 6 User s Choice User s Choice Functions 119 Making the User s Choice Settings 124 7 Data Send 126 This chapter explains about the functions that are made available by using the User Mode Key i e Job Memory Input Zoom Memory Input Meter Count Toner Replenisher Drum Dehumidifier and User s Choice It also shows how to recall a job program from the memory using the Job Recall Key Chapter 4 Us...

Page 121: ...Count Select a function by pressing the key 1075O139CA 1134O141CA Job Memory Input 1 Select a memory number key to store your current job into memory Account job 2 3 4 5 6 7 8 9 10 Exit Cancel 1134O141CA 1134O141CA Job Memory Input 1 Select a memory number key to store your current job into memory Account job 2 3 4 5 6 7 8 9 10 Exit Cancel 1134O141CA Touch any one of the 10 job number keys from 1 ...

Page 122: ...po X1 000 Auto Paper Orig Copy Finishing Cover Mixed Orig 1 Input Cancel 1134P412CA The Basic screen reappears If you select a key in which an old job is stored and then Input is touched the old job is replaced with the new one NOTE Chapter 4 Using the User Mode 1 Job Memory Input and Job Recall 109 ...

Page 123: ...sing the key 1075O139CA Then the following screen appears 1134O141CA Job Memory Input 1 Select a memory number key to store your current job into memory Account job 2 3 4 5 6 7 8 9 10 Exit Cancel 1134O141CA Touch Account Job 4 User Mode 1134P356CA Touch any one of the five job number keys from 1 to 5 A highlighted job number key indicates that a job has already been stored under that job number In...

Page 124: ...po X1 000 Auto Paper Orig Copy Finishing Cover Mixed Orig 1 Input Cancel 1134P412CA The Basic screen reappears If you select a key in which an old job is stored and then Input is touched the old job is replaced with the new one NOTE Chapter 4 Using the User Mode 1 Job Memory Input and Job Recall 111 ...

Page 125: ...t you expected touch Cancel and the Job Recall screen reappears Recalling a Job from Memory Press the Job Recall Key 1 1134P361CB Job Recall 1 Press a key to recall a job Account job 2 3 4 5 6 7 8 9 10 Exit 1134P361CB Touch the number key in which the desired job has been stored 2 To recall an account job first touch Account Job and then on the screen opened select the desired number key Job Recal...

Page 126: ...Chapter 4 Using the User Mode 1 Job Memory Input and Job Recall 113 ...

Page 127: ... Exit BackUp Zoom 1 x1 000 2 x1 000 3 x0 930 Input the zoom ratio using the 10 Key Pad and assign to a number key x 1134P363CA Using the 10 Key Pad enter the desired zoom ratio which can range from 0 500 to 2 000 To enter 1 234 key in 1 2 3 and 4 in that order To correct an entry press the Clear Key then enter the new ratio again 3 Touch any number key on the Touch Panel either 1 2 or 3 4 1134P366...

Page 128: ...y number is lost NOTES 0 930 Mini Reduce has been initially stored in key number 3 The zoom ratio is now stored in memory and shown on the number key touched 1134P364CA Zoom Memory Input Exit BackUp Zoom 1 x1 234 2 x1 000 3 x0 930 Input the zoom ratio using the 10 Key Pad and assign to a number key x1 243 1134P364CA 2 Zoom Memory Input Chapter 4 Using the User Mode 115 ...

Page 129: ...er of a preset size The size will be set by your Technical Representative 2 Sided Total Shows the number of 2 sided copies made 2 Sided Size Shows the number of 2 sided copies made on the copy paper of a preset size the same size as set for Size Accessing the Meter Count Press the User Mode Key 1 Then the Touch Panel shows the counts of all four counters as shown below 1134P367CA Meter Count 2 Sid...

Page 130: ... a function by pressing the key 1075O139CA The copier immediately starts a toner replenishing sequence which will last for about 2 minutes It is also possible to change the copying functions while the copier is in this sequence Toner Replenisher cannot be started while the copier is warming up Do not turn the Power Switch OFF or swing down the Front Door while the copier is replenishing toner Tone...

Page 131: ...essing the key 1075O139CA This sets the copier into the Drum Dehumidifier cycle which lasts for about 3 minutes Make a copy to check that the copy image is clear Run the Drum Dehumidifier cycle once again if the copy image is not yet clear 3 A copy cycle can be initiated even while the copier is in the Drum Dehumidifier cycle Useful Tip The copier cannot be set into the Drum Dehumidifier cycle whi...

Page 132: ...aper Priority A4 1 Language Selection German Mixed Orig Detection OFF Exit Select a key to change settings or press Pg key for additional menu 1134P443DA A listing of User s Choice functions is given in six pages of menu from 1 6 to 6 6 To show the listing of each page touch the desired page number key on the bottom of the Touch Panel Mixed Orig Detection Language Selection Paper Priority Copy Mod...

Page 133: ...or panel reset The initial setting is Auto Expo Level Priority Auto Mode Determines the default exposure level in the Auto Exposure Mode either Lighter Normal or Darker The initial setting is Normal Manual Mode Determines the default exposure level in the Manual Exposure Mode The initial setting is Normal Manual Expo Adjust Determines the default exposure level adjusting increments in the Manual E...

Page 134: ...etting is ON Intelligent Sort Specifies whether to turn ON or OFF the function that automatically switches between the Sort and Non Sort mode selecting Non Sort if only a single original is loaded on the AFR 9 and Sort if two or more originals are loaded on the AFR 9 The initial setting is OFF Confirmation Beep Selects whether to turn ON or OFF the beep that sounds each time a key on the Touch Pan...

Page 135: ...er When a Zoom ratio is selected that ratio is automatically selected when the 2 in 1 separation copy is set Auto Size is among the choices of zoom ratio The initial setting is 1 414 When a Margin setting is made that setting is automatically selected when the 2 in 1 separation copy is set The initial setting is no margin When an Erase setting is made that setting is automatically selected when th...

Page 136: ...dministrator number is set by the Technical Representative For more details consult your Technical Representative Selects whether to turn ON or OFF the copy track function by accounts The initial setting is OFF Max Copy Sets Determines the number of copies or copy sets that can be set using the 10 Key Pad The initial setting is OFF User Help Sets the help code to be transmitted by the user when DT...

Page 137: ...n Sort to Sort touch 2 6 3 1134P443DA User s Choice 1 6 1 6 2 6 3 6 4 6 5 6 6 6 Copy Mode Priority Auto Size Paper Priority A4 1 Language Selection German Mixed Orig Detection OFF Exit Select a key to change settings or press Pg key for additional menu 1134P443DA Touch the key of the desired User s Choice function In this example you touch Finishing Priority 4 1134P370CA User s Choice 2 6 1 6 2 6 ...

Page 138: ...CA Touch Enter 6 1134P369CA User s Choice 2 6 1 6 2 6 3 6 4 6 5 6 6 6 Finishing Priority Sort Manual Expo Adjust Mode 1 Expo Level Priority Normal Expo Mode Priority Auto Exit Select a key to change settings or press Pg key for additional menu 1134P369CA Touch Exit 7 Repeat steps 2 to 6 to make new settings for other User s Choices Chapter 4 Using the User Mode 125 ...

Page 139: ...the copier by means of preset codes when the DT 103 is mounted For more details consult your Technical Representative 1134P359CA User Mode Exit Toner Re Plenisher Job Memory Input Data Send Drum De humidifier Zoom Mem ory Input User s Choice Meter Count Select a function by pressing the key 1134P359CA 126 ...

Page 140: ...4 4 When the Message Misfeed detected Appears 136 5 When the Message The section indicated by is open Appears 146 6 When Appears 149 7 What Does Each Message Mean 150 This chapter explains about the various warning messages given on the Touch Panel and steps to take to correct these faulty conditions It also covers the procedures to be used for replenishing supplies Chapter 5 When a Message Appear...

Page 141: ...rrupted and you cannot then start a new copy cycle The blinking Drawer has run out of paper Load the Drawer with paper by using the following procedure 1st 2nd Drawer Slide the Drawer out 1 1075O101DA Unwrap the package of copy paper and fan the paper stack thoroughly 2 1139O1370A Front Side Load the paper stack into the Drawer so that its front side the side facing up when the package was unwrapp...

Page 142: ...nd fan the paper stack thoroughly 2 1139O1370A Front Side 1075O050BA Load the paper stack into the right half of the Drawer facing its front side down Press the leading edge of the paper stack tightly up against the right edge of the Drawer 3 The paper should be loaded no higher than the Max Level Indicator NOTE 1075O051BA Load another paper stack into the left half of the Drawer facing its front ...

Page 143: ...r should be loaded no higher than the Max Level Indicator NOTE 1134O020AA 1075O052BA Slide the Drawer back in 5 Chapter 5 When a Message Appears 1 When the Message The current Paper Drawer is empty Appears 130 ...

Page 144: ... stack onto the Paper Plate so that its front side faces up 3 Make sure that the leading edge of the paper stack is pressed tightly up against the Guide Plate on the left of the C 302 The paper should be loaded no higher than the Max Level Indicator NOTES 1134O033AA Close the Cassette Door 4 This causes the Paper Plate to rise automatically The Paper Plate may not ascend if the Cassette Door is no...

Page 145: ...d lighter It is recommended therefore that you replace the Toner Bottle as soon as possible Swing down the Upper Front Door 1 1075O053AA 1075O142DB Please add toner MT Toner 601B Follow the procedure on the label inside the Front Door 1075O142DB When toner has run out the message shown on the left appears and you can no longer start a new copy cycle Replace the Toner Bottle with a new one by follo...

Page 146: ...A Pull the seal off the Toner Bottle 6 1075O058AA 1075O059AA Swing the Toner Bottle Holder closed and close the Front Door 7 Use ONLY MT Toner 601B for the EP6000 copier Using any other toner could result in trouble Be careful not to drop the Toner Bottle from a 1 m or more height It may cause damage to the Toner Bottle NOTES Use the Auxiliary Toner Replenishing Mode if the image is light immediat...

Page 147: ...en below Check that no portion of the staple sheet hangs out of the Cartridge Break off any portion of the sheet that hangs out of the Cartridge NOTE Replacing the Staple Cartridge for ST 207 Holding the Lock Release Lever slide the Staple Sorter away from the copier 1 1136O166AA 1136O166AA Open the Staple Cover 2 1136O011AA While pressing down the Staple Cartridge Release Lever pull the Staple Ca...

Page 148: ...7 Non Sort Bin 1136O015AA Remove the sheet of paper from the 1st Bin and check that it has been stapled 9 1136O017AA If no staples are evident place another sheet of paper into the 1st Bin and repeat steps 7 8 and 9 Replace the Staple Cartridge only after you are prompted to do that by the message Removing the Staple Cartridge before then will result in stapling trouble Immediately after the new S...

Page 149: ... a misfed sheet of paper depending on the location First isolate the location then clear the misfeed according to the procedure applicable to the misfeed occurring at that particular location Copier p 138 1075O163CA 1075O163CA Multi Bypass Table p 140 1075O177CA 1075O177CA 4 When the Message Misfeed detected Appears 1075O164CA 1075O164CA 1075O165CA 1075O165CA 1075O166CA 1075O166CA 1075O167CA 1075O...

Page 150: ...ssette C 302 p 143 1075O176CA 1075O176CA 20 Bin Sorter S 206 Staple Sorter ST 207 p 144 1075O174CA 1075O174CA 1075O173CA 1075O173CA 1075O172CA 1075O172CA 1075O175CA 1075O175CA Chapter 5 When a Message Appears 4 When the Message Misfeed detected Appears 137 ...

Page 151: ...out the sheet of paper 4 Swing down the Upper Half of copier 5 Close the Front Door 6 1075O061AA 1075O060AA 1075O067AA 1075O063AB Be careful not to touch the areas marked with High Voltage and Caution with bare hands NOTE 1075O064AA Swing up Misfeed Removal Guide Plate M3 and at the same time turning Misfeed Removal Knob M4 pull out the sheet of paper 3 1075O065AC Chapter 5 When a Message Appears ...

Page 152: ...load the paper from the Drawer 10 Fan the paper thoroughly and reload it in the Drawer 11 Slide the Drawer back in 12 Swing down the Front Door and then swing it closed to reset the misfeed indication message on the Touch Panel 13 In the same way unload and reload the paper stack in the 2nd Drawer and 3rd Drawer 14 1075O068AA 1075O070AA 1075O070AA 1075O069AA 1075O074AB Chapter 5 When a Message App...

Page 153: ...ake Up Section Then close the Right Door 2 Fan the paper stack thoroughly and place it back on the Table 3 Swing down the Front Door and then swing it closed to reset the misfeed indication message on the Touch Panel 4 1075O070AA 1075O071AB 1075O072AB 1075O073AA Chapter 5 When a Message Appears 4 When the Message Misfeed detected Appears 140 ...

Page 154: ...own the Front Door slide out the Duplex Unit and open Misfeed Removal Guide Plate D2 5 Pull out the sheet of paper from the Duplex Unit 6 Opening Misfeed Removal Guide Plate D3 pull out of the sheet of paper 7 1075O076AB 1075O079AA 1075O077AB 1075O080AA 1075O075AB Slide the Duplex Unit back into copier and close the Front Door 8 1075O216AA Chapter 5 When a Message Appears 4 When the Message Misfee...

Page 155: ... Raise the AFR 9 5 Opening Document Turnover Feed Unit Guide Plate F4 gently pull out the original from the Document Feed Unit 6 1139O0790A 1139O0810A 1139O0820A Remove the original from the Original Glass and lower the AFR 9 7 1075O129AA Unload the originals from the Document Feed Tray 1 1075O130AA Return the number of originals indicated on the Touch Panel back onto the Document Feed Tray 8 1075...

Page 156: ... the sheet of paper 2 Close the Cassette Door 3 1134O031AA 1134O027AA 1134O033AA Press the Lock Release Lever and slide the C 302 away from the copier 4 Remove the sheet of paper 5 Slide the C 302 back against the copier 6 1134O028AA 1134O029AA 1134O030AA Chapter 5 When a Message Appears 4 When the Message Misfeed detected Appears 143 ...

Page 157: ...tion of the arrow ST 207 only 3 Pull out the copy from the Transport Section 4 Close S 5 Slide the Sorter back against the copier 6 1136O166AA 1136O166AA 1136O167AA 1136O167AA 1136O174CA 1136O175CA Swing down Misfeed Removal Guide Plate S with care not to touch the area marked with Caution 2 Chapter 5 When a Message Appears 4 When the Message Misfeed detected Appears 144 ...

Page 158: ...Chapter 5 When a Message Appears 4 When the Message Misfeed detected Appears 145 ...

Page 159: ...ilure by following the procedure given below Monitor Display Check Location Check that the Front Door is closed Check that the Upper Front Door is closed Check that the Left Door is closed Check that the Right Door is closed 1075O189CA 1075O190CA 1075O192CA 1075O191CA 1075O067AA 1075O133AA 1075O076AB 1075O078AB 5 When the Message The section indicated by is open Appears Chapter 5 When a Message Ap...

Page 160: ...at 20 Bin Sorter S 206 or Staple Sorter ST 207 is attached to the copier properly Check that Document Feed Unit Door F1 and Document Turnover Exit Unit Door F3 of the AFR 9 are closed 1075O193CA 1075O195CA 1075O136CA 1075O137CA 1075O081AA 1075O132AA 1075O083AA 1075O084AA 1075O196CA 1136O014AA Chapter 5 When a Message Appears 5 When the Message The section indicated by is open Appears 147 ...

Page 161: ...play Check Location Check that the Large Capacity Cassette is attached to the copier properly 1075O197CA 1134O030AA Chapter 5 When a Message Appears 5 When the Message The section indicated by is open Appears 148 ...

Page 162: ...component is selected the message Selected mode can not be used Please call your Technical Rep appears You can nonetheless make copies as long as you don t use that particular function Touching shows the following screen NOTE This is only for the Technical Representative s use Touching Enter in the upper right corner of the screen returns the Basic copying screen to the Touch Panel 1134O144CA Mach...

Page 163: ...eplenish Toner Toner is soon running out Replace the Toner Bottle 2 When the Message Replenish Toner Appears p 134 The Staple Cartridge is empty Please replace The staples have run out Replace the Staple Cartridge with a new one 3 When the Message The Staple Cartridge is empty Appears p 136 Misfeed detected Remove misfeed at O A misfeed has occurred and no copy cycle can be initiated Clear the mis...

Page 164: ...hange direction of original The copy paper of the calculated size is loaded in a direction different from that of the original to run a copy cycle in the Auto Paper mode Change the direction of the original Auto Size is not possible Please cancel or select another paper size The zoom ratio calculated based on the original size and copy paper size is outside the range 0 500 2 000 to run a copy cycl...

Page 165: ...py sets to make in the Sort or Sort and Staple mode If you press the Start Key the copier starts the copy cycle to make only 20 copy sets Re insert the following of originals After a misfed sheet of paper has been cleared you need to reload the originals fed out onto the Document Exit Tray onto the Document Feed Tray Place the number of originals shown back onto the Document Feed Tray Reduction Ma...

Page 166: ...rty 155 The Image on the Copy is not aligned properly 155 2 The Copier is not functioning as designed The Touch Panel shows nothing 156 No copies are fed out when the Start Key is pressed 156 Control Panel Keys do not respond 156 The Copier is not activated when the Power Switch is turned ON 156 This chapter gives you instructions on how to troubleshoot copier malfunctions Chapter 6 Troubleshootin...

Page 167: ... in the User Mode p 117 The message Replenish toner or Please add toner is shown on the Touch Panel Replace the Toner Bottle with a new one p 132 The paper is damp Replace the paper p 128 The Image is too dark The exposure level for the Auto Exposure Mode is set at one of the Dark levels Change the setting of the User s Choice Exposure Priority p 120 Cancel the Auto Exposure Mode and select the Ma...

Page 168: ...to enlarge the copy to the appropriate size p 42 The original is not placed in the correct position Zoom Ratio is set at full size 100 Select the paper drawer that is loaded in the same direction as the original p 40 Or reload the paper in the same direction as the original p 128 The reduction ratio selected is not in accord with the copy paper size When doing manual reduction copying Select the z...

Page 169: ...ready for making copies after it has been turned ON Please wait The copier has developed a malfunction Check the Touch Panel and take action according to the message on the Panel p 150 Control Panel Keys do not respond The Interrupt Key LED is lit up The copier is in the interrupt mode Press the Interrupt Key to cancel the interrupt mode p 36 The copier is not activated when the Power Switch is tu...

Page 170: ...cument Feeder 160 3 Large Capacity Cassette 161 4 20 Bin Staple Sorter 162 5 20 Bin Sorter 163 6 Data Controller 164 7 Copier Outline Dimensions 165 This chapter gives complete specifications of the copier system and options Chapter 7 Specifications 157 ...

Page 171: ...ze 1st Drawer 2nd Drawer A3L B4L A4C A4L A5L 210 330 mm L 297 430 mm L 220 280 mm L 216 320 mm L 297 216 mm C 216 297 mm L 210 280 mm L Foolscap L Quarto L 3rd Drawer A4C Multi Bypass Table Crosswise 297 mm to 100 mm Lengthwise 432 mm to 140 mm Lost image 1 sided copy in the Full size mode Leading edge 4 mm 2 5 mm Front edge Rear edge 4 mm or less Warming up Time 5 minutes or less at Ambient tempe...

Page 172: ...ass Table Plain paper Recycled paper Weighing 60 to 90 g m2 50 sheets Thick paper Weighing 90 to 157 g m2 20 sheets Transparencies 20 sheets Translucent paper 20 sheets Post card weighing 190 g m2 20 sheets Multiple Copy Up to 999 copies Count Down system Exposure Control Auto and Manual Power Requirements AC 110V 115V 120V 127V 200V 220V 220V 240V 50 60 Hz Power Consumption 1 5 kW Max Dimensions ...

Page 173: ...ginal Mode 1 A3L B4L A4L A4C A5L A5C FLSL 2 in 1 Mode A4C A5C 1 sided 2 sided Mixed Original Detection Mode 1 A3L B4L A4L A4C FLSL Capacity of Document Feed Tray A4L A4C B5L B5C A5L A5C 50 sheets 80 g m2 A3L B4L 30 sheets 80 g m2 Document Loading Face up Copy Productivity 100 First copy in automatic document feeding 5 1 seconds or less Power Source DC24V supplied from copier Power Consumption 60W ...

Page 174: ...Stand with Slide Rails Types of Paper Plain paper Recycled paper Weighing 60 g m2 to 90 g m2 Paper Size A4C Capacity 3 000 sheets 80 g m2 Power Source DC24 V 1 2 A supplied from copier Power Consumption 30 W or less Dimensions Width 290 mm Depth 446 mm Height 500 mm Weight 12 9 kg Including Mounting Brackets 3 Large Capacity Cassette Chapter 7 Specifications 161 ...

Page 175: ...Capacity of Bins Non Sort Mode Hole Punch Mode Plain paper Recycled paper Non Sort bin 50 sheets 1st bin to 20th bin 50 sheets bin Total 1 050 sheets A4 or smaller weighing 80 g m2 Total 1 600 sheets Larger than A4 weighing 80 g m2 Special paper Transparencies 10 sheets Max paper size A4 Thick paper Translucent paper 10 sheets Sort Mode Group Mode Sort Staple Mode Plain paper Recycled paper 1st bi...

Page 176: ...apacity of Bins Non Sort Mode Plain paper Recycled paper Non Sort bin 50 sheets 1st bin to 20th bin 50 sheets bin Total 1 050 sheets A4 or smaller weighing 80 g m2 Total 1 600 sheets Larger than A4 weighing 80 g m2 Special paper Transparencies 10 sheets Max paper size A4 Thick paper Translucent paper 10 sheets Sort Mode Group Mode Plain paper Recycled paper 1st bin to 20th bin 50 sheets bin Total ...

Page 177: ...otal 9 999 999 Max no of copies made by paper size 9 999 999 Max no of copies made by department 999 999 Max no of copies made by copy mode 999 999 Max no of copies made by department copy mode 99 999 Distinguishable Copy Modes Up to 16 types Power Source DC24V supplied from copier Power Consumption 5W or less Dimensions Width Depth Height 180 mm 64 mm 111 mm Weight Approx 550 g Others A printer o...

Page 178: ...7 Copier Outline Dimensions EP6000 1565 369 461 1075O103DA 1192 1471 1075O086BB Scale mm EP6000 With a Complete Lineup of Options 2344 1439 1335 1231 1075O126CB Scale mm Chapter 7 Specifications 165 ...

Page 179: ...166 ...

Page 180: ...leaning 169 2 Function Combination Matrix 172 3 Description of Copy Paper Size 175 4 Zoom Ratio Table Original Size to Copy Paper Size 176 This chapter explains about care of the copier and the various possible combinations of functions Chapter 8 Miscellaneous 167 ...

Page 181: ...le Cable connecting the copier with options Original Glass Item Action Is the Glass dirty Clean the Glass using the procedure given in Cleaning p 169 Is the Glass scratched Call your Technical Representative Is the Glass cracked or chipped Original Cover Duplexing Document Feeder Item Action Is the Document Transport Belt dirty Clean the Belt using the procedure given in Cleaning p 170 Is the Docu...

Page 182: ... of the Control Panel clean with a soft dry cloth 2 Original Glass Raise the Original Cover 1 Wipe the surface of the Original Glass clean with a soft dry cloth 2 NEVER use a glass cleaner or any other detergent to avoid damage to the control panel keys and Touch Panel NOTE Control Panel 1 Care of the Copier 1075O087AA 1075O088AA 1075O089AA Chapter 8 Miscellaneous 169 ...

Page 183: ...oth edges and pull it to the left to expose a fresh surface 3 1139O1920A Wipe the fresh surface clean using the soft cloth dampened with neutral home detergent 4 Repeat these steps until the entire surface of the Belt is wiped clean 1139O1910A Front Door Swing down the Front Door 1 Wipe the inside of the Front Door clean with a soft cloth 2 1075O090AA 1 Care of the Copier Chapter 8 Miscellaneous 1...

Page 184: ...1 Care of the Copier Chapter 8 Miscellaneous 171 ...

Page 185: ...O O O O O O O O O O O O Page Insertion O O O O O O O O O O O O O Single Copy O O O O O O O Multi Copy O O O O O O O File Margin Right O O O O O O O O O O O O O O O Left O O O O O O O O O O O O O O O Reduce O B O B B O O O O O O O O O O 2 in 1 O B O B B O O O O Edge Frame Erase O O O O O O O O O O O O O O O Book Copy O O O O O Interrupt O O O O O O O O O O O O Multi Bypass O O O O O A O A O A Job M...

Page 186: ... O O O O O O O O O O O O O Page Insertion O O O O O O O O O O O O O O Single Copy D O O O O O O Multi Copy O O O O O O O File Margin Right O O O O O O O O O O O O O O Left O O O O O O O O O O O O O O O O Reduce O O O O O O O O O O O O O O A O 2 in 1 O O O O O O O O O O Edge Frame Erase O O O O O O O O O O O O O O O O A O Book Copy O O O O O O O O O O O Interrupt O O O O O O O O O O Multi Bypass O ...

Page 187: ...ise paper and therefore you cannot select paper of any other size If none of the paper sources of the copier is loaded with A4 crosswise paper A4 lengthwise is next selected You cannot select OHP Interleaving however if neither A4 crosswise nor A4 lengthwise paper is loaded in the copier D The combination is possible if the copier is not equipped with a Sorter If a Sorter is attached the function ...

Page 188: ...1 17 279 mm 432 mm 11 14 11 14 279 mm 356 mm COMPUTER 10 1 8 14 257 mm 356 mm 10 14 10 14 254 mm 356 mm 9 1 4 14 9 1 4 14 236 mm 356 mm LEGAL 8 1 2 14 216 mm 356 mm FOOLSCAP GOVERNMENT LEGAL 8 1 2 13 216 mm 330 mm FOOLSCAP 8 13 203 mm 330 mm FOOLSCAP 8 2 3 13 220 mm 330 mm FOOLSCAP FOLIO 8 1 4 13 210 mm 330 mm 8 1 4 11 3 4 8 1 4 11 3 4 210 mm 301 mm LETTER 8 1 2 11 216 mm 279 mm GOVERNMENT LETTER ...

Page 189: ... A4 1 640 A5 1 154 B4 2 000 B5 1 414 Inch Areas Original Size Copy Paper Size Zoom Ratio 11 17 279 4 431 8 mm 11 14 0 823 Legal 0 772 Foolscap 0 764 Letter 0 647 Invoice 0 500 11 15 279 4 381 mm 11 14 0 933 Legal 0 772 Foolscap 0 772 Letter 0 733 Invoice 0 500 11 14 279 4 355 6 mm Legal 0 772 Foolscap 0 772 Letter 0 772 Invoice 0 500 Legal 8 1 2 14 215 9 355 6 mm Foolscap 0 928 Letter 0 785 Invoic...

Page 190: ...pies 100 Book Original 2 sided Copy 100 C Center Erase 102 Cleaning 169 Closure Failure 146 Confirmation Beep User s Choice 119 121 Control Panel 14 Copy Mode Priority User s Choice 119 120 Copy Paper Size 40 Copy Track 119 123 Correcting the Number Entry 34 Counter Removal User s Choice 119 121 Cover Mode Front 79 Cover Mode Front Back 79 Crosswise Type of Originals and Copy Paper xi Custom Book ...

Page 191: ...ing Direction copy paper path x File Margin 96 Finishing Mode 64 Finishing Priority User s Choice 119 120 Fixed Zoom Ratios 42 Frame Erase 102 Full Size 43 Function Combination Matrix 172 G Group 65 67 H Hole Punch 65 68 I Image Density 45 Initial Mode 22 Intelligent Sort User s Choice 119 121 Interrupt Mode 36 J Job Memory Input 108 Job Recall 112 L Language Selection User s Choice 119 120 Left E...

Page 192: ... Copies 34 Number of Originals Auto Original Count Mode 60 O OHP Interleaving 90 1 One sided 1 sided 46 49 1 One sided 1 sided 2 in 1 47 52 1 One sided 2 sided 46 49 1 One sided 2 sided 2 in 1 48 54 1 sided 2 in 1 1 One sided 48 55 Orig Copy Default 123 Original Copy Type 46 Original Count Mode Auto Count 60 Original Placement 30 Original Thickness User s Choice 119 121 Outline Dimensions 165 P Pa...

Page 193: ...a Multi Copy Cycle 35 T Toner Replenisher 117 Top Edge Erase 102 Total Counter 116 Touch Panel 16 Type of Originals and Copy Paper xi 2 two sided Size Counter 116 2 two sided Total Counter 116 2 two sided 1 sided 47 51 2 two sided 2 sided 47 52 2 sided 2 in 1 1 One sided 48 56 U User Help 119 123 User s Choice 119 W Width Type of Originals and Copy Paper xi Z Zoom Memory 44 Zoom Memory Input 114 Z...

Reviews: