background image

22

Basic image processing

BASIC IMAGE PROCESSING

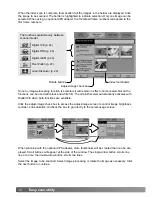
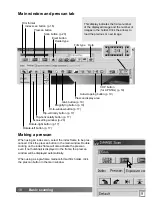
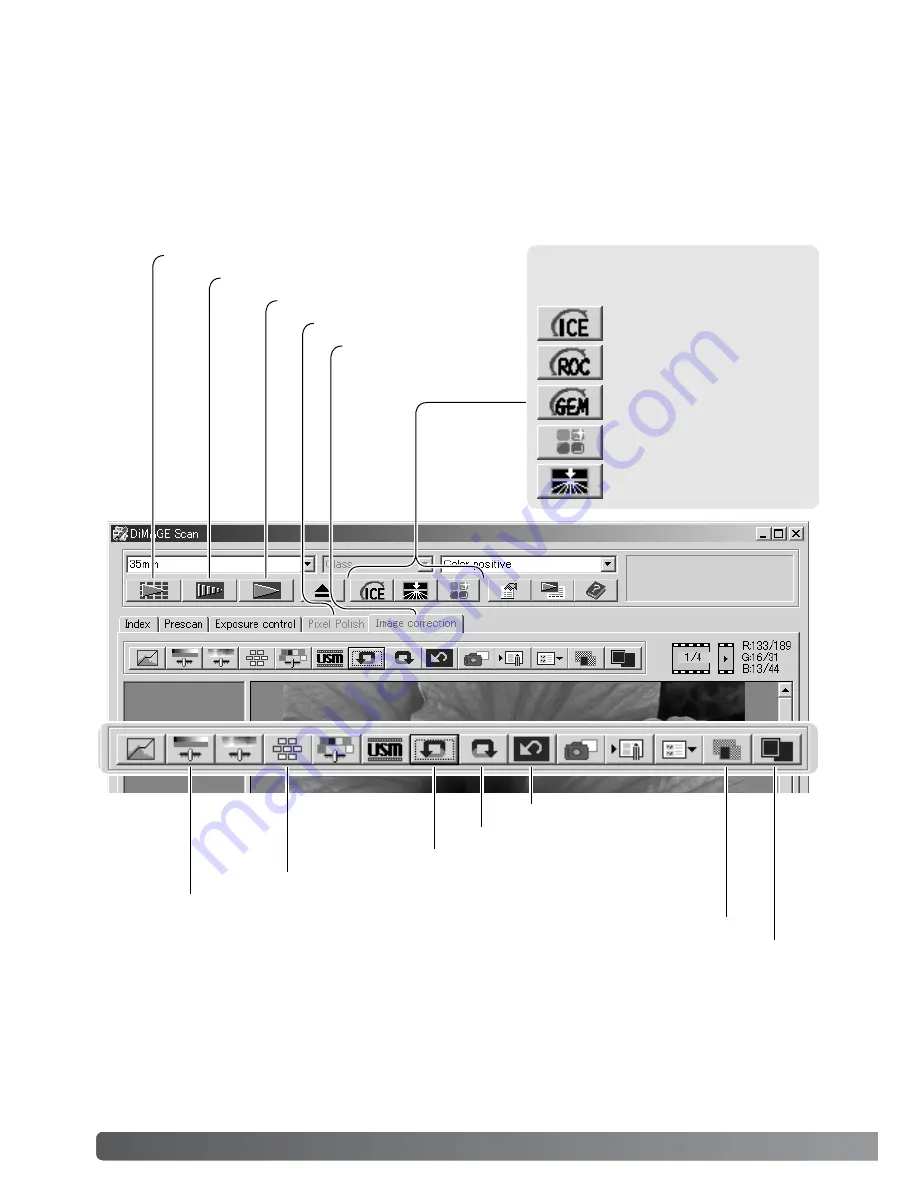
Main window and image-correction tab

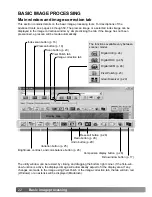
Index scan button (p. 16)

Prescan button (p. 18)

Scan button (p. 20)

Image-correction tab

Fit-to-window button (p. 17)

Display area

Comparison display button (p. 28)

Reset-all button (p. 28)

Redo button (p. 28)

Undo button (p. 28)

Variation button (p. 25)

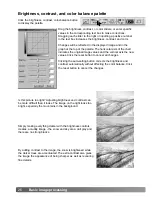
Brightness, contrast, and color-balance button (p. 26)

This section contains details on the basic image-processing tools. For descriptions of the
advanced tools, see pages 44 though 59. The prescan image or a selected index image can be
displayed in the image correction window by simple clicking the tab. If the image has not been
prescanned, a prescan will be made automatically.

The utility window can be resized by clicking and dragging the bottom right corner. If the fit-to-win-
dow function is active, the displayed image will automatically adjust to fit the display area. If any
changes are made to the image using Pixel Polish or the image-correction tab, the tab will turn red
(Windows) or an asterisk will be displayed (Macintosh).

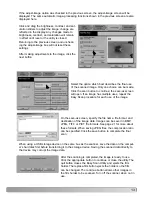
Pixel Polish tab

The functions available vary between
scanner model.

Digital ICE (p. 24)

Digital GEM (p. 46)

Digital ROC (p. 45)

Pixel Polish (p. 23)

Grain Dissolver (p. 29)

Summary of Contents for DIMAGE SCAN DUAL III

Page 1: ...SOFTWARE MANUAL E 9222 7310 11 AV A304 ME 0304...

Page 2: ...this example the image is too yellow By moving the blue curve up the image looks more neutral For more on tone curve corrections see page 50 Original image After Digital ROC processing Digital ROC Rec...

Page 3: ...of your new scanner Check the packing list in the scanner hardware manual before using this product The DiMAGE Scan functions available vary between scanner models To find the functions listed in this...

Page 4: ...Digital ICE Image Correction Enhancement 24 Variation palette 25 Brightness contrast and color balance palette 26 An introduction to color 27 Comparing pre and post correction images 28 Undoing and re...

Page 5: ...ogram auto setting 53 White black and gray point corrections 54 Setting the white and black point values 55 Tracking image corrections snapshot button 55 Hue saturation and lightness palette 56 Select...

Page 6: ...lick the browse button in the run dialog box 3 Select the CD ROM drive from the look in box in the browse window 4 Open the driver folder 5 Open the English folder 6 Click on the Setup exe file It wil...

Page 7: ...uld only be installed with compatible scanners see Compatibility with the DiMAGE Scan Utility in the scanner notes section of the hardware manual Normally the TWAIN data source should be installed The...

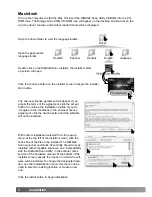
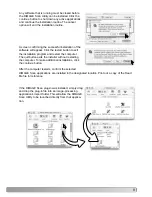
Page 8: ...ntosh The end user license agreement will appear If you accept the terms of the agreement click the accept button to continue the installation routine If you do not agree to the conditions in the end...

Page 9: ...are installed in the designated location Print out a copy of the Read Me file for reference 9 Any software that is running must be closed before the DiMAGE Scan Utility can be installed Click the con...

Page 10: ...only Index scan priority speed setting p 30 Color depth 8 bit No multi sample scanning Automatic cropping to inside edge p 19 When Digital ROC is active color matching is turned off sRGB output color...

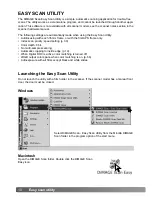
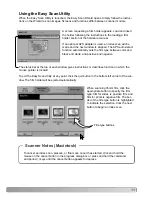
Page 11: ...at the top of each window gives instructions or describes function on which the mouse pointer is located To exit the Easy Scan Utility at any point click the quit button in the bottom left corner of t...

Page 12: ...s selected it will remain in effect until canceled Not all the functions can be used with black and white film The Grain Dissolver automatically activates with Digital ICE when both functions are avai...

Page 13: ...has multiple uses repeat the Easy Scan procedure for each use of the image On the save as screen specify the file name file format and destination of the image data Images can be saved in BMP JPEG TIF...

Page 14: ...pes of scans can be made singularly or in combination depending on the workflow and degree of processing Do not launch the utility with a film holder in the scanner If the scanner model has a manual f...

Page 15: ...ed and the scan will not be made Some model scanners use both glass and glassless film holders see the scanner notes section in the hardware manual This must be set with the holder type drop down list...

Page 16: ...ll frames Making an index scan Index scans can be made of 35mm or APS film An index scan cannot be made with single frame medium format film holders The type of film holder available vary with scanner...

Page 17: ...ges can be changed with the flip and rotate buttons on the tool bar Fit to window button Normally index thumbnails and prescan images are displayed based on their size and resolution When the number o...

Page 18: ...ing a prescan When using an index scan select the index frame to be pres canned Click the prescan button in the main window Double clicking on the index frame will also activate the prescan even if no...

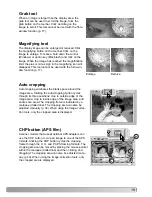
Page 19: ...gnification limit the plus or minus sign in the magnifying icon will disappear This tool cannot be used with the fit to win dow function p 17 When an image is larger than the display area the grab too...

Page 20: ...an settings yourself DiMAGE Scan Utility gives you an easier choice the Job function This function automatically loads the scan settings based on the final use of the image The scan setting dialog box...

Page 21: ...n the right side of the window The Job settings vary with the film format Click the OK button to apply the Job settings When the Job file is loaded a cropping frame will appear on the image The frame...

Page 22: ...prescan image or a selected index image can be displayed in the image correction window by simple clicking the tab If the image has not been prescanned a prescan will be made automatically The utility...

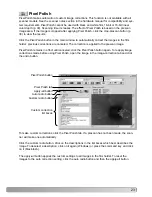
Page 23: ...kes automatic or custom image corrections This function is not available with all scanner models See the scanner notes section in the hardware manual for compatibility and sys tem requirements Pixel P...

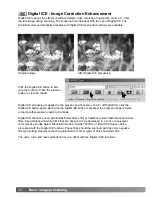
Page 24: ...films that are designed to be developed in a C 41 or equivalent color process Kodak Select Black White 400 Kodak T400CN or Ilford XP2 Super can be processed with the Digital ICE function These films s...

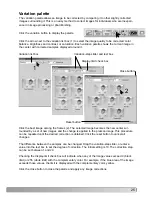
Page 25: ...ton 1 2 Click the best image among the frames 2 The selected image becomes the new center sur rounded by a set of new images and the change is applied to the prescan image This procedure can be repeat...

Page 26: ...ightness and contrast automatically without affecting the color balance Click the reset button to cancel the changes Click the brightness contrast color balance button to display the palette Brightnes...

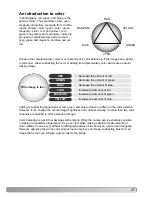
Page 27: ...ile the human eye is extremely sensitive in making comparative judgements it is a poor tool when making absolute measurements of color Initially it can be very difficult to distinguish between blue an...

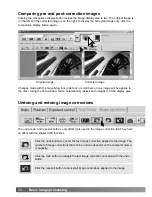
Page 28: ...to the other Using the fit to window button automatically resizes both images to fit the display area Undoing and redoing image corrections Click the undo button to cancel the last image correction ap...

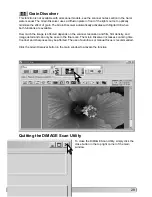
Page 29: ...ont of the light source to optically minimize the effect of grain The Grain Dissolver automatically activates with Digital ICE when both functions are available How much the image is affected depends...

Page 30: ...he exposure difference in a bracket series When using AE lock or AE area selection with negatives p 39 the auto function must be selected Autofocus at scan check box this option activates the autofocu...

Page 31: ...g resolution to be increased to 2820 dpi when scanning medium format film and Digital ROC and GEM to be used Click the serial number button to open the serial number window Enter the serial number of...

Page 32: ...for any point in the image simply place the mouse pointer in the image area to see the values of that point Pressing the shift key Windows or com mand key Macintosh will display the CMY values The mas...

Page 33: ...k box This is recommended when making settings for specific films Saving exposure settings Loading exposure settings Click the apply all button to use the exposure control settings for all the images...

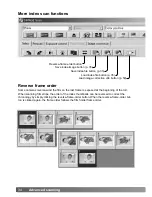
Page 34: ...button p 35 Reverse frame order Some cameras reverse wind the film so the last frame is exposed at the beginning of the roll When scanning film strips the order of the index thumbnails can be reverse...

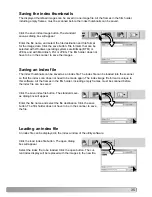
Page 35: ...Loading an index file Click the save index image button The standard save as dialog box will appear Enter the file name and select the file destination and file format for the image data Click the sa...

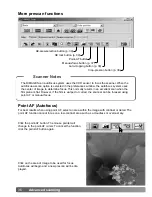
Page 36: ...tton The mouse pointer will change to the point AF cursor To cancel the function click the point AF button again Click on the area of image to be used for focus Autofocus will begin and a new prescan...

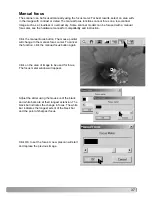
Page 37: ...indicates the change in focus The white bar indicates the longest extent of the black bar and the point of sharpest focus Click OK to set the focus A new prescan will start and replace the previous i...

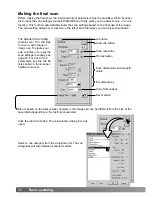
Page 38: ...ange to a four pointed arrow Simply click and drag the entire frame over the image area Clicking the auto cropping button to display the cropping frame marquee To enlarge or reduce the cropping frame...

Page 39: ...rea selection button after prescanning the image Pressing the shift key changes the dotted cropping frame to the solid AE area frame While pressing the shift key use the mouse to adjust and move the A...

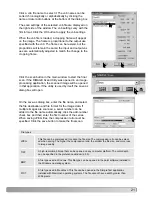
Page 40: ...elected among the drop down list or be entered into the box directly Output reso lution cannot be entered if pixel is selected in the unit list box Input size text box input size is determined by eith...

Page 41: ...iles with different resolutions at a given size monitors cannot add or remove pixels to fit the display area The image in the example above has a pixel dimension of 850 X 566 too large for a 800 X 600...

Page 42: ...scan settings are complete and the final scan can be made p 20 Once made scan settings remain in effect until changed Example 2 setting output by print size and output resolution This example creates...

Page 43: ...from the drop down menu Enter the Job name Click OK to save the settings The Job file name can contain up to 24 characters See page 20 to load a Job Select the Job file to be deleted from the Job cat...

Page 44: ...before continuing Selective color button p 57 Unsharp mask button p 58 Digital GEM tab p 46 The RGB display will show the color values for any point on the image the first numbers of each color chann...

Page 45: ...bit linear color depth p 30 When Digital ROC is activated the auto expose for slides setting in the preferences box color matching and the AE lock and AE area selection functions are disabled Digital...

Page 46: ...ect Black White 400 Kodak T400CN or Ilford XP2 Super can be processed with the Digital ROC function These films should be scanned with the color negative film type setting Results cannot be guarantied...

Page 47: ...ointer outside the frame click and drag to define a new sample area To extend the area over the entire image press the control key Windows or command key Macintosh and the A key at the same time Click...

Page 48: ...on p 49 Freehand curve button p 49 Channel list box p 48 Color histogram button p 52 Using tone curves Click the arrow next to the channel box to select the channel from the drop down menu To make adj...

Page 49: ...of that point will be indicated on the tone curve by a white circle The reset button cancels all corrections in all channels Click the freehand curve button 1 The mouse pointer changes to the pencil...

Page 50: ...e bottom left portion of the graph represents the dark colors and shadow areas of the image The middle section represents the mid tones skin grass blue sky The top right section is the highlights clou...

Page 51: ...l selected click on the tone curve near the top and bottom to add two nodes Slightly move the top node up and the bottom node down This will increase the angle of the central portion of the tone curve...

Page 52: ...maximize the distribution of the pixels in the image The highlight level shadow level and gamma can be set manually with the sliders or text boxes The gamma slider defines the mid tones of the image D...

Page 53: ...ts the tone curve and histogram to maximize image contrast and color The darkest pixels in the image are set to a black level of 0 the brightest pixels are set to a white level of 255 and the rest of...

Page 54: ...be adjusted based on the selected point The default level for the black point is 0 for each RGB channel With the dropper tool click on the brightest neutral area of the image to define it as the whit...

Page 55: ...black point values are set to 255 and 0 for each RGB level Changing these values allow the calibration of an image with no true white or black Double click on either the white point or black point bu...

Page 56: ...tool It is a creative tool When changing hue in the palette each color is assigned a new hue depending on the degree of rotation through the color space For example a very simple color space could ha...

Page 57: ...Television sets and computer monitors use RGB to create images The CMY color model is a subtractive process that uses the secondary colors cyan magenta and yellow A subtractive color system recreates...

Page 58: ...lt is produced Clicking the reset button restores the default settings Click the unsharp mask button to open the unsharp mask dialog box Original image With mask Shadow protection level to limit the s...

Page 59: ...n Job button to save the current image correction settings Enter the Job name Click OK to save the settings Click on an image correction Job thumbnail to select it Click OK to apply the Job to the dis...

Page 60: ...es to be scanned The frame number refers to the frame number of the holder or in the case of the optional APS adapter the film frame numbers Click the next button to continue Enter scan settings Click...

Page 61: ...is used those settings can be selected in the Custom Wizard setting dialog box Click the start button to begin automatic scan ning When scanning multiple images a serial number is added automatically...

Page 62: ...older and reinsert it into the scanner Click the Batch Scan Utility button to begin scanning The scanner only initializes before the first holder is scanned To change or confirm the Batch Scan setting...

Page 63: ...b Click the Job load button to open the Job selection dialog box For more on Jobs see page 20 Jobs can be created or one time custom settings can be made using the Batch Scan setup dialog box see belo...

Page 64: ...For information on color matching see page 66 To crop the image automatically and to set the output size and resolution See page 19 for information on auto cropping See page 43 on how to make and sav...

Page 65: ...image correction Jobs The auto setting functions automatically correct the scanned image the tone curve and histogram setting improves color and contrast the bright ness contrast and color balance se...

Page 66: ...tching function matches the scanned color with specified color spaces The color matching system can use the monitor s ICC profile to display the image as accurately as possible Click the color matchin...

Page 67: ...reproduced on standard computer monitors or by printing technology Wide gamut RGB This color space is wider than ColorMatch RGB The extensive color range makes it ideal for prepress use However the ra...

Page 68: ...profile for the monitor in use The selected profile will be displayed in the pref erences window Click OK in the preferences window to set the ICC profile When installing the DiMAGE Scan Utility soft...

Page 69: ...ded from the manufacturer s web site See the monitor s instruction manual on how to install the ICC profile Color monitor ICC profiles can be created with one of the profile creation tools on the mark...

Page 70: ...rtup APPENDIX To uninstall the DiMAGE Scan software from a Macintosh computer place the DiMAGE Scan CD ROM in the CD ROM drive repeat the instal lation procedure but select uninstall from the pop up m...

Page 71: ...98 Me XP OR WINNT 2000 Windows Twain dll Twain32 dll Twunk_32 exe System wowpost exe NT only MCMLDS dll Winaspi dll NT only Winaspi32 dll 98 and NT only Twain_32 DiMAGEScan System32 Drivers aspi32 sys...

Page 72: ...minoltausa com TWAIN driver Windows and Plug in Macintosh compatible with Photoshop 6 0 1 and 7 0 1 and Photoshop Elements 2 0 Dimage Scan Multi and Multi II system requirements Recommended SCSI board...

Page 73: ...nversions in sophisticated image process ing or DTP applications When using these profiles the color reproduced may not be the same as the color matching system in the utility software MLTF3100 icc us...

Page 74: ...Black Amount Radius Threshold Shadow Image correction Job Digital ICE Digital ROC Digital GEM Exposure control Exposure control setting file Master Red Green Blue Scan settings Job name Input resolut...

Page 75: ...he bottom bar displays the rela tive shift to the Original color space In the example the reds have been shifted to green and the yellows to lavender Original color space New color space Selective col...

Page 76: ...om Camera know how image composition digital image editing dis cover more about Minolta s new internet world and visit www minoltaphotoworld com 9222 7310 11 AV A304 ME 0304 Printed in Germany 2003 Mi...

Reviews: