background image

Complete Parts List available at www.MillerWelds.com

OM-282374 Page 38

SECTION 6 


OPERATING WELDER/GENERATOR

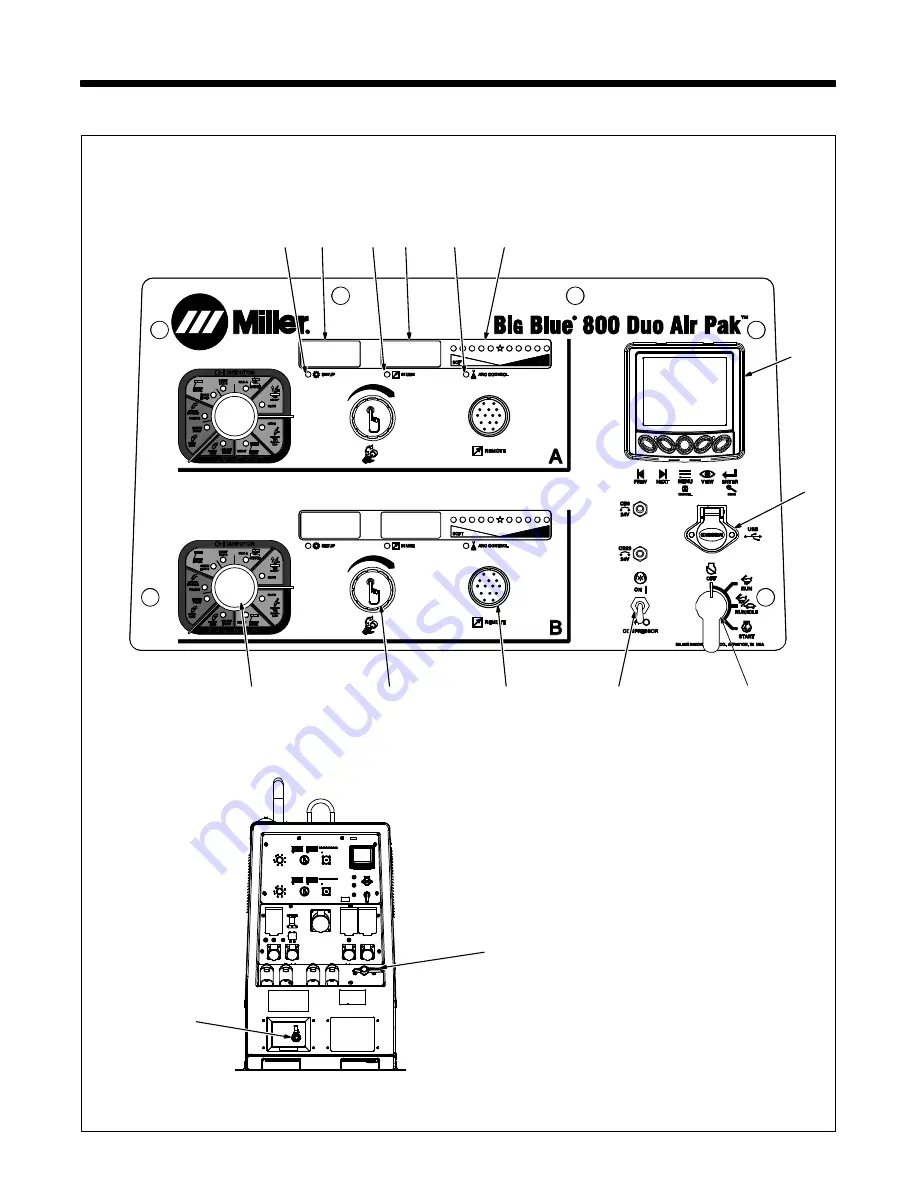
6-1. Front Panel Controls (See Section 6-2)

13

15

907763 / 277078

1

2

5

4

6

7

8

9

3

11

12

10

14

Summary of Contents for Big Blue 800 X Duo Air Pak

Page 1: ...iption TIG GTAW Welding Stick SMAW Welding Engine Driven Welder Generator And Air Compressor Air Carbon Arc CAC A Cutting and Gouging MIG GMAW Welding Flux Cored FCAW Welding File Engine Drive For product information Owner s Manual translations and more visit www MillerWelds com ...

Page 2: ...ontinue the tradition They re just as committed to providing equipment and service that meets the high standards of quality and value established in 1929 This Owner s Manual is designed to help you get the most out of your Miller products Please take time to read the Safety precautions They will help you protect yourself against potential hazards on the worksite We ve made installation and operati...

Page 3: ...Volt Ampere Curves 20 4 8 AC Generator Power Curves 21 4 9 Fuel Consumption 22 SECTION 5 INSTALLATION 23 5 1 Installing Welder Generator 23 5 2 Grounding Generator To Truck Or Trailer Frame 24 5 3 Installing Exhaust Pipe 24 5 4 Connecting The Battery 25 5 5 Using The Battery Disconnect Switch 25 5 6 Engine Prestart Checks 26 5 7 Connecting To Weld Output Terminals 27 5 8 Making Dual Operator CC We...

Page 4: ...57 8 4 Checking Generator Brushes 57 8 5 Battery Replacement 57 8 6 Battery Maintenance 57 8 7 Servicing Air Cleaner 58 8 8 Engine Speed Adjustment 58 8 9 Servicing Fuel And Lubrication Systems 59 8 10 Engine Generator Overload Protection 60 8 11 Voltmeter Ammeter Error Displays 61 8 12 Removing Optional Air Dryer For Service 62 SECTION 9 AIR COMPRESSOR MAINTENANCE 63 9 1 Air Compressor Maintenanc...

Page 5: ... locations or while wearing wet clothing on metal structures such as floors gratings or scaffolds when in cramped positions such as sitting kneeling or lying or when there is a high risk of unavoid able or accidental contact with the workpiece or ground For these conditions use the following equipment in order presented 1 a semiautomaticDC constant voltage wire welder 2 a DC manual stick welder or...

Page 6: ...s to adjacent areas Watch for fire and keep a fire extinguisher nearby Be aware that welding on a ceiling floor bulkhead or partition can cause fire on the hidden side Do not cut or weld on tire rims or wheels Tires can explode if heat ed Repaired rims and wheels can fail See OSHA 29 CFR 1910 177 listed in Safety Standards Do not weld on containers that have held combustibles or on closed containe...

Page 7: ...iod before working on equipment To handle hot parts use proper tools and or wear heavy insu lated welding gloves and clothing to prevent burns STEAM AND HOT COOLANT can burn If possible check coolant level when engine is cold to avoid scalding Always check coolant level at overflow tank if present on unit instead of radiator unless told otherwise in maintenance section or engine manual If the engi...

Page 8: ... burn Do not touch hot compressor or air system parts Allow cooling period before working on equipment To handle hot parts use proper tools and or wear heavy insu lated welding gloves and clothing to prevent burns READ INSTRUCTIONS Read and follow all labels and the Owner s Manual carefully before installing operating or servicing unit Read the safety information at the beginning of the manual and...

Page 9: ...ward any part of the body other people or any metal when threading welding wire OVERUSE can cause OVERHEATING Allow cooling period follow rated duty cycle Reduce current or reduce duty cycle before starting to weld again Do not block or filter airflow to unit STATIC ESD can damage PC boards Put on grounded wrist strap BEFORE handling boards or parts Use proper static proof bags and boxes to store ...

Page 10: ...d 51B from National Fire Protection Association Quincy MA 02169 phone 1 800 344 3555 website www nfpa org OSHA Occupational Safety and Health Standards for General Indus try Title 29 Code of Federal Regulations CFR Part 1910 177 Subpart N Part 1910 Subpart Q and Part 1926 Subpart J from U S Govern ment Printing Office Superintendent of Documents P O Box 371954 Pittsburgh PA 15250 7954 phone 1 866 ...

Page 11: ...confinées ou s il y a un risque de chute Se servir d une source électrique à courant électrique UNIQUE MENT si le procédé de soudage le demande Si l utilisation d une source électrique à courant électrique s avère nécessaire se servir de la fonction de télécommande si l appareil en est équipé Des précautions de sécurité supplémentaires sont requises dans des environnements à risque comme les endro...

Page 12: ...s fumées toxiques en cas de soudage LES ACCUMULATIONS DE GAZ risquent de provoquer des blessures ou même la mort Fermer l alimentation du gaz comprimé en cas de non utilisation Veiller toujours à bien aérer les espaces confinés ou se servir d un respirateur d adduction d air homologué LES RAYONS DE L ARC peuvent provoquer des brûlures dans les yeux et sur la peau Le rayonnement de l arc du procédé...

Page 13: ...ouverture de la vanne de la bouteille Ne pas se tenir devant ou derrière le régulateur lors de l ouverture de la vanne Maintenir le chapeau de protection sur la soupape sauf en cas d utilisationou de branchement de la bouteille Utilisez les équipements corrects les bonnes procédures et suffi samment de personnes pour soulever déplacer et transporter les bouteilles Lire et suivre les instructions s...

Page 14: ...orisé à installer utiliser et entretenir cet appareil conformément à son manuel d utilisation aux normes industrielles et aux codes nationaux d état ou locaux Ne pas dépasser le débit nominal ou la capacité du compresseur ou de tout équipement du circuit d air comprimé Concevoir le circuit d air comprimé de telle sorte que la défaillance d un composant ne risque pas de provoquer un accident matéri...

Page 15: ...d utilisateurs les normes nationales provinciales et de l industrie ainsi que les codes municipaux 2 5 Dangers supplémentaires en relation avec l installation le fonctionnement et la maintenance Risque D INCENDIE OU D EXPLOSION Ne pas placer l appareil sur au dessus ou à proximité de surfaces inflammables Ne pas installer l appareil à proximité de pro duits inflammables Ne pas surcharger l install...

Page 16: ...t vers soi d autres per sonnes ou toute pièce mécanique en enga geant le fil de soudage L EMPLOI EXCESSIF peut SURCHAUFFER L ÉQUIPEMENT Laisser l équipement refroidir respecter le fac teur de marche nominal Réduire le courant ou le facteur de marche avant de poursuivre le soudage Ne pas obstruer les passages d air du poste LES CHARGES ÉLECTROSTATI QUES peuvent endommager les circuits imprimés Étab...

Page 17: ...e 1 800 344 3555 website www nfpa org OSHA Occupational Safety and Health Standards for General Indust ry Title 29 Code of Federal Regulations CFR Part 1910 Subpart Q and Part 1926 Subpart J auprès du U S Government Printing Office Superintendent of Documents P O Box 371954 Pittsburgh PA 15250 7954 téléphone 1 866 512 1800 il y a 10 bureaux régiona ux le téléphone de la région 5 Chicago est 312353...

Page 18: ... Protect yourself from electric shock by insulating yourself from work and ground Safe3 2017 04 Keep your head out of the fumes Safe6 2017 04 Use forced ventilation or local exhaust to remove the fumes Safe8 2012 05 Use ventilating fan to remove fumes Safe10 2012 05 Keep flammables away from welding Do not weld near flammables Safe12 2012 05 Welding sparks can cause fires Have a fire extinguisher ...

Page 19: ...maximum lift eye rating see Specifications Safe25 2012 05 Do not spray water on electrical parts including Engine Control Unit ECU Safe 118 2014 10 Do not use ether or other starting fluids Using starting fluids voids warranty See engine Owner s Manual Safe89 2017 04 Hot muffler and exhaust pipe can cause severe burns Safe90 2017 04 Welding cutting drilling or grinding on base can cause fire or ex...

Page 20: ...bels on unit Safe47 2012 05 12 4 V Read Owner s Manual for battery maintenance information Safe117 2014 06 0 50 h std Safe54 2017 04 During the first 50 hours of operation keep welding load above 200 amperes Do not weld below 200 amperes of output 50 h std Safe55 2012 05 After the first 50 hours of operation change the engine oil and filter Never use generator inside a home or garage even if doors...

Page 21: ...ngine Engine Start Engine RPM Engine Off Engine Stop Idle Slow Run Fast Engine Belt Air Compressor Air Compressor Air Filter Call for Maintenance Check Injectors Pump Check Valve Clearance Certified Trained Mechanic Spark Arrestor Air Cleaner Temperature Filter Increase U0 Rated No Load Voltage OCV U2 Conventional Load Voltage I2 Rated Welding Current n Rated Load Speed n0 Rated No Load Speed n1 R...

Page 22: ...A 38 VDC 100 Duty Cycle 95 Generator Power Rating Engine Fuel Tank Capacity Independent of Weld Output Single Phase 4 kVA kW 34 17 A 120 240 V AC 50 60 Hz 3 Phase Generator In addition to standard 4 kVA kW Generator Power Single Phase Three Phase 12 20 kVA kW 50 48 A 120 240 V AC 50 60 Hz Deutz TD2011L04w Oil cooled Four cylinder Turbo charged 63 4 HP Diesel Engine 25 gal 95 L 4 3 Air Compressor S...

Page 23: ...57 9 in 1470 mm C 46 375 in 1178 mm D 11 5625 in 294 mm E 27 5 in 699 mm F 1 in 25 mm G 29 8125 in 757 mm H 9 16 in 14 mm Dia 4 Holes With mounting brackets in center position Dimensions vary with location of mounting brackets Weight No fuel 2020 lb kg W fuel 2195 lb kg Lifting Eye Weight Rating 2500 lb 1134 kg Maximum 4 6 Duty Cycle And Overheating 1 100 Duty Cycle Duty Cycle is percentage of 10 ...

Page 24: ...or Curves of all other settings fall between the curves shown A Stick Mode B TIG Mode C MIG Mode 0 100 0 100 200 300 400 500 600 700 800 DC VOLTS DC AMPERES 0 20 40 60 80 100 0 100 200 300 400 500 600 700 800 DC VOLTS DC AMPERES DC VOLTS DC AMPERES Dual Operator Parallel Mode 900 Parallel Mode Dual Operator 20 40 60 80 0 100 200 300 400 500 600 700 800 900 0 20 40 60 80 100 Parallel Mode Dual Oper...

Page 25: ...ws the generator power in amperes A Single Phase 4 kW 180 200 220 240 260 280 0 10 20 30 40 AC VOLTS AC AMPERES 60 50 40 30 20 10 0 180 200 220 240 260 280 AC VOLTS AC AMPERES AC VOLTS AC AMPERES 140 280 135 270 130 260 125 250 120 240 115 230 110 220 105 210 100 200 95 190 90 180 0 10 20 30 40 50 60 70 80 90 100 B Single Phase 12 kW C Three Phase 20 kW ...

Page 26: ... shows typical fuel use under weld or power loads 268 071 A 0 00 0 25 0 50 0 75 1 00 1 25 1 50 1 75 2 00 2 25 2 50 2 75 3 00 3 25 3 50 3 75 4 00 0 50 100 150 200 250 300 350 400 450 500 550 600 650 700 750 800 US Gal Hr DC WELD AMPERES AT 100 DUTY CYCLE No Air Output Dual Weld Mode With Air Output Notes ...

Page 27: ...hicle or trailer and comply with all DOT and other applicable codes Do not weld on base Welding on base can cause fuel tank fire or ex plosion Weld only on the four mounting brackets or bolt unit down NOTICE Do not mount unit by supporting the base only at the four mounting bracket s Use cross supports to adequately sup port unit and prevent damage to base 1 Cross Supports 2 Mounting Brackets Supp...

Page 28: ... ing auxiliary equipment If unit does not have GFCI receptacles use GFCI protected extension cord Do not use GFCI receptacles to power life support equipment 1 Equipment Grounding Terminal On Front Panel 2 Grounding Cable Not Supplied 3 Metal Vehicle Frame Connect cable from equipment ground terminal to metal vehicle frame Use 8 AWG or larger insulated copper wire Electrically bond generator frame...

Page 29: ...ble last Reinstall battery ac cess panel Do not allow the battery cables to touch opposing terminals When con necting the battery cables attach the positive cable to the positive battery terminal first followed by neg ative cable to negative battery terminal Never start the engine when the cables are loose or poorly connected to the battery terminals Never disconnect the battery while the engine i...

Page 30: ...time may cause wet stacking or engine damage Follow run in procedure in engine manual If unburned fuel and oil collect in exhaust pipe see Section 14 Fuel NOTICE Do not use gasoline Gasoline will damage engine Add fresh diesel fuel before starting see engine maintenance label for fuel specifica tions Leave filler neck empty to allow room for expansion Engine stops if fuel level is low Oil After fu...

Page 31: ...per bar Make sure that the surfaces of the weld cable terminal and copper bar are clean 1 Correct Weld Cable Connection 2 Incorrect Weld Cable Connection 3 Weld Output Terminal 4 Supplied Weld Output Terminal Nut 5 Weld Cable Terminal 6 Copper Bar Remove supplied nut from weld output terminal Slide weld cable terminal onto weld output terminal and secure with nut so that weld cable terminal is tig...

Page 32: ...ode Positive DCEP connect work cables to Negative terminals and elec trode holder cables to Positive ter minals For Stick TIG Direct Current Electrode Negative DCEN connect work cables to Positive terminals and electrode holder cables to Negative terminals Be sure Process Selector switches are set correctly See Section 6 4 Tools Needed Welder A Left Side 3 4 in Welder B Right Side 1 1 2 Direct Cur...

Page 33: ...le Use Dual Operator mode for CC and CV welding see Section 6 2 1 Electrode Holder Cables 2 Work Jumper Cable 3 Common Work Cable For Stick TIG welding Direct Current Elec trode Positive DCEP connect common work cable and work jumper cable to Welder B right Negative terminal Con nect other end of work jumper cable to Welder A left Negative terminal Connect electrode holder cables to Positive termi...

Page 34: ...G and FCAW welding Direct Current Electrode Positive DCEP connect work cables to Negative terminals and wire feeder cables to Positive terminals For MIG and FCAW Direct Current Elec trode Negative DCEN connect work cables to Positive terminals and wire feeder cables to Negative terminals Be sure Process Selector switches are set correctly See Section 6 4 Tools Needed 3 4 in 1 1 2 2 Direct Current ...

Page 35: ...rk cable must be able to carry combined weld output of both CC weld output ter minals see Section 5 15 for proper cable size Use Dual Operator mode for CC and CV welding see Section 6 2 1 Wire Feeder Cables 2 Work Jumper Cable 3 Common Work Cable For MIG and FCAW welding Direct Current Electrode Positive DCEP connect com mon work cable and work jumper cable to Welder B right Negative terminal Conn...

Page 36: ...rrent Electrode Negative DCEN connect work cable to Positive terminal and electrode holder cable to Negative terminal Be sure Process Selector switches are set correctly See Section 6 4 For MIG and FCAW welding Direct Current Electrode Positive DCEP connect work cable to Negative terminal and wire feeder cable to Positive terminal For MIG and FCAW Direct Current Elec trode Negative DCEN connect wo...

Page 37: ...der Cable 2 Wire Feeder Cable 3 Work Jumper Cable 4 Common Work Cable For Direct Current Electrode Positive DCEP connect common work cable and work jumper cable to Welder B right Neg ative terminal Connect other end of work jumper cable to Welder A left Nega tive terminal Connect electrode holder cable to one Pos itive terminal Connect wire feeder cable to remaining Positive terminal Be sure Proce...

Page 38: ... for proper cable size 1 Electrode Holder Cable 2 Work Cable For Stick TIG welding Direct Current Elec trode Positive DCEP connect work cable to Negative terminal and electrode hold er cable to Positive terminal For Stick TIG Direct Current Electrode Neg ative DCEN connect work cable to Posit ive terminal and electrode holder cable to Negative receptacle Be sure Process Selector switch is set corr...

Page 39: ... 1 0 60 2 0 70 3 0 95 4 0 120 2x2 0 2x70 2x3 0 2x95 2x3 0 2x95 2x4 0 2x120 400 1 0 60 2 0 70 3 0 95 4 0 120 2x2 0 2x70 2x3 0 2x95 2x4 0 2x120 2x4 0 2x120 500 2 0 70 3 0 95 4 0 120 2x2 0 2x70 2x3 0 2x95 2x4 0 2x120 3x3 0 3x95 3x3 0 3x95 600 3 0 95 4 0 120 2x2 0 2x70 2x3 0 2x95 2x4 0 2x120 3x3 0 3x95 3x4 0 3x120 3x4 0 3x120 700 4 0 120 2x2 0 2x70 2x3 0 2x95 2x4 0 2x120 3x3 0 3x95 3x4 0 3x120 3x4 0 3...

Page 40: ... 24 volts AC Protected by supplementary protector B Contact closure to A completes 24 volt AC contactor control circuit REMOTE OUTPUT CONTROL C Output to remote control 10 volts DC in MIG mode 0 to 10 volts DC in Stick or TIG mode D Remote control circuit common E DC input command signal 0 to 10 volts from min to max of remote control with Voltage Amperage Adjust control at maximum F Current feedb...

Page 41: ... is running and the front panel Compressor switch is moved to the On position see Section 6 2 Run engine at weld power speed for maxi mum air compressor output Compressor output is reduced when engine is running at idle speed The air compressor will not start if still under pressure If air compressor is turned off wait for air pressure to bleed off about 20 seconds before turning air compressor on...

Page 42: ... Complete Parts List available at www MillerWelds com OM 282374 Page 38 SECTION 6 OPERATING WELDER GENERATOR 6 1 Front Panel Controls See Section 6 2 13 15 907763 277078 1 2 5 4 6 7 8 9 3 11 12 10 14 ...

Page 43: ...able and connections To set voltage turn Process Contactor switch to GMAW or FCAW position Turn V A control until desired voltage is displayed on Volt meter When welding is finished voltmeter displays average weld voltage and then de faults to preset voltage 7 DC Ammeter Ammeter displays preset amperage Stick and TIG only when not welding and actual output amperage when welding To set amperage tur...

Page 44: ...d in the Run or Run Idle position Glow plugs function automatically according to ambient tem perature The operator needs to pause at either switch position while the engine con troller goes through the preheat sequence Once this message clears the engine can be started Turn Engine Control switch to Start Re lease Engine Control switch when engine starts To Stop turn Engine Control switch to Off po...

Page 45: ... that does not require a control cable back to the welder generator Output On SMAW STICK XX18 and STICK XX10 Stick welding with or without a remote amperage control Strike an arc to start welding Output On GTAW Lift Arc TIG Lift Arc TIG touch tungsten to work and lift to start welding Uses circuitry internal to the welder generator to aid arc start Can be used with or without a remote control Auto...

Page 46: ...RT Only accessible in SMAW processes LIMT OFF Disables Hot Start option LIMT 1 25 Sets Hot Start current limit selectable between 1 25 and 2 0 0 25 increments in SMAW XX10 and SMAW Remote LIMT 1 50 Sets Hot Start current limit selectable between 1 5 and 3 0 0 5 increments in SMAW XX18 DIG RNGE 50 150 Sets current limit above preset amperage between 50 and 150 amps AUTO CRTR Only accessible in GTAW...

Page 47: ...w inductance STIF 12 SOFT 25 to 1 Flat or horizontal welds with XX18 electrode with short weld cables 0 Starting point for XX18 XX13 XX14 XX24 and XX22 electrodes STIFF 1 to 25 Minimizes stickiness with XX18 XX14 XX22 XX24 and XX13 electrodes STOP 5 to 1 Auto Crater off see Section 6 5 More sensitive Auto Stop 0 Starting point STOP 1 to 5 Less sensitive Auto Stop Lift Arc start No Auto Crater allo...

Page 48: ...rol SOFT 25 to 1 Starting point for 3 32 rod SOFT 15 0 Starting point for XX10 electrode open root vertical down joint STIFF 1 to 25 Stiffer more rapidly responding arc Dig Range DIG 50 Starting point for 3 32 rod DIG RNGE 65 100 Starting point for downhill pipe factory default DIG RNGE 115 150 Arc Control SOFT 25 to 1 Flat or horizontal welds with XX18 electrode or 3 32 rod with short weld cables...

Page 49: ...is not permitted Select Lift Arc at Process Contac tor switch Turn gas on 1 Touch or scratch 2 Lift at any angle Touch tungsten electrode to workpiece at weld start point Slowly lift electrode Arc is started when electrode is lifted Maintain shielding gas coverage and eliminate tungsten and work piece contamination by using Auto Crater or Auto Stop to end the arc See Section 6 5 to adjust Auto Sto...

Page 50: ...mote Control On Ad just Optional Remote Control to 100 Set V A Control To Desired Maximum Weld Output Using Weld Meters Set TIG or STICK Process In Example Min 20 A DC Max 205 A DC Max 205 A DC Min 20 A DC Connect Remote Control To Remote Receptacle Adjust Optional Remote Control to desired weld output Ammeter Shows Preset Output When Not Welding Actual Amperage While Welding Set WIRE Process Conn...

Page 51: ... the user is promptedto confirm the start of the down load The Voltmeter Ammeter display reads AL NO Confirm by rotating the Adjust Control Se lect button clockwise to select YES Then press the Select button After the update has started do not power down or remove the flash drive until the update is complete During the download the left meter display indicates the active download with ALLC ALLW AL...

Page 52: ... 1 Summary File Each time a USB stick is inserted in the USB receptacle a summa ry file is saved to the USB stick as SummaryFile txt USB ACC will display as the file is written File is complete when display no longer shows USB ACC The summary file provides diag nostic and weld information 1 ...

Page 53: ... Complete Parts List available at www MillerWelds com OM 282374 Page 49 6 13 Fuel Hour Gauge Descriptions ...

Page 54: ...epending on the capabilities of the ArcReach device the Process Contactor switch Adjust Control Select button and Arc Control adjustment may be overridden The following ArcReach accessories are compatible with this welder generator ArcReach Smart Feeder For Advanced Wire Processes ArcReach Stick TIG Remote For Stick Or TIG Welding ArcReach SuitCase Feeders For MIG Or FCAW Welding When welder gener...

Page 55: ...tacle Heater rated at 300 watts Do not run engine while oil pan heater is on NOTICE In extremely cold weath er heater should be connected to power source when engine oil is warm to eliminate possibility of oil coking on heater Severe coking on heater element may cause damage to engine en gine oil and oil pan heater The area near the oil pan heater gets hot Disconnect plug to turn off heater 6 15 O...

Page 56: ...yer heaters from damage due to overload If CB14 opens the heaters do not work and the dryer does not discharge moisture in cold weather Press button to reset circuit breaker CB14 When a circuit breaker opens it usually indicates a more serious problem exists Contact a Factory Authorized Service Agent Start engine and turn on air compres sor Check fittings for air leaks and tighten fittings if nece...

Page 57: ...h in On position to reset 7 400 V 30 A 3 Phase Receptacle RC5 Receptacle supplies 50 60 Hz three phase power 8 Supplementary Protector CB5 CB5 protects the auxiliary power winding from over current If CB5 opens the 110 volt receptacles and 220 volt receptacles do not work Place switch in up position to reset 9 Earth Leakage Circuit Breaker ELCB1 ELCB1 protects receptacles RC3 and RC4 from overload...

Page 58: ...lated to ground faults Reset and test GFCI receptacle according to the following procedures A solid green LED indicates power to the GFCI A solid red LED indicates that the GFCI has been tripped Resetting Testing GFCI Receptacle Test GFCI monthly If Red LED blinks stop using GFCI receptacleand have it replaced by a Factory Authorized Service Agent Extension cords with bad insulation or of extended...

Page 59: ...t www MillerWelds com OM 282374 Page 55 SECTION 8 MAINTENANCE 8 1 Maintenance Label NOTICE The total initial oil fill requires approximately 18 qt 17 L Service oil fill is 11 qt 10 4 L Check engine dipstick as filling Do not overfill ...

Page 60: ...l for important start up service and storage information Service engine more often if used in severe conditions Recycle engine fluids Check Change Clean Replace To be done by Factory Authorized Service Agent Reference Every 8 Hours FUEL WATER See engine manual for fuel specifications Section 5 6 Primary Fuel Filter Fuel Level Oil Level Oil Fuel Spills Clean unit exterior in cluding stainless steel...

Page 61: ...ator Brushes Replace Damaged Brushes 8 5 Battery Replacement 255 858 Stop engine 1 Battery Locator Bracket Mounting Holes Access battery as shown in Section 5 4 Disconnect battery Remove J bolts securing battery and remove battery Battery locator brackets can be moved to accommodate batteries of different physical sizes Install and secure replacement bat tery Connect negative battery cable last 1 ...

Page 62: ...Window 4 Service Indicator Reset Button Service air cleaner element if red band appears in window A green band means air cleaner is okay Press button to reset indicator Clean or replace primary element if dirty see note above before cleaning Re place primary element if damaged Re place primary element yearly or after six cleanings 5 Housing 6 Safety Element Optional 7 Primary Element 8 Cover 9 Dus...

Page 63: ... turn clock wise For primary fuel filter reconnect water sensor Bleed air from fuel system accord ing to engine manual Inspect fuel line and replace if cracked or worn Close doors To reset service reminder intervals shown on the Engine Display see Sections 13 12 and 13 13 To drain sludge from fuel tank Beware of fire Do not smoke and keep sparks and flames away from drained fuel Dispose of drained...

Page 64: ... low or stops entirely If F2 opens weld output is low or stops entirely 4 kVA kW generator power is still available 5 SupplementaryProtector CB3 6 Supplementary Protector CB4 CB3 protects the engine weld control cir cuit If CB3 opens weld output stops meters will be blank however generator power is still available CB4 protects the field flashing circuit If CB4 opens the generator may not excite at...

Page 65: ...t check unit IGBT 2SHT Indicates the thermistor in IGBT module 2 has shorted Have Factory Authorized Service Agent check unit IGBT 2OPN Indicates the thermistor in IGBT module 2 is open Have Factory Authorized Service Agent check unit IGBT TEMP Indicates an IGBT module has overheated If this display is shown check generator cooling system and or reduce duty cycle Keep engine access door closed whe...

Page 66: ...ss panel air dryer as sembly away from unit rear panel Support dryer assembly to relieve strain on timer control cable Disconnect battery negative cable When service is complete reconnect battery negative cable Reinstall battery access panel air dryer assembly Reconnect air dry er heater cable Reconnect air line to dryer bottom inlet Final tighten all hardware and air line and air dryer fittings S...

Page 67: ... AIR COMPRESSOR MAINTENANCE 9 1 Air Compressor Maintenance Label The air compressor normally requires service at the intervals listed in the maintenance schedule if used in a clean dry environment The compressor will require service more often if used in dirty humid conditions Notes ...

Page 68: ...ore often if used in severe conditions Recycle air compressor fluids Check Change Clean Replace To be done by Factory Authorized Service Agent Reference Every 8 Hours Section 9 5 Spills Oil Level Every 250 Hours Section 9 3 Unreadable Labels Belt Tension Air Cleaner Hoses Air Filter Element Worn or Damaged Air Oil Hoses Cooling System Every 500 Hours Section 9 5 Oil Oil Filter Every 1000 Hours Sec...

Page 69: ...safety element Replace the safety element after servicing the pri mary element three times 1 Compressor Air Cleaner Service air cleaner element if red band appears in window A green band means air cleaner is okay Press button to reset indicator Clean or replace primary element if dirty see note above before cleaning Re place primary element if damaged Re place primary element yearly or after six c...

Page 70: ...r fuse opens it usually indicates a more serious problem exists Contact Factory Authorized Service Agent See Section 8 10 for engine gener ator overload protection 1 Circuit Breaker CB15 Circuit breaker CB15 protects the air compressor clutch If CB15 opens the compressor does not run and air output stops Press button to reset breaker 907763 1 ...

Page 71: ...oute compressor oil drain hose through hole in base Remove compressor oil fill cap Re move cap from oil drain hose and drain oil into a suitable container Reinstall oil drain hose cap Tighten cap with wrench Remove filter by turning filter counterclock wise Remove filter Apply thin coat of oil to gasket on new filter Install new filter and turn clockwise until tight Add recommended oil until oil l...

Page 72: ...air pressure as follows 1 Screw Loosen jam nut securing screw Turn screw clockwise increase pressure or counterclockwise decrease until pressure is 125 psi 862 kPa Maximum weld output is reduced if compressor air pressure is set above 125 psi 862 kPa Tighten nut 2 Pressure Relief Valve Pressure relief valve opens and re leases pressure at 150 psi 1034 kPa The pressure relief valve is not adjustabl...

Page 73: ... check integrated rectifier SR2 capacitor C6 and the rotor Have Factory Authorized Service Agent check brushes and slip rings and field excitation circuit Erratic weld output Check and tighten connections inside and outside unit Be sure connection to work piece is clean and tight Use dry properly stored electrodes Remove excessive coils from weld cables Have Factory Authorized Service Agent check ...

Page 74: ...ary protector CB4 Have Factory Authorized Service Agent check integrated rectifier SR1 Have Factory Authorized Service Agent check brushes and slip rings and field excitation circuit High output at generator power AC receptacles Have engine Factory Authorized Service Agent check engine speed Have Factory Authorized Service Agent adjust generator power field current resistor R3 Low output at genera...

Page 75: ...l and engine manual Engine suddenly stops Check oil level Automatic shutdown system stops engine if oil pressure is too low or engine temperature is too high see Section 5 6 Automatic shutdown system is inhibited for 30 seconds after start up See engine manual Engine slowly stopped and cannot be restarted Check fuel level Check engine air and fuel filters see Sections 8 7 and 8 9 See engine manual...

Page 76: ...oil level see Section 9 5 If oil level is too high system becomes saturated with oil Change compressor air oil separator see Section 9 5 Check connections of control lines see air compressor circuit diagram in Section 12 Have Factory Authorized Service Agent check for blocked separator scavenge check valve filter orifice Oil in compressor air cleaner Have Factory Authorized Service Agent verify co...

Page 77: ... Complete Parts List available at www MillerWelds com OM 282374 Page 73 Notes ...

Page 78: ...OM 282374 Page 74 SECTION 12 ELECTRICAL DIAGRAMS Figure 12 1 Circuit Diagram For Welder Generator ...

Page 79: ...OM 282374 Page 75 281933 C ...

Page 80: ...til the initial Wait to Start message on the display is cleared see Section 13 4 Function buttons are used to navi gate through menus increase de crease and select see Section 13 2 The yellow LED lights as part of se quences used to alert the operator to errors or conditions that will affect operation such as low fuel The red LED lights as part of a shut down sequence such as when fuel is too low ...

Page 81: ...Run or Run Idle position and glow plugs are functioning The operator needs to pause at either switch position while the engine controller goes through the preheat sequence Once this message clears the engine can be started 2 Service Reminder Display The Service Reminder display shows ser vicing intervals in hours counting down from engine manufacturer recommended service intervals This display app...

Page 82: ...isplay to appear 3 Engine Oil Pressure 4 Engine Coolant Temperature 5 Engine RPM 6 Compressor Air Pressure 7 Battery Voltage 8 Fuel Level 9 Engine Hourmeter 0 PSI 32 F 0 RPM 0 0 H 0 0 VDC 0 PSI 32 F 0 PSI 0 0 H 0 0 VDC 1 2 3 4 5 6 7 8 9 n min 13 6 Getting To 1 Up Display 1 View Function Button From 6 Up Display press the View function button to go to 1 Up Display 2 1 Up Oil Pressure Display To go ...

Page 83: ...ess the Previ ous function button To return to the 6 Up Display press the View function button Battery Potential 0V 0 3 6 9 12 15 18 Fuel Level 0 25 50 75 100 Machine Hours 0H 1 Coolant Temperature 25 50 75 100 125 150 175 200 225 250 Engine Speed 0RPM 1500 500 2000 1000 2500 n min 0 0F Service Reminders 0H Engine Oil Percent Load RPM 0 25 50 75 100 125 0 ...

Page 84: ...t function button To return to previous display press the Previous function button To return to the 6 Up Display press the View function button Air Pressure display does not appear if the air pressure input is less than 50 PSI 1 Air Pressure 0PSI 120 40 160 80 200 Compressor Hours 0H Service Reminders 0H Compressor Oil Engine Oil 0H ...

Page 85: ...ars and begins to flash when fuel level reaches 10 It continues to flash until fuel level falls to 0 4 Yellow LED The yellow LED begins to flash when the low fuel warning appears It con tinues to flash until 0 is reached 5 Red LED The red LED turns on and stays lit when fuel level reaches 0 The en gine will shut down 6 No Fuel Display This display appears at engine shut down Turn Engine Control sw...

Page 86: ...according to the J1939 standard Typical faults are listed in Table 13 1 9 Diagnostic Description 10 Occurrence Count For non critical faults the number of occurrences can accumulate 11 Previous Function Button 12 Next Function Button 13 Hide Function Button Non critical faults can be hidden 14 Acknowledge Function Button Ack To acknowledge the fault and ad vance the display to the 1 up or 6 up dis...

Page 87: ... threshold exceeded 13 11 Engine Diagnostic Display Engine diagnostic codes are for use by the engine Factory Authorized Service Agent only Attempting engine repair may void engine warranty 1 Diagnostic Display 2 Number Of Faults 3 Suspect Parameter Number 4 Failure Mode Identifier The SPN and FMI numbers are generated by the engine controller according to the J1939 standard 5 Diagnostic Descripti...

Page 88: ...ction Button 1 ENTER PASSWORD 0000 Cancel Enter 2 3 4 5 6 13 13 Main Menu Options Resetting Hours At Oil Change 1 Main Menu 2 Cursor 3 Scroll Function Buttons Use scroll function buttons to move cursor 4 Select Function Button When the cursor is in desired posi tion press Select function button to go to sub menu 5 Service Reminders Display Move cursor to select engine or compressor and press Selec...

Page 89: ...ction buttons to in crease or decrease display brightness When desired per centage is reached press Select function button 6 Contrast Menu Display Use scroll function buttons to in crease or decrease display con trast lightness darkness Con trast range is 0 to 175 Viewing angle affects appearance of dis play When desired contrast is reached press Select function button 7 Units Menu Display Use scr...

Page 90: ...rval can be modified Shorter service inter vals may be appropriate during heavy use or in certain environ ments such as dusty or extreme temperatures Lengthening ser vice intervals is not recommended and could result in voiding engine warranty 8 Increase Number Function Button 9 Go to Next Number Function Button Use the increase function button to increase the value underlined Use the function but...

Page 91: ... may be requested by a Factory Author ized Service Agent during troubleshooting 7 Stored Codes Stored codes can also be accessed when the initial Service Reminder display appears as the engine con troller is initiating see Sections 13 4 and 13 11 8 Language Menu Display Use scroll function buttons to scroll through choices English French Italian Spanish and Brazilian Portuguese When de sired langu...

Page 92: ...g run in period to properly seat piston rings and prevent wetstacking See name plate rating label or specifications section in this manual to find rated voltage and current NOTICE Do not idle engine longer than necessary Piston rings only seat correctly if engine runs at weld power rpm and the welder genera tor is kept loaded during run in 2 Engine Exhaust Pipe Wetstacking is unburned fuel and oil...

Page 93: ...ter as shown if not provided on generator Start engine and run for several minutes For Load Bank Set load bank switches and then adjust generator A V control so load equals rated voltage and current of generator see nameplate rating label or the specificationssection in this manual For Resistance Grid Set grid switches and then adjust gen erator A V control so load equals rated voltage and current...

Page 94: ... 8 6 19 4 34 5 30 0 156 0 632 1 40 2 52 5 6 10 0 22 5 40 0 35 0 173 0 71 1 56 2 80 6 2 11 2 25 0 44 7 40 0 19 0 77 1 71 3 07 6 8 12 3 27 3 49 1 45 0 208 0 843 1 9 3 36 7 6 13 4 30 3 53 8 50 0 225 9 14 2 05 3 64 8 2 14 5 32 8 58 2 60 0 26 1 05 2 35 4 2 9 4 16 8 37 5 67 0 70 0 295 1 19 2 68 4 76 10 7 19 0 43 0 76 0 80 0 33 1 33 2 97 5 32 11 9 21 2 47 5 85 0 90 0 364 1 47 3 28 5 87 13 1 23 5 52 5 94 ...

Page 95: ...der Medium 3 6 6 0 8 4 24 Riveting Hammer Horizontal Grinder 2 3 0 5 0 7 0 20 Light 2 25 3 75 5 25 15 Horizontal Grinder 4 9 0 15 0 21 0 60 Riveting Hammer Heavy 4 5 7 5 10 5 30 Horizontal Grinder 6 9 0 15 0 21 0 60 SAWS Circular 8 6 75 11 25 15 75 45 Horizontal Grinder 8 12 0 20 0 28 0 80 Circular 12 9 75 16 25 23 8 65 Vertical Grinders and Sanders 5 Pad 5 25 8 75 12 25 35 Chain Lightweight 4 20 ...

Page 96: ...ealth Fact Sheet No 29 Grounding of Portable And Vehicle Mounted Welding Gen erators 1 Equipment Grounding Terminal On Front Panel 2 Grounding Cable Not Supplied 3 Metal Vehicle Frame Connect cable from equipment ground terminal to metal vehicle frame Use 8 AWG or larger insulated copper wire Electrically bond generator frame to ve hicle frame by metal to metal contact Bed liners shipping skids an...

Page 97: ...ve load and requires a constant amount of power 2 Non Resistive Load Equipment with a motor is a non re sistive load and requires approximatelysix times more power while starting the motor than when running see Section 16 8 3 Rating Data Rating shows volts and amperes or watts required to run equipment Amperes x Volts Watts Example 1 If a drill uses 4 5 am peres at 115 volts calculate its running ...

Page 98: ...me Equipment Rating Starting Watts Running Watts Stock Tank De Icer 1000 1000 Grain Cleaner 1 4 HP 1650 650 Portable Conveyor 1 2 HP 3400 1000 Grain Elevator 3 4 HP 4400 1400 Milk Cooler 2900 1100 Milker Vacuum Pump 2 HP 10 500 2800 Farm Duty Motors Std e g Conveyors Feed Augers Air Compressors 1 3 HP 1720 720 1 2 HP 2575 975 3 4 HP 4500 1400 1 HP 6100 1600 1 1 2 HP 8200 2200 2 HP 10 550 2850 3 HP...

Page 99: ...000 1 HP 6000 1500 1 1 2 HP 8200 2200 2 HP 10 500 2800 Electric Chain Saw 1 1 2 HP 12 in 1100 1100 2 HP 14 in 1100 1100 Electric Trimmer Standard 9 in 350 350 Heavy Duty 12 in 500 500 Electric Cultivator 1 3 HP 2100 700 Elec Hedge Trimmer 18 in 400 400 Flood Lights HID 125 100 Metal Halide 313 250 Mercury 1000 Sodium 1400 Vapor 1250 1000 Submersible Pump 400 GPH 600 200 Centrifugal Pump 900 GPH 90...

Page 100: ... must be at least twice the motor s running amperage kVA HP x HP x 1000 Volts Starting Amperage Example Calculate starting amper age required for a 230 V 1 4 HP mo tor with a motor start code of M Volts 230 HP 1 4 kVA HP 11 2 11 2 x 1 4 x 1000 230 12 2A Starting the motor requires 12 2 amperes VOLTS AMPS HP 230 2 5 1 4 Hz PHASE CODE 60 1 M AC MOTOR 1 2 3 4 16 9 How Much Power Can Generator Supply ...

Page 101: ... the electrical load from electric utility service to the generator Transfer load back to electric utility when service is re stored Install correct switch customer supplied Switch rating must be same as or greater than the branch overcurrent protection 3 Fused Disconnect Switch Install correct switch customer supplied if required by electrical code 4 Welder GeneratorOutput Generator output voltag...

Page 102: ...50 15 40 4800 112 34 62 19 37 11 45 5400 100 30 62 19 50 6000 87 26 50 15 Conductor size is based on maximum 2 voltage drop Cord Lengths for 240 Volt Loads Use GFCI protection when operating auxiliary equipment If unit does not have GFCI receptacles use GFCI protected exten sion cord Do not use GFCI receptacles to power life support equipment Maximum Allowable Cord Length In ft m for Conductor Siz...

Page 103: ...bor Tregaskiss Guns No Labor Water Cooling Systems Wireless Remote Foot Hand Controls and Receivers Work Stations Weld Tables No Labor 5 6 Months Parts Batteries 6 90 Days Parts Accessory Kits Canvas Covers Induction Heating Coils and Blankets Cables and Non Electronic Controls M Guns MIG Guns Subarc SAW Torches and External Cladding Heads Remote Controls and RFCS RJ45 Replacement Parts No labor S...

Page 104: ...th your personal records Always provide Model Name and Serial Style Number Contact a DISTRIBUTOR or SERVICE AGENCY near you Welding Supplies and Consumables Options and Accessories Personal Safety Equipment Service and Repair Replacement Parts Training Schools Videos Books Technical Manuals Servicing Information and Parts Circuit Diagrams Welding Process Handbooks Contact the Delivering Carrier to...

Reviews: