


24
Close the valve on the charging cylinder and discharge the refrigerant by loosening the flare nut on the
2-way valve approximately 45’ until the gauge indicates 0.3 to 0.5 Mpa.
6). Disconnect the charge set and the charging cylinder, and set the 2-way and 3-way valves to the open
position
Be sure to use a hexagonal wrench to operate the valve stems.
7). Mount the valve stems nuts and the service port cap
Be sure to use a torque wrench to tighten the service port cap to a torque 18N.m.
Be sure to check the gas leakage.
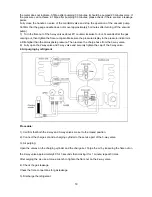
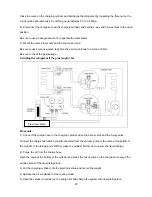
6.7 Re-installation while the outdoor unit need to be repaired
1. Evacuation for
the whole system
Procedure:
1).
Confirm that both the 2-way and 3-way valves are set to the opened position.
2). Connect the vacuum pump to 3-way valve’s service port.
3). Evacuation for approximately one hour. Confirm that the compound meter indicates -0.1Mpa.
4). Close the valve (Low side) on the charge set, turn off the vacuum pump, and confirm that the gauge
needle does not move (approximately 5 minutes after turning off the vacuum pump).
5). Disconnect the charge hose from the vacuum pump.
Summary of Contents for 9ASI-A-1209
Page 1: ...LUNA INVERTER SERIES Service Manual 2012 9ASI A 1209...
Page 13: ...13 MS9A 24HRDN1 QRC4W...
Page 14: ...14 5 2 Outdoor Unit MOB 09HFN1 QRC4W MOB 12HFN1 QRC4W MOC 18HFN1 QRC4W...
Page 15: ...15 MOF 24HFN1 QRC4W...
Page 48: ...48 9 2 Diagnosis and Solution 9 2 1 EEPROM parameter error diagnosis and solution E0...
Page 49: ...49 9 2 2 Indoor unit and outdoor unit communication protection error diagnosis and solution E1...
Page 53: ...53 9 2 7 Outdoor fan speed has been out of control diagnosis and solution F5...


