


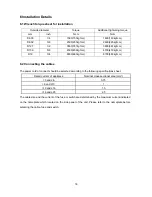


23
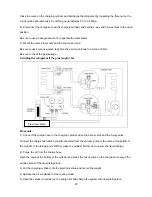
5). Operate the air conditioner at the cooling cycle and stop it when the gauge indicates 0.1MPa.
6). Set the 3-way valve to the closed position immediately
Do this quickly so that the gauge ends up indicating 0.3 to 0.5Mpa.
Disconnect the charge set, and tighten the 2-way and 3-way valve’s stem nuts.
Use a torque wrench to tighten the 3-way valves service port cap to a torque of 18N.m.
Be sure to check for gas leakage.
2. Air purging by the refrigerant
Procedure:
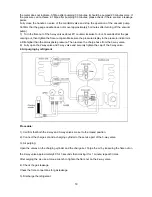
1). Confirm that both the 2-way and 3-way valves are set to the closed position.
2). Connect the charge set and a charging cylinder to the service port of the 3-way valve
Leave the valve on the charging cylinder closed.
3). Air purging.
Open the valves on the charging cylinder and the charge set. Purge the air by loosening the flare nut on
the 2-way valve approximately 45’ for 3 seconds then closing it for 1 minute; repeat 3 times.
After purging the air, use a torque wrench to tighten the flare nut on the 2-way valve.
4). Check the gas leakage
Check the flare connections for gas leakage.
5). Discharge the refrigerant.
Summary of Contents for 9ASI-A-1209
Page 1: ...LUNA INVERTER SERIES Service Manual 2012 9ASI A 1209...
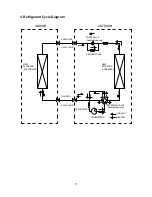
Page 13: ...13 MS9A 24HRDN1 QRC4W...
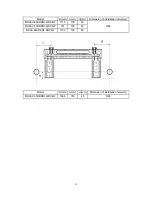
Page 14: ...14 5 2 Outdoor Unit MOB 09HFN1 QRC4W MOB 12HFN1 QRC4W MOC 18HFN1 QRC4W...
Page 15: ...15 MOF 24HFN1 QRC4W...
Page 48: ...48 9 2 Diagnosis and Solution 9 2 1 EEPROM parameter error diagnosis and solution E0...
Page 49: ...49 9 2 2 Indoor unit and outdoor unit communication protection error diagnosis and solution E1...
Page 53: ...53 9 2 7 Outdoor fan speed has been out of control diagnosis and solution F5...


