Middle Atlantic Products Essex HANG-MMR10 Instruction Sheet Download Page 3

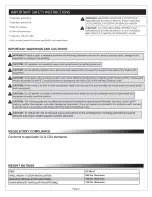
CONSIGNES  DE  SECURITE  IMPORTANTES

• Lisez  attentivement ces instructions.

• Conservez  ces instructions a portee de la main.

• Pretez  attention a tous les avertissements.

•  Suivez toutes les instructions. 

^ jk

• N ’utilisez pas cet appareil a proximite de l'eau.

• Utilisez uniquement les cordons et accessoires recommandes par le 

fabricant.

AVERTISSEMENTS  IMPORTANTS  ET  PRECAUTIONS!

AVERTISSEMENT: AVERTISSEMENT  INDIQUE  UNE 

SITUATION  POTENTIELLEMENT DANGEREUSE 
SUSCEPTIBLE,  SI  ELLE  N'EST PAS  EVITEE,  DE 

PROVOQUER  LE  DECES  OU  UNE  BLESSURE  GRAVE.

ATTENTION: ATTENTION  indique  une situation 

potentiellement dangereuse  susceptible,  si elle  n'est pas 

evitee,  de  provoquer une  blessure  mineure  ou  moderee.

AVERTISSEMENT!  Ne  pas  lire,  comprendre et suivre  les  informations  suivantes  peut entrainer de  graves  blessures,  des 

dommages a  l'equipement ou  de  la  nullite de  la garantie.

ATTENTION:  Toutes  les etapes d'installation  et de  montage doivent etre effectues  par du  personnel  qualifie.

ATTENTION: Assurez-vous que  le  mur / plancher a  une capacite de charge de  structure qui  supporte  le  poids de  l'armoire 

entierement charge  avec l'equipement.

ATTENTION:  Certaines  parties  du  systeme  d'enceinte  ne  peuvent  pas etre  efficacement collees a  la terre de  protection  du  terminal 

(PET).  Si  ces  pieces doivent etre  lie  a  l'animal,  il  doit etre fait conformement a  l'article 250 du  Code  national  de  l'electricite.

ATTENTION:  Cordon  (s),  pour les fans ou  d'autres accessoires,  doivent etre  garantis  afin  de  s'assurer qu'ils  sont achemines  loin 

des  points  de  pincement et des  pieces  mobiles.

ATTENTION:  N'essayez  pas de decharger ou  de deplacer les enceintes seules.  Assurez-vous d'avoir suffisamment de 

personnel  et de  materiel  a deplacer en toute securite de  ce  produit.

ATTENTION:  Les  pieces  suivantes  ne  sont  pas effectivement lies  a  la  borne  de terre  de  protection:  cremailleres,  barres  de 

dentelle,  Lever Lock™,  etageres,  cloisons,  panneaux vierges,  et des  equipements de gestion  des cables.  Si  une  partie  doit etre 
lie a  la  borne de terre de  protection,  il  doit etre fait conformement a  l'article 250 du  Code  national  de  l'electricite.

ATTENTION:  P o ur reduire  le  risque de  blessures  et s o n t conform es  a  la  liste  UL ces  instructions de  m ontage  doiven t 

etre  respectees  et  la  capacite  de  poids  approprie  d oiven t  etre  respectees.

CONFORMITE

Le produit repond  aux exigences  des  normes  suivantes: 

•  UL 2416
•  CSA C22.2  No.1-04

COTES  DE  POIDS

ARTICLE

DETAILS

W ALL  MOUNT / SOL  INSTALLATION

250  lbs.  Maximum

PLAQUE  PROFILEE OPTION  (OPTION)  MURALE / SOL  INSTALLATION

150  lbs.  Maximum

HANG SUPPORT INSTALLATION  (OPTION)

150  lbs.  Maximum

Page  3

Summary of Contents for Essex HANG-MMR10

Page 1: ...ies Multi Mount Rack Please read these instructions thoroughly before installing assembling this product PRODUCT FEATURES Multi purpose design allows for wall mount or floor standing Optional quick ha...

Page 2: ...rth Terminal PET If these parts need to be bonded to the PET it should be done in accordance with Article 250 of the National Electrical Code CAUTION Power cord s for fans or other accessories need to...

Page 3: ...fficacement collees a la terre de protection du terminal PET Si ces pieces doivent etre lie a l animal il doit etre fait conformement a l article 250 du Code national de l electricite ATTENTION Cordon...

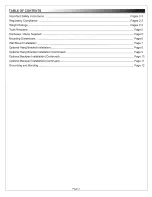
Page 4: ...red Page 5 Hardware Items Supplied Page 5 Mounting Dimensions Page 6 Wall Mount Installation Page 7 Optional Hang Bracket Installation Page 8 Optional Hang Bracket Installation Continued Page 9 Option...

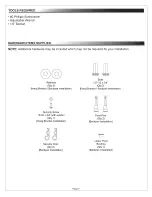
Page 5: ...be required for your installation Washers Qty 2 Hang Bracket Backpan Installation Security Screw 10 32 x 3 4 with washer Qty 1 Hang Bracket Installation Bolts 1 2 13 x 3 4 Qty 2 Hang Bracket Backpan I...

Page 6: ...NG DIMENSIONS HANG BRACKET INSTALLATION 19 5 16 0 6 6 O o o O O o 0 16 0 16 0 6 6 O o o O O 0 0 HANG MMR18 HANG MMR16 HANG MMR12 HANG MMR10 MOUNTING DIMENSIONS BACKPAN INSTALLATION 16 0 8 o 1 1 1 75 1...

Page 7: ...wall 2 Align rear mounting holes in rack with studs Refer to Mounting Dimensions on Page 6 for mounting hole locations 3 Secure rack to studs in wall using all mounting holes mounting hardware not sup...

Page 8: ...acket with studs Refer to Mounting Dimensions on Page 6 for mounting hole locations 3 Secure bracket to studs in wall using all mounting holes mounting hardware not supplied FIGURE B NOTE A minimum of...

Page 9: ...5 Secure rack to hang bracket using 2 1 2 13 bolts with washers and 1 10 32 x 3 4 security screw with washer FIGURE D OPTIONAL HANG BRACKET INSTALLATION CONTINUED 1 2 13 x 3 4 Qty 2 Page 9...

Page 10: ...is required for installation 1 Locate studs behind sheetrock wall 2 Align rear mounting holes in backpan with studs Refer to Mounting Dimensions on Page 6 for mounting hole locations 3 Secure backpan...

Page 11: ...vot FIGURE G Bushing FIGURE I Pivot Bushing Upper Pivot Pin Upper Pivot Bushing Security Clip Pivot Pin FIGURE F FIGURE H Lower Pivot Pin 7 Pivot rack into backpan and align with upper pivot bushing F...

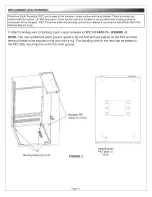
Page 12: ...nnections shall be in accordance with Article 250 of the National Electric Code 1 Attach bonding wire to bonding studs using hardware kit PET K MMR PH FIGURE J NOTE The main protective earth ground ne...

Page 13: ...HER WARRANTIES OF ANY KIND EITHER EXPRESSED OR IMPLIED INCLUDING BUT NOT LIMITED TO IMPLIED WARRANTIES OF MERCHANTABILITY AND FITNESS FOR A PARTICULAR PURPOSE TO THE MAXIMUM EXTENT PERMITTED BY APPLIC...

Reviews: