Middle Atlantic Products Essex HANG-MMR10 Instruction Sheet Download Page 12

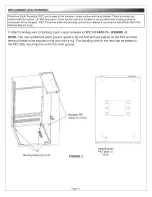
GROUNDING AND  BONDING

Protective  Earth  Term inals  (PET)  are  located  in  the  backpan,  ce n te r section  and  hang  bracket.  These te rm ina ls  are 

m arked  w ith  the  sym bol  Q   W all  rack parts,  ce n te r section  and  door,  contain  o r are  provided  w ith  bonding  points for 

connection  to the  backpan  /  PET.  Protective  earth  and  bonding  co nnections  shall  be  in  accordance w ith A rticle   250  o f the 

N ational  E le ctric Code.

1) Attach  bonding wire to  bonding  studs  using  hardware  kit #PET-K-MMR-PH. 

(FIGURE J)


NOTE: 

The  main  protective earth  ground  needs to  be the first terminal  placed  on the  PET and  this 

terminal  needs to be  secured  on  its own with  a  nut.  The  bonding wire for the rack can  be  added  to 
the  PET after securing the  nut for the  main  ground.

Backpan  PET 

Studs  (2)  1/4-20

°---  

,

Hang  Bracket 

PE T Stud  (1) 

10-32

0

u

O

Bonding  Studs  (4)  10-32

FIGURE J

Page  12

Summary of Contents for Essex HANG-MMR10

Page 1: ...ies Multi Mount Rack Please read these instructions thoroughly before installing assembling this product PRODUCT FEATURES Multi purpose design allows for wall mount or floor standing Optional quick ha...

Page 2: ...rth Terminal PET If these parts need to be bonded to the PET it should be done in accordance with Article 250 of the National Electrical Code CAUTION Power cord s for fans or other accessories need to...

Page 3: ...fficacement collees a la terre de protection du terminal PET Si ces pieces doivent etre lie a l animal il doit etre fait conformement a l article 250 du Code national de l electricite ATTENTION Cordon...

Page 4: ...red Page 5 Hardware Items Supplied Page 5 Mounting Dimensions Page 6 Wall Mount Installation Page 7 Optional Hang Bracket Installation Page 8 Optional Hang Bracket Installation Continued Page 9 Option...

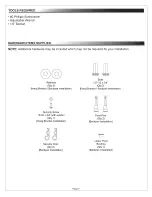
Page 5: ...be required for your installation Washers Qty 2 Hang Bracket Backpan Installation Security Screw 10 32 x 3 4 with washer Qty 1 Hang Bracket Installation Bolts 1 2 13 x 3 4 Qty 2 Hang Bracket Backpan I...

Page 6: ...NG DIMENSIONS HANG BRACKET INSTALLATION 19 5 16 0 6 6 O o o O O o 0 16 0 16 0 6 6 O o o O O 0 0 HANG MMR18 HANG MMR16 HANG MMR12 HANG MMR10 MOUNTING DIMENSIONS BACKPAN INSTALLATION 16 0 8 o 1 1 1 75 1...

Page 7: ...wall 2 Align rear mounting holes in rack with studs Refer to Mounting Dimensions on Page 6 for mounting hole locations 3 Secure rack to studs in wall using all mounting holes mounting hardware not sup...

Page 8: ...acket with studs Refer to Mounting Dimensions on Page 6 for mounting hole locations 3 Secure bracket to studs in wall using all mounting holes mounting hardware not supplied FIGURE B NOTE A minimum of...

Page 9: ...5 Secure rack to hang bracket using 2 1 2 13 bolts with washers and 1 10 32 x 3 4 security screw with washer FIGURE D OPTIONAL HANG BRACKET INSTALLATION CONTINUED 1 2 13 x 3 4 Qty 2 Page 9...

Page 10: ...is required for installation 1 Locate studs behind sheetrock wall 2 Align rear mounting holes in backpan with studs Refer to Mounting Dimensions on Page 6 for mounting hole locations 3 Secure backpan...

Page 11: ...vot FIGURE G Bushing FIGURE I Pivot Bushing Upper Pivot Pin Upper Pivot Bushing Security Clip Pivot Pin FIGURE F FIGURE H Lower Pivot Pin 7 Pivot rack into backpan and align with upper pivot bushing F...

Page 12: ...nnections shall be in accordance with Article 250 of the National Electric Code 1 Attach bonding wire to bonding studs using hardware kit PET K MMR PH FIGURE J NOTE The main protective earth ground ne...

Page 13: ...HER WARRANTIES OF ANY KIND EITHER EXPRESSED OR IMPLIED INCLUDING BUT NOT LIMITED TO IMPLIED WARRANTIES OF MERCHANTABILITY AND FITNESS FOR A PARTICULAR PURPOSE TO THE MAXIMUM EXTENT PERMITTED BY APPLIC...

Reviews: