background image

2

English

2. Checking interface card status

When you run Windows 95/98, the Adaptec AVA-
2902E SCSI adapter is detected and the driver is
automatically installed. Make your Windows 95/98
CD-ROM ready for use. Some computers may
prompt you to load Windows 95/98 software during
your installing AVA-2902E driver. Follow steps
below to check.

1. Turn on your computer, click 

Start

Settings

,

and select 

Control Panel

.

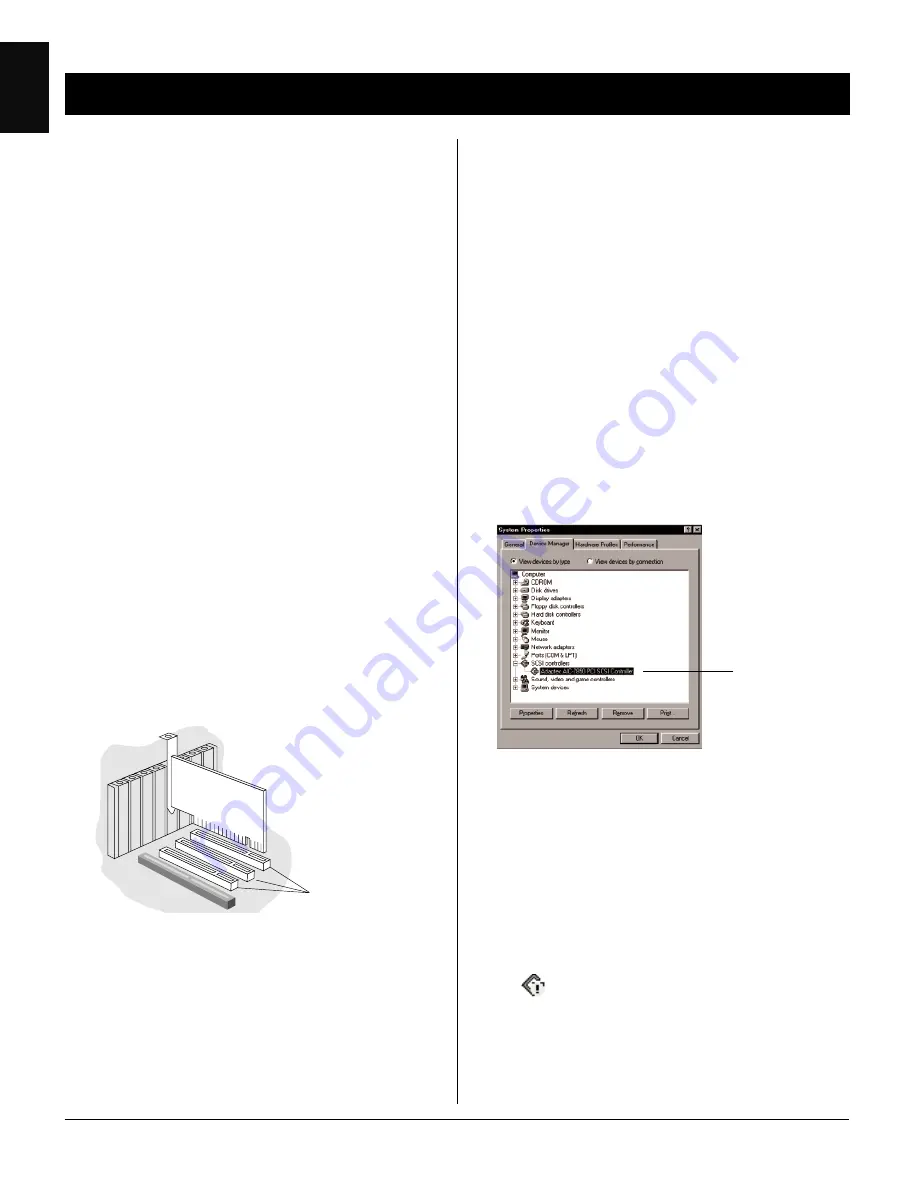
2. Double-click on the 

System 

icon in Control

Panel and select 

Device Manager

 from the top.

3. Double-click on “

SCSI controllers

” to display

the screen below.

The message “Adaptec AIC-7850 PCI SCSI
Controller” displays indicates that the driver is
installed and the AVA-2902E interface card
works properly.

If a conflict exists, either of the following will
occur:

• a yellow exclamation mark appears next to

the phrase:


Adaptec AIC-7850 PCI SCSI

Controller

- or -
• nothing is listed under “SCSI Controllers”. In

either case, refer to the 

Troubleshooting

section.

To install under Windows 95/98, take the steps
below:

1. Install the interface card in your computer
2. Check the interface card status
3. Install software
4. Reset the scanner’s SCSI ID if necessary
5. Connect the scanner and computer
6. Check the scanner status
7. Test your scanner

1. Installing the interface card

Before installing the interface card supplied with
your scanner, make sure you turn off your computer
and peripherals. Then follow the steps below:

1. Shut down your computer and unplug the

power cord. Next, remove the cover from your
computer.

2. Look for an available PCI card slot (typically

white or ivory) in your computer, remove the
slot cover, and insert the Adaptec AVA-2902E
into the slot. Push the card in to make sure it’s
seated all the way in the slot.

2902E Card

This is important, as an improper card connection
will make you unable to use your scanner, and
you will then have to remove the computer case
and restart the card all over again.

3. Replace the cover of the computer, then plug the

power cord back in.

The result of
the check is
displayed here.

Installation under Windows 95/98

PCI expansion
slots (typically
white or ivory)

Summary of Contents for ScanMaker 4

Page 1: ...Microtek ScanMaker 4 User s Manual...

Page 2: ...tion against harmful interference in a residential installation This equipment generates uses and can radiate radio frequency energy and if not installed and used in accordance with the instructions m...

Page 3: ...8 3 Checking your Windows NT configuration 8 4 Installing software 9 5 Connecting the scanner 9 6 Testing your scanner 10 Troubleshooting for Windows NT 4 0 11 Installation under Macintosh 12 1 Reset...

Page 4: ...tch film holder 16 d Using the 6 x 9 cm batch film holder 17 Miscellaneous 18 Returning your scanner for repairs 18 Locking the carriage 18 Locking the ScanMaker 4 for shipping 18 Lamp Replacement 19...

Page 5: ...kwise to unlock it When successfully unlocked the screw will push out a little nearly even with the bottom of the scanner BeforeYouBegin Introduction An image scanner is a device that captures and con...

Page 6: ...ion To install under Windows 95 98 take the steps below 1 Install the interface card in your computer 2 Check the interface card status 3 Install software 4 Reset the scanner s SCSI ID if necessary 5...

Page 7: ...k s proprietary color calibration technology for use with Microtek color scanners With DCR installed your scanner is capable of capturing extremely accurate color images Step 4 Install documentation r...

Page 8: ...d Take the following steps to connect 1 Shut down your computer 2 Connect the card and the scanner using the SCSI cable that provided in the scanner package Make sure your scanner and computer are tur...

Page 9: ...cates the Scanner Test was successful and the scanner is now ready to scan 6 Close and exit Microtek ScanTest program For more details on how to operate your scanner with ScanWizard refer to the file...

Page 10: ...d is not properly seated in the PCI card slot on your computer Situation B Your interface card conflicts with another device Situation C Windows 95 98 can not recognize your interface card Situation D...

Page 11: ...to shut down your computer select No then click Close You will be asked whether you wish to restart your computer Click Yes and restart your computer Resolving situation D See the section Technical Ti...

Page 12: ...r and computer 6 Test your scanner Part of the above procedures especially to hardware installation should refer to the previous pages Installation under Windows 95 98 section Descriptions below follo...

Page 13: ...3 Follow screen instructions to complete installation When installation is complete Microtek ScanWizard for Windows NT appears as a folder on the Programs menu Step 2 Install software application Ins...

Page 14: ...your scanner 1 Restart Windows NT Before you restart the computer make sure your scanner is on and ready 2 Click Start Programs Microtek ScanWizard for Windows NT and then select Scanner Test 3 When...

Page 15: ...ace card is not properly seated in the PCI card slot on your computer Situation B The AVA 2902E SCSI driver is not properly installed in your computer See details below for resolving the individual si...

Page 16: ...ssary This procedure is provided as a reference You may or may not need to change the SCSI ID on your scanner A SCSI ID is a number assigned to each SCSI device in your daisy chain to differentiate th...

Page 17: ...am Follow screen instructions until installation is complete 4 Scanning images 1 Launch your image editing software 2 When ScanWizard starts up and appears on your screen you will see the Settings and...

Page 18: ...ted the READY indicators stay lit Note Note Note Note Note If there are problems with the POWER and READY indicators you may need service on your scanner Call Technical Support for help or outside the...

Page 19: ...uch as 6 x 9 cm film 4 x 5 film individual 35mm slides or 35mm filmstrips Main Holder a 35mm Batch Slide Holder b 35mm Filmstrip Holder d 4 x 5 Batch Film Holder c 6 x 9 cm Batch Film Holder Using the...

Page 20: ...y tray of the ScanMaker 4 b Using the 35mm Filmstrip Holder 1 Push to open the 5 piece 35mm Filmstrip Holder 2 Place the 35mm filmstrip to be scanned in the 35mm Filmstrip Holder 35mm Batch Slide Hold...

Page 21: ...assembly in the transparency tray of the ScanMaker 4 d Using the 6 x 9 cm Batch Film Holder 1 Push to open the 6 x 9 cm Batch Film Holder 2 Place the film to be scanned in the 6 x 9 cm Batch Film Hol...

Page 22: ...get damaged during shipping Miscellaneous This section contains information the following Returning the scanner Locking the carriage Replacing the scanner lamp Returning your scanner for repairs Your...

Page 23: ...p back out Lamp Replacement The lamp inside your scanner is not user serviceable and should be replaced if it does not come on or begins to flicker dim after some time If the lamp requires replacement...

Page 24: ...SCSI 2902E Interface Card for PC model only 5 SCSI Terminator optional 6 Warranty Card 7 Scanner Software CD ROM 8 Universal Glass Film Holder 9 Main Holder 10 35mm Batch Slide Holder 11 35mm Filmstri...

Page 25: ...dy indicator for reflective materials orange LED Power indicator green LED Ready indicator for transparent films orange LED Reflective material Scanner cover Glass surface Horizontal ruler Power conne...

Page 26: ...om 0 to 51 in 3 increments Resolution Settings 1 dpi to 1200dpi in 1 dpi increments Scanning Speed 5 milliseconds per line for line art halftone and gray 6 5 milliseconds per line for color speed meas...

Reviews: