


32 ArtixScan DI 4020 Plus/ArtixScan DI 2020 Plus User's Manual
Scanning for OCR
The OCR (Optical Character Recognition) function allows the scanner to convert a
scanned document into text that can be edited from any word processing
application.
1. Place the documents with text to be scanned on the ADF's Document Feed
Tray.
2. Launch ScanWizard DI in stand-alone mode by clicking the program icon on
the desktop.
3. Follow the procedures (steps 3 through 6) for “Scanning a Stack of
Documents” to specify your scanning requirements.
a) In step 3d, the recommended resolution is 300 dpi or above for OCR.
b) In step 6, from the Attribute options
menu, choose
Line Art
as your
image type to obtain best OCR results. When
Black & White
is your
chosen mode in the Scan Type options,
Line Art
should be the selected
image type.
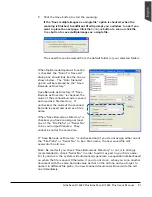
4. Click the
Custom Scan
button and select
OCR
to open the “Custom Scan-
OCR” dialog box.
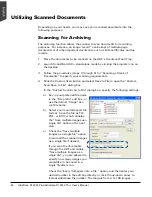
In the “Custom Scan-OCR” dialog box, specify the following settings:
a) Key in your preferred file name in
the “File prefix” edit box, or use
the default “Document” as a root
file name.
b) Select your required export file
format.
c) Check the “Save multiple pages
as a single file” option to store all
the scanned images as a single
file if desired.
d) Select your preferred language
from the “OCR Language”
options. The available options
are English, German, French,
Italian, Spanish, and Chinese.
e) Check the “Send document to
application after saving” option,
then choose your word
processing application from the
options.