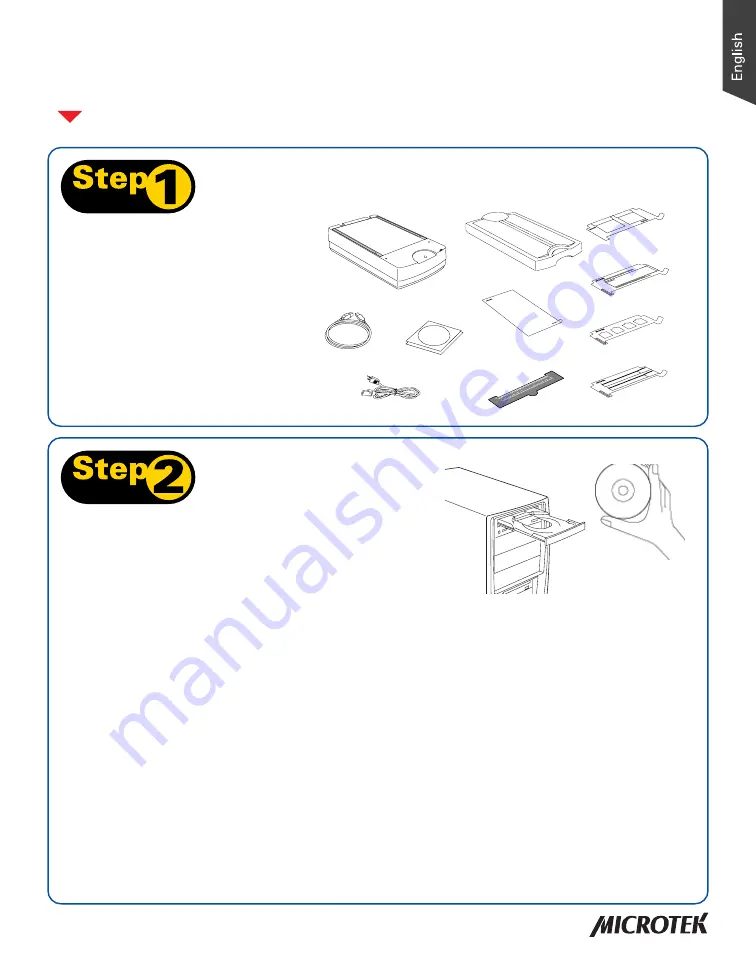
background image

     1

Step 2:

Install Software

Start Here

 Installing your Microtek ArtixScan 3200XL

Important

: Do not remove the yellow stickers from your scanner

until you are told to do so.
You must install software before connecting your scanner. 

Always

close any open programs, and turn off Anti-virus utilities before

installing software.

MAC:

A.

Place the 

Adobe DVD 

into a drive, and install

the software. Skip this step if you have a

newer version of Photoshop Elements already

installed on your computer.

B.

Place the 

Microtek Software CD/DVD 

into a

drive, and double-click the 

ScanWizard Pro

installer icon to install ScanWizard Pro first.

C.

Install the remaining software components,

then restart your computer at the end of all

software installation.

NOTE

: After rebooting your Macintosh, the Microtek software

will attempt to locate your scanner on the system. Since this is

your first install and you have not yet connected the scanner,

simply ignore the message that appears and proceed to the next

step.

Step 1:

Unpack Contents

Copyright © 2013   Microtek International, Inc.   http://www.microtek.com
I49-004647 C, September 2013

Unpack your scanner package and

check for major components.

1.  ArtixScan 3200XL (lower base)
2.  USB Cable
3.  Power Cord
4.  Software CDs/DVDs
5.  TMA 1600-III
6.  Black Plate
7.  U-shaped Ruler (Calibration Ruler
8.  4" x 5" Film Template
9.  120 Film Template with Black Plate
10. 35mm Slide Template
11. 35mm Filmstrip Template

1

PC:

A.

Place the 

Adobe DVD 

into a drive, and install

the software. Skip this step if you have a

newer version of Photoshop Elements already

installed on your computer.

B.

Place the 

Microtek Software CD/DVD 

into a

drive, and follow the on-screen instructions to

install the driver and software.

NOTE

: If the Microtek Software Installer screen does not

come up automatically, double-click the following in

succession: “My Computer”; the CD/DVD-ROM icon; then

cdsetup.exe to start the installer program.

C.

Restart your computer at the end of all

software installation.

2

3

4

5

6

7

8

9

10

11

Summary of Contents for ArtixScan 3200XL

Page 1: ...t connected the scanner simply ignore the message that appears and proceed to the next step Step 1 Unpack Contents Copyright 2013 Microtek International Inc http www microtek com I49 004647 C Septembe...

Page 2: ...r s 15 pin accessory port Refer to the next section Using the TMA III for the details about the connection of the TMA NOTE To lock the scanner for shipping and other reasons refer to ArtixScan 3200XL...

Page 3: ...the TMA 1600 III into the scanner s 15 pin accessory port II Unlocking theTMA 1600 III 1 Remove the yellow Step 3 sticker from the TMA 1600 III 2 Look for the locking knob at the base of the TMA 1600...

Page 4: ...es of the scanner s upper front surface making sure that it has been oriented correctly 2 Align the template s front corners firmly against the top corners left and right of the U shaped Ruler located...

Page 5: ...the vertical rulers of both sides as an alignment guide line for film placement then place the film on the scanner glass surface U shaped Ruler Calibration Ruler B Positioning Reflectives To scan ref...

Page 6: ...en showing the running status of the scanner 5 When the calibration is done completely a window will appear on the screen to notify you Now you may use the ScanWizard Pro as usual Click the OK button...

Page 7: ...on the scanner glass surface toward the front of the scanner as detailed in the Positioning Reflectives section of this guide 3 In the Preview window of ScanWizard Pro choose Reflective from the Scan...

Page 8: ...ose Reflective from the Scan Material menu 4 Click the Overview button in the Preview window to see a preliminary scan of the image 5 Select the Scan Frame tool and choose the area to be scanned by si...

Page 9: ...procedures detailed in Scanning Photos If scanning negatives a Go to the Preview window of ScanWizard Pro and from the Scan Material menu choose Negative Negative Film The Negative Scan Settings wind...

Page 10: ...atives or slides Make sure that you have properly inserted the templates as indicated in the Using the TMA 1600 III Positioning the Scan Material section of this guide The templates should be placed c...

Page 11: ...Software Upgrades After you finish the installation of software if you found that the installed drivers and software cannot run your product or your computer system properly later please go to the Mi...

Page 12: ...12...

Reviews: