background image

Miter Gauge

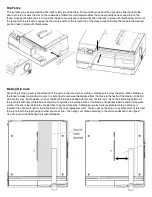
The included miter gauge is not only useful for making 90° cross cuts and angled cuts, you may also use it as a push stick / sliding

fence. Always set the miter gauge to the desired angle and firmly lock it into position prior to powering up the saw. Once the angle

is set, place stock to be cut on the saw table and hold it firmly against the miter gauge. Before powering up the saw, test the 

sliding action of the path you will take. Then back away and turn the saw on, letting the blade come up to full speed. Hold stock

firmly against the miter fence and pass the piece slowly and steadily through the running blade. After the cut is complete, turn the

saw off.

Vacuum Adapter Use

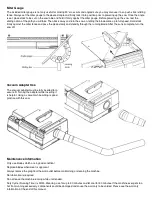
The vacuum adapter must be fully inserted for a

secure fit. Turning the adapter while inserting it

is helpful. Using a vacuum while cutting is good

practice with this saw.

Maintenance Information

Only use blades which are in good condition!
Replace blades when wear is apparent.
Always remove the plug from the wall outlet before maintaining or cleaning the machine.
No lubrication is required.
Do not leave the machine running while unattended.
Duty Cycle (Running Time) is 50/50. Meaning, use for up to 30 minutes and let cool for 30 minutes. If the machine ever gets too

hot from running excessively, components could be damaged and cause the warranty to be voided. Please see the warranty 

information at the end of this manual.

Summary of Contents for MicroLux 87775

Page 1: ...before starting to work with the machine Always wear safety glasses when operating power tools Keep the work area clean and tidy Do not use electric tools in rain under wet conditions near flammable liquids or gasses Avoid contact with grounded parts such as pipes radiators cookers or refrigerators Store tools out of the reach of children Do not overload the machine Do not wear loose clothes or je...

Page 2: ...g the switch in the O position Before plugging the unit into the power supply always ensure that the switch is set to Off Be sure the blade and table surface are clear of obstructions tools fingers etc before starting the saw Installing and Removing Blades Switch the saw to the Off position and unplug the power cable from the wall Push in the door release button A to unlatch the door then slide it...

Page 3: ...with the saw to quickly and easily secure it to work surfaces up to 1 7 8 thick Add a wood spacer block if your work surface is too thin for the clamps to be tightened securely 3 wood screws 2 long and one short are provided to permanently mount the saw to your work surface Insert the 2 long screws through the holes indicated in the top of the saw on the left side of the housing and the remaining ...

Page 4: ...king cuts across the grain When setting up the fence to make longitudinal rip cuts it is important to measure the distance from the fence to the teeth of the blade not the flat side Here s why Some blades such as the 80 tooth blade included with this saw feature set Set is the alternating pattern of the teeth left and right of the blade s centerline It improves the cutting action of the blade and ...

Page 5: ...ugh the running blade After the cut is complete turn the saw off Vacuum Adapter Use The vacuum adapter must be fully inserted for a secure fit Turning the adapter while inserting it is helpful Using a vacuum while cutting is good practice with this saw Maintenance Information Only use blades which are in good condition Replace blades when wear is apparent Always remove the plug from the wall outle...

Page 6: ...g from improper assembly adjustment or maintenance accident alterations normal wear abuse or misuse and does not apply where products are used commercially The warranty shall also not apply when the product has been used for purposes beyond those for which it was designed or unreasonable for its size Micro Mark makes no other warranty of any kind whatever expressed or implied and all implied warra...

Reviews: