background image

Install MIRA Cal DS

■■■■■■■■■■■■■■■■■■■■■■

24

■■■■■■■■

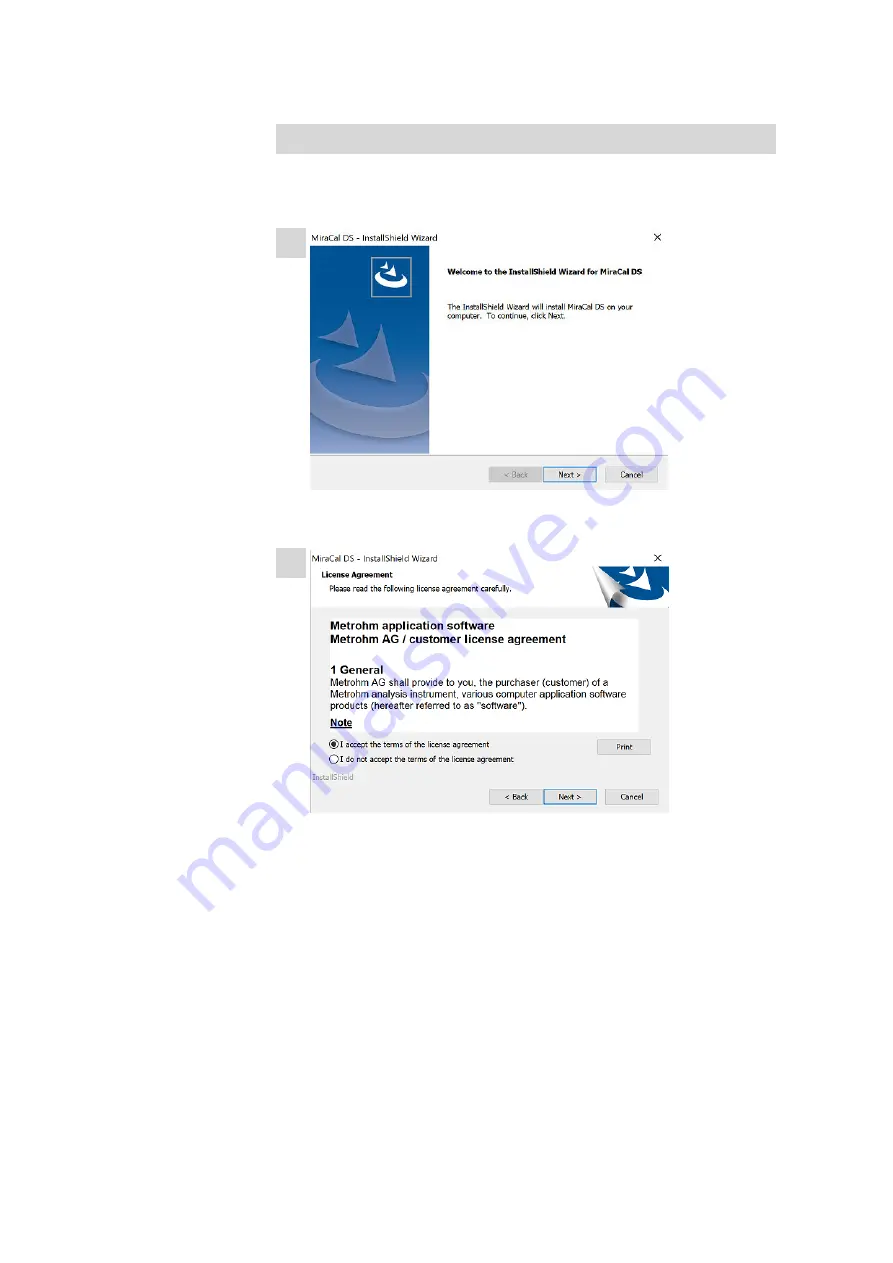
Installing MIRA Cal DS

After the installation of the Metrohm USBCOM Driver is completed, the
MIRA Cal DS installation wizard starts automatically.


1

Click on 

[Next]

 to start the installation of MIRA Cal DS software.


2

Select 

I accept the terms of the license agreement

.

Click on 

[Next]

.

Summary of Contents for 6.06071.020

Page 1: ...MIRA Cal DS MIRA Cal DS Tutorial 8 105 8069EN 2021 09 15 ...

Page 2: ......

Page 3: ...Metrohm Raman 407 South 2nd Street Laramie WY 82070 USA 1 307 460 2089 info metrohm com www metrohm com MIRA Cal DS MIRA Cal DS 1 2 50 Tutorial 8 105 8069EN 2021 09 15 ...

Page 4: ...errors to the address above Copyright This documentation is protected by copyright All rights reserved Trademark notice Bluetooth is a registered trademark of Bluetooth SIG Inc HazMasterG3 is a registered trademark of Alluviam LLC Windows is a registered trademark of Microsoft Corporation in the Uni ted States and other countries All other trademarks are the property of their respective owners ...

Page 5: ...5 Design of warning messages 5 2 6 Meaning of warning signs 6 3 Functional description 8 3 1 General overview 8 3 2 Operating procedures 8 3 3 Drop down menus 9 3 4 Function tabs and feature views 15 3 5 Identification of samples with libraries 18 4 Installation 20 4 1 System requirements 20 4 2 Install MIRA Cal DS 21 5 Initial start up 30 5 1 Start MIRA Cal DS 30 5 2 Establish a connection betwee...

Page 6: ...h MIRA XTR DS MIRA DS 41 6 2 Displaying and managing data 43 6 2 1 Viewing a spectrum 43 6 2 2 Sample list folder management 43 6 3 Processing a spectrum 44 6 4 Generate reports 46 6 5 Export 49 6 6 Database backup 51 6 7 Managing 52 6 7 1 Managing users 52 7 Create support log file 54 ...

Page 7: ...DS software and MIRA XTR DS MIRA DS instru ments Synchronizing MIRA XTR DS MIRA DS instruments to MIRA Cal DS soft ware ensures that the instrument is up to date The current versions of active operating procedures libraries and user accounts are transferred to the instrument Samples are saved to the database More than 1 instrument can be used They can be synchronized to the same database in order ...

Page 8: ...the figure number The second number refers to the product part in the fig ure Instruction step Numbers indicate the order of the instructions steps Method Names of parameters menu items tabs and dialog windows File New Menu path Continue Button or key 1 4 Additional information Device manuals Refer to the following manuals for information about the instruments Manual MIRA DS 8 926 8001EN Manual MI...

Page 9: ...cturer assumes no liability for damage due to non observance of these limit values The EU declaration of conformity loses its validity if modifications are car ried out on the instruments and or the components 2 2 Responsibility of the operator The operator must ensure that basic regulations on occupational safety and accident prevention in chemical laboratories are observed The opera tor has the ...

Page 10: ...f standards laws and regula tions governing the handling of such chemicals 2 4 Safety instructions 2 4 1 Danger from electrical potential WARNING Electric shock from electrical potential A considerable danger of injury exists in connection with touching live parts Never open the housing of the instrument when the power cord is connected You can not service or replace any parts inside the housing O...

Page 11: ...systems in your country 2 5 Design of warning messages There are 4 hazard levels for warning messages The following signal words are used for classifying the hazard levels in warning messages DANGER indicates a hazardous situation which if not avoided will result in serious injury or death WARNING indicates a hazardous situation which if not avoided could result in serious injury or death CAUTION ...

Page 12: ...ences when not observing the notice A minor to moderate injury is probable Measures to avoid the danger 2 6 Meaning of warning signs This documentation uses the following warning signs Table 1 Warning sign according to ISO 7010 Warning sign Meaning General warning sign Warning of electrical voltage Warning of hand injuries Warning of sharp object Warning of hot surface Warning of biological hazard...

Page 13: ... Warning of flammable materials Warning of corrosive substances Warning of optical radiation Warning of laser beams Depending on the intended use of the product the corresponding warn ing sign stickers must be placed on the product ...

Page 14: ...the acquisition and evaluation of spectra are defined in operating procedures This ensures that measurement is done in a reproducible and well defined way MIRA XTR DS MIRA DS has a Smart Acquire feature which automati cally optimizes the acquisition parameters for a sample Users can also build operating procedures by using parameters that the user selects either in the MIRA Cal DS software or on t...

Page 15: ...ettings Opens a view with two tabs General see General tab page 11 Reports see Reports tab page 13 Advanced Database Info Lists database information Help Back Up Backs up the database Restore Restores the database Set Location Sets the location of the database Import Licensed Libraries Imports licensed libraries Import MIRA Cal M Database Imports the database from MIRA Cal M Reset Removes all item...

Page 16: ... default PIN code is 9999 System Suitability Test Archive Lists all system suitability tests in the database Info Lists identification information of the instrument and the operating system Rename Is displayed only when the MIRA XTR DS MIRA DS instrument is connected to MIRA Cal DS The user can change the name of MIRA XTR DS MIRA DS Full Sample Down load Downloads all samples stored on MIRA XTR DS...

Page 17: ...Japan library Help About Displays the MIRA Cal DS version and copyright Create Support File Generates a support file for the desktop software and MIRA XTR DS MIRA DS The user will be asked to attach the Calibration Standard and select Okay A support file is generated and the user is prompted to save the file The support file can be sent to Metrohm Raman should there be issues with the device or de...

Page 18: ...d Login Requires the user to login to use the advanced features of the software see Managing users page 52 Check Require Advanced Login Change the password for the default advanced user by entering a password and click Change Add a new user by entering the user name and password and click Save Delete users by selecting the user from the Delete Users window and click Delete Click Close Go to the Ho...

Page 19: ... be set for device synchronization The custom folder can be defined by Day Device Name Serial Number Sync Time Hazard Level PIN code or Operating Procedure Data Retention Retain All Data Retains all data in the database If deactivated the time period of expiration of the data the data clearing fre quency and settings for the database backup can be chosen Chart Settings Y Grid Lines Displays Y grid...

Page 20: ... the report To add a personalized logo to the report click on Add Logo in the Reports section of the Home tab Full Sample Report Settings The selected settings define the content of the Full Sample report Click on View Example to view save or print the report To add a personalized logo to the report click on Add Logo in the Reports section of the Home tab Quick Match Report Settings The selected s...

Page 21: ...n which view the user has selected from the left side menu There are the following views Sample view Library view Operating Procedure view Synchronize view Sample view Sample Home Samples Click on a sample in the sample list to highlight and carry out actions Right click on a selected sample to open a function menu ...

Page 22: ... parameters to sort samples Process Select a sample and reprocess the data against different libraries Identification Perform a Pearson s correlation match against the chosen library Mixture Identification Perform mixture matching against the chosen library use 0 999 to force a mixture match Spectral Math Add or subtract two spectra or perform other mathematical operations on selected data Reports...

Page 23: ...procedure view Operating Procedures Home Operating Proce dures List the operating procedure in the database Click on an operating procedure to highlight and carry out actions No actions can be taken on the default OP Right click on a selected operating procedure to open a function menu Device Operat ing Procedures List of operating procedures on the device The user can add them to the data base fr...

Page 24: ...of samples with libraries The measured spectrum of a substance is compared with existing spectra in a library that has been loaded to MIRA XTR DS MIRA DS The Illicit Library created by Metrohm Raman is preinstalled on MIRA XTR DS MIRA DS Libraries can also be created by the user or purchased from commercial sources Creating a library Users can create a library in MIRA Cal DS which will then be use...

Page 25: ...cedures are cre ated When analyzing a sample the sample spectrum will be compared to all the spectra in the selected library The measured sample will be identified as one of the library samples and displayed as Identification Result If there is no match of the sample to a library Inconclusive will be dis played ...

Page 26: ...ed support for Windows 7 Support for Metrohm Raman software ended with the Microsoft lifecycle Screen resolution Resolution 1024 x 768 or higher RAM All operating systems 2 GB minimum 4 GB recommended Storage capacity Minimum 100 GB 500 GB recommended USB connectors USB 3 0 Mouse and key board Required USB PS 2 style or wireless Keyboard Compatible keyboard using USB PS 2 or similar connection Sys...

Page 27: ...stem requirements see System requirements page 20 Installing the Metrohm USBCOM Driver 1 To download the latest version of MIRA Cal DS click on the following link https www metrohm com en support and service software center miracal Double click on the installer 2 Click on Yes in the appearing window and follow the wizard on the screen 3 Click on Install ...

Page 28: ...Install MIRA Cal DS 22 4 Click on Next to begin the installation of the driver 5 Click on Install ...

Page 29: ... Installation 23 6 Click on Next 7 Click on Finish to complete the installation ...

Page 30: ...er the installation of the Metrohm USBCOM Driver is completed the MIRA Cal DS installation wizard starts automatically 1 Click on Next to start the installation of MIRA Cal DS software 2 Select I accept the terms of the license agreement Click on Next ...

Page 31: ... Installation 25 3 Enter your User Name Enter the Company Name Click on Next 4 Click on Install to start the installation ...

Page 32: ...tempt to restart applica tions Click on OK 6 Click on Finish to complete MIRA Cal DS installation Installing HazMasterG3 software 1 If HazMasterG3 was purchased copy the HazMasterG3 application from the USB drive and double click on the executable installation ...

Page 33: ... Installation 27 Click on Next to start the installation of HazMasterG3 2 Check I Agree Click on Next ...

Page 34: ...Install MIRA Cal DS 28 3 Click on Next 4 Click on Install ...

Page 35: ... Installation 29 5 Click on Next 6 Click on Finish to complete HazMasterG3 installation ...

Page 36: ...ize and reports will be generated A sample summary report is the default but full report generation can be set as the default in the software setting tab 5 1 Start MIRA Cal DS 1 Double click on the MIRA Cal DS icon on the desktop The home page for MIRA Cal DS opens 5 2 Establish a connection between MIRA XTR DS MIRA DS and MIRA Cal DS NOTICE Only use the provided Metrohm USB cable 6 021 08010 and ...

Page 37: ...he home page 1 On the home page of MIRA Cal DS click on Connect The instrument will automatically connect and synchronize its data If more than one MIRA XTR DS MIRA DS is connected the user may be asked to select an available instrument Select Metrohm Raman Device 2000 and click on Select After the initial connection of the MIRA XTR DS MIRA DS the soft ware will recognize the instrument and not as...

Page 38: ...perating procedures user libraries and licensed libraries not in the database will be listed in the Synchronize view Click Save to Database to add selected items to MIRA Cal DS database 3 To disconnect MIRA XTR DS MIRA DS from the software click on Disconnect Connect Disconnect from advanced tools 1 On the home page of MIRA Cal DS click on Advanced 2 In the menu tabs select Instrument Connect A sy...

Page 39: ...n be synchronized to the same database in order to achieve a clean data management However the instruments cannot be connected to the software simultaneously they must be used consecutively 5 3 Configuration 5 3 1 Create and edit libraries Spectra for libraries come from samples that have previously been acquired or imported into the sample database Create a library 1 Go to the Library view 2 Go t...

Page 40: ...tadata tab You can add the following information in this tab Name CAS Hazard Level Sample Type Hazard Comment Synonyms GHS Classifications This information is displayed in the MIRA XTR DS MIRA DS identifi cation screens 10 Click on Save in the Library Samples tab to save sample meta data 11 Click on Save in the Library tab to create the new library 12 Check Auto Synchronize in the settings to auto...

Page 41: ...list and click on Delete 5 3 2 Create and edit operating procedures Operating procedures direct the acquisitions and evaluations of spectra MIRA XTR DS MIRA DS has Smart Acquire a process that optimizes acquisition parameters to enhance sample evaluation The default proce dure on MIRA XTR DS MIRA DS and in MIRA Cal DS automatically per forms a smart acquire and evaluates spectra against all availa...

Page 42: ...nded value is 5 Reasons to lower the laser power are Measuring critical materials such as explosive or flammable materials Measuring materials with a low melting point Liquid and solid forms of a compound have differ ent spectra Auto Integration The instrument automatically chooses the best Integration time for the cur rent sample Integration Time sec The integration time indicates how long a sing...

Page 43: ...ds to have a delay before a scan Leave this field blank if the user does not intend to have a delay before a scan The maximum scan delay is 59 minutes Smart Tip Select the required attachment to measure your samples If no dedicated smart tip is required select Allow all XTR Mode Automatic automatically runs XTR processing if fluorescence is detected Every Scan runs XTR on every scan even if fluore...

Page 44: ...against user enabled libraries on the instrument This is useful if the instrument has a large number of targeted libraries installed The user can activate a targeted sub library instead of searching the entire large library 7 Go to the Mixture Identification tab Select the library to be used for mixture matching from the Available Libraries Double click on the library or click on Add in the Mixtur...

Page 45: ...are If you do not check Auto Synchronize it is necessary to click Syn chronize in the header to synchronize new operating procedures to MIRA XTR DS MIRA DS Edit an operating procedure 1 Go to the Operating Procedures view 2 Select an operating procedure Click on Edit 3 You can edit the following settings Metadata Acquisition Identification Mixture Identification 4 Click on Save 5 Edited operating ...

Page 46: ... self test to demonstrate instrument suitability Several internal test procedures are performed For example peak intensity and wavenumber calibration check The user can run this test independently of calibration The test can be run on a daily basis to ensure that the instrument runs as expected After suc cess or failure of the test a report can be saved The report shows details of performed tests ...

Page 47: ... instrument from MIRA Cal DS 3 Calibrate if desired or skip calibration 4 Go to the Home screen 5 If preferred change the operating procedure 6 Acquire spectra Transfer acquired spectra from MIRA XTR DS MIRA DS to MIRA Cal DS 1 Connect the MIRA XTR DS MIRA DS instrument to the MIRA Cal DS software 2 MIRA XTR DS MIRA DS will synchronize to MIRA Cal DS either auto matically or manually This depends ...

Page 48: ...ng Procedure Acquire box is deactivated the Acquisition Settings tab appears If you check no boxes the user selects integration time laser power and number of averages If you check Auto Integration the process determines the integration time The user selects the laser power and the number of averages If you check Smart Acquire there are no user options for acquisition Operating procedure The user ...

Page 49: ...ptions When unchecked the normal Raman spectrum will be displayed From Browser Offset slightly offsets 2 overlaid spectra for easy comparison Baseline Normal Raman data can be processed to remove a raised baseline for better viewing XTR displays the eXTRacted data collected with MIRA XTR DS Matches overlays the matches of the active spectrum in the viewing window Peaks labels the peaks in the spec...

Page 50: ...rary drop down list 2 Increase or decrease the number in Matches to define the number of results shown 3 Increase or decrease the number in Threshold to define the thresh old for the matching A higher threshold value increases the chances for false negatives The default value is 0 85 4 Click on Match to perform the match with the selected parame ters Quick match 1 Select Quick Match to open the Qu...

Page 51: ...dentification 1 Select the library to match against from the Library drop down list 2 Increase or decrease the number in Threshold to define the thresh old for the matching A high number for example 0 99 will increase the chances for forced matches The default threshold is 0 920 for on device matching 3 Click on Match to perform the mixture match with the selected parameters Spectral math The user...

Page 52: ...st the weigh ted implementation on the operand 5 The result will be displayed in the active viewing window as a new spectrum To see a preview of the results click on and activate Preview Results 6 4 Generate reports There are 2 options to generate a sample report The following 2 proce dures describe them The report looks the same with both procedures Sample report option 1 1 Select the Sample view...

Page 53: ...e a library report The following 2 proce dures describe them The report looks the same with both procedures Library report 1 1 Select the Libraries view 2 Click on the Reports tab 3 Click on Save Full 4 Select a destination for the file Click on Save 5 If needed print out the PDF file Library report 2 1 Select a library Right click on the selected library 2 Go to Reports 3 Select a report format N...

Page 54: ...re report option 1 1 Select the Operating Procedure view 2 Click on the Reports tab 3 Click on Full 4 Select a destination for the file Click on Save 5 If needed print out the PDF file Operating procedure report option 2 1 Select an operating procedure Right click on the selected operating procedure 2 Go to Reports 3 Select a report format NOTICE Preview the report by selecting View Full ...

Page 55: ...click on the sample Click Save As 4 Select a file type BRMS format brms Raman sample This is the default and recommended file type BRMS format brms contains spectra and metadata such as integration time matches to any of the used libraries comments compliance data and used software and firmware versions SRMP format srmp SRMP format srmp contains spectra and metadata such as integration time matche...

Page 56: ...cedure to export Multiple selection is possi ble 3 Right click on the operating procedure Click on Save As Operat ing procedures can only be saved as ormp file type 4 Select a destination for the file Click on Save Export HazmasterG3 data 1 Go to the Samples view 2 Select the sample to export Multiple selection is possible 3 Right click on the sample Click on Save Hazmaster Data 4 Select a destina...

Page 57: ...he viewing window 3 Right click anywhere in the sample chart Click on Save Raw Data 4 Select a destination for the file Click on Save 6 6 Database backup Exporting database 1 Click on File Advanced Database Backup 2 Select a destination for the file Click on Save Restoring database NOTICE Be aware that the existing MIRA Cal DS data is overwritten with the data from the database file ...

Page 58: ...ore Click Open 3 Confirm the restore Select Yes 6 7 Managing 6 7 1 Managing users Figure 4 User management window Activating the advanced login 1 To access the Users window go to File Settings 2 Check Require Advanced Login 3 Change the password for the default advanced user by entering a password and click Change Creating and deleting users 1 Go to File Settings 2 Click Manage Advanced Users ...

Page 59: ...n and control 53 3 Create a user name and password in the New User section and click Save 4 Delete a user by selecting the user in the Delete User section and click Delete 5 Click Close to close the Users window ...

Page 60: ... can be sent to your Metrohm representative A calibration standard should be attached to the instrument but is not necessary Instrument support log 1 Click on Help Create Support File Attach the Calibration Stand ard Click on Okay A log file is created This may take some time 2 Select a destination for the file Click on Save ...

Reviews: