background image


Page 12 


Locker Controller ELS ASSIGN Touch Technical Manual 


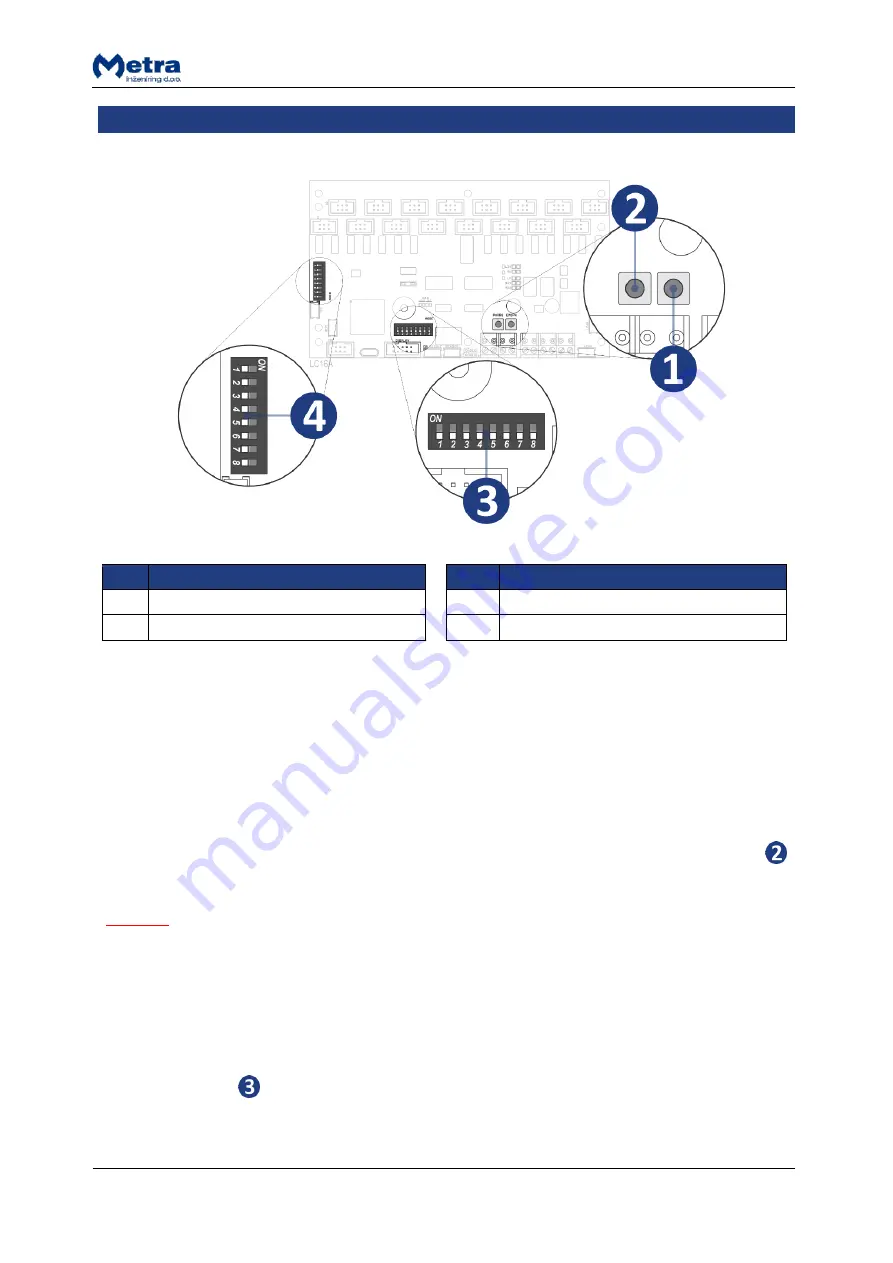
DIP switch settings 


description 


description 

Emergency open pushbutton 


Network Address DIP switch 

Parameters request button 


Operating Mode DIP Switch (Not used) 

 
To change between different pins positions, use a small flat headed screwdriver or similar object to 
push DIP switch pins to desired position. 
 

STANDALONE CONFIGURATION:

 After each address change power off and back on the device for the 

new settings to take effect. 
 

FULL NETWORK CONFIGURATION:

 After each address change power off and back on the device for 

the new settings to take effect. Operating parameters are obtained through the Metra NET Network. 
The  server,  Display  Touch  and  ELS  Assign  application  on  the  display  Touch  must  be  set  up  and 

running  for  that  purpose.  To  obtain  operating  parameters,  press  the  PARAMETERS  REQUEST 


button. 


 NOTE 


Network based functionality will be present only if the server and Display Touch are running and the 
Locker Controller has been properly configured.


 Network address 

 
After  installation  is  complete,  the  device’s  network  address  must  be  set  by  changing  the  Network 

Address DIP Switch 

 pins positions. 


Summary of Contents for ELS ASSIGN Touch

Page 1: ...Locker Controller ELS ASSIGN Touch Technical Manual ...

Page 2: ...tion board 8 Power supply connection Locker Controller with distribution board 9 Metra NET Network connection Locker Controller without distribution board 10 Metra NET Network connection Locker Controller with distribution board 10 External emergency open pushbutton connection optional 11 DIP switch settings 12 Network address 12 Operating modes 14 Signalization 14 Power on 14 Operation 15 Network...

Page 3: ...t of this manual may be reproduced in any form or by any means without prior written permission of Metra inženiring d o o The contents of this manual are subject to change without notice All efforts have been made to ensure the accuracy of the contents of this manual however should any errors be detected Metra inženiring would greatly appreciate being informed of them Metra inženiring d o o can as...

Page 4: ...break in an Alarm message is distributed over Metra NET Network to Metra user interface devices and over Metra Network Controller to LAN WAN and Metra software For easier installation on site different configurations of controller extension module s on mounting plates are supplied Basic Parts Locker Controller PCB with two extension modules and connecting PCB Emergency Open Push button optional Em...

Page 5: ...d but not required Operating parameters are set on the Displays Touch Use Metra Network Terminator on all ends of Metra NET Network For more information see Metra NET Network Installation Manual Full network configuration In full network configuration all the operating parameters are set in the Metra software With Metra software you gain additional functionality on line locker monitoring in real t...

Page 6: ...ronic Lock 10 36 Local CAN 11 Electronic Lock 11 37 Local CAN 12 Electronic Lock 12 38 BDM Loader 13 Electronic Lock 13 39 COM Not used 14 Electronic Lock 14 40 Local CAN 15 Electronic Lock 15 41 Local CAN 16 Electronic Lock 16 42 Metra NET Network 17 Electronic Lock 17 43 Power 18 Electronic Lock 18 44 Power 19 Electronic Lock 19 45 Emergency open pushbutton 20 Electronic Lock 20 46 Coin acceptor...

Page 7: ...ker Extension Modules When Locker Controller without mounting plate is used connect up to two Extension modules by 6 wire flat cable There are two equivalent connectors on the main electronics board LC16A use the one which suits your connection best When Locker Controller is ordered with mounting plate Extension Modules LC24_ and LC32_ are already connected Locker Extension Module setting The firs...

Page 8: ...Locker Controller without distribution board Regulated 12 VDC power supply is required for proper operation Connect as many units as possible to a single power supply unit Consult the Technical Specifications section of this document for current consumption There are two internally connected power connectors on the board You can use one as Power IN and the other as Power OUT connector Connect 12V ...

Page 9: ...nit Consult the Technical Specifications section of this document for current consumption Connect 12V DC regulated power supply to designated terminals The terminals are marked as 12V for positive connection and GND for ground connection WARNING Mind the polarity Wrong polarity could result in irreparable damage to the device Respect power requirements data Using unsuitable power supply could resu...

Page 10: ...ork Line Terminator must be connected at the far end of the network cable See also Metra NET Network Installation Manual for different wiring schemes Connect the twisted pair network cable to designated terminals The terminals are marked as CANLO for network low signal and CANHI for network high signal NOTE Mind the polarity of the network connection Metra NET Network connection Locker Controller ...

Page 11: ...ELS ASSIGN Touch Technical Manual External emergency open pushbutton connection optional Connect the blue and blue white wires of the UTP cable from the Emergency open pushbutton to designated terminals as shown in the schematic ...

Page 12: ...ke effect FULL NETWORK CONFIGURATION After each address change power off and back on the device for the new settings to take effect Operating parameters are obtained through the Metra NET Network The server Display Touch and ELS Assign application on the display Touch must be set up and running for that purpose To obtain operating parameters press the PARAMETERS REQUEST button NOTE Network based f...

Page 13: ... 0 1 10 0 1 1 1 0 1 1 60 0 0 0 1 0 1 0 11 0 1 1 1 1 0 0 61 0 0 0 1 0 1 1 12 0 1 1 1 1 0 1 62 0 0 0 1 1 0 0 13 0 1 1 1 1 1 0 63 0 0 0 1 1 0 1 14 0 1 1 1 1 1 1 64 0 0 0 1 1 1 0 15 1 0 0 0 0 0 0 65 0 0 0 1 1 1 1 16 1 0 0 0 0 0 1 66 0 0 1 0 0 0 0 17 1 0 0 0 0 1 0 67 0 0 1 0 0 0 1 18 1 0 0 0 0 1 1 68 0 0 1 0 0 1 0 19 1 0 0 0 1 0 0 69 0 0 1 0 0 1 1 20 1 0 0 0 1 0 1 70 0 0 1 0 1 0 0 21 1 0 0 0 1 1 0 71 0...

Page 14: ... 0 0 0 0 1 98 0 1 1 0 0 0 0 49 1 1 0 0 0 1 0 99 0 1 1 0 0 0 1 50 Operating modes Operating Mode DIP Switch is not used in this type of ELS ASSIGN system Switches 1 through 8 on the Operating Mode DIP Switch must be set to OFF switch down Signalization Power on When power is applied the following LEDs are on Yellow LED on Locker Controller 12VDC present Green LED on Locker Controller 5VDC regulated...

Page 15: ...that the device is running Network Communication Network communication Metra NET is signalled on the Locker Controller by four LEDs Left Green LED is on when the Locker Controller is receiving data packets from Extension Module s Left Red LED is on when the Locker Controller is transmitting data packets to Extension Module s Right Green LED is on when the Locker Controller is receiving data packet...

Page 16: ...etwork Controller must be connected to Metra NET Network Metra server must be running and all hardware added in Metra software Metra Displays Touch must be connected to Metra NET Network turned ON and PC application must be running Each Locker Controller must have set its unique Metra NET Network address ID PROCEDURE Set Locker Controllers Network adresses IDs on Displays Touch See ELS ASSIGN Touc...

Page 17: ...er Device replacement This chapter describes Locker Controller replacement procedure The problem should be identified before any repairing is tried STEP 1 Disconnect the power supply NOTE Disconnect the adapter not the wires fixed on the Locker Controller board to avoid short circuit STEP 2 Open the Locker Controller Box Locker see Locker manufacturer s documentation STEP 3 Disconnect all cables a...

Page 18: ...ric Lock if necessary The Locker door not ejected when unlocked Adjust the door strike Technical data Operating voltage 12V DC regulated 11 5 15V DC tolerated Current consumption PCB 0 65 A peak 0 45 A average PCB with two extension modules 2 A peak 1 A average Operating temperature range 0 to 50 C Audio signal integrated piezoelectric beeper Buffer capacity 40 records Electronic Lock Interface Up...

Page 19: ...Page 19 Locker Controller ELS ASSIGN Touch Technical Manual 2 Physical dimensions Mounting rails 3 Physical dimensions Mounting plate 4 Network schematic 5 Device configuration example ...

Page 20: ...IGN Touch Physical dimensions Locker Controller Locker Controller Extension Module 1 2 5 3 4 6 7 8 1 2 5 3 4 6 7 8 19 179 100 7 5 15 8 5 17 7 5 26 5 8 5 37 5 36 75 5 84 5 1 2 3 4 11 89 16 39 5 44 5 8 5 100 7 5 8 5 43 5 4 5 30 5 26 7 5 80 ...

Page 21: ...79 5 5 94 20 Ć 4 0 3 4 2 1 6 4 5 Appendix 2 Physical dimensions Mounting rails 1 2 5 3 4 6 7 8 1 2 5 3 4 6 7 8 180 79 Locker Controller ELS ASSIGN Touch ...

Page 22: ...Appendix 3 Physical dimensions Mounting plate 5 8 39 39 46 5 368 380 8 4 4 2 368 6 4 2 10 171 159 115 78 46 5 366 Locker Controller ELS ASSIGN Touch ...

Page 23: ... LAN Reception 2 Metra DB Server Reception 1 Appendix 4 Network schematic Locker Controller 2 Network Controller TCP IP Master Emergency open push button Max 32 lockers Max 32 lockers BANK OF LOCKERS 2 BANK OF LOCKERS 1 Display Touch 1 Electric Locks Locker Controller N Max 32 lockers BANK OF LOCKERS N Locker Controller ELS ASSIGN Touch ...

Page 24: ... 147 150 151 152 153 154 155 160 159 161 162 163 164 167 168 169 170 171 172 156 157 165 166 148 149 158 172 143 141 142 CAN Network Power Supply 12 VDC Appendix 5 Device configuration example Display Touch Locker Controller ELS ASSIGN Touch OPTIONAL To other Metra devices ...

Reviews: