background image

8

ENGLISH

1.

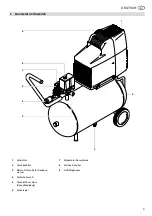
Machine Overview.......................7

2.

Please Read First! .......................8

3.

Safety ...........................................8

3.1 Specified conditions of use ...........8

3.2 General safety information ............8

3.3 Safety devices ...............................9

4.

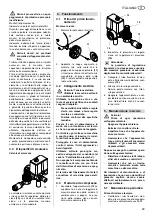
Operation .....................................9

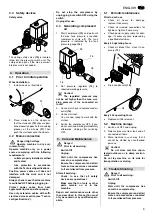
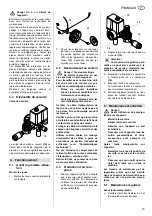
4.1 Prior to initial operation .................9

4.2 Mains connection ..........................9

4.3 Generating compressed air ...........9

5.

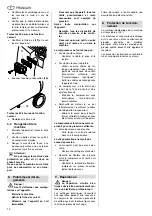
Care and Maintenance ................9

5.1 Periodic maintenance....................9

5.2 Machine storage............................9

6.

Trouble Shooting ........................9

7.

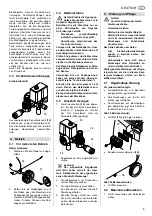
Repairs .......................................10

8.

Environmental Protection ........10

9.

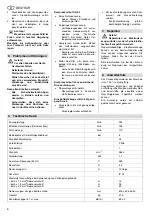
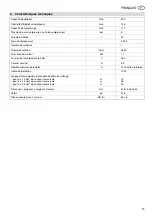
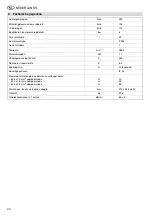
Technical Specifications ..........10

Read these instructions before use. 
Pay special attention to the safety 
information. 

If you notice transport damage while 
unpacking, notify your supplier 
immediately. 

Do not

 operate the 

machine! 

Dispose of the packing in an envi-
ronmentally friendly manner. Take 
to a proper collecting point. 

Keep these instructions for refer-
ence on any issues you may be 
uncertain about. 

If you lend or sell this machine be 
sure to have the instructions to go 
with it. 

3.1 Specified conditions of 

use 

This machine is intended to generate 
compressed air required for the opera-
tion of air tools. 

Any use for medical purposes, food 
processing as well as filling of oxygen 
cylinders for breathing equipment is not 
permitted. 

Explosive, combustible gases or gases 
detrimental to health may not be com-
pressed. Operation in hazardous loca-
tions is not permitted. 

Any other use is not as specified. Use 
not as specified, alteration of the 
machine or use of parts that are not 
approved by the equipment manufac-
turer, can cause unforeseeable damage! 

Children, juveniles and persons not hav-
ing been instructed in its usage are not 

permitted to operate this machine and 
any air tools connected to it. 

3.2 General safety informa-

tion 

When using this electric tool observe the 
following safety instructions, to exclude 
the risk of personal injury or material 
damage. 


Please also observe the special safety 
instructions in the respective chapters; 


Keep all documents, supplied with the 
machine, for future reference. 


Observe the statuary accident insurance 
institution regulations and regulations for 
the prevention of accidents pertaining to 
the operation of air compressors and air 
tools, where applicable. 

A


General Hazard! 

Keep your work area tidy – a messy 
work area invites accidents. 


Be alert. Know what you are doing. Set 
out to work with reason. Do not operate 
electric tool while under the influence of 
drugs, alcohol or medication. 


Consider environmental conditions. 


Keep work area well lighted. 


Prevent adverse body positions. Ensure 
firm footing and keep your balance at all 
times. 


Do not operate electric tool near inflam-
mable liquids or gases. 


Keep bystanders, particularly children, 
out of the work area. Do not permit other 
persons to touch the tool or power cable 
while the electric tool is running. 


Do not overload electric tool – use it only 
within the performance range it was 
designed for (see Technical Specifica-
tions). 

B


Danger! Risk of electric shock!


Do not expose electric tool to rain. 


Do not operate electric tool in damp or 
wet environment.


Prevent body contact with earthed 
objects such as radiators, pipes, cooking 
stoves or refrigerators when operating 
this electric tool. 


Do not use the power cable for any pur-
pose it is not intended for. 

A

Risk of personal injury by 

escaping compressed air and parts 
hurled about by escaping air! 

Never direct compressed air against per-
sons or animals! 


Ensure all air tools and accessories 
used are designed for the working pres-
sure or are supplied via a pressure regu-
lator. 


Please note that, when disconnecting 
the quick coupler, the compressed air 
contained in the pressure hose will 
escape all of a sudden. You should 
therefore firmly hold the air hose when 

disconnecting it. 


Ensure all screwed connections are fully 
tightened at all times. 


Do not attempt to repair the machine 
yourself! Only trained specialists are 
permitted to service or repair compres-
sors, pressure vessels and air tools. 

A

Hazard generated by oil-satu-
rated compressed air! 

Use oil saturated compressed air only 
for air tools requiring such supply. Do 
not use an air hose used to supply com-
pressed air containing oil to supply air 
tools not designed for operation on com-
pressed air containing oil. Do not fill tires 
with compressed air containing oil. 

A

Risk of burns from the sur-

faces of parts carrying compressed 
air! 

Let tool cool off before servicing. 

A

Risk of personal injury and 
crushing by moving parts! 

Do not operate the electric tool without 
installed guards. 


Please note that the compressor will 
start automatically when the pressure 
falls off to minimum! – disconnect from 
power supply prior to any servicing. 


Ensure that when switching on (e.g. after 
servicing) no tools or loose parts are in 
the electric tool. 

A

Hazard generated by insuffi-

cient personal protection gear! 

Wear hearing protection. 


Wear safety glasses. 


Wear mask respirator when work gener-
ates dust or mist detrimental to health. 


Wear suitable work clothes When work-
ing outdoors wearing of non-slip shoes is 
recommended. 

A

Hazard generated by electric 
tool defects! 

Keep electric tool and accessories in 
good repair. Observe the maintenance 
instructions. 


Check electric tool for possible damage 
before any use: Before operating the 
electric tool all safety devices, protection 
devices or slightly damaged parts must 
be inspected for proper functioning as 
specified. Check to see that all moving 
parts work properly and do not jam. All 
parts must be correctly installed and 
meet all conditions necessary for the 
proper operation of the electric tool. 


Damaged protection devices or parts 
must be repaired or replaced by an qual-
ified specialist. Have damaged switches 
replaced by a service centre. Do not 
operate electric tool if the switch can not 
be turned ON or OFF. 


Keep handles free of oil and grease. 

Table of Contents

2. Please Read First! 

3. Safety 

Summary of Contents for Basic 240

Page 1: ...ginales 11 Origineel gebruikaanwijzing 16 Manuale d uso originale 21 Manual de instrucciones original 26 Manual de servi o original 31 Original brugsvejledning 36 Original instruksjonsbok 40 Original...

Page 2: ...6 4 0 D D 4 5 E D 00 000 6 2 D 8 0000 8 E 5 E 3 5 3 8 5 3 8 E 5 6 40 5 E E E00 E 54 5 E 3 D54000 2 6 0000 3 3 8 8 3 3 0 5 8 00 3 5 000 5 8 2 3 0000 3 5 8 8 5 8 8 3 5 8 50 3 5 8 5 5 5 5 5 00 8 3 5 3 0...

Page 3: ...9 4 7 1 Verdichter 2 Druckbeh lter 3 Ablass Schraube f r Kondens wasser 4 Sicherheitsventil 5 Druckluft Anschluss Schnellkupplung 6 Druckregler 7 Manometer Kesseldruck 8 Ein Aus Schalter 9 Luftfilter...

Page 4: ...nnbaren Fl ssigkei ten oder Gasen Halten Sie Kinder aus dem Arbeitsbe reich fern Lassen Sie w hrend des Betriebs andere Personen nicht das Werkzeug oder das Netzkabel ber hren berlasten Sie dieses Ele...

Page 5: ...das Netzkabel vor Hitze aggressiven Fl ssigkeiten und schar fen Kanten Verwenden Sie nur Verl ngerungs kabel mit ausreichendem Aderquer schnitt siehe Technische Daten Schalten Sie den Kompressor nicht...

Page 6: ...entil in Fachwerk statt berholen lassen Druckluftwerkzeug erh lt nicht gen gend Druck Druckregler nicht weit genug aufge dreht Druckregler weiter aufdrehen Schlauchverbindung zwischen Kom pressor und...

Page 7: ...7 1 Compressor pump 2 Pressure vessel 3 Condensate drain cock 4 Safety valve 5 Compressed air outlet quick coupler 6 Pressure regulator 7 Tank pressure gauge 8 On Off switch 9 Air intake filter housin...

Page 8: ...t was designed for see Technical Specifica tions B Danger Risk of electric shock Do not expose electric tool to rain Do not operate electric tool in damp or wet environment Prevent body contact with e...

Page 9: ...nnect air hose to compressed air outlet 16 4 Connect air tool You are now ready to work with the air tool 5 Switch the compressor OFF if you do not continue working immediately afterwards Unplug after...

Page 10: ...ied out by qualified electricians only Electric tools in need of repair can be send to the service centre in your coun try See spare parts list for address Please attach a description of the fault to...

Page 11: ...sseur 2 Ballon 3 Vis de vidange pour l eau de condensation 4 Valve de s curit 5 Alimentation en air comprim raccord rapide 6 Manostat 7 Manom tre pression de chaudi re 8 Interrupteur marche arr t 9 En...

Page 12: ...on Veiller un clairage correct Eviter de prendre une position du corps inconfortable Veiller adopter une posi tion stable et garder constamment votre quilibre Ne pas utiliser la machine en pr sence de...

Page 13: ...ues Installer le c ble d alimentation de fa on ce que celui ci ne g ne pas et ne puisse tre endommag pendant les travaux V rifier chaque fois que la machine est teinte avant d enficher la fiche de con...

Page 14: ...ction transversale suffisante voir Caract ristiques techniques Eviter les c bles de rallonge avec l appareil froid Le compresseur a t teint par retrait de la fiche de contact alors qu il fonctionnait...

Page 15: ...rotation tr min 2850 Puissance du moteur kW 1 1 Tension de raccordement 50 Hz V 230 Courant nominal A 6 2 Nombre minimum de fusibles A 10 action retard e Indice de protection IP 20 Longueur totale ma...

Page 16: ...pslag 1 2 3 5 6 8 9 4 7 1 Compressor 2 Drukvat 3 Aftapplug voor condenswater 4 Veiligheidsklep 5 Persluchtaansluiting snelkoppeling 6 Drukregelaar 7 Keteldrukmeter 8 Hoofdschakelaar 9 Luchtfilterbehui...

Page 17: ...sfacto ren Zorg dat er goede verlichting is Zorg voor een goede lichaamshouding Zorg ervoor dat u op een stevige onder grond staat en let er vooral op dat u altijd goed in evenwicht bent Gebruik het e...

Page 18: ...ge nstalleerd geaard en goedgekeurd zekering conform de technische gegevens Het snoer moet zo gelegd worden dat de schaafwerkzaamheden niet bemo eilijkt worden en dat het snoer niet beschadigd kan wor...

Page 19: ...met voldoende doorsnede zie Tech nische gegevens Vermijd gebruik van een verlengsnoer bij een koud apparaat De compressor werd uitgeschakeld door de netstekker uit het stopcon tact te trekken terwijl...

Page 20: ...Toerental min 1 2850 Motorvermogen kW 1 1 Voedingsspanning 50 Hz V 230 Nominale stroomsterkte A 6 2 Zekering min A 10 langzaam Beveiligingsklasse IP 20 Maximale totale lengte bij gebruik van verlengs...

Page 21: ...o a pressione 3 Vite di scarico per condensa 4 Valvola di sicurezza 5 Allacciamento dell aria compressa innesto rapido 6 Regolatore di pressione 7 Manometro pressione della caldaia 8 Interruttore acce...

Page 22: ...o apparecchio elettrico se Vi manca la dovuta concentrazione Tenete in debita considerazione i poten ziali effetti dell ambiente circostante Provvedete ad una buona illuminazione Evitate di assumere p...

Page 23: ...na soltanto in un ambiente asciutto Utilizzate la macchina solo su una fonte di energia elettrica che soddisfi i seguenti requisiti Prese elettriche installate a regola d arte con messa a terra regola...

Page 24: ...ore si veda le Caratteristiche tecni che Quando l apparecchiatura fredda evitate la prolunga Il compressore stato spento tirando il connettore di rete mentre era in funzione Spegnere intanto il compre...

Page 25: ...ndri 1 Velocit min 1 2850 Potenza motore kW 1 1 Tensione di allacciamento 50 Hz V 230 Corrente nominale A 6 2 Fusibile min A 10 ritardato Protezione IP 20 Lunghezza complessiva massima con l utilizzo...

Page 26: ...si n 3 Tap n para vaciar el agua con densada 4 V lvula de seguridad 5 Conexi n de aire comprimido para aire exento de aceite acople r pido 6 Regulador de presi n 7 Man metro presi n de reci piente 8 I...

Page 27: ...gura y de poder mantener en cual quier momento el equilibrio No utilizar estos aparatos en la cercan a de l quidos inflamables o gases Mantener a los ni os alejados de la zona de trabajo No permitir q...

Page 28: ...ra y controladas de acuerdo a las prescripciones El valor del fusible debe corres ponder al indicado en las especi ficaciones t cnicas Coloque el cable de alimentaci n de forma que no impida el trabaj...

Page 29: ...e extensi n con una secci n trans versal suficiente v ase Especi ficaciones t cnicas Evitar el uso de un cable de extensi n si el equipo est fr o El compresor fue desconectado mientras estaba en march...

Page 30: ...min 1 2850 Potencia del motor kW 1 1 Tensi n de conexi n 50 Hz V 230 intensidad nominal A 6 2 Fusible m nimo A 10 de reacci n lenta Clase de protecci n IP 20 Longitud m xima total utilizando cables de...

Page 31: ...Tanque de press o 3 Buj o de drenagem para gua condensada 4 V lvula de seguran a 5 Conex o de ar comprimido acoplamento r pido 6 Regulador de press o 7 Man metro press o do tambor 8 Interruptor liga...

Page 32: ...os p s e assegure sempre o seu equil brio Nunca operar esta m quina na vizi nhan a de gases ou l quidos inflam veis Mantenha crian as completamente fora da zona de perigo N o deixar outras pessoas toc...

Page 33: ...ca que cumprir os seguintes requisitos Caixa da tomada instalada ater rada e testada de acordo com os regulamentos Protec o por fus veis de acordo com os Dados T cnicos Dispor o cabo el ctrico de tal...

Page 34: ...n sumo de corrente evitar o uso de cabos de extens o Compressor foi desligado retirando a ficha da tomada durante o funcio namento Primeiro desligar o compressor pelo Interruptor liga desliga depois l...

Page 35: ...ntidade de cilindros 1 Rota o rpm 2850 Pot ncia do motor kW 1 1 Tens o da conex o 50 Hz V 230 corrente nominal A 6 2 Protec o por fus veis min A 10 inerte Norma de protec o IP 20 Comprimento m ximo ao...

Page 36: ...6 8 9 4 7 1 Kompressor 2 Trykbeholder 3 Aftapningsskrue til kondens vand 4 Overtryksventil 5 Trykluft tilslutning lynkobling 6 Trykregulator 7 Manometer kedeltryk 8 Start stop kontakt 9 Luftfilterhus...

Page 37: ...un anvendes inden for det effektomr de der er angivet under de tekniske data B Der er fare pga elektricitet El v rkt jet m ikke uds ttes for regn Maskinen m ikke anvendes i fugtige eller v de omgivels...

Page 38: ...atoren 15 indstilles A NB Det indstillede regulatortryk m ikke v re h jere end det maksi male arbejdstryk for det tilsluttede trykluftsv rkt j 3 Trykluftslangen p trykluft tilslutnin gen 16 tilsluttes...

Page 39: ...toren bn mere for trykregulatoren Slangeforbindelsen mellem kom pressor og trykluftsv rkt j er ut t Kontroller slangeforbindelsen udskift om n dvendigt den beskadige del A Fare Reparationer p elv rkt...

Page 40: ...ikk 1 2 3 5 6 8 9 4 7 1 Kompressor 2 Lufttank 3 Tappeskrue for kondensvann 4 Sikkerhetsventil 5 Trykkluftkobling hurtigkobling 6 Trykkregulator 7 Manometer p lufttanken 8 P Av bryter 9 Luftfilterhus X...

Page 41: ...r det som er angitt i de tekniske data B Fare fra elektrisk str m Ikke utsett kompressoren for regn Ikke bruk kompressoren i fuktige eller v te omgivelser Unng ber ring av jordede deler f eks varmeele...

Page 42: ...mpressoren hvis du ikke skal fortsette arbeidet umiddelbart og dra ut kontakten A Fare Alltid f r arbeid skal utf res p kompressoren Sl av kompressoren Ta ut st pselet Vent til kompressoren st r still...

Page 43: ...oblingen og bytt om n dvendig A Fare Reparasjoner av elektroverk t y m kun utf res av elektrofagfolk Elektroverkt y som m repareres kan sendes til serviceavdelingen i Norge Adressen finner du p deleli...

Page 44: ...5 6 8 9 4 7 1 Kompressor 2 Tryckk rl 3 Avtappningsskruv f r kondens vatten 4 S kerhetsventil 5 Tryckluftsanslutning snabbkoppling 6 Tryckregulator 7 Manometer f r matartryck 8 Str mbrytare 9 Luftfilte...

Page 45: ...Fara f r elektricitet Undvik att uts tta elmaskinen f r regn Anv nd den inte heller p fuktiga eller v ta arbetsplatser Undvik att komma i ber ring med jor dade delar t ex v rmeelement r r spi sar kyls...

Page 46: ...arbetstrycket f r det anslutna tryck luftsverktyget 3 Anslut tryckluftsslangen till tryck luftsanslutningen 16 4 Anslut tryckluftsverktyget Nu kan du b rja arbeta med tryck luftsverktyget 5 St ng all...

Page 47: ...ligt ppna tryckregulatorn mer Slangkopplingen mellan kompressor och tryckluftsverktyg r inte t t Kontrollera slangkopplingen byt ev trasiga delar A Fara Reparationer p elververktyg f r endast utf ras...

Page 48: ...5 6 8 9 4 7 1 Kompressori 2 Paines ili 3 Kondenssiveden poistoruuvi 4 Turvaventtiili 5 Paineilmaliit nt pikaliitin 6 Paineens din 7 S ili paineen manometri 8 P LLE POIS kytkin 9 Ilmansuodattimen kotel...

Page 49: ...sa v lt kehon kosketuksia maa doitettujen osien esim l mp patterit putket hellat j kaapit kanssa l k yt verkkokaapelia sellaisiin tar koituksiin mihin sit ei ole tarkoitettu A Ulos virtaavasta paineil...

Page 50: ...ty kalun maksimaalinen k ytt paine 3 Liit paineilmaletku paineilmaliit n t n 16 4 Liit paineilmaty kalu Nyt ty skentely paineilmaty kalun kanssa voidaan aloittaa 5 Kytke laite pois p lt jos ty sken te...

Page 51: ...tar peeksi avaa paineens dint enemm n Kompressorin ja paineilmaty kalun v linen paineilmaletku vuotaa tarkasta letkuliittimet vaihda vau rioituneet osat tarvittaessa A Vaara S hk ty kalujen korjaukse...

Page 52: ...7 1 l gs r t 2 pr sleveg s tart ly 3 kondenzv z leereszt csavarja 4 biztons gi szelep 5 pr sleveg s csatlakoz csonk gyorscsatlakoz 6 nyom sszab lyoz 7 tart lynyom s nyom sm r je 8 be ki kapcsol 9 l gs...

Page 53: ...Gondoskodjon a megfelel vil g t sr l Ker lje a nem term szetes testhelyzetet Mindig biztosan lljon a talajon hogy ne vesz thesse el az egyens ly t Ne dolgozzon az elektromos szersz m mal gy l kony fol...

Page 54: ...kat l sd a M szaki adatok n l A h l zati t pvezet ket gy kell lefek tetni hogy az ne zavarja a munk t s ne s r lhessen meg Mindig ellen rizze hogy ki van e kap csolva a g p miel tt bedugn a h l zati...

Page 55: ...tos t t Nem el g a h l zati fesz lts g Megfelel rkeresztmetszet hosszabb t t haszn ljon l sd M szaki adatok Ne haszn l jon hosszabb t t amig a k sz l k hideg zem k zben a h l zati dugasz csatlakoz n l...

Page 56: ...1 Fordulatsz m ford perc 2850 Motorteljes t ny kW 1 1 H l zati fesz lts g 50 Hz V 230 N vleges ram a 6 2 Biztos t min a 10 inerci s V detts gi oszt ly IP 20 Hosszabb t eset n a teljes vezet k legnagy...

Page 57: ...iowy 3 ruba spustowa dla wody kon densacyjnej 4 Zaw r bezpiecze stwa 5 Przy cznik powietrza spr onego sprz g o szybkodzia aj ce 6 Regulator ci nienia 7 Manometr ci nienia w zbiorniku 8 Przycisk w czni...

Page 58: ...zymywa porz dek w miejscu pracy nieporz dek w miejscu pracy mo e poci gn za sob przykre konsekwencje Prosz by uwa nym Prosz uwa a na to co Pa stwo robicie Prosz z rozs dkiem przyst powa do pracy Prosz...

Page 59: ...zywa si gdy przekroczone zostaje maksy malne dopuszczalne ci nienie 4 1 Przed pierwszym urucho mieniem Monta k ek 1 K ka nale y zamontowa zgodnie z rysunkiem 2 Tak na o y ko paki na k ka by zaciski ko...

Page 60: ...e w lub na urz dze niu nie znajduj si adne narz d zia czy temu podobne Kompresor nie dzia a Brak napi cia w sieci Sprawdzi kabel wtyczk gniazdo wtykowe i bezpieczniki Zbyt niskie napi cie sieciowe Nal...

Page 61: ...ylindr w 1 Pr dko obrotowa min 1 2850 Moc silnika kW 1 1 Napi cie przy czeniowe 50 Hz V 230 Pr d znamionowy A 6 2 Bezpiecznik sieciowy min A 10 zw oczny Rodzaj ochrony IP 20 Maksymalna ca kowita d ugo...

Page 62: ...62 1 1 2 3 5 6 8 9 4 7 1 2 3 4 5 6 7 8 9 XK0005G2 fm...

Page 63: ...63 1 62 2 63 3 63 3 1 63 3 2 63 3 3 64 4 64 4 1 64 4 2 64 4 3 64 5 65 5 1 65 5 2 65 6 65 7 65 8 66 9 66 3 1 3 2 A B A A 2 3...

Page 64: ...64 A A A A A A 3 3 10 4 1 1 2 11 12 4 2 B 4 3 1 13 14 2 15 4 10 11 12 15 14 13 16...

Page 65: ...65 A 3 16 4 5 A 5 1 50 17 18 250 5 2 1 2 3 A A 5 6 17 18...

Page 66: ...vice 100 7 8 9 l min 220 l min 105 l min 110 bar 8 A l 24 F 205 1 min 1 2850 kW 1 1 50 Hz V 230 A 6 2 A 10 IP 20 3 x 1 0 mm2 3 x 1 5 mm2 3 x 2 5 mm2 m m m 10 25 50 x x mm 615 x 325 x 630 kg 21 5 1 m d...

Reviews: