background image

29 


About Lyrics and Audio 

Synchronizing Software  

7. In the

 Text 

box, type or paste the lyrics that you 

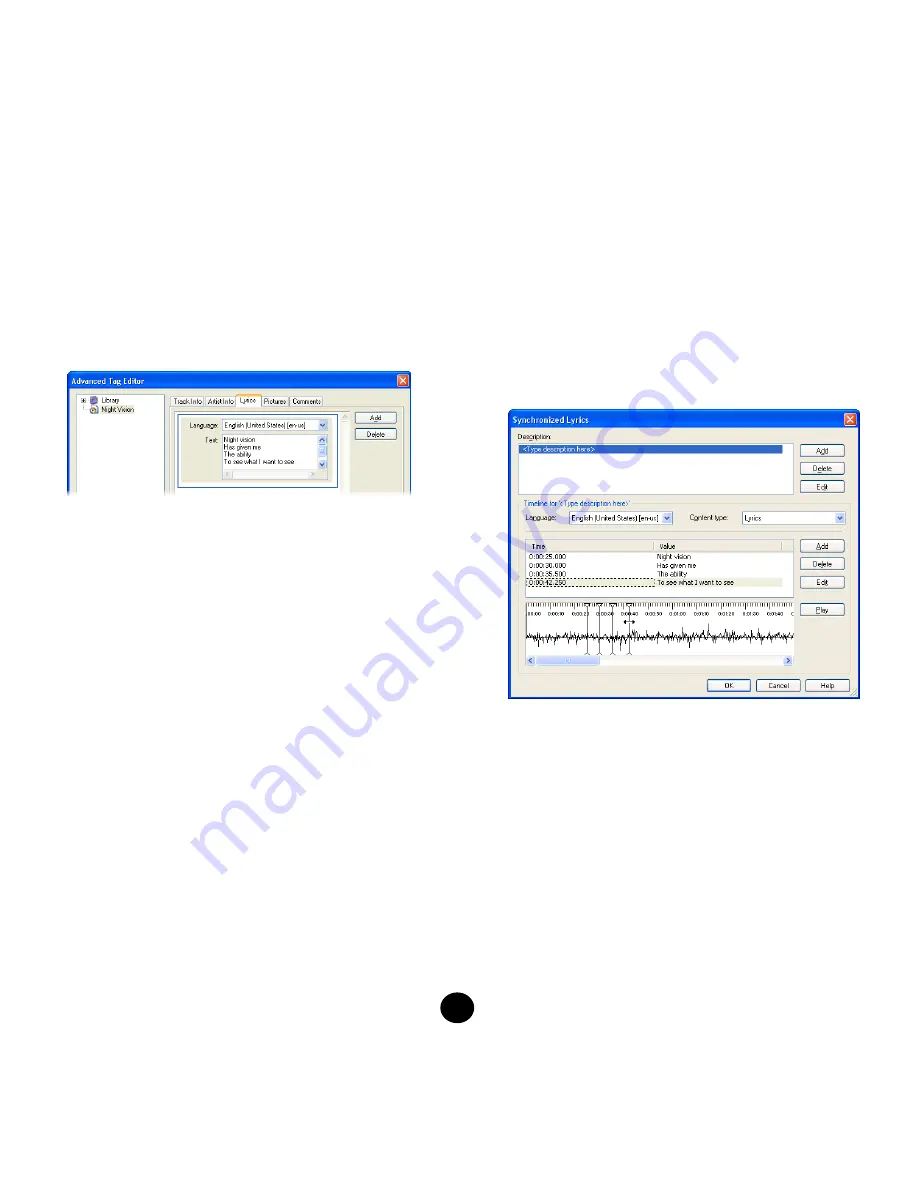
copied, as shown in the following screen shot. If you 
want to create a set of synchronized lyrics from your 
static lyrics, make sure that each line of verse is on its 
own line. 


To add synchronized lyrics


1. Complete the procedure for adding static lyrics earlier 

in this article, but do not close the 

Advanced Tag 

Editor

 dialog box. 

2. Click 

Synchronized Lyrics

, and then wait for the 

Player to load the static lyrics data into the timeline 
area. Note that each line of lyrics is assigned a 
successive but arbitrary time on the timeline. The time 
values (in minutes) that the Player assigns to your 
lyrics determine when the lyrics appear in the 

Now 

Playing

 feature as the song is played, and will 

probably not match when you hear the vocals unless 
you adjust them. See step 5. 

3. (Optional) To add a description of the lyrics, click 

<Type description here>

, and then type your 

description. The description does not show when the 
song is played. 

4. (Optional) Select a Language and a Content type. 

5. To test how closely an assigned time value for the 

appearance of a line of lyrics matches when you hear 
it, click the line of verse under either the Time or 
Value columns, and then click Play. The song plays 
starting at the time value in the timeline, and a red bar 
shows the song's progress. Click and drag the blinking 
vertical bar forward or backward to match when you 
hear the corresponding line, as in the following screen 
shot. Note that your pointer becomes a double-
headed arrow when you place it over the blinking 
vertical bar.


6. Click 

Play

 again to test the new time value. Repeat 

this until the line of verse appears when you hear the 
matching vocals. 

7. When you are satisfied with the lyrics, click 

OK 

to 

close the 

Synchronized Lyrics

 dialog box. 

8. On the Lyrics tab of the Advanced Tag Editor dialog 

box, if you only want the synchronized lyrics to be 
visible, and not the static lyrics, click 

Delete

9. Click 

OK

 to close Advanced Tag Editor. 

10.  Before copying to MP3 player, please playback the 

synchronized lyrics in Windows Media player 10 to 
confirm the compilation completed.


Summary of Contents for iJive

Page 1: ......

Page 2: ...yer 8 Turning the player on and off 9 Main menu 9 Music Playback 10 Music submenu EQ and Play mode 11 Music submenu Playlist Navigation 12 Voice Mode 13 FM Tuner 14 FM Radio submenu 15 FM Recording 16...

Page 3: ...oid damaging the internal electrical circuits or receiving electric shocks z Be extremely cautious while using headphone earphones because if they hook things accidentally it could cause strangling z...

Page 4: ...ed music by means of information network without the author s permission the infringer will violate the right of communication to the public and the right of distribution and shall be subject to the c...

Page 5: ...ndows are trademarks of Microsoft Corporation Trademarks of other products mentioned in this user s manual are owned by their respective companies or organizations About Website z URL http www mercury...

Page 6: ...uto Keylock Keylock function with timer to prevent inadvertent pressing of buttons z Firmware update function Users can obtain the latest firmware from the download center on the website and update th...

Page 7: ...5 Appearance Front view Back view Play Pause Volume up Volume down Next Previous USB cap USB port inside Earphone Jack Microphone LCD screen Strap holder Reset button...

Page 8: ...lay button Play Pause Programmed FM channel switch 2 Volume down Reduce volume 3 Volume up Increase volume 4 Previous Select l previous track channel file item 5 Next Select next track channel file it...

Page 9: ...Removable Disk in My Computer You can enter this device to access the data in the player After connecting successfully the LCD screen on the player displays READY 4 You can also access the player fro...

Page 10: ...nutes When keylock is locked the functions of all the buttons on the front side of the player are locked and ineffective while the keylock status on the screen flashes To release the keylock press and...

Page 11: ...nsert the tip of a pin or pointed object into the hardware RESET button on the back of the player to reset it Press the Play button to turn the player on Main menu Press and hold the Play button to en...

Page 12: ...s not in Music Playback mode just press and hold the Play button to enter the Main menu then select Music Playback to start playing automatically 2 Play Pause Starts playing music once it enters the M...

Page 13: ...ous button once to select the previous track Press the Play button once to confirm selection The player automatically returns to Music Playback if no button is pressed for 20 seconds LCD display descr...

Page 14: ...e the highlight bar up or down When the highlight bar has moved to the topmost part of the list moving up further will cause the bar to remain on the topmost directory When the highlight bar has moved...

Page 15: ...ck mode the next time you turn it on To return the player to Repeat All just select the Music play list function and select the topmost root directory a and press the Play button once to change the Mu...

Page 16: ...ld the Play button until the release keylock motion ends Operation procedure 1 Select FM Radio Press and hold the Play button to enter the Main menu Press the Previous or Next button to select FM Radi...

Page 17: ...player automatically returns to FM Radio if no button is pressed for 20 seconds LCD display description FM Radio submenu options FM Recording Recording format FM frequency bands FM tuner sensitivity F...

Page 18: ...example the frequency step in Taiwan is 0 1 MHz while US has a frequency step of 0 2 MHz and Japan has a frequency step of 0 05 MHz Example Under Taiwan s 87 60 MHz frequency if you wish to search the...

Page 19: ...uring recording the display will show Low Battery to warn the user the battery is low Recording will be stopped and the voice file will be automatically saved No further recording is possible unless t...

Page 20: ...cording the display will show Device Full if the flash memory is full The recording will be stopped and the recorded file will be automatically saved No further recording is possible During recording...

Page 21: ...irm deletion To cancel delete let it idle for 5 seconds or press and hold the Play button to return to the Main menu 4 The display will show Delete Done if the file is already deleted Setting Setting...

Page 22: ...guage Then press the Play button to confirm the selection The logo for each language option shown on the display is an abbreviation Rec type When selecting the sampling rate for recording a higher sam...

Page 23: ...Off Keylock and Display Off then press the button to confirm SEC Means second MIN means minute HR means hour Stop Off To set the allowable idle time including pause playback stop playback before the...

Page 24: ...button to open the screen again The default value is 30 seconds Reset to default value Reset all the settings to the default values including all the settings under the Setting mode and clears all pr...

Page 25: ...orm the software installation procedure see page 24 System requirements Pentium 133MHz or faster CPU CD ROM drive USB port Windows 98 SE ME 2000 XP operating system 10 MB available memory space 1 This...

Page 26: ...nstallation procedure 1 Click on Install or Software installation to install the drivers and the latest firmware upgrade program 2 Click on Next 3 Read the License Agreement carefully and if you agree...

Page 27: ...hrough firmware update and expand support for other music formats and languages 3 Please download the latest version of the upgrade firmware from our website and select the right version for your prod...

Page 28: ...click on OK to start the uninstallation procedure 2 Click on Finish to complete uninstalling the software 3 Run autorun exe in this directory again and click on Install Follow the procedure in page 2...

Page 29: ...firmware upgrade Caution Selecting the Format Data Area option will delete all data and files including music files and personal settings on the player and reset the player to the default settings Thi...

Page 30: ...hardware removal see page 9 to disconnect the player from the PC and then restart the player About Lyrics and Audio Synchronizing Software Supporting ID3V2 Lyrics3 V2 0 or LRC ASF standard format for...

Page 31: ...escription does not show when the song is played 4 Optional Select a Language and a Content type 5 To test how closely an assigned time value for the appearance of a line of lyrics matches when you he...

Page 32: ...d other electronic devices zAdjust the location and angle of the earphone cord and the player because the earphone cord has a built in FM antenna zTune FM sensitivity to high P 19 No response while pr...

Page 33: ...ed Digital volume control 32 levels ID3 tag Supported Item Specification Sampling rate 48KHz 44KHz 32KHz 22KHz 16KHz 11KHz 8KHz Playback mode Normal Repeat One Repeat All Random Random and Repeat All...

Page 34: ......

Reviews: