


P 6
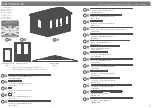
Please retain product label and instructions for future reference
8
23
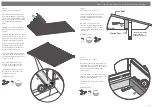
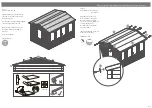
Step 9
Parts Needed - No. 3 QTY 2
Place the gable tops (No. 3)
onto the assembly. Fix into
position by screwing through
the notches as shown in the
illustration.
*Ensure that the boards are
level and flush with each
other as you lay each one.
4x70mm Screws
Pre drill
hole
70mm
screw
10
8
11
6
7
7
6
11
3
3
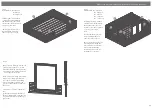
Step 7
Parts Needed - No. 6 QTY 12
No. 7 QTY 12
No. 8 QTY 6
No. 10 QTY 6
No. 11 QTY 12
Following the same method
outlined in
Pre-Assembly
, lay
the remaining boards (No’s. 6, 7,
8, 10 & 11) onto the assembly
to bring the board level to the
top of the window and door
frames.
*Ensure that the boards are
level and flush with each
other as you lay each one.
*Doors can be hung once the
boarding has enclosed the door
frame.
Step 8
Parts Needed - No. 8 QTY 1
No. 10 QTY 1
No. 22 QTY 1
No. 23 QTY 1
Following the same method
outlined in
Pre-Assembly
, lay
the last two boards (No’s. 10
& 22) onto the window and
plain side.
Once in position place log
boards (No’s. 8 & 23) onto
the front and rear of the
assembly.
*Ensure that the boards are
level and flush with each
other as you lay each one.
10
22
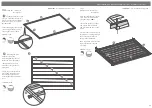
Step 6
Once you have laid the second
level of boards onto the assembly
slide the window(
s
) (No. 1)
between the smaller boards and
rest on to the longer board.
*Ensure the boards are level with
each end.
*Please note:
This image is for
illustrative purposes and may
differ from your choice in product
(
regarding window position
).
Nevertheless the process of fitting
the window is the same.


