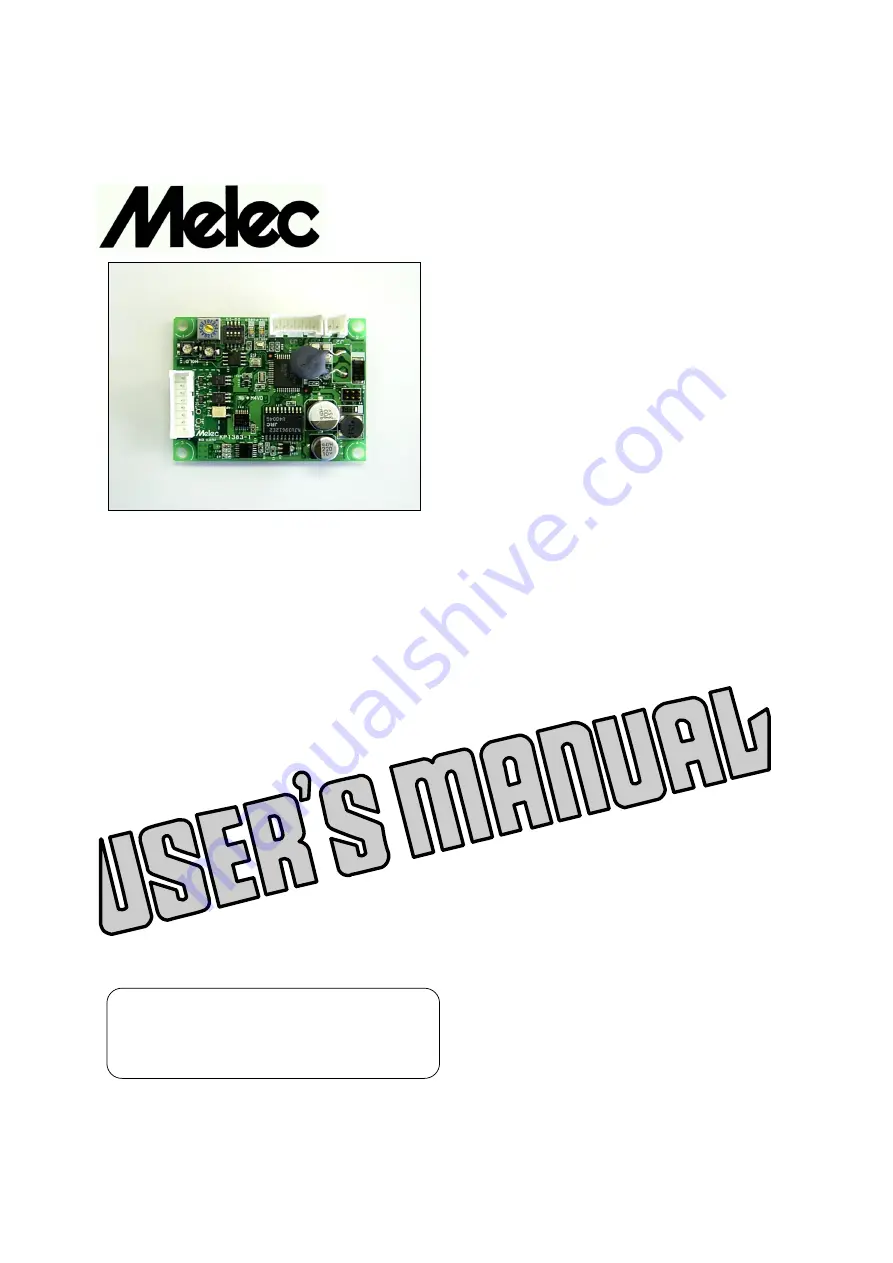
background image


-phase Stepping Motor Driver

DB-2310/B32

Instructions Manual

(For designers' use)

MN0060

Please ensure to read and understand this
Instructions Manual before using the product.
Please keep this Instructions Manual at hand
so that it is always available for reference.

Summary of Contents for DB-2310/B32

Page 1: ...B 2310 B32 Instructions Manual For designers use MN0060 Please ensure to read and understand this Instructions Manual before using the product Please keep this Instructions Manual at hand so that it is always available for reference ...

Page 2: ...river DB 2310 B32 with emphasis on the specifications assuming that our readers are engaged in designing of control devices incorporating stepping motors Please ensure to read and understand this Instructions Manual before using the product Please keep this Instructions Manual at hand so that it is always available for reference 2 ...

Page 3: ... circumstances in advance Consequently this instructions manual describes all the hazardous and dangerous circumstances and situations which can be foreseen and anticipated as well as necessary precautions All the above descriptions are being titled by the following symbol marks and signal words namely Represents warnings ignorance of which can cause accidents involving fatal or serious physical i...

Page 4: ...ng 10 Characteristics 10 Product Configuration 10 Appearance Signal Input Connector J1 DC Input Motor Output Connector J2 J3 POWER LED Operating Section Setting HOLD CURRENT ADJUSTMENT trimmer Setting DRIVE CURRENT SELECT switch 11 11 12 13 14 15 16 O H A LED 12 1 1 1 2 2 1 2 2 2 3 3 1 3 3 3 2 3 4 3 5 4 1 4 2 4 3 Conditions for Installation Mounting Method Overview of Connection Configuration Conn...

Page 5: ... 33 10 3 Maintenance and Check up Troubleshooting Storing Disposal 26 27 28 28 8 1 8 2 9 1 9 2 I O Signal General Specifications Drive pulse input Example Circuit Connection Motor excitation stop input Dimensions Applicable Motors Torque Characteristics CW CCW M F 29 34 35 36 31 32 30 10 2 10 1 10 4 10 5 10 6 3 2 1 5 ...

Page 6: ...ctions when the power is on Doing so may cause electric shock 4 This product is for a devices inclusion Please establish it into enclosure without fail 5 Please do not touch the driver during after operation for a while may cause burn on the skin due to overheating of the driver 6 Ensure to use this product according to the method specified in the Instructions Manual and within the specifications ...

Page 7: ...motor Ensure correct setting When setting up the STEP ANGLE SELECT switch Erroneous setting may cause breakage of the machine or injury due to unexpected rotation of the motor Ensure correct setting When setting up the HOLD CURRENT ADJUSTMENT trimmer A high setting value may cause burn on the skin due to overheating of the motor Do not select a high value beyond the required When setting up the DR...

Page 8: ... pulled or pinched Doing so may cause fire Erroneous connection may result in breakage of the motor Correctly connect the motor wiring When inputting power Breakage of the machine or injury is apprehended due to unexpected behavior of the motor Maintain the state where emergency stop is enabled at any time When performing maintenance and checking Do not replace fuse Do not disassemble repair or mo...

Page 9: ...n stop M F signal Deterioration of the holding power with the motor may cause breakage of the machine or injury Check safety before inputting When the overheat alarm O H A LED comes on Stop operation when this LED comes on Overheating may cause fire I I 9 ...

Page 10: ...om 0 4A phase 0 8A phase Four step angles can be selected from angles ranging from a 1 2 1 8 1 16 and 1 32 division of the basic angle HOLD CURRENT and DRIVE CURRENT can be set up 2 2 Product Configuration The product consists of the main frame and the accessories DB 2310 B32 One unit Housing for J1 51103 0800 Molex One unit accessory Housing for J2 51103 0200 Molex One unit accessory Housing for ...

Page 11: ...or 3 2 DC Input Motor Output Connector J2 J3 DB 2310 B32 J3 Outputs current to drive the motor Power input terminal DC power supply is connected M F 7 N C 8 N C 6 5 4 3 M F CCW CW 2 CW CCW 1 N C 6 N C 5 B 4 MOTOR B 3 A 2 A 1 DC 24V DC 1 J2 0V DC 2 CW drive pulse signal input terminal CCW drive pulse signal input terminal Motor excitation stop signal input terminal Motor output terminal DC input te...

Page 12: ...Instructions Manual 3 3 POWER LED POWER LED GREEN comes on upon inputting power 3 4 O H A LED O H A LED RED comes on when internal temperature of the driver has reached approx 65 or more 12 ...

Page 13: ...me is selected DH1 150ms 2P Selects a pulse input type SB ON STEP ANGLE SELECT switch Selects a step angle SA OFF 1 32 division Name of Operation Section Function Factory Setting PULSE INPUT TYPE SELECT switch HOLD CURRENT ADJUSTMENT trimmer Adjusts HOLD CURRENT Approx 40 DRIVE CURRENT SELECT switch Selects DRIVE CURRENT No D 13 ...

Page 14: ...EL switch The step angle can be selected from four different types of step angles Set this switch power OFF The switches are factory set to 1 32 divisions 1 Turn power OFF 2 Set the STEP SEL switch SA SB to the step angle required Relationship between the STEP SEL switch and the step angle Factory setting STEP SEL switch Number of Divisions Step angle SB SA 1 8 motor ON ON 1 2 0 9 ON OFF 1 8 0 225...

Page 15: ...ge of the trimmer to the required value Relationship between the trimmer scales and HOLD CURRENT HOLD CURRENT DRIVE CURRENT Ratio of HOLD CURRENT typical Trimmer HOLD CURRENT changes relative to DRIVE CURRENT setting The ratio of HOLD CURRENT of 100 represents the same as the setting for DRIVE CURRENT The greater the ratio of HOLD CURRENT grows the more heat the motor generates when is on holding ...

Page 16: ...p with the DRIVE I SEL switch The switch is factory set to No D 1 Set the DRIVE I SEL switch No to the setting specified in the table 10 5 Applicable Motors Relationship between the DRIVE I SEL switch and DRIVE CURRENT Factory setting 1 2 switch No 0 5 6 0 20 3 4 7 8 0 22 0 24 9 A 0 27 0 29 B C 0 31 0 33 D E 0 35 0 38 0 40 F DRIVE CURRENT A phase 0 07 0 09 0 11 0 13 0 16 0 18 I 16 ...

Page 17: ... inputs of CW and CCW switch the SPI SEL to OFF 2P When the motor is operated with the pulse signal and direction signal input switch SPI SEL to ON 1P In the case that 1 pulse input method is selected the CCW terminal becomes direction signal input designating the direction of the motor rotation Drive pulse set to the CW terminal CW CW The input timing is same with 2 pulse input method and 1 pulse...

Page 18: ...OLD CURRENT automatic switching time is set up with the HOLD SWITCHING TIME SELECT switch Set this switch with power OFF The switch is factory set to DH1 150ms 1 Turn power OFF 2 Set the DHT SEL DH1 DH2 Factory setting OFF 150ms DH1 DHT SEL Hold Switching Time ON 15ms DH2 18 ...

Page 19: ...Area not subject to direct vibration or shock Area not subject to splashing water oil or chemicals 2 Install the driver at least 15mm away from other equipment 3 Considering heat release control the ambient temperature around the driver within the specified value Take measures against accumulation of heat such as allowing generous space around the driver or installing a fan so that heat release is...

Page 20: ...n the main body are used The following items are required 1 Fix the product at the four round holes on the main body Mounting example 4 M 3 screw 12mm or more in length 4 4 M 3 spring washer Spacer 6mm or more in length of thing that consists of insulator 20 ...

Page 21: ... input signal line Provide shielding for the signal line where considerable noise is generated Use the wire material of the characteristic that is difficult to burn Provide shielding for the motor line if it generates significant noise Use the DC power supply that was reinforced insulation between primary side and secondary side Example configuration The metallic enclosure and shielded wires work ...

Page 22: ...3 Connect the housings to the connectors on the main frame The contacts for J1 are 6 pieces When inserting keep pushing J1 housing into the connectors until it is locked Also check if the contacts are not displaced from the housing In wiring isolate the J1 signal lines from equipment that may be a source of noise the power line and the motor line Surface on which the contacts are inserted Housing ...

Page 23: ...essories Manually operated crimping tool One unit for AWG28 22 57295 5000 Molex 1 Crimp the contact to the cable used for wiring 2 Insert the contact into the housing Make sure that the housing No and the connector No on the main frame are matched before inserting the contacts 3 Connect the housings to the connectors on the main frame The contacts for J2 for DC input are 2 pieces and for J3 motor ...

Page 24: ...ORIENTAL MOTOR CO LTD Do not use the A and B COM leads of the motor of unipolar winding and insulate them separately 6 4 Inputting Power Breakage of the machine or injury is apprehended due to unexpected behavior of the motor Maintain the state where emergency stop is enabled at any time 1 Input the DC power supply in the cable that connected to No 1 and No 2 terminals of J2 A 1 1 B B 4 4 Motor A ...

Page 25: ...d the motor wiring are correctly performed Switch No Setting of STEP ANGLE SELECT switch Setting of HOLD CURRENT ADJUSTMENT trimmer Setting of DRIVE CURRENT SELECT switch SA SB Trimmer Scale Check STEP SEL Remarks Check Points Connection of J3 Connection of J2 Connection of J1 DC DC MOTOR Setting of MOTOR SELECT switch Setting of HOLD SWITCHING TIME SELECT switch DHT SEL MOTOR SEL 10L 5L DH1 DH2 2...

Page 26: ...y cause injury or fire 1 As for a maintenance inspection the engineer of the specialty shall do it 2 We recommend that the following check ups should be performed periodically Checking for any loosened contact on the connectors Checking for any flaw and crack on the cabling 3 In case of failure return the driver to us and have it repaired I 26 ...

Page 27: ...ications Voltage and wave form of the DRIVE CURRENT is too low pulse signal Setting of the DRIVE CURRENT Wrong setting for the step SELECT switch angle Setting of the STEP ANGLE Driver failure SELECT switch Motor failure 4 The motor steps out Starting pulse speed Starting pulse signal speed during acceleration Acceleration time is too high Acceleration time is too short 5 The motor generates Setti...

Page 28: ...direct sunshine Area that ambient temperature and humidity are controlled within the range set out in the specifications Area protected from dust salt or iron particles Area not subject to direct vibration or shock Area not subject to splashing water oil or chemicals 2 Do not allow standing or placing anything heavy on the product 9 2 Disposal 1 Dispose of the product as industrial waste 28 ...

Page 29: ...CURRENT selection DRIVE I SEL Indoor Exposure to direct sun is not allowed Without any explosive corrosive or inflammable gas oil mist or dust 1 Input voltage range is DC 24V 10 2 Use a power supply that provides sufficient input current Supply Power Driving method Motor output current Bipolar constant current type Input Signal Overheat alarm LED O H A LED Operating Ambient Temperature 0 40 No fre...

Page 30: ...Instructions Manual 10 2 I O Signal 1 Example Circuit Connection 30 ...

Page 31: ...n at the rising edge t4 greatly varies according to the inertial moment including that of the motor Automatic switching for DRIVE HOLD DRIVE HOLD HOLD t1 t1 15ms HOLD SWITCHING TIME SELECT switch ON DH2 t1 150ms HOLD SWITCHING TIME SELECT switch OFF DH1 Inputting drive pulse causes the current output to the motor to change from HOLD CURRENT to DRIVE CURRENT which returns to HOLD CURRENT in about t...

Page 32: ...urrent is shut off with the photo coupler ON At this time motor torque changes to detent torque When this signal is input motor torque may be lost resulting in failure to retain the load transported In particular this risk is high with the vertical drive such as the Z axis Timing chart M F t1 t2 t1 300ms t1 Time required for the motor to be enabled t2 5ms t2 Time required for the motor output curr...

Page 33: ...eaches approx 65 or more O H A LED comes on At this time the motor output current is not blocked When this LED comes on stop operation and check if there is any abnormality occurring with the motor and the driver Provide mechanical cooling for example if this LED comes on while no abnormality is detected Continuous operation is possible unless this LED comes on I 33 ...

Page 34: ...Instructions Manual 10 4 Dimensions Unit mm 44 50 3 3 34 ...

Page 35: ...nipolar winding ranging from 0 4A phase 0 8A phase 6 leads Both axes Torque Data Fig No Applicable Motors Basic Angle DRIVE I SEL Current A phase TS3692N41 51 1 8 D Fig 1 TS3692N42 52 Fig 2 Applicable Motors Basic Angle DRIVE I SEL Torque Data Fig No D Fig 4 PK244 02A B 1 8 F Fig 3 PK245 02A B D TAMAGAWA SEIKI CO LTD Oriental Motor Co Ltd Current A phase 0 35 Factory Setting 0 8 Factory Setting 35...

Page 36: ... the setting of 1 8 0 225 division Maximum value 20s 1 At the setting of 1 16 0 1125 division Maximum value 10s 1 At the setting of 1 32 0 05625 division Maximum value 5s 1 2 The Maximum Starting Pulse Rate is represented as fs by the value at zero inertial load 3 Upon operation provide adequate allowance for torque 4 The stepping motor may attain high temperature depending on the operational cond...

Page 37: ...Instructions Manual 37 ...

Page 38: ...and Service TEL 042 664 5384 FAX 042 666 2031 URL http www melec inc com Melec Inc Control equipment marketing department 516 10 Higashiasakawa cho Hachioji shi Tokyo 193 0834 Japan This Operating Manual is subject to change without prior notice for the purpose of product improvement Cロロロロ ...

Reviews: