BUILDING THE VERTICAL
1.
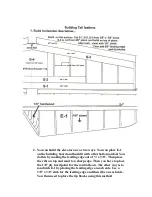
Build over the plans on a flat surface. Take F-1 and apply the ½” x
¾” leading and the ¾” SQ front post.
2.
Now slide the horizontal in place. Making sure that everything is
squared up and on the centerline then glue in place.
3.
It may be easier to sand the leading edges of the vertical and
horizontal to shape prior to gluing them together.
4.
The rudder is built with R-1 sandwiched between R-4 (3/4” x 3/8”
leading edges.) The ribs are placed on each side and R-3 on each
side. After all built up apply R-5 to the front of the rudder. Sand
ribs and R-3 to a sharp edge.
INSTALLING THE TAIL TO THE FUSE
1.
The fuse should be glassed, tail wheel installed with your pull-pull
already finished for steering. All your control lines should be
installed for the rudder and elevators. The tail should be glassed.
2.
You will have to take a Dremel or knife and sand/cut the very rear
of the triangular stock on B-1 square to accept the ¾” sq.
tail/rudder post. Now trial fit your tail assembly. You will need to
mount the wing on the fuse and check alignment. Make any
adjustments that you need to so the tail is straight.
3.
Once you are totally satisfied with the fit, take epoxy and glue in
place. If you are good, you may use 5 min, If you like taking your
time then use 12-30 min cure time.
4.
Now with micro-filler type blend the tail assembly onto the fuse.


