background image

C

ONNECT

 STC

S


TO

 A

MPS

/M

OTOR

/E

NCODER

4-4

P

C

X

S

T

D

1

0

4

X

C

P

C

&

 V

6

U

C

o

n

n

ec

ti

o

n

to

 S

te

p

 M

o

to

rs

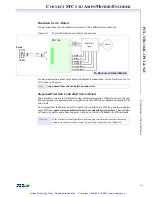
Connections to Step Motors

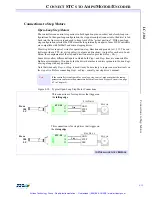
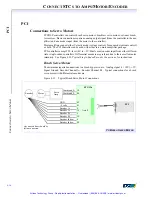
Open-Loop Step Motors

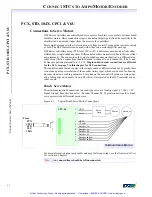
The DSP controllers can control step motors in both open-loop (no encoder) and closed-loop 
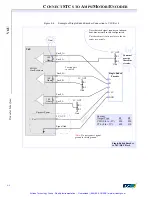
configurations. In the open-loop configuration the step pulse output (connected to the drive) is 
fed back into the line receivers and used to keep track of the “actual position.” With open-loop 
step configuration selected, the DSP closes the loop internally on a pair of axes. DSP control-
lers are compatible with full, half and micro stepping drives.

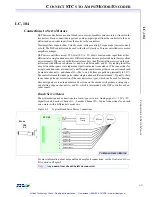
Figure 4-3

Typical Open-Loop Step Motor Connections (PCX/CPCI/STD/V6U/104X)

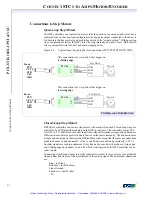
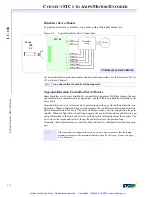
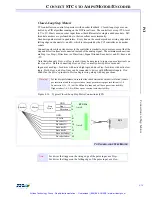
Closed-Loop Step Motors  

DSP Series controllers can control step motors with encoder feedback. Closed-loop steps are 
controlled by a PID algorithm running on the DSP in real time. The controllers accept TTL-
level (0V to 5V, 40mA max) encoder input from either differential or single-ended encoders. 
Differential encoders are preferred due to their excellent noise immunity. The connections for 
a single-ended encoder is identical to a differential encoder except that there are no connections 
made to channel A- and channel B-. (The A- and B- lines are pulled up internally to 2.5V).

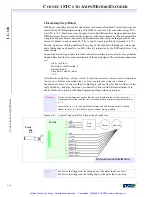
Encoder signals are read in quadrature. Every line on the encoder will produce a rising edge 
and a falling edge on channels A+ and B+ which is interpreted by the DSP controller as 4 en-
coder counts.

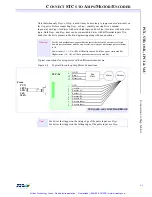
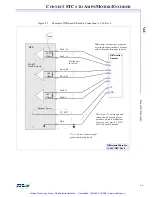
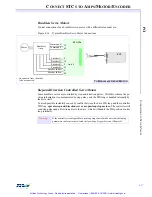
Connecting closed-loop step motors to the controller is similar to servo motors, except that the 
step and direction lines are connected instead of the analog signal. The minimum connections 
are:

Step+ (or Step-) 
Di (or Direction-) 
Signal Ground 
Encoder A+ and B+ lines 
+5V

M

OTOR

M

OTOR

STC-26

STC-26

12

11

1

1

12

10

Step - 

Step + 

GND

STEP
DIR

GND

STEP
DIR

S

TEP

 D

RIVE

This connection is for step drives that trigger on 
the 

falling edge

.

This connection is for step drives that trigger on 
the 

rising edge

.

From

PCX

CPCI

STD
V6U

104X

From

PCX

CPCI

STD
V6U

104X

S

TEP

 D

RIVE

T

O

 O

PEN

-

LOOP

 S

TEP

 M

OTORS

GND

Direction 

GND

Direction 

Artisan Technology Group - Quality Instrumentation ... Guaranteed | (888) 88-SOURCE | www.artisantg.com

Summary of Contents for 104/DSP

Page 1: ...l service in house repair center WE BUY USED EQUIPMENT Sell your excess underutilized and idle used equipment We also offer credit for buy backs and trade ins www artisantg com WeBuyEquipment REMOTE INSPECTION Remotely inspect equipment before purchasing with our interactive website at www instraview com LOOKING FOR MORE INFORMATION Visit us on the web at www artisantg com for more information on ...

Page 2: ... 681 3300 fax 805 681 3311 info motioneng com For the following MEI motion controllers CPCI Bus ISA Bus PC 104 Bus STD Bus CPCI DSP PCX DSP 104 DSP SERCOS STD PCI Bus LC DSP 104X DSP STD DSP PCI DSP SERCOS DSP SERCOS 104 VME Bus V6U DSP Artisan Technology Group Quality Instrumentation Guaranteed 888 88 SOURCE www artisantg com ...

Page 3: ...e contents of the docu ment may not be disclosed to third parties translated copied or duplicated in any form in whole or in part without the express written permission of Motion En gineering Inc The information contained in this document is subject to change without notice No part of this document may be reproduced or transmitted in any form or by any means electronic or mechanical for any purpos...

Page 4: ...s 2 6 Connect Cables Insert Board 2 7 CPCI 2 8 No Switches 2 8 Accessing the CPCI 2 8 Connect Cables Insert Board 2 8 PCI 2 10 No Switches 2 10 Accessing the PCI 2 10 Connect Cables InsertBoard 2 10 STD 2 11 Locate Switches 2 11 Set Base I O Address 2 11 Set the Interrupts 2 11 Connect Cables Insert Board 2 12 SERCOS STD 2 13 Locate Switches 2 13 Set Base I O Address 2 13 Set the Interrupts 2 13 C...

Page 5: ... 27 Connect Cables Insert Board 2 28 3 TEST CONTROLLER S I O ADDRESS Using Motion Console 3 2 Using SETUP EXE 3 3 Using CONFIG EXE 3 4 Other CONFIG Functions 3 4 Examples 3 4 4 CONNECT STCS TO AMPS MOTOR ENCODER PCX STD 104X CPCI V6U 4 2 Connections to Servo Motors 4 2 Brush Servo Motors 4 2 Brushless Servo Motors 4 3 Step and Direction Controlled Servo Motors 4 3 Connections to Step Motors 4 4 Op...

Page 6: ...tes 5 2 Opto Isolation 5 2 PCX V6U 104X CPCI STD only 5 2 Output Wiring 5 2 Analog Input Wiring 5 3 PCX CPCI STD V6U Only 5 3 Low Pass Filters on Analog Inputs V6U only 5 4 8254 Counter Wiring 5 4 PCX CPCI STD V6U Only 5 4 Home and Limit Switch Wiring 5 5 Wiring Examples 5 5 PCI DSP Connections 5 7 Opto Isolation 5 7 Opto Circuit Specifications 5 7 Dedicated I O PCI 5 8 Output Wiring 5 8 Amplifier...

Page 7: ... 4 Closed Loop Step Motors A 4 B MOTION CONSOLE REFERENCE Controller List Group B 3 Open Axis Window B 6 C SETUP EXE Intro C 2 For DOS Win 3 x Win 95 98 Only C 2 To Load the SETUP Program C 2 Saving Default Parameters to the Controller C 3 Functional Grouping by Axis C 4 SETUP Menus Screens C 5 File Menu C 6 Load Defaults from File C 6 Save Defaults to File C 6 DOS Shell C 6 About C 7 Exit C 7 Con...

Page 8: ...p 4 Set Integral Gain Ki D 16 Step 5 Set Velocity and Acceleration Feed Forward D 17 Tuning Closed Loop Steppers D 18 Step 1 Set Proportional Gain Kp D 18 Step 2 Set Velocity Acceleration Feed Forward Gains Kv Ka D 18 Step 3 Set the Integral Gain Ki D 19 E CONNECTIONS SPECIFICATIONS Motor Signal Header Locations E 2 PCX E 2 CPCI E 2 STD 104X E 3 V6U E 3 104 E 4 LC E 4 Dedicated User I O E 5 PCX CP...

Page 9: ... For Axes 0 1 F 5 For Axes 2 3 F 6 Specifications F 7 Schematics F 8 Circuit Examples F 9 Connect an OptoCon Input to a Switch F 9 Connect an OptoCon Input to an Open Collector Driver F 10 Connect an OptoCon Output to an Amplifier Enable Input F 11 Using an Internal Pull Up Resistor F 11 Using an Internal Pull Down Resistor F 12 Connect an OptoCon Output to a Relay F 13 INDEX Artisan Technology Gr...

Page 10: ...n Motion Console is available for set up procedures the Microsoft Win32S extensions are available at no charge from Microsoft Motion Console provides a powerful means to set up configure test and debug motion control systems that use MEI controllers If you use only DOS then see Appendix C SETUP EXE for set up procedures For Servo Motors 1 2 For Step Motors 1 3 Motion Developer s Support Program 1 ...

Page 11: ... window Next to activate the amplifier in the Axis Operation window click Enable in the Amplifier group If the amplifier is in torque mode you should be able to turn the motor shaft by hand If the amplifier is in velocity mode the motor shaft should be stiff For more informa tion consult the amplifier manufacturer s documentation 10 Verify the encoder phasing by entering positive and negative valu...

Page 12: ...guration property page 7 In the Axis Operation window click the Clear Position and Clear Fault buttons 8 Turn on the step drive Verify all motor and drive wiring turn on the drive and enable the drive If the controller s amp enable output is connected to the drive you must configure the amp enable logic in the Dedicated I O window Then click Enable in the Amplifier group in the Axis Operation wind...

Page 13: ...riodically releases new software firmware versions New features are implemented performance enhanced and new applications developed The latest firmware software releases are available on our FTP site at ftp ftp motioneng com These files are password protected please contact MEI for information The DSP controller has non volatile memory space to store the firmware and configuration pa rameters All ...

Page 14: ...ompatible with the firmware version controller status will be listed as bad in Motion Console s Controller List and the controller will be inaccessible If you wish to use an earlier version of the firmware on a newly purchased controller or if you have an older controller and want to use a new firmware version run the CONFIG program as described in the section in CONFIG EXE Board Configuration Pro...

Page 15: ...y individual controllers Product PCX 2 6 CPCI 2 8 PCI 2 10 STD 2 11 SERCOS STD 2 13 V6U 2 15 104 2 19 104X 2 21 SERCOS 104 2 23 LC 2 25 SERCOS DSP 2 27 Warning MEI motion controller boards are sensitive electronic devices and require handling with proper ESD protection Please do not touch the controller s bus interface CPCI PCI Users Because CPCI PCI controllers comply with the PCI Plug and Play s...

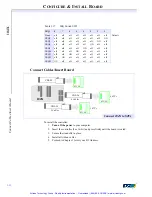
Page 16: ...er STC 26 Connection module for motor axes 1 required for 2 motor axes STC 50 Connection module for I O lines 1 required for each I O header STC MODULES FOR PCX CPCI STD 104X V6U CBL 20 Analog input ribbon cable 1 required per controller CBL 26 Motor axes ribbon cable 1 required for every 2 axes CBL 50 I O ribbon cable 1 required for every I O header CABLES FOR PCX CPCI STD 104X V6U STC 50 Connect...

Page 17: ...odules STC D50 Connection module for User I O 1 required per controller STC 136 Connection to four axes of I O 1 required for per controller STC MODULES FOR PCI CBL 68 Shielded cable for I O connections 2 required per controller CBL 50V Shielded cable for User I O connections 1 required per controller CABLES FOR PCI Non Strain Relieved Connector Connects to controller Strain Relieved Connector Con...

Page 18: ...6 addresses on the ISA 104 STD bus see next table Warning The controller must not share this I O space the 16 address locations with any other devices Table 2 1 Typical Mapping of I O Port Address Space Hex Address Typical Uses Hex Address Typical Uses 200 20F Game Control Adapter 300 31F Prototype Card 210 237 Not Used 320 32F XT Hard Disk 238 23F Bus Mouse 330 377 Not Used 240 277 Not Used 378 3...

Page 19: ...p 2 Next the data is read write on addresses 0x302 and 0x303 with two 8 bit read writes Host DSP Communications ISA 104 STD BUS RAM DSP Address Low Byte DSP Address High Byte DSP Data Low Byte DSP Data Low Byte Set Reset DSP Flip Flop Clear Reset DSP Flip Flop HOST I O SPACE DSP SERIES CONTROLLER Address Data A block of 1 0 addresses Memory Window For DSP 0x300 0x301 0x302 0x303 0x304 0x305 0x309 ...

Page 20: ...terrupt IRQ2 IRQ3 that you want the PCX to use Table 2 3 Base Address Switch SW1 Address 8 7 6 5 4 3 2 1 240 on on OFF on on OFF on on 250 on on OFF on on OFF on OFF 260 on on OFF on on OFF OFF on on low 270 on on OFF on on OFF OFF OFF OFF high 300 on on OFF OFF on on on on Default 310 on on OFF OFF on on on OFF 320 on on OFF OFF on on OFF on 330 on on OFF OFF on on OFF OFF 340 on on OFF OFF on OF...

Page 21: ...nd connect the non strained relieved connec tors to the PCX 6 Secure the bracket in place with the screw 7 Proceed to Chapter 3 to test your I O Address Table 2 4 IRQ Switch SW2 IRQ 8 7 6 5 4 3 2 1 None off off off off off off off off Default IRQ2 off off off off off off off ON IRQ3 off off off off off off ON off IRQ4 off off off off off ON off off IRQ5 off off off off ON off off off IRQ10 off off...

Page 22: ...ers on the bus Simply select Add Con troller and click on the PCI Controller tab The address and IRQ of all PCI bus controllers will be listed Usage of the MEI function find_pci_dsp is further described in the C Programming Refer ence Manual Please refer to that document for a detailed description on using this function If you are still having problems communicating with the controller after you v...

Page 23: ...rt the controller partially into the chasis 4 Feed cables through the front panel and connect the non strain relieved connectors to the CPCI 5 Insert the controller fully into the slot until the injectors engage the chassis Use the injectors to firmly seat the controller in the chassis 6 Proceed to Chapter 3 to test your I O Address Artisan Technology Group Quality Instrumentation Guaranteed 888 8...

Page 24: ...sp is further described in the C Programming Refer ence Manual Please refer to that document for a detailed description on using this function If you are still having problems communicating with the controller after you ve found its ad dress you may have to reserve the resources in use by the controller using the System applet in the control panel Connect Cables InsertBoard To install the controll...

Page 25: ... for the interrupt IRQ2 IRQ3 that you want the STD to use Table 2 5 Base Address Switch SW1 Address 8 7 6 5 4 3 2 1 240 on on OFF on on OFF on on 250 on on OFF on on OFF on OFF 260 on on OFF on on OFF OFF on on low 270 on on OFF on on OFF OFF OFF OFF high 300 on on OFF OFF on on on on Default 310 on on OFF OFF on on on OFF 320 on on OFF OFF on on OFF on 330 on on OFF OFF on on OFF OFF 340 on on OF...

Page 26: ... until the board is seated in the card edge connec tor 5 Proceed to Chapter 3 to test your I O Address Table 2 6 IRQ Switch SW2 IRQ 4 3 2 1 None off off off off Default IRQX off off off ON only supported by the STD 32 bus INTRQ3 off off ON off INTRQ ON off off off INTRQ1 off ON off off STC 20 CBL 20 STC 50 CBL 50 STC 26 CBL 26 STD Connect STD to STCs 3 Cables 3 STCs 4 STCs 4 Cables Artisan Technol...

Page 27: ...2 for the interrupt IRQ2 IRQ3 that you want the SERCOS STD to use Table 2 7 Base Address Switch SW1 Address 8 7 6 5 4 3 2 1 240 on on OFF on on OFF on on 250 on on OFF on on OFF on OFF 260 on on OFF on on OFF OFF on on low 270 on on OFF on on OFF OFF OFF OFF high 300 on on OFF OFF on on on on Default 310 on on OFF OFF on on on OFF 320 on on OFF OFF on on OFF on 330 on on OFF OFF on on OFF OFF 340 ...

Page 28: ...x connector etc The light emitting module on the controller can be turned on and off for testing with the functions turn_on_sercos_led and turn_off_sercos_led See the DSP Series C Programming Reference for more information 6 When all drives are connected turn on the power to the drives Each drive begins an initialization sequence Most drives have an LCD or LED display to indicate when the initiali...

Page 29: ...FFF02A0 0xFFFF0300 0xFFFF0320 0xFFFF0340 0xFFFF0360 or 0xFFFF0380 After choosing a Base I O Address look at the next 2 tables to find the switch settings that will implement your desired Base I O Address Table 2 9 Base Address Switch 0xFFFF0220 0xFFFF02A0 Bus Switch 0xFFFF0220 0xFFFF0240 0xFFFF0260 0xFFFF280 0xFFFF02A0 A15 SW2 3 on on on on on A14 SW2 2 on on on on on A13 SW2 1 on on on on on A12 ...

Page 30: ...o 8 bit read writes or a 16 bit read write Table 2 10 Base Address Switch 0xFFFF0300 0xFFFF0380 Bus Switch 0xFFFF0300 0xFFFF0320 0xFFFF0340 0xFFFF0360 0xFFFF0380 A15 SW2 3 on on on on on A14 SW2 2 on on on on on A13 SW2 1 on on on on on A12 SW1 8 on on on on on A11 SW1 7 on on on on on A10 SW1 6 on on on on on A9 SW1 5 OFF OFF OFF OFF OFF A8 SW1 4 OFF OFF OFF OFF OFF A7 SW1 3 on on on on on A6 SW1...

Page 31: ...witch For example if IRQ3 is selected then SW4 should represent the decimal value 3 So SW4 1 and SW4 2 must be ON SW4 3 and SW4 4 must be OFF Table 2 12 IRQ Select Switch SW3 IRQ 8 7 6 5 4 3 2 1 None off off off off off off off off Default IRQ1 off off off off off off off ON IRQ2 off off off off off off ON off IRQ3 off off off off off ON off off IRQ4 off off off off ON off off off IRQ5 off off off...

Page 32: ...on cables 4 Insert the controller and press firmly until the board is seated in the backplane connec tor 5 Fasten the mounting screws for models that have mounting screws 6 Proceed to Chapter 3 to test your I O Address STC 20 CBL 20 STC 26 CBL 26 STC 50 CBL 50 V6U Connect V6U to STCs 3 Cables 3 STCs 4 STCs 4 Cables Artisan Technology Group Quality Instrumentation Guaranteed 888 88 SOURCE www artis...

Page 33: ... for the interrupt IRQ2 IRQ3 that you want the 104 to use Table 2 14 Base Address Switch SW1 Address 8 7 6 5 4 3 2 1 240 on on OFF on on OFF on on 250 on on OFF on on OFF on OFF 260 on on OFF on on OFF OFF on on low 270 on on OFF on on OFF OFF OFF OFF high 300 on on OFF OFF on on on on Default 310 on on OFF OFF on on on OFF 320 on on OFF OFF on on OFF on 330 on on OFF OFF on on OFF OFF 340 on on O...

Page 34: ...f off off Default IRQ2 off off off off off off off ON IRQ3 off off off off off off ON off IRQ4 off off off off off ON off off IRQ5 off off off off ON off off off IRQ10 off off off ON off off off off IRQ11 off off ON off off off off off IRQ12 off ON off off off off off off IRQ15 ON off off off off off off off For 104 Users For an easy way to separate 104 cards get the PC 104 Removal Tool available ...

Page 35: ... for the interrupt IRQ2 IRQ3 that you want the 104X to use Table 2 16 Base Address Switch SW1 Address 8 7 6 5 4 3 2 1 240 on on OFF on on OFF on on 250 on on OFF on on OFF on OFF 260 on on OFF on on OFF OFF on on low 270 on on OFF on on OFF OFF OFF OFF high 300 on on OFF OFF on on on on Default 310 on on OFF OFF on on on OFF 320 on on OFF OFF on on OFF on 330 on on OFF OFF on on OFF OFF 340 on on ...

Page 36: ...witch SW2 IRQ 8 7 6 5 4 3 2 1 None off off off off off off off off Default IRQ2 off off off off off off off ON IRQ3 off off off off off off ON off IRQ4 off off off off off ON off off IRQ5 off off off off ON off off off IRQ10 off off off ON off off off off IRQ11 off off ON off off off off off IRQ12 off ON off off off off off off IRQ15 ON off off off off off off off STC 20 CBL 20 STC 50 CBL 50 STC 2...

Page 37: ...W2 for the interrupt IRQ2 IRQ3 that you want the SERCOS 104 to use Table 2 18 Base Address Switch SW1 Address 8 7 6 5 4 3 2 1 240 on on OFF on on OFF on on 250 on on OFF on on OFF on OFF 260 on on OFF on on OFF OFF on on low 270 on on OFF on on OFF OFF OFF OFF high 300 on on OFF OFF on on on on Default 310 on on OFF OFF on on on OFF 320 on on OFF OFF on on OFF on 330 on on OFF OFF on on OFF OFF 34...

Page 38: ...ond drive s dark gray Rx connector etc The light emitting module on the controller can be turned on and off for testing with the functions turn_on_sercos_led and turn_off_sercos_led See the DSP Series C Programming Reference for more information Once the SERCOS 104 has been initialized you can exercise and tune the system using Motion Console Table 2 19 IRQ Switch SW2 IRQ 8 7 6 5 4 3 2 1 None off ...

Page 39: ... for the interrupt IRQ2 IRQ3 that you want the LC to use Table 2 20 Base Address Switch SW1 Address 8 7 6 5 4 3 2 1 240 on on OFF on on OFF on on 250 on on OFF on on OFF on OFF 260 on on OFF on on OFF OFF on on low 270 on on OFF on on OFF OFF OFF OFF high 300 on on OFF OFF on on on on Default 310 on on OFF OFF on on on OFF 320 on on OFF OFF on on OFF on 330 on on OFF OFF on on OFF OFF 340 on on OF...

Page 40: ...eaders on the STC 50s STC 50 shown above see Appendix F OptoCon Reference if using the Opto Con 7 Proceed to Chapter 3 to test the I O Address Table 2 21 IRQ Switch SW2 IRQ 8 7 6 5 4 3 2 1 None off off off off off off off off Default IRQ2 off off off off off off off ON IRQ3 off off off off off off ON off IRQ4 off off off off off ON off off IRQ5 off off off off ON off off off IRQ10 off off off ON o...

Page 41: ...2 for the interrupt IRQ2 IRQ3 that you want the SERCOS DSP to use Table 2 22 Base Address Switch SW1 Address 8 7 6 5 4 3 2 1 240 on on OFF on on OFF on on 250 on on OFF on on OFF on OFF 260 on on OFF on on OFF OFF on on low 270 on on OFF on on OFF OFF OFF OFF high 300 on on OFF OFF on on on on Default 310 on on OFF OFF on on on OFF 320 on on OFF OFF on on OFF on 330 on on OFF OFF on on OFF OFF 340...

Page 42: ...ing module on the controller can be turned on and off for testing with the functions turn_on_sercos_led and turn_off_sercos_led See the DSP Series C Programming Manual for more information 7 When all drives are connected turn on the power to the drives Each drive begins an initialization sequence Most drives have an LCD or LED display to indicate when the initialization is complete Consult the spe...

Page 43: ...CON FIG program to test the I O location After testing your controller s I O address proceed to Chapter 4 to connect the STCs to the amplifiers motors and encoders If your Operating System is Then use this application to test the I O location Windows 95 98 Windows NT Windows with 32S extensions Motion Console 3 2 DOS Windows 3 11 SETUP or CONFIG 3 3 3 4 Warning Only use Motion Console version 2 00...

Page 44: ...and select controller Next click OK 6 The new controller should now appear in the Hardware Summary Controller List with a status of OK If Motion Console cannot find the controller at the specified address Motion Console will list the controller s status as Bad If the controller s name and address appear as desired proceed to Chapter 4 and contin ue with your installation by connecting the STCs to ...

Page 45: ...O Base Address 4 In the I O Base Address window enter the desired base address for the controller then select OK Reopen the I O Base Address window and verify that the Current I O Ad dress is now the address that you just entered If the address is correctly set then proceed to Chapter 4 and continue with your instal lation by connecting the STCs to amplifiers encoders and motors Configure Set I O ...

Page 46: ...aved to the controller s firmware and are not saved to the firmware files on diskette If there are any problems the CONFIG program will display error messages Examples To configure a controller located at an address other than the default 300 Hex use the b command line switch For example to configure a controller located at address 0x280 execute CONFIG B 0x280 To download a particular firmware fil...

Page 47: ...4 6 V6U only Encoder Interface 4 7 Encoder Integrity Checking 4 10 LC 104 Connections to Servo Motors 4 11 Brush Servo Motors 4 11 Brushless Servo Motors 4 12 Step and Direction Servo Motors 4 12 Connections to Step Motors 4 13 Open Loop Step Motors 4 13 Closed Loop Motors 4 14 Connections for Dual Loop Control 4 15 PCI Connections to Servo Motors 4 16 Brush Servo Motors 4 16 Brushless Servo Motor...

Page 48: ...r connections are different for the V6U see page 7 in this chapter for V6U connections The controller reads the index pulse either single ended or differential ended Typically there is one index pulse per revolution of the encoder rotary type which can be used for homing Encoder signals are read in quadrature Every line on the encoder will produce a rising edge and a falling edge on channels A and...

Page 49: ... by the drive itself To avoid possible instability caused by conflict between the drive PID loop and the controller board PID loop operate step and direction servos as open loop step motors The controller will send step pulses and a direction pulse to the drive which will handle the PID internally Note Any unused lines should be left unconnected Warning If the controller is configured for open loo...

Page 50: ...ers are preferred due to their excellent noise immunity The connections for a single ended encoder is identical to a differential encoder except that there are no connections made to channel A and channel B The A and B lines are pulled up internally to 2 5V Encoder signals are read in quadrature Every line on the encoder will produce a rising edge and a falling edge on channels A and B which is in...

Page 51: ...ed loop Step Motor Connections Warning For the best performance ensure that the ratio is between the encoder resolution counts per revolution and the step resolution steps per microsteps per revolution is 1 4 Lower ratios 1 1 1 2 will be difficult to tune and will have poor static stability Higher ratios 1 6 1 8 will have poor constant velocity stability Note For drives that trigger on the rising ...

Page 52: ...and can be any axis that is not controlling a motor For example if axis 0 is configured for velocity feed back and axis 1 is configured for positional feedback your system would be connected as shown in the next figure Figure 4 5 Typical Dual loop Encoder Connections with Differential Encoders STC 26 Encoder Brushless Amp Motor Servo GND 5 volts Encoder A Encoder A Encoder B Encoder B Encoder Inde...

Page 53: ...re included here to highlight the wiring changes Note that twisted pair shielded cabling provides the best immunity in electrically noisy envi ronments For more about Encoder Integrity Checking please consult the DSP Series C Pro gramming Reference Warning The encoder interface circuits have changed from Revision 2 to Revision 4 If you use a Rev 4 V6U controller in a Rev 2 system containing single...

Page 54: ...le Ended Encoder to V6U DSP Rev 4 Twisted pair in cables Encoder Output Type R1 R2 CMOS 0 to 5V 820 820 TTL 0 to 3V 620 330 Note that each signal requires an indepen dent bias network in this configuration Put these bias circuits as close to the en coder as possible Note Do not connect signal ground to shield ground R1 R2 Gnd 5V_OUT R1 R2 Gnd 5V_OUT R1 R2 Gnd 5V_OUT New You must provide thesebias ...

Page 55: ...vers There is one 5 volt supply and return shared by each pair of encoders which is available at 2 sets of power pins 5V_OUT GND on each connector Encoder Power Differential Encoder to V6U DSP Rev 4 Twisted pair in cables Differential encoders are preferred over single ended encoders because of their superior immunity to noise Note Do not connect signal ground to shield ground New Artisan Technolo...

Page 56: ...n wire condition occurs when either A and A channels or B or B channels are in the same logic state for 3 consecutive sample periods 300 nsec When a broken encoder wire is detected the appropriate bit one per axis in the broken wire status register is latched Use the routine set_feedback_check int16 axis int16 state to configure broken wire and il legal state detection To enable feedback checking ...

Page 57: ... identical to a differential encoder except that no connections should be made to channel A and channel B The A and B lines are pulled up internally to 2 5V The controller reads the index pulse either single ended or differential ended Typically there is one index pulse per revolution of the encoder rotary type which can be used for homing Encoder signals are read in quadrature Every line on the e...

Page 58: ...ection position information to the drive The drive closes the torque velocity and position loops in ternally When configured for closed loop steppers the controller sends step and direction po sition information to the drive and receives action position information from the encoder The drive closes the torque and velocity loops the controller closes the position loop Generally the best performance...

Page 59: ...ome drives allow differential inputs in which both Step and Step lines are connected for higher noise immunity If in doubt fax the driver data sheets or driver pinouts to Motion Engi neering along with any questions Note that when only Step or Step is used it may be necessary to jumper unused terminals on the step drive Before connecting Step or Step consult your step drive s manual Figure 4 10 Ty...

Page 60: ...er A and B lines 5V Note that when only Step or Step is used it may be necessary to jumper unused terminals on the step drive Before connecting Step or Step consult your step drive s manual In general use Step for drives with active high logic and use Step for drives with active low logic Both Step and Step lines can be connected to drives with differential inputs If in doubt fax the drive pinouts...

Page 61: ...through software and can be any axis that is not controlling a motor For example if axis 0 is configured for velocity feed back and axis 1 is configured for positional feedback your system would be connected as shown in the next figure Figure 4 12 Typical Dual loop Encoder Wiring with Differential Encoders STC 50 Position Brushless Amp Motor Servo Encoder A Encoder A Encoder B Encoder B Encoder In...

Page 62: ...her differen tial or single ended controllers Differential encoders are preferred due to their excellent noise immunity See Figure 4 19 Typical Single Ended Encoder Connections for instructions Brush Servo Motors The minimum required connections to a brush type servo are Analog signal 10V 5V Signal Ground Encoder Channel A Encoder Channel B Typical connections for a brush servo motor with differen...

Page 63: ... between the drive PID loop and the controller PID loop operate step and direction servos as open loop step motors The controller will send step pulses and a direction pulse to the drive which will handle the PID position control loop internally Warning If the controller is configured for open loop step control make sure that the tuning parameters conform to those listed in Open Loop Stepper Syste...

Page 64: ...ation selected the DSP closed the loop internally on a pair of axes PCI controllers are compatible with full half and micro stepping drives Figure 4 15 Typical Open Loop Step Motor Connections PCI Motor Motor 16 49 3 3 16 15 Step Step GND STEP DIR GND STEP DIR Step Drive This connection is for step drives that trigger on the falling edge This connection is for step drives that trigger on the risin...

Page 65: ...rminals on the step drive Before connecting Step or Step consult your step drive s manual In general use Step for drives with active high logic and use Step for drives with active low logic Both Step and Step lines can be connected to drives with differential inputs If in doubt fax the drive s pinouts to Motion Engineering along with any questions Figure 4 16 Typical Closed Loop Step Motor Connect...

Page 66: ...will be used for the velocity encoder is configurable through software and can be any axis that is not controlling a motor For example if axis 0 is configured for velocity feed back and axis 1 is configured for position feedback your system would be connected as shown in the next figure Figure 4 17 Typical Dual Loop Encoder Connections PCI Encoder Brushless Amp GND 5 volts Encoder A Encoder A Enco...

Page 67: ...which is available at 2 sets of power pins 5V_OUT GND on each connector Figure 4 18 Typical Differntial Encoder Connections PCI PCI 100 Ohms Enc0_A Enc0_A Differential Encoder A 5V GND 100 Ohms Enc0_B Enc0_B 100 Ohms Enc0_I Enc0_I Vcc Gnd 5V_OUT_0 A B B I I EIA 422 Line Receivers Encoder Power Differential Encoder to PCI Twisted pair in cables Note Do not connect signal ground to shield ground Art...

Page 68: ...Encoder to PCI Twisted pair in cables R1 R2 Output Type 820 820 CMOS 0 5V 620 330 TTL 0 3V The bias circuits shown will generate 5V Vdiff at the receivers Also note that each signal requires an indepen dent bias network in this configuration Put these bias circuits as close to the encoder as possible Note Do not connect signal ground to shield ground R1 R2 Gnd 5V_OUT_0 R1 R2 Gnd 5V_OUT_0 R1 R2 Gnd...

Page 69: ... refer to Appendix E Connections Specifications Dedicated and User I O Notes 5 2 Opto Isolation 5 2 Output Wiring 5 2 Analog Input Wiring 5 3 8245 Counter Timer Wiring 5 4 Home Limit Switch Wiring 5 5 Wiring Examples 5 5 PCI DSP Connections 5 7 Opto Isolation 5 7 Output Wiring 5 8 Input Wiring 5 10 Bi Directional User I O 5 12 Analog Input Wiring 5 13 Artisan Technology Group Quality Instrumentati...

Page 70: ... be set using the function libraries Refer to the DSP Series C Programming Reference Output Wiring User I O outputs are driven by an Intel 82C55 Programmable Peripheral Interface Controller When power is supplied to the 82C55 these outputs have 3 possible output states High Impedance High Z 1 micro amp leakage current High 3 0V at 2 5 milliamp source current Low 0 4V at 2 5 milliamperes sink curre...

Page 71: ...ins 2 and 20 Analog GND are con nected to the logic ground of the A D chip and to a separate ground plane beneath the A D chip The logic ground of the A D chip is also connected to the bus ground with all of the other GND signals When connecting analog inputs use the separated analog grounds to improve noise immunity There are 8 channels each with a 12 bit resolution Each channel can be configured...

Page 72: ...ts of 1 25 and 10 MHz re spectively The gate signal for Counter 0 used in some modes is on pin 11 of P8 All counter outputs are available on P8 Figure 5 4 Counter Timer Wiring Diagram V6U Analog Input Filters 470 ohms Analog Input 01 uF Post Filter Analog Input A 34 kHz single pole low pass filter has been added to each of the analog inputs The low pass filter anticipates source imped ance of 50 o...

Page 73: ...ches Non Opto Isolated Figure 5 6 Example Wiring Diagram for Axis 0 Limit Switches Opto Isolated NEG GND POS GND HOME GND NEG Limit POS Limit E Stop 220 Ohm 220 Ohm 220 Ohm Home STC 50 From PCX STD V6U 45 46 47 48 43 49 44 5 V Note Limit Switches Normally Closed Non Opto Isolated Opto GND Note Limit Switches are Normally Closed Logic Logic V GND Opto GND NEG Opto GND POS HOME Home NEG Limit POS Li...

Page 74: ...otion is stopped until the problem is corrected Since the controller can be configured for either active high or low inputs other limit and home sensor circuits can be used For opto isolation with the LC or 104 refer to Appendix F OptoCon Reference POS GND NEG GND HOME POS Limit NEG Limit E Stop 220 Ohm 220 Ohm 220 Ohm Home STC 50 From 104 LC 27 49 29 49 31 1 49 5 V Note Limit Switches are Normall...

Page 75: ...erating Temperature Range 0 60 C User Voltage Range 24 VDC Active Inputs Guaranteed 3 5V max Inactive Input Guaranteed 1 0V max Peak Operational Voltage Vin 45V max Active Output Guaranteed Iout 10mA min Vout 3V max Inactive Output Guaranteed Iout 01mA max Absolute Maximums Iout 50mA max Vout 40V max may damage parts if these are exceeded Ireverse 100mA max Protection Diode Active Input Guaranteed...

Page 76: ... Amp Enable Input Active LOW GND Opto Isolator Amp_En0_C Amp_En0_E Active Low Enable at Amp R 5V 24V Note Verify that VCE of the output is less than VIL for the amplifier s enable input 5V R 1K 24V R 4 7K PCI Internal Logic C E Amplifier Amp Enable Input Active High GND Opto Isolator Amp_En0_C Amp_En0_E Active High Enable at Amp 5V 24V R 5V R 1K 24V R 4 7K Artisan Technology Group Quality Instrume...

Page 77: ...should use a differential receiver such as the 26LS32 Figure 5 10 Example In_Position Output Wiring PCI External Logic In_PosN Gnd In_Position Outputs Twisted pair in cables 1 Optional 100 ohms termination R1 In_PosN Gnd E1A 422 26LS32 Note Do not connect signal ground to shield ground Note No opto isolation Artisan Technology Group Quality Instrumentation Guaranteed 888 88 SOURCE www artisantg co...

Page 78: ... Figure 5 12 Example of Pull Down Logic PCI Amp_Flt0_IN Amp_Flt0_Rtn Axis 0 Pull Up Logic Normally closed 5V 24V Amp Fault Constant Current Diode PCI Amp_Flt0_IN Amp_Flt0_Rtn Axis 0 Pull Down Logic Normally closed 5V 24V Amp Fault Constant Current Diode Artisan Technology Group Quality Instrumentation Guaranteed 888 88 SOURCE www artisantg com ...

Page 79: ...c PCI Home0_IN Pos_Lim0_I Neg_Lim0_I Mech0_Rtn Axis 0 Common Gnd Logic Normally closed 5V 24V 5V 24V 5V 24V Limit Sensors Constant Current Diode PCI Home0_IN Pos_Lim0_IN Neg_Lim0_IN Mech0_Rtn Axis 0 Common Vcc Logic Normally closed 5V 24V Limit Sensors Constant Current Diode Artisan Technology Group Quality Instrumentation Guaranteed 888 88 SOURCE www artisantg com ...

Page 80: ...ed to the PCI s power or ground connections UserIO_A0 UserIO_A0_Rtn User I O As Input PCI C E Normally closed 5V to 24V R Pull Up Input For 5V circuits use R 820 ohms For 24V circuits use R 6 8K 5V to 24V Pull Down Input R Or Note An external series re sistor must be used 26 1 UserIO_A0 UserIO_A0_Rtn 5V to 24V 1 26 PCI R Pull Up Output C E 5V to 24V R Pull Down Output User I O As Output Or For 5V ...

Page 81: ... each with a 12 bit resolution Each channel can be configured as either Unipolar 0 to 5V or Bipolar 2 5V to 2 5V Because there is no buffer between the con nector and the actual A D integrated circuit the input voltages must not exceed 5V or fall below 2 5V Use this configuration for an isolated analog source such as a thermocouple Figure 5 17 Example of Analog input for an isolated analog source ...

Page 82: ...CONNECT STCS TO DISCRETE I O 5 14 Bi Directional User I O Analog Input Wiring Artisan Technology Group Quality Instrumentation Guaranteed 888 88 SOURCE www artisantg com ...

Page 83: ...oop systems at each step This method should make the process easier and save time This procedure assumes that you have successfully installed the controller and that the Motion Console program can execute properly Also before testing your system you must configure the Axis Configuration property page for closed loop operation and select the appropriate motor type Closed Loop Systems Step 1 Connect...

Page 84: ...encoder counts number of encoder lines x 4 Step 3 Connect the Motor Turn off the power to the computer Connect the analog motor command or step direction lines Turn the computer power on Step 4 Manually Turn the Motor Click the Abort button in the Axis Operation window to disable PID control Turn on power for the servo amp step drive The shaft of the servo motor should now turn freely for torque m...

Page 85: ...ce depends on the tuning parameters servo amp step drive and the mechanical system Finding optimum tun ing parameters requires experimentation theoretical understanding of PID control loops and practical experience Before tuning verify the settings for the axis in the Axis Configuration property page Double click on the axis to open the Axis Operation window and refer to the Tuning Parameters dis ...

Page 86: ...ition within that range a second motion will not be initiated Table 6 2 Tuning Parameters Parameter Servos Closed Loop Steppers Proportional Kp 100 20 Depends on step encoder pulse ratio Integral Ki 2 0 Derivative Kd 400 0 Accel FF 0 0 Vel FF 0 1000 Depends on step encoder pulse ratio Integ Max 32767 100 Offset 0 0 Limit 3500 3500 Scale 5 1 slow 3 med 5 fast 6 superfast Friction FF 0 0 Tip Motor R...

Page 87: ...unts If while in repeat mode a move fails to reach the final position within that range a second motion will not be initiated The fields in the Position Status display show the command and actual position velocity ac celeration and position error of the axis in real time To view a plot of the motion enter motion values in the Movement and Motion Parameters fields click Repeat Mode on and start the...

Page 88: ...r a value 10 in the Offset field of the Tuning Parameters controls Increase the Offset until the motor begins to turn slowly If the motor does not turn with approximately 1000 counts of offset check the output of the controller with a voltmeter Note that the Offset range is 32 767 counts corresponding to 10V or full scale step output Next disconnect the amplifier connections to the controller and ...

Page 89: ...e speed range selected in the Axis Configuration property page Use the fields in the Movement and Motion Parameters controls to command point to point motion Table 6 4 Tuning Parameters for Open Loop Steppers Parameter Value Proportional Kp 320 Integral Ki 32 Derivative Kd 0 Accel FF 32 Vel FF 3750 Integ Max 32767 Offset 0 Limit 32767 Scale 1 slow 3 med 5 fast 6 superfast Artisan Technology Group ...

Page 90: ...TEST SYSTEM 6 8 Open Loop Stepper Systems Step 3 Exercise the Motor Artisan Technology Group Quality Instrumentation Guaranteed 888 88 SOURCE www artisantg com ...

Page 91: ...When the amplifier is in Torque mode the current applied to the motor is proportional to the analog input voltage 10V to 10V Encoder Input DSP Series controllers accept TTL level 0V to 5V 40mA max encoder input from either dif ferential or single ended encoders Differential encoders are preferred due to their excellent noise immunity When used with differential encoders the differential line recei...

Page 92: ... scheme the po sition information is communicated by step pulses and the PID loop is handled internally by the drive itself Step and Direction servo systems can be operated in open loop or closed loop controller configurations To avoid possible instability caused by conflict between the drive PID loop and the controller s PID loop you should operate step and direction servos as open loop step moto...

Page 93: ...ion output for each axis In ad dition the complements of the step and direction are also provided Step and Dir Some drives allow differential inputs in which both Step and Step lines are connected for higher noise immunity If in doubt fax the driver data sheets or driver pinouts to Motion Engineering along with any questions Note that when only Step or Step is used it may be necessary to jumper un...

Page 94: ... PID algorithm running on the DSP in real time The controllers accept TTL level 0V to 5V 40mA max encoder input from either differential or single ended encod ers Differential encoders are preferred due to their excellent noise immunity The connections for a single ended encoder are identical to a differential encoder except that no connections are made to channel A and channel B The A and B lines...

Page 95: ...5V Note that when only Step or Step is used it is often necessary to jumper unused terminals on the step drive Before connecting the step inputs consult your step drive s manual In general use Step for drives with active high logic and use Step for drives with active low logic Both Step and Step lines can be connected to drives with differential inputs If in doubt fax the drive s pin outs to Motio...

Page 96: ...MORE ABOUT WIRING A 6 Wiring Step Motors Closed Loop Step Motors Artisan Technology Group Quality Instrumentation Guaranteed 888 88 SOURCE www artisantg com ...

Page 97: ...s NT or Windows 95 98 Windows 3 x with Win32S extensions Motion Console will only run under 32 bit Window operating systems Windows 3 11can be upgraded to Windows 32S in order to run Motion Console The Windows 32S upgrade is available from Microsoft at no charge Motion Console is not designed to run under DOS DOS users should use the DOS utilities provided by MEI SETUP EXE CONFIG EXE VERSION EXE M...

Page 98: ...MEI controller All controllers and their axes can be configured and the status viewed from the Hard ware Summary window The Synchronized Axes Configuration window enables you to quickly configure axes for syn chronous control and or synchronous graphing Simply select an axis or axes and then click in the desired box Motion Console Windows Artisan Technology Group Quality Instrumentation Guaranteed...

Page 99: ...r s using the configuration and parameter settings stored in Boot Memory This is equivalent to a dsp_reset function Remove Controller Remove the selected controller s from the Controller List User I O Open the User I O window for the selected controller s Refresh Controller List Update the Configuration and Axis lists to reflect any status changes i e axis disabled that occured while Motion Consol...

Page 100: ...ntroller Add Controller ISA Bus PCI Bus Warning Only use Motion Console version 2 00 0006 or later with the PCI DSP All PCI controllers will be listed here Select the controller you want If no controllers are found on the PCI Bus no controllers will appear in this field Artisan Technology Group Quality Instrumentation Guaranteed 888 88 SOURCE www artisantg com ...

Page 101: ...ted by State radio buttons State radio buttons cannot be changed for input groups Output groups can be set to a particular I O state using the State radio buttons to test wiring and functionality For Output groups the Toggle box can also be checked to toggle output bit states State For input groups State indicates whether line is High or Low For output groups use Set Level buttons to configure ind...

Page 102: ... tune motors for the selected axis Before opening this window select a controller from the Controller List and select an axis from the Axis List then click Open Axis Window Hardware Summary Window Axis Status Control Panel Axis Window B 6 See pages B 8 9 See page B 11 See page B 7 See pages B 3 4 5 See page B 10 Artisan Technology Group Quality Instrumentation Guaranteed 888 88 SOURCE www artisant...

Page 103: ...tion minus the Increment value the button commands the motor to move to the current position plus the Increment value Clicking either button with Repeat Mode ON in Motion Profile starts repetitive motion in which the motor is continuously commanded to increment its position in the same direction Clicking on the button moves the axis to either position or position whichever is far ther from the cur...

Page 104: ...chronize the motion of 2 or more axes Position With Absolute Mode selected Position specifies the position in encoder counts that the motor is commanded to move when the button is clicked Trapezoidal Specifies a trapezoidal motion profile for current position Relative Mode Enables relative motion as specified by the value entered in the Increment field When selected Position and Position are dis a...

Page 105: ...high inertial loads need more motor current to accelerate or decelerate than systems with light loads need Acceleration Feed Forward is used with torque controlled servos current Velocity Feed Forward Velocity Feed Forward is useful in velocity controlled servos or closed loop stepper systems As a speed of a system increases the position error generally increases linearly and therefore a higher ou...

Page 106: ...active low Home Active Low AND High Index Index only active high or active low Home Active High AND High Index General Parameters Stop Decel Rate E Stop Decel Rate Position Tolerance Amp Enable Polarity Low Active High Active Feedback Specifies the axis actual position feedback source for PID algorithm Encoder Supports single ended and differential ended incremental encoders Parallel Supports 32 d...

Page 107: ...r Position Error in counts Velocity Actual and Command Velocity Voltage Actual voltage of the axis servo output The Graph Window can generate a detailed graph of sev eral motion control parameters in real time or can display sampled data from a previous move Sync Graphing To graph more than 2 or more axes at a time Sample Numbers Changes horizontal scale to parameter selected in 2 boxes below it U...

Page 108: ...MOTION CONSOLE REFERENCE B 12 Artisan Technology Group Quality Instrumentation Guaranteed 888 88 SOURCE www artisantg com ...

Page 109: ... C 6 Save Defaults to File C 6 DOS Shell C 6 About C 7 Exit C 7 Configure Menu I O Base Address C 8 Tuning Parameters C 9 Axis Configuration C 11 Limit Switch Configuration C 13 Software Limits C 14 Reset F9 C 14 Status Menu Position Status C 15 Axis Status C 15 Dedicated I O C 16 Motion Menu Point to Point Motion C 17 Graphic Analysis C 18 Artisan Technology Group Quality Instrumentation Guarante...

Page 110: ... by typing SETUP at the DOS prompt You should next see the About SETUP window which shows the date and version of the SETUP pro gram Note that when SETUP initializes the controller SETUP does not change any of the current configurations or conditions on the DSP Series controller Mouse Trackball A mouse or trackball makes the SETUP program much easier to use Hot Keys If you do not have a mouse or t...

Page 111: ... program reads the values stored in boot mem ory Save Defaults to File saves the current boot memory configuration to a diskette file with the extension ABS Load Defaults From Disk loads the boot memory configuration from a diskette file into boot memory F9 DSP hardware reset ESC Close the current window Alt F Select the File menu Alt C Select the Configure menu Alt S Select the Status menu Alt M ...

Page 112: ... If a 3 axis controller is to be used for 2 closed loop step motors and 1 open loop step motor then the open loop step motor must be axis 2 and the closed loop motors must be axes 0 and 1 Home Index Functions 4 On a 4 axis controller all axes will be configured to use the Home and Index in the same fashion On a 7 axis controller axes 0 3 will have a configuration that is inde pendant of the config...

Page 113: ... Set limit switch configuration Set software limits Reset controller with boot memory Servo or step Open closed loop Stepping speed Home sensor configuration Voltage output Feedback device type Integration active mode page C 8 Status Monitor position status Monitor axis status Monitor dedicated I O status Position Velocity Acceleration and Error Idle Run Mode In Motion In Position Source and State...

Page 114: ...ure if necessary DOS Shell Selecting DOS Shell allows you to access the DOS command line without exiting the SETUP program Type EXIT at the DOS prompt to return to the SETUP program Option Load Defaults from File Loads the values from CD into DSP boot memory requests filename Save Defaults to File Saves values in DSP boot memory to diskette prompts for filename DOS Shell Shells to DOS About Displa...

Page 115: ...out displays the SETUP version number and date Exit Exits the SETUP program After exiting motion will stop but all configuration parameters will remain active Artisan Technology Group Quality Instrumentation Guaranteed 888 88 SOURCE www artisantg com ...

Page 116: ... DOS prompt then the SETUP program will use address 280 hex The CONFIG program will also use this address Option Window I O Base Address Sets the I O address where SETUP comminicates with the controller Tuning Parameters Sets tuning parameters DC offset and voltage pulse rate limit Aux Tuning Parameters Sets auxilliary tuning parameters derivative sample rate etc Axis Configuration Allows axes to ...

Page 117: ...gain Kv velocity feed forward Ka acceleration feed forward Ko static DAC offset Kf friction feed forward En position error Mn 0 or 1 based on the command velocity Vn command velocity An command acceleration 2 6 Sn integrated error Smax maximum integrated error Proportional Gain The proportional gain affects the analog command voltage or pulse rate based on the amount of position error The higher t...

Page 118: ...to Frequency converter outputs to prevent motion when the axis is placed in idle mode The internal offset is set by the CONFIG EXE program After the CONFIG program has run the normal DAC offset should be under 3 millivolts which will not produce step pulses Tem perature drift is approximately 1 millivolt per degree C Only positive values of Offset will output steps since the Voltage to Frequency c...

Page 119: ... the controller will use feedback from an external device to close the loop If open loop are selected and Step was selected on Motor line the board will direct the step output back into the encoder input for the axis in effect digitally closing the loop on the con troller Figure C 6 Internal Architecture to Control Step Motors Speed Disable Output or Fast or Medium or Slow This selection sets the ...

Page 120: ...alog servo motors configure the output for bipolar operation If you are using stepper motors configure the output for unipolar operation Slow Medium Fast 0 to 23 kHz 0 to 94 kHz 0 to 375 kHz Table C 5 Tuning Parameters for Open loop steps Parameter Setting Proportional Kp 320 Integral Ki 32 Derivative Kd 0 Accel FF Ka 32 Vel FF Kv 3750 I Maximum 32767 Offset 0 Output Limit 32767 Shift 1 Slow 3 Med...

Page 121: ...t Switch Configuration Window The Configure Limit Switch Configuration window defines the active state of the positive neg ative limit switches home switch device fault and the amp enable output It also specifies which event is triggered when each sensor becomes active The events are Selection Device Type Pin Location Encoder Incremental Encoder Motor Signal Header Analog Unipolar LVDT Analog Inpu...

Page 122: ...e and hardware configurations are re read from boot memory the command and actual positions are reset the amp enable output is disabled User I O is reconfigured etc A hardware reset causes the DSP to release control of the axes and I O for a few milliseconds which may cause motors to jump Event No Action Ignore a condition Stop Decelerate to a stop at a specified stop rate E Stop Decelerate to a s...

Page 123: ...C 9 Status Position Status Window Axis Status Figure C 10 Status Axis Status Window This window displays the real time status of the flags for the axis displayed In the following Option Window Position Status Displays the position velocity and acceleration of each axis Axis Status Displays the status of each axis Motion E stop Run Idle etc Dedicated I O Display the status of dedicated I O lines Bu...

Page 124: ... if the position is within the in position window Negative Direction Displays Yes if the command velocity is negative Frames Left Displays Yes if additional unexecuted frames are still in buffer Axis Done Displays Yes if In Motion is No and In Position is Yes Source Displays the source host CPU position limit etc of a current event State Displays current event on an axis Button Clear Reset all fla...

Page 125: ...c and S curve Generally choose an acceleration that is 10 times the velocity and a jerk that is 100 times the acceleration Recall that the velocity is the rate of change of the position acceleration is the rate of change of the velocity and jerk is the rate of change of the acceleration Also note that increasing the velocity and acceleration of parabolic and S curve moves can actually increase the...

Page 126: ...he F4 key To dis play continuous motion use the Repeat button in the Motion Two Point Motion window To command single step motion press the space bar The hot keys that control data acquisition and display are Table C 6 Hot Keys Key Space Bar Command a single move acquire data in either direction T Change the trigger mode for REPEAT motion Trigger data acquisition on increasing position Trigger dat...

Page 127: ...umber of data points dis played divided by the total number of DSP calculation cycles during the move Press the letter to select D Display mode C Continuous mode which instructs the host CPU to collect and display the data simultaneously S Sample then display mode which instructs the host CPU to collect all the data and then display it on the screen The sample then display mode has a higher sampli...

Page 128: ...SETUP EXE C 20 Motion Menu Graphic Analysis Artisan Technology Group Quality Instrumentation Guaranteed 888 88 SOURCE www artisantg com ...

Page 129: ... Tuning Closed Loop Servos D 16 Step 1 Set Proportional Gain Kp D 16 Step 2 Set the Derivative Gain D 16 Step 3 Iterate Steps 1 and 2 D 16 Step 4 Set Integral Gain Ki D 16 Step 5 Set Velocity and Acceleration Feed Forward D 17 Tuning Closed Loop Steppers D 18 Step 1 Set Proportional Gain Kp D 18 Step 2 Set Velocity Acceleration Feed Forward Gains Kv Ka D 18 Step 3 Set the Integral Gain Ki D 19 Art...

Page 130: ...ex mathematics and precise knowl edge of all of the system parameters such as motor and amplifier response load inertia and friction Control systems textbooks provide methods for calculation of the tuning parameters for a large variety of applications Trial and error has the advantage in that no knowledge of the control system s possesive pa rameters is necessary and no calculations are needed How...

Page 131: ...iles from software The PID algorithm is based on the following formula On 2shift Kp En Kd En En 1 Ki Sn Kv Vn 64 Ka An Kf Mn Ko The lower case n represents the sample period The terms are defined if Smax Sn Smax Sn Sn 1 En if Sn Smax Smax if Sn Smax Smax On DAC output shift overall scale factor Kp proportional gain Kd derivative gain Ki integral gain Kv velocity feed forward Ka acceleration feed f...

Page 132: ...leration Feedforward 64 Multiplier PID Filter 2shift 2shift Output Limit Offset Internal Offset Friction Feedforward 16 bit resolution across 10volts D A Converter DAC Volts Servo Output Error KI z z 1 Kp KD z 1 z Integration Limit Output z Transfer of the Integrator and Differentiator Artisan Technology Group Quality Instrumentation Guaranteed 888 88 SOURCE www artisantg com ...

Page 133: ...tional Gain Determines the systems overall response to position error Kd Derivative Gain Provides damping and stability for the system by preventing over shoot Ki Integral Gain Helps the system overcome static position errors caused by friction or loading Kv Velocity Feed Forward Increases the system s motor control signal based on the command ve locity useful for amplifiers in velocity mode Ka Ac...

Page 134: ...le D 4 Typical Proportional Gain Values If Proportional Gain is System tends to be with Stiffness and incurs under Load Low very stable and to not oscillate low large position errors High less stable and oscillate high small position errors For Typical Proportional Gain Values are Velocity controlled servos voltage or closed loop step systems 100 500 Torque controlled servos current 500 2000 Artis...

Page 135: ...motor to fall behind The end result is that the output voltage and position error will oscillate as demonstrated in the graphs below Also low Kp values will often result in static errors at the end of moves Figure D 3 Insufficient Proportional Gain The motor actual posi tion is not keeping up with the command posi tion yet the output volt age is not saturated Note the static error at the end of th...

Page 136: ...xcessive Proportional Gain Note Excessive proportional gain is characterized by oscillation In some situa tions damping derivative gain can be increased to help compensate The motor actual posi tion is keeping up with the command position but the output voltage is saturated and oscillates Less gain is needed HIGH PROPORTIONAL GAIN But output saturates oscillates Follows the command position well A...

Page 137: ...ter a step change in posi tion Large values of Derivative gain have a slower step response but also may allow higher Proportional Gain to be used without oscillation Table D 6 Typical Derivative Gain Values If Derivative Gain is System Response Low very fast but has overshoot ringing High not as fast but may allow higher Proportional Gains to be used without oscillation For Typical Derivative Gain...

Page 138: ...D 5 Insufficient Derivative Gain LOW DERIVATIVE GAIN Follows the command position quickly and well Actual Position Command Position But output oscillates Artisan Technology Group Quality Instrumentation Guaranteed 888 88 SOURCE www artisantg com ...

Page 139: ...6 Excessive Derivative Gain HIGH DERIVATIVE GAIN Slower response to position error Actual Position Command Position High Proportional Gain with no ringing Artisan Technology Group Quality Instrumentation Guaranteed 888 88 SOURCE www artisantg com ...

Page 140: ...te at low frequen cy about the desired position Table D 8 Typical Integral Gain Values Table D 9 Integral Mode Configurations Figure D 7 Insufficient Integral Gain only when standing If Integral Gain is System Response Low or zero has position errors at rest Higher has smaller position errors at rest but may hunt for the desired position Typical Integral Gain Values are 0 32 depending on the Integ...

Page 141: ... a higher output voltage or pulse rate is needed to reduce the following position error The Velocity Feed Forward term reduces the following position error by increasing the controller output voltage proportionally to the command velocity Table D 10 Effects of Velocity Feed Forward If Velocity Feed Forward is Then too large the motor will try to travel ahead of the command position too small the s...

Page 142: ...such as gravity that is applied externally to a control system Note that the internal offset in a DSP controller is calibrated at the factory so that when the offset is zero the analog or pulse output is also zero If necessary use the CONFIG program to re calibrate the analog and step pulse output Scale You use the Scale parameter to adjust the resolution of the PID and feed forward terms The Scal...

Page 143: ... 768 to 32 767 Generally torque controlled motion systems with constant friction benefit most from using a friction feed forward term Integration Limit The integrator sums the position error as a function of time The integrator summation is lim ited using the Integration Limit This prevents the integrator from building up a large position error summation and saturating the motor control output sig...

Page 144: ... Proportional Gain to half the value that first produces oscillation The stability can be tested by physically bumping the motor shaft or mechanical system An external impulse should not cause the motor to oscillate if the Proportional Gain Kp is set properly Step 2 Set the Derivative Gain Start with a Derivative Gain Kd equal to the Proportional Gain Kp Increase the value of Kd by factors of two ...

Page 145: ...s in the Movement and Motion Parameters controls specify a move that takes 5 to 10 seconds using the highest desired speed and acceleration Notice the position error during the constant speed portion of the motion Increase the Velocity Feed Forward Kv until the constant velocity error is minimized Use the same process to adjust the Acceleration Feed Forward Ka watching the acceleration error durin...

Page 146: ... a very small value about 1 10 of the current value Step 2 Set Velocity Acceleration Feed Forward Gains Kv Ka Using the fields in the Movement and Motion Parameters controls specify a move with a typically desired speed and acceleration and that also takes 5 to 10 seconds to complete Notice the position error during the constant speed portion of the motion Increase the Ve locity Feed Forward Gain ...

Page 147: ...ed Loop Steppers Start the motion and observe the position error between moves Gradually increase the Integral Gain Ki until the final position error is minimized As you increase the Integral Gain Ki above this level watch for oscillation at the beginning or end of the motion If oscillation occurs at the beginning or end of the motion reduce the val ue of the Integral Gain Ki Parameter Value Delay...

Page 148: ...TUNING D 20 Tuning Closed Loop Steppers Step 3 Set the Integral Gain Ki Artisan Technology Group Quality Instrumentation Guaranteed 888 88 SOURCE www artisantg com ...

Page 149: ... 8 Pinouts PCX CPCI STD 104X V6U E 9 CPCI DSP Rear I O E 11 Notes for CPCI Rear I O E 14 PCI E 14 104 LC E 16 Specifications Power Consumption Notes E 18 PCX E 19 CPCI E 20 PCI E 21 STD E 22 SERCOS STD E 23 V6U E 24 104 E 25 104X E 26 SERCOS 104 E 27 LC E 28 SERCOS DSP E 29 LED support E 30 Artisan Technology Group Quality Instrumentation Guaranteed 888 88 SOURCE www artisantg com ...

Page 150: ... I O 1 4 axis controllers Motor Axes 4 5 Motor Axes 0 1 Analog Inputs 8 Motor Axes 6 7 Motor Axes 2 3 PCX PCX Motor Signal Headers 26 pins P1 P8 P2 P3 P4 P6 P5 P7 Analog Inputs 8 User I O Motor Axes 4 5 Motor Axes 0 1 Motor Axes 2 3 Motor Axes 6 7 Dedicated I O Axes 0 3 Dedicated I O Axes 4 7 or User I O 1 4 axis controllers J5 J4 CPCI CPCI Motor Signal Headers Artisan Technology Group Quality Ins...

Page 151: ... Dedicated I O Axes 4 7 Motor Axes 2 3 Motor Axes 6 7 or User I O 1 4 axis controllers STD or 104X STD or 104X Motor Signal Headers 26 pins P1 P3 P8 P2 P4 P6 P5 P7 Analog Inputs 8 Motor Axes 0 1 User I O Dedicated I O Axes 0 3 Dedicated I O Axes 4 7 or User I O 1 4 axis controllers Motor Axes 4 5 Motor Axes 2 3 Motor Axes 6 7 V6U V6U Motor Signal Headers 26 pins Artisan Technology Group Quality In...

Page 152: ... LC Figure E 6 Motor Signal Header Locations LC 104 Motor Axes 0 3 Dedicated and User I O 104 Motor Signal Headers 50 pins LC Motor Axes 0 3 Dedicated and User I O LC Motor Signal Headers 50 pins Artisan Technology Group Quality Instrumentation Guaranteed 888 88 SOURCE www artisantg com ...

Page 153: ...t with Home sensor signals is con figured as an output port only 6 of the 8 signals can be used For the PCX CPCI STD and V6U the Home Sensor inputs are not available for User I O The following diagram shows the configuration of the 72 I O lines for the PCX CPCI STD and V6U PCX CPCI STD V6U Figure E 7 User Dedicated I O Headers PCX CPCI STD and V6U Table E 1 User I O Headers I O Description P1A Use...

Page 154: ...P1 29 17 2 P1 13 2 0 P1 43 10 1 P1 27 18 2 P1 11 3 0 P1 41 11 1 P1 25 19 2 P1 9 4 0 P1 39 12 1 P1 23 20 2 P1 7 5 0 P1 37 13 1 P1 21 21 2 P1 5 6 0 P1 35 14 1 P1 19 22 2 P1 3 7 0 P1 33 15 1 P1 17 23 2 P1 1 Table E 3 User I O Available on Controllers with 4 or Less Axes Bit Port Header Pin Bit Port Header Pin Bit Port Header Pin 24 3 P3 47 32 4 P3 31 40 5 P3 15 25 3 P3 45 33 4 P3 29 41 5 P3 13 26 3 P...

Page 155: ...e signals can be programmed in groups of 8 as inputs or outputs Bit Description Pin Bit Description Pin Bit Description Pin 0 User Port A 8 bits input or output 1 8 User Port B 8 bits input or output 9 16 User Port C 8 bits input or output 17 1 2 9 10 17 18 2 3 10 11 18 19 3 4 11 12 19 20 4 5 12 13 20 21 5 6 13 14 21 22 6 7 14 15 22 23 7 8 15 16 23 24 Artisan Technology Group Quality Instrumentati...

Page 156: ...h impedance input state Table E 4 104 LC User I O Connections 100 pin connector Bit Port Module Pin Bit Port Module Pin Bit Port Module Pin 0 0 1 39 8 1 2 89 16 2 1 45 1 0 1 41 9 1 2 91 17 2 1 47 2 0 1 43 10 1 2 93 18 2 1 46 3 0 1 40 11 1 2 90 19 2 1 48 4 0 1 42 12 1 2 92 20 2 2 95 5 0 1 44 13 1 2 94 21 2 2 97 6 0 14 22 2 2 96 7 0 15 23 2 2 98 Table Notes bits 6 7 14 and 15 are not available on th...

Page 157: ...coder Index 1st 7 12V 8 Encoder Index 1st 8 Analog in 2 9 10V Analog Out 1st 9 5V 10 Step Pulse 1st 10 Analog in 3 11 Step Pulse 1st 11 Gate 0 12 Step Direction 1st 12 Analog in 4 13 Step Direction 1st 13 Out 0 14 GND 2nd 14 Analog in 5 15 5V 2nd 15 Out 1 16 Encoder A 2nd 16 Analog in 6 17 Encoder A 2nd 17 Out 2 18 Encoder B 2nd 18 Analog in 7 19 Encoder B 2nd 19 GND 20 Encoder Index 2nd 20 Analog...

Page 158: ... 2 13 In Position Out 0 4 13 I O Line C 1 15 Amp Enable Out 0 4 15 I O Line C 0 17 Amp Fault Input 3 7 17 I O Line B 7 19 Home Input 3 7 19 I O Line B 6 21 NEG Limit Input 3 7 21 I O Line B 5 23 POS Limit Input 3 7 23 I O Line B 4 25 Amp Fault Input 2 6 25 I O Line B 3 27 Home Input 2 6 27 I O Line B 2 29 NEG Limit Input 2 6 29 I O Line B 1 31 POS Limit Input 2 6 31 I O Line B 0 33 Amp Fault Input...

Page 159: ...er A 4 A25 Encoder Index 3 B25 Encoder Index 3 Table E 8 J4 Rear I O Connections Continued Pin Signal Pin Signal C1 User I O PB6 D1 User I O PB7 C2 User I O PB2 D2 User I O PB3 C3 User I O PA6 D3 User I O PA7 C4 User I O PA2 D4 User I O PA3 C5 Home Input 7 D5 Positive Limit 7 C6 User I O PC3 D6 In Position 7 C7 Home Input 6 D7 Positive Limit 6 C8 Home Input 5 D8 Positive Limit 5 C9 User I O PC2 D9...

Page 160: ... GND Table E 10 J5 Rear I O Connections Pin Signal Pin Signal A1 Encoder A 3 B1 Encoder A 3 A2 Encoder A 2 B2 Encoder A 2 A3 Encoder A 1 B3 Encoder A 1 A4 Encoder A 0 B4 Encoder A 0 A5 Direction 6 B5 Direction 6 A6 Direction 5 B6 Direction 5 A7 Direction 4 B7 Direction 4 A8 Direction 3 B8 Direction 3 A9 Direction 2 B9 Direction 2 A10 Direction 1 B10 Direction 1 A11 Direction 0 B11 Direction 0 A12 ...

Page 161: ...8 12V D18 Reserved C19 Analog GND D19 Reserved C20 12V D20 Reserved C21 Analog GND D21 Analog in 6 C22 Analog GND D22 Analog in 2 Table E 12 J5 Rear I O Connections Continued Pin Signal Pin Signal E1 Encoder Index 2 F1 GND E2 Encoder Index 2 F2 GND E3 Encoder Index 1 F3 GND E4 Encoder Index 1 F4 GND E5 Encoder Index 0 F5 GND E6 Encoder Index 0 F6 GND E7 Reserved F7 GND E8 Step Pulse 7 F8 GND E9 St...

Page 162: ...me2_IN 41 5V_OUT 8 Pos_Lim0_IN 42 Gnd_OUT 8 Pos_Lim2_IN 42 Gnd_OUT 9 Neg_Lim0_IN 43 Mech0_Rtn 9 Neg_Lim2_IN 43 Mech2_Rtn 10 Command_0 44 Command_0 10 Command_2 44 Command_2 11 Reserved 45 Reserved 11 Reserved 45 Reserved 12 Amp_Flt0_IN 46 Amp_Flt0_Rtn 12 Amp_Flt2_IN 46 Amp_Flt2_Rtn 13 Amp_En0_C 47 Amp_En0_E 13 Amp_En2_C 47 Amp_En2_E 14 Reserved 48 Reserved 14 Reserved 48 Reserved 15 Step0 49 Step0...

Page 163: ...IO_B1 35 UserIO_B1_Rtn 11 UserIO_B2 36 UserIO_B2_Rtn 12 UserIO_B3 37 UserIO_B3_Rtn 13 UserIO_B4 38 UserIO_B4_Rtn 14 UserIO_B5 39 UserIO_B5_Rtn 15 UserIO_B6 40 UserIO_B6_Rtn 16 UserIO_B7 41 UserIO_B7_Rtn 17 UserIO_C0 42 UserIO_C0_Rtn 18 UserIO_C1 43 UserIO_C1_Rtn 19 UserIO_C2 44 UserIO_C2_Rtn 20 UserIO_C3 45 UserIO_C3_Rtn 21 UserIO_C4 46 UserIO_C4_Rtn 22 UserIO_C5 47 UserIO_C5_Rtn 23 UserIO_C6 48 U...

Page 164: ...ep Pulse 1 21 Step Pulse 0 22 Step Pulse 1 23 Direction 0 24 Direction 1 25 Direction 0 26 Direction 1 27 Positive Limit 0 28 Positive Limit 1 29 Negative Limit 0 30 Negative Limit 1 31 Home Input 0 32 Home Input 1 33 Amp Fault 0 34 Amp Fault 1 35 Amp Enable 0 36 Amp Enable 1 37 In Position 0 38 In Position 1 39 User I O PA0 40 User I O PA3 41 User I O PA1 42 User I O PA4 43 User I O PA2 44 User I...

Page 165: ...Pulse 2 22 Step Pulse 3 23 Direction 2 24 Direction 3 25 Direction 2 26 DIrection 3 27 Positive Limit 2 28 Positive Limit 3 29 Negative Limit 2 30 Negative Limit 31 Home Input 2 32 Home Input 3 33 Amp Fault 2 34 Amp Fault 3 35 Amp Enable 2 36 Amp Enable 3 37 In Position 2 38 In Position 3 39 User I O PB0 40 User I O PB3 41 User I O PB1 42 User I O PB4 43 User I O PB2 44 User I O PB5 45 User I O PC...

Page 166: ...ower is through 25mil traces of 1oz copper Allows 1 amp to flow with 10 degrees C temp rise A conservative estimate of current that can be drawn off the supply pins of the on board head ers A typical estimate of current that can be drawn off the supply pins of the on board headers Table E 17 Current dissipation for all DSP Series boards 5V typical 5V max 12V max 12V max 4 axis board 0 513 amp 0 53...

Page 167: ... I Digital Noise Filtering RS 422 Line receiver inuts 4 0 mA max current output Motion Profiles Trapezoidal Parabolic S Curve acceleration deceleration Dedicated I O TTL compatible 4 0 mA drive on outputs No pull up resistors are included Dedicated Inputs per axis Forward Limit POS Reverse Limit NEG Home Amp Fault Dedicated Outputs per axis In Position Amp Enable User I O 2 4 axis models 44 lines ...

Page 168: ...Filtering RS 422 Line receiver inputs 4 0 mA max current input Motion Profiles Trapezoidal Parabolic S Curve acceleration deceleration Dedicated I O TTL compatible 4 0 mA drive on outputs No pull up resistors are included Dedicated Inputs per axis Forward Limit POS Reverse Limit NEG Home Amp Fault Dedicated Outputs per axis In Position Amp Enable User I O 2 4 axis models 44 lines 6 8 axis models 2...

Page 169: ...I Digital Noise Filtering RS 422 line receiver inputs 4 0 mA max current input Motion Profiles Trapezoidal Parabolic S Curve acceleration deceleration Dedicated I O Optically isolated 5 24V with termination resistors Dedicated Inputs per axis Forward Limit POS Reverse Limit NEG Home Amp Fault Dedicated Outputs per axis Amp Enable In Position not optically isolated User I O 24 lines of Bi Direction...

Page 170: ... A B I Digital Noise Filtering RS 422 line receiver inputs 4 0 mA max current input Motion Profiles Trapezoidal Parabolic S Curve acceleration deceleration Dedicated I O TTL compatible 4 0 mA drive on outputs No pull up resistors are included Dedicated Inputs per axis Forward Limit POS Reverse Limit NEG Home Amp Fault Dedicated Outputs per axis In Position Amp Enable User I O 2 4 axis models 44 li...

Page 171: ...e rate in drive typical 5 kHz Current loop update rate in drive up to 20 kHz Interoperability Indramat Pacific Scientific Kollmorgen Sanyo Denki Modicon and Lutze LEDs Axis Status Fault Loop Closed Motion Profiles Trapezoidal Parabolic S Curve acceleration deceleration Ranges Position 32 bit 2 15 billion counts steps Velocity 48 bit 65 million counts sec and 2 kHz sampling Acceleration 48 bit 131 ...

Page 172: ... or differential A B I Digital Noise Filtering RS 422 line receiver inputs 4 0 mA max current input Motion Profiles Trapezoidal Parabolic S Curve acceleration deceleration Dedicated I O TTL compatible 4 0 mA drive on outputs No pull up resistors are included Dedicated Inputs per axis Forward Limit POS Reverse Limit NEG Home Amp Fault Dedicated Outputs per axis In Position Amp Enable User I O 2 4 a...

Page 173: ...on Feedback Input Frequency 5 MHz max including Quadrature Quadrature single ended or differential A B I Digital Noise Filtering RS 422 line receiver inputs 4 0 mA max current input Motion Profiles Trapezoidal Parabolic S Curve acceleration deceleration Dedicated I O TTL compatible 4 0 mA drive on outputs No pull up resistors are included Dedicated Inputs per axis Forward Limit POS Reverse Limit N...

Page 174: ...B I Digital Noise Filtering RS 422 line receiver inputs 4 0 mA max current input Motion Profiles Trapezoidal Parabolic S Curve acceleration deceleration Dedicated I O TTL compatible 4 0 mA drive on outputs No pull up resistors are included Dedicated Inputs per axis Forward Limit POS Reverse Limit NEG Home Amp Fault Dedicated Outputs per axis In Position Amp Enable User I O 2 4 axis models 44 lines...

Page 175: ...rate in drive typical 5 kHz Current loop update rate in drive up to 20 kHz LEDs Axis Status Fault Loop closed Interoperability Indramat Pacific Scientic Kollmorgen Sanyo Denki Modicon and Lutze Motion Profiles Trapezoidal Parabolic S Curve acceleration deceleration Ranges Position 32 bit 2 15 billion counts steps Velocity 48 bit 65 million counts sec and 2 kHz sampling Acceleration 48 bit 131 bill...

Page 176: ...cluding Quadrature Quadrature single ended or differential A B I Digital Noise Filtering RS 422 line receiver inputs 4 0 mA max current input Motion Profiles Trapezoidal Parabolic S Curve acceleration deceleration Dedicated I O TTL compatible 4 0 mA drive on outputs No pull up resistors are included Dedicated Inputs per axis Forward Limit POS Reverse Limit NEG Home Amp Fault Dedicated Outputs per ...

Page 177: ...e in drive typical 5 kHz Current loop update rate in drive up to 20 kHz LEDs Axis Status Fault Loop closed Interoperability Indramat Pacific Scientific Kollmorgen Sanyo Denki Modicon and Lutze Motion Profiles Trapezoidal Parabolic S Curve acceleration deceleration Ranges Position 32 bit 2 15 billion counts steps Velocity 48 bit 65 million counts sec and 2 kHz sampling Acceleration 48 bit 131 billi...

Page 178: ...0 1 2 3 4 5 6 or 7 EPROM versions 1 24 2 24 and higher and firmware versions 2 1C and higher support the LEDs Older firmware version 2 1C does not support the axis LEDs When using 2 1C firmware the axis LEDs may remain Orange or may not be lit FPGA LED Status Red FPGA did not boot properly No LED DSP did not boot properly Green FPGA and DSP are OK Axis LED Status No LED Off Axis not enabled Orange...

Page 179: ...hes configure the direction of 3 user I O ports Each OptoCon supports 2 motion control axes dedicated I O 2 axes and 10 lines of user I O Connector P1 is a 50 pin IDC connector and is compatible with the LC DSP and 104 DSP con trollers Four axis applications require using 2 OptoCon modules The OptoCon requires that you use the CBL 100 cable with each CBL 100 cable supporting up to 4 axes of contro...

Page 180: ...ion use the MEI library function set_boot_amp_enable_level Note The Amp Enable pull down resistors should only be enabled when the Amp En ables are configured as Active High on the motion controller Note The pull down resistors for the In Position outputs should always be enabled because the the In Position outputs are always Active High Table F 1 Switch S1 Settings To enable disable pull down res...

Page 181: ... s direction do not use init_io to reconfigure the port s direction Warning You can only use the switch settings shown in the table Other switch settings may damage the OptoCon circuits Table F 2 Switch S2 S3 Settings To configure User I O as inputs or outputs Position Port A B Input Port C Input Port A B Input Port C Output Port A B Output Port C Input Port A B Output Port C Output Switch S2 1 Of...

Page 182: ... connector on MEI accessory cable CBL 100 to the 100 pin header on the LC DSP or 104 DSP Connect either of the two 50 pin connectors on the CBL 100 to the 50 pin header on the OptoCon OptoCon Cabling OPTOCON 104 DSP OPTOCON LC DSP CBL 100 Motor Encoder Dedicated I O for Axes 2 3 User I O PB0 PB5 PC4 PC7 Motor Encoder Dedicated I O for Axes 0 1 User I O PA0 PA5 PC0 PC3 OR 100 pin header 100 pin hea...

Page 183: ...ep Pulse 0 20 Step Pulse 1 21 Step Pulse 0 22 Step Pulse 1 23 Direction 0 24 Direction 1 25 Direction 0 26 Direction 1 27 Positive Limit 0 28 Positive Limit 1 29 Negative Limit 0 30 Negative Limit 1 31 Home Input 0 32 Home Input 1 33 Amp Fault 0 34 Amp Fault 1 35 Amp Enable 0 36 Amp Enable 1 37 In Position 0 38 In Position 1 39 User I O PA0 40 User I O PA3 41 User I O PA1 42 User I O PA4 43 User I...

Page 184: ...Step Pulse 2 22 Step Pulse 3 23 Direction 2 24 Direction 3 25 Direction 2 26 Direction 3 27 Positive Limit 2 28 Positive Limit 3 29 Negative Limit 2 30 Negative Limit 3 31 Home Input 2 32 Home Input 3 33 Amp Fault 2 34 Amp Fault 3 35 Amp Enable 2 36 Amp Enable 3 37 In Position 2 38 In Position 3 39 User I O PB0 40 User I O PB3 41 User I O PB1 42 User I O PB4 43 User I O PB2 44 User I O PB5 45 User...

Page 185: ...n threshold voltage 0 6 V max 19 V max Propagation delay High Low tPDHL 50 µsec max 20 µsec max Propagation delay Low High tPDLH 300 µsec max 400 µsec max Table F 6 Outputs V_USER 5 VDC V_USER 24 VDC On state output voltage 0 25 V 250mA 0 25 V 250mA On state output current 250 mA max 250 mA max Off state output leakage current 25 µA max 25 µA max Propagation delay Low High tPDLH 10 µsec max 20 µse...

Page 186: ...it Negative Limit Home and Fault cannot be reconfigured All of the I O signals share a common supply V_USER USER_GND which is fused at 1 amp Additionally each individual output is fused at 1 amp 2 7K Vcc V_Opto P2 2 P2 27 P2 34 P2 39 P2 48 Fuse 1A 60V V_USER Input To Controller TYPICAL INPUT CIRCUIT Input Circuit Note V_OPTO is shared by all input and output circuits in the OptoCon 10K V_Opt Vcc P...

Page 187: ... controller will read depending upon the state of the switch and the configuration of the Home event logic For example if the switch is open the Home input will be high 1 and if the Home event logic is configured for Active High the controller will generate an event Home Input Active High Active Low Switch State State Event Event Open 1 Yes No Closed 0 No Yes 2 7 LC DSP 104 DSP P2 2 V Common CBL 1...

Page 188: ...f the Home event logic is configured for Active High the controller will not generate an event When In is high the driver transistor is required to sink the current flowing through the opto isolator diode The driver transistor must be capable of sinking this current To calculate IC ISink V VD VCE 2700 V Your system s power supply voltage VD Voltage across diode VD 1V VCE Collector emitter On volta...

Page 189: ...ot be able to disable the amplifier by pulling the Enable input low To calculate Isink Isink V VDS RP RP Equivalent parallel resistance of Rin 10K RP Rin 10K Rin 10K V Amplifier logic power supply voltage VDS OptoCon On state output voltage VDS 0 25V Rin Amplifier Enable internal pull up resistance Note The Amp Enable output s polarity must match the polarity of the amplifier s Enable input The Am...

Page 190: ...age Rin Amplifier Enable internal pull up resistance If the value for Vin is lower than the amplifier manufacturer s minimum high input thresh old voltage you must add the resistor Rext see the next figure To calculate the required value of Rext first calculate the parallel resistance RP required to achieve the desired Vin high level RP Rin 1 V Vin V Amplifier s logic power supply voltage Vin Requ...

Page 191: ...mum On state output current for the OptoCon 250 mA If this condition is not met the relay may not switch To calculate Isink Isink V VDS RC V Amplifier logic power supply voltage VDS OptoCon On state output voltage VDS 0 25V RC Relay coil resistance Warning You must set S1 correctly for Active High or Active Low Amp Enable Operation see Switch Settings on F 2 10K LC DSP 104 DSP P2 2 V Common CBL 10...

Page 192: ...OPTOCON REFERENCE F 14 Circuit Examples Connect an OptoCon Output to a Relay Artisan Technology Group Quality Instrumentation Guaranteed 888 88 SOURCE www artisantg com ...

Page 193: ...o step and direction controlled servo motors 4 3 8254 counter for user functions 5 4 82C55 Intel Programmable Peripheral Interface Con troller 5 2 A Acceleration Feed Forward Ka D 14 Axis Configuration property page 6 1 Axis Configuration Tab Motion Console B 10 Axis Status Control Panel Motion Console B 7 Axis Window Motion Console Axis Configuration Tab B 10 Axis Status Control Panel B 7 Graph T...

Page 194: ... input wiring 5 8 5 10 output wiring 5 8 Derivative Gain Kd D 9 effects of D 9 typical values of D 9 direction pulse synchronization in step drives A 4 dual loop control 104 LC 4 15 PCX CPCI STD V6U 104X 4 6 E encoders to verify correct phasing with motor 6 3 F firmware versions 1 5 Friction Feed Forward parameter D 15 G Graph Tab Motion Console B 11 Grayhill Gordos Opto 22 pin arrangements 5 2 H ...

Page 195: ...ircuits typical F 8 installation F 4 connect an output to a relay F 13 connect an output to an amp enable input pull down resistor F 12 connect an output to an amp enable input pull up resistor F 11 connect input to a switch F 9 connect input to open collector driver F 10 screw terminal connectors F 5 specifications F 7 switch settings F 2 opto isolation PCI opto circuit specifications 5 7 P PCI a...

Page 196: ...led A 2 velocity torque mode A 1 wiring discussion A 1 software updates how to get 1 4 specifications OptoCon F 7 STC Modules STC D50 2 3 STC modules OptoCon 2 2 STC 136 2 3 STC 20 2 2 STC 26 2 2 STC 50 2 2 STC D50 2 3 STD 8254 counter wiring 5 4 analog input wiring 5 3 base I O address 2 11 home limit switch wiring non opto isolated 5 5 opto isolated 5 5 I O addresses for 2 4 installation 2 11 in...

Page 197: ...fects of D 13 what do gains do D 5 what problems do gains solve D 5 Tuning parameters window 6 3 U User Dedicated I O User I O controllers with 4 or less axes E 6 User I O on any controller E 6 User I O Motion Console B 5 V V6U 8254 counter wiring 5 4 addresses VME 2 16 analog input wiring 5 3 base address switch 2 15 2 16 base I O address 2 15 encoder integrity checking 4 10 encoder interface 4 7...

Page 198: ...INDEX Index 6 V Artisan Technology Group Quality Instrumentation Guaranteed 888 88 SOURCE www artisantg com ...

Page 199: ...l service in house repair center WE BUY USED EQUIPMENT Sell your excess underutilized and idle used equipment We also offer credit for buy backs and trade ins www artisantg com WeBuyEquipment REMOTE INSPECTION Remotely inspect equipment before purchasing with our interactive website at www instraview com LOOKING FOR MORE INFORMATION Visit us on the web at www artisantg com for more information on ...

Reviews: