background image

3 9

S V E R K E R   7 5 0 / 7 6 0

P r o g r a m m a   E l e c t r i c   A B
Z P - C D 0 1 E   R 0 5 A

6 How to operate

Sverker

6.2 Injecting current –
General rules

When you inject current through protective relay
equipment for testing purposes, you must observe
several rules of thumb:

• Provide as much impedance as possible in

series with the load.
This will counteract changes in current and
minimize waveform distortion for relays
whose impedances change when they have
operated, and also for relays that become
saturated.
Moreover, the current become more easy to
to adjust, since this will increase the turn of
the knob.

• When you are measuring operating times,

the value of the applied current or voltage
used for testing must exceed the tripping
limit by an ample margin (rule of thumb: 1.2-
1.5 times the pick-up limit).

• High current should be injected through the

protective relay equipment for as short a
time as possible to prevent overheating.
It may be advisable to use manually-control-
led (momentary) generation or time-limited
generation when injecting high current.

Output alarm

If more than 1 V/ 0.5 A flows (in the 10 A range)
when Sverker is in the OFF state there will be a
message on the display "CAUTION OUTPUT".

CAUTION OUTPUT

6.1 General

This chapter presents the steps you should take to
perform typical Sverker testing operations effi-
ciently. Sometimes several alternative ways of
carrying out a step are presented. This chapter will
help you formulate testing procedures for different
types of protective relay equipment.

Summary of Contents for Programma Sverker 750

Page 1: ...SVERKER 750 760 User s manual Relay Test Unit ...

Page 2: ...commitment on the part of Programma Electric AB Any attached hardware schematics and technical descriptions or software listings that disclose source code are for informational purposes only Reproduction in whole or in part to create working hardware or software for other than Programma Electric AB products is strictly prohibited except as permitted by written license agreement with Programma Elec...

Page 3: ... indicator 21 4 5 Display 21 4 6 Ammeter voltmeter 22 4 7 AC Voltage source 23 Sverker 750 23 Sverker 760 23 4 8 Auxiliary voltage source 23 4 9 Make Break contact 24 4 10 Resistor set and capacitor 24 Sverker 750 24 Sverker 760 24 4 11 Power supply 25 4 12 Other 25 5 Making settings on the display 26 5 1 Introduction 26 5 2 Button functions 27 5 3 Direction indicator 27 5 4 The menu system 30 5 5...

Page 4: ... measurement not initiated by Sverker 50 6 18 Measuring Z P R X VA VAR and COS M 50 6 19 Plotting a magnetization curve 51 6 20 Testing an automatic recloser 52 6 21 Measuring the trip pulse length 53 6 22 Injecting current External start 53 7 Application examples 54 7 1 Testing voltage relays 54 7 2 Testing over current relays 55 7 3 Testing directional over current relay systems or directional g...

Page 5: ...r outlet WARNING FIRST OF ALL connect protective earth ground Use the green yellow cable NEVER connect the Sverker 750 760 to an external voltage if the protective earth ground is not connected Always use safety connecting leads Always turn the Sverker 750 760 off before connecting Generated voltages and currents may be harmful to the operator or the device under test The Sverker 750 760 should be...

Page 6: ... phase by phase Moreover many relay protection systems that require phase shifting can be tested Items that can be tested using Sverker 750 760 include Type of relay IEEE standard code Overcurrent relay 50 76 Inverse time overcurrent relay 51 Undercurrent relay 37 Ground fault relay 50 Directional overcurrent relay 67 Directional ground fault relay 67N Overvoltage relay 59 Undervoltage relay 27 Di...

Page 7: ...e Using transformer technology in Sverker design gives both advantages and disadvantages One disadvantage is that the quality of the output signal is depending on the quality of the input voltage if the main voltage is distorted the output signal will also be distorted Sverker is equipped with a timer ammeter and voltmeter and these instruments can also be used to indicate resistance impedance pha...

Page 8: ...f Sverker and the types of functions it performs For more detailed descriptions please see Chapters 4 and 5 Sverker 760 control panel The front panel of Sverker 760 is almost the same as Sverker 750 s The differences are that there is no capacitor terminals in the upper left corner and the AC voltage source has a phase angle control Sverker 750 control panel ...

Page 9: ...i t n e r e h t o e s y a l e r r e t f a d e t p u r r e t n i s i n o i t a r e n e g s r u c c o p i r t n e h W e h t s e t a l u m i s y a l e d s i h T s e l c y c s n i a m f o r e b m u n a y a l e d f o h t g n e l e h T e m i t g n i k a e r b s r e k a e r b t i u c r i c r e s u e h t y b t e s e b n a c An indicator lamp to the right of the set of resistors is lighted during generatio...

Page 10: ...he following ways Indication Start condition INT a When an internal start occurs i e for a test sequence started by Sverker ON TIME or OFF TIME b When a voltage is applied to the start input or when a contact is closed c When a voltage applied to the start input vanishes or when a contact is opened d When the state of the input changes Stop conditions The timer can be stopped in the following ways...

Page 11: ...splay The display window is also used to make settings To do this you must put Sverker in the setting mode by pressing the button marked MODE 3 4 Trip indicator When the stop condition is met the TRIP indicator is lighted This lamp indicates tripping of the relay protection equipment When a test includes timing this indicator lamp flashes when tripping occurs ...

Page 12: ... see section 9 5 and or repeat the same test again A HOLD freeze function permits you to measure voltages and currents having durations as short as a quarter of the mains cycle When the timer is stopped the current and voltage values are frozen If the timer is not stopped the values present when the current was interrupted are frozen The hold func tion is engaged by pressing the button marked HOLD...

Page 13: ...voltage input A set of resistors and a capacitor can be used to change the phase angle of the current and the voltage Sverker 760 The AC voltage source provides 0 130 V AC with adjustable phase angle Since the AC voltage source is separated from other outputs it is set independ ently of the current source The AC voltage source is intended primarily for the relay protection equipment s voltage inpu...

Page 14: ...te There is no capacitor on the Sverker 760 The phase angle is set with the knob at the AC voltage source 3 9 Make Break contact There is a make break contact that is actuated when Sverker 750 is set to the ON TIME or OFF TIME state It can be used for example to synchronize other equipment or to change the voltage supplied to the relay protection equipment at the start of a test from non faulty to...

Page 15: ...use the Sverker 750 760 with the software Sverker Win the Sverker 750 760 must be unlocked with a software key You can check if your Sverker is unlocked by doing the folowing 1 Press MODE 2 Press t down arrow until you get to the bottom where the SW version is displayed If the text PC 750 or SVERKER WIN is shown the Sverker is unlocked If the text is not shown you must order the software key for S...

Page 16: ...1 7 S V E R K E R 7 5 0 7 6 0 P r o g r a m m a E l e c t r i c A B Z P C D 0 1 E R 0 5 A 4 Control panel Sverker 750 control panel ...

Page 17: ...1 8 S V E R K E R 7 5 0 7 6 0 P r o g r a m m a E l e c t r i c A B Z P C D 0 1 E R 0 5 A Sverker 760 control panel ...

Page 18: ...her characteristic con nect one or more resistors in series To change the phase angle 90o on Sverker 750 connect the capacitor A jumper must be connected to this connector when it is not being used 11 Start switch Turns the current source on and off Use the and buttons to select the desired mode Indication What is meant ON TIME Current source is activated until the object being tested has operated...

Page 19: ... provides a move to the right on the display 4 3 Timer 12 START input This is used to start the timer Max 250 V AC or DC The time is shown in the display Indication Condition required for timer start INT a Internal Used when ON TIME or OFF TIME is selected b When voltage is applied or when a contact is closed c When applied voltage vanishes or when a contact is opened d When the state of the input...

Page 20: ...d without timing start switch at the ON position Flashing indicator lamp Indicates tripping when the test is being conducted with timing start switch at the ON TIME or OFF TIME position It also indicates that timing is completed Sverker then returns automatically to the OFF state You can reset the flashing indicator lamp by pressing the button marked HOLD item 21 twice 4 5 Display 16 Display 17 Bu...

Page 21: ...d The SEL blue text button selects the menu option that is displayed 20 Input marked V This is the input to the Sverker voltmeter and it is always acti vated The voltage value is shown on the display 21 Button marked HOLD This button freezes the prevailing current and voltage values when the object being tested is tripped or when generation stops If tripping does not occur the prevailing value is ...

Page 22: ... 22 0 130 V AC Separate independent output for AC voltage 23 Knob used for setting the AC amplitude When not in use set to OFF position 43 Knob used for rough adjustment about 90 steps of the phase angle 44 Knob used for fine adjustment of the phase angle Turn this to 0 position most left to get 0 phase shift 4 8 Auxiliary voltage source 27 20 220 V DC Separate independent output for auxiliary vol...

Page 23: ...t and capacitor Sverker 750 35 Capacitor 10 mF 450 V 36 Resistor set Sverker 760 36 Resistor set 4 9 Make Break contact 31 Relay contact Changes state in response to ON TIME and OFF TIME 32 Break normally closed function 33 Make normally open function 34 F3 1A Miniature circuit breaker for relay contact 31 ...

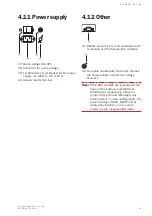
Page 24: ...ltage sources Note CHG ESC and SEL are imprinted on the faces of the buttons marked HOLD MODE and A respectively These im prints CHG ESC and SEL apply only when Sverker is in the setting mode The panel markings HOLD MODE and A apply when Sverker is in its normal mode i e the measurement mode 4 11 Power supply 37 Mains voltage ON OFF 38 Connector for mains voltage 39 F1 Miniature circuit breaker fo...

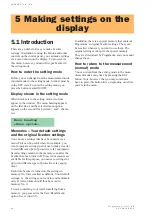
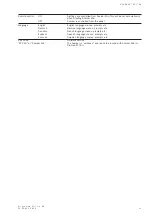
Page 25: ... mode normal mode to the setting mode Sverker must be in the OFF state To enter the setting mode you press the button marked MODE Display shown in the setting mode When Sverker is in the setting mode two lines appear in the window The menu heading appears on the first line and the selected menu option appears on the second line between and charac ters Menu heading Menu option Memories Your default...

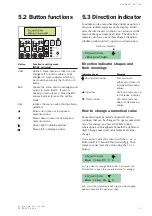
Page 26: ...numerical value The direction indicator can have one of three shapes diamond double up down arrow up arrow or down arrow Direction indicator Injection Maintained Direction indicator shapes and their meanings Indicator shape Meaning Up and down arrow You can move either up or down or increase decrease a value V Up arrow You can only move up or increase a value W Down arrow You can only move down or...

Page 27: ...ime 99 0 s c You press the W button nine times to step from 99 9 down to 99 0 and then move it one step to the left by pressing the button Injection Max time 95 0 s d Press the W button four times to step from 99 0 down to 95 0 The numerical value is now set as desired but to invoke it you must press the SEL button ...

Page 28: ...2 9 S V E R K E R 7 5 0 7 6 0 P r o g r a m m a E l e c t r i c A B Z P C D 0 1 E R 0 5 A ...

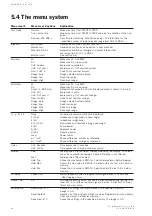
Page 29: ... Mid Fixed mid range Range High Fixed high range Q ϕ W VA None No extra measurement function displayed Z Ω ϕ Impedance magnitude phase angle Z Ω Impedance magnitude R X Ω Ω Resistance and reactance magn and magn P W Active power S VA Apparent power Q VAr Reactive power cos ϕ Power factor ϕ Iref Phase difference current as reference ϕ Uref Phase difference voltage as reference Timer Unit Seconds Ti...

Page 30: ...rker Win OFF Sverker is controlled from the panel Language English English language menus prompts etc Deutsch German language menus prompts etc Francais French language menus prompts etc Espanol Spanish language menus prompts etc Svenska Swedish language menus prompts etc SW R04E Software version PC 750 or Sverker Win The Sverker is unlocked and ready to be used with Sverker Win or ProView PC750 ...

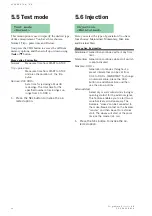
Page 31: ...option 5 6 Injection Injection Maintained Here you select the type of generation You have four choices Maintained Momentary Max time and External Start Menu option Explanation Maintained Generation continues without any time limit Momentary Generation continues while start switch is kept activated Max time 99 9 s Generation continues throughout a preset interval that can be set from 00 1 to 99 9 s...

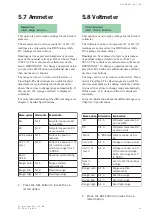
Page 32: ... a w o L e g n a R 2 t l A e g n a r w o l d e x i F d i M e g n a R 3 t l A e g n a r d i m d e x i F h g i H e g n a R 4 t l A e g n a r h g i h d e x i F 1 Press the SEL button to invoke the se lected option 5 7 Ammeter Ammeter AC Amp Auto This option is used to make settings for the Sverker ammeter The ammeter can be set to measure AC or DC AC readings are expressed as true RMS values while DC...

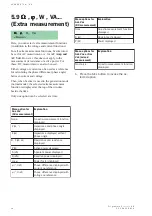
Page 33: ... these DC measurement can also be used Either voltage or current can be used as a reference for calculating the phase difference phase angle between current and voltage Then when Sverker is used in the generation mode normal mode the selected extra measurement function is displayed at the top of the window beside the time Only one option can be selected at a time r o f n o i t p o u n e M c a V c ...

Page 34: ... F d e l b a s i d r e t l i f e u l a v e g a r e v A p i r T d l o H r o f S M R n i e u l a v x a m e h t s w o h S e r o f e b y l e t a i d e m m i d o i r e p 1 g n i p p i r t x a M d l o H r o f S M R n i e u l a v x a m e h t s w o h S s 5 0 t s a l e h t n i h t i w d o i r e p 1 y r o m e m n i d l e h n i M d l o H r o f S M R n i e u l a v n i m e h t s w o h S s 5 0 t s a l e h t n i...

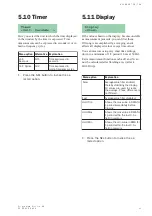
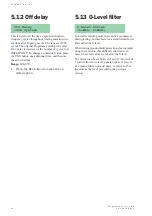
Page 35: ...n 1 and 9 A 0 level of 1 min allows low level signals to pass A 0 level of 9 max filters out most noise A 0 level of 5 is the same as the level provided in the previous version 5 12 Off delay Off delay 004 Cycles This is used to set the time expressed in mains frequency cycles throughout which generation is to continue after tripping occurs The range is 0 999 cycles The original Programma setting ...

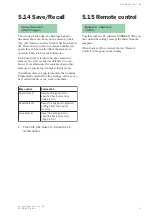
Page 36: ...r such memories Each time Sverker is turned on the contents of memory No 0 are recalled as defaults You can however recall and use the contents of any other memory by specifying its number in this menu In addition there is a special memory that contains Programma s original Sverker settings and they can be recalled whenever you want to use them n o i t p o u n e M n o i t a n a l p x E m e m l l a...

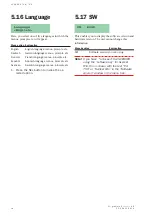
Page 37: ... language menus prompts etc Español Spanish language menus prompts etc Svenska Swedish language menus prompts etc 1 Press the SEL button to invoke the se lected option 5 17 SW SW R04D This enables you to display the software version and hardware version The user cannot change this information Menu heading Explanation SW Software version you are using Note If you have unlocked the SVERKER using the...

Page 38: ...of the applied current or voltage used for testing must exceed the tripping limit by an ample margin rule of thumb 1 2 1 5 times the pick up limit High current should be injected through the protective relay equipment for as short a time as possible to prevent overheating It may be advisable to use manually control led momentary generation or time limited generation when injecting high current Out...

Page 39: ...r This is useful since ammeter accuracy is highest when measurement proceeds via the external input The external input can be used for currents of up to 6 A The HOLD freeze function makes it possible to measure currents of very short duration Activate it by pressing the button marked HOLD See the section headed Ammeter and voltmeter in Chap ter 3 6 3 Selecting the correct current output Select the...

Page 40: ...er test point to the selected output 3 Activate the HOLD freeze function 4 Activate ON briefly using the start switch 5 Read the current 6 Repeat starting with step 4 until the correct current is set Low currents and good setting resolution You can obtain low currents and good setting resolution by connecting one or more of the resis tors in the Sverker set of resistors in series in the current ci...

Page 41: ...ing the start switch 6 Turn up the current until pick up 7 The tripping limit will be frozen and held on the display 8 Press the HOLD button twice in order to reset the HOLD function 9 Turn down the current until the relay drops out You can now read the frozen drop out value from the display window 10 Interrupt output by setting the start switch to OFF Method 2 Manually controlled momentary inject...

Page 42: ... the start switch If you want to check the time you can activate ON TIME instead of ON 8 Check to see that the instantaneous unit has operated This can be done by a checking the indicator lamp on the relay or b checking to see that the TRIP indicator lamp on Sverker is on 9 Read the current 10 Search for the lowest current where the relay operates by repeating from point 6 above and onwards 6 7 Fi...

Page 43: ...the timer start condition to INT 5 Set the timer stop condition to CLOSURE OPENING CONTACT for example 6 Set the desired current it must exceed the pick up value by an ample margin by changing the setting of the main knob Activate ON briefly using the start switch and read the current from the ammeter Repeat until the desired current has been set 7 Activate ON TIME using the start switch and keep ...

Page 44: ... ON using the start switch Set the entity current or voltage being tested so that it exceeds by an ample margin the value that has been preset for the relay 6 Activate OFF TIME using the start switch 7 Read and note the time and current 6 10 Measuring voltage 1 Set the voltmeter to measure AC or DC see Chapter 6 2 Connect the voltmeter input to the voltage that is to be measured Do not exceed the ...

Page 45: ...tage of the connected voltmeter Always comply with the applicable safety regulations 6 11 Obtaining the correct phase angle when two or more AC outputs are being used Three separate AC voltages can be obtained from Sverker 0 250 V AC output from the current source 0 120 V AC voltage source 0 100 A 0 40 A and 0 10 A current outputs from different taps on the same winding If these are connected to a...

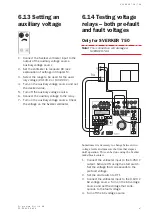
Page 46: ...7 Turn on the auxiliary voltage source Check the voltage on the Sverker voltmeter 6 14 Testing voltage relays both pre fault and fault voltages Only for SVERKER 750 Note This connection will damage a SVERKER 760 Sometimes it is necessary to change between two voltage levels and measure the time that elapses until operation This can be done using the Sverker make break contact 1 Connect the voltmet...

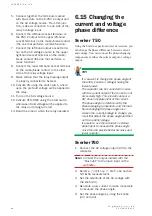
Page 47: ...relay operated 6 15 Changing the current and voltage phase difference Sverker 750 Using the built in capacitor and set of resistors you can change the phase difference between current and voltage You can connect the phase changing components at either the current output or voltage output TIP It is easiest to change the phase angle of the entity current or voltage having the lowest power The capaci...

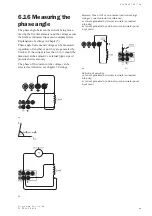
Page 48: ...ted by Sverker If the current is less than 6 A it should be measured at the ammeter s external input since it provides better accuracy The phase of the current or the voltage can be selected as reference see chapter 5 Settings a b Example Phase shift at an inductive load current lags voltage Current selected as reference a Current generated by Sverker ammeter connected internally b Current generat...

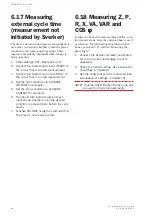
Page 49: ...5 Set the stop condition to CLOSURE CONTACT for example 6 The input state indicator lamp at each input shows whether or not the desired condition is present there before the cycle starts 7 Activate ON TIME using the start switch 8 The timer is now ready to start 6 18 Measuring Z P R X VA VAR and COS ϕ ϕ ϕ ϕ ϕ Sverker can be used to measure these entities even in external circuits Here the currents...

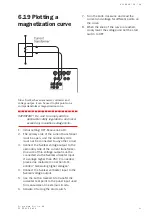
Page 50: ...o any other circuit 3 Connect the Sverker voltage output to the secondary side of the current transformer One side of this voltage output must be connected via the Sverker ammeter input If a voltage higher than 250 V is needed proceed as instructed in section 6 11 entitled Generating higher voltages 4 Connect the Sverker voltmeter input to the Sverker voltage output 5 Use the button marked A to tr...

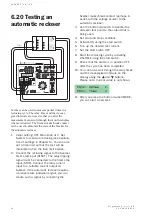
Page 51: ...you press the button marked MODE you can start a new test 6 20 Testing an automatic recloser Sverker can be used to measure partial times in a reclosing cycle The relay times and the de ener gized intervals are stored so that you after the measurement can scroll through them on the display whenever desired The Sverker make break contact can be used to stimulate the state of the breaker for the aut...

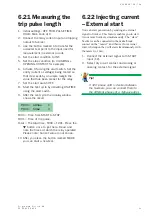
Page 52: ...s OFF TRIP PULSE TIME HOLD Main knob at 0 2 Connect the relay current input and tripping output to Sverker 3 Use the button marked A to transfer the ammeter test point to the input used for measurement in external circuits 4 Set the start condition to INT 5 Set the stop condition to CLOSEING OPENING CONTACT for example 6 Activate ON using the start switch Set the entity current or voltage being te...

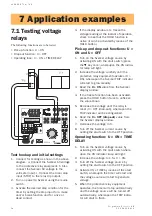
Page 53: ...start switch to the OFF position Operating function U ON TIME DELAY 1 Turn on the Sverker voltage source by activating ON with the start switch where upon the ON indicator lamp will light 2 Increase the voltage to 1 5 x U ON 3 Turn off the Sverker voltage source by setting the start switch to the OFF position 4 Activate ON TIME by means of the start switch whereupon the timer will start and the vo...

Page 54: ...agram a Connect the Sverker current output to the protective relay equipment b Connect the timer stop input STOP to the relay trip output c If the test current is not too high you can connect one or more resistors into the 6 Read the U ON TIME DELAY value from the Sverker display window 7 Repeat the U ON TIME DELAY run two or three times to confirm its accuracy through repetition 8 Decrease the vo...

Page 55: ...current rapidly until the equip ment operates I ON whereupon the Sverker TRIP indicator will start to glow steadily 6 Read the I ON value from the display window current circuit in series Moreover resis tors can be connected into the Sverker Rx Cx terminal 2 Turn on power to Sverker using the mains switch 3 Move the ammeter test point to the de sired current output When measuring low currents less...

Page 56: ...ll stop automatically and the current source will be turned off automatically whereupon the TRIP indica tor will start to flash 6 Read the I ON TIME DELAY value from the Sverker display window 7 For the remaining phases repeat the steps 1 6 as set forth above Finishing the test Enter the values read from the display into the test report Turn off power to Sverker using the mains switch Disconnect t...

Page 57: ...2 Turn on the SVERKER output by activating ON using the start switch W 13 Set the phase angle Use the lower knob for fine adjustment and the middle knob for step of 90 000ms 070 0 100A 63 05V Note A small current flowing in the circuit is required to measure the phase angle 14 Increase the current until the relay oper ates pick up Read the value Press the HOLD button twice to reset the display 15 ...

Page 58: ...om the display window If the protective relay equipment fails to operate reverse the polarity of the voltage circuit 5 If the freeze function has been activated press the HOLD button twice to unfreeze the value shown 6 Decrease the current until drop out occurs I OFF whereupon the TRIP indicator will be extinguished 7 Read the I OFF value from the display window 8 Decrease the current to 0 9 Turn ...

Page 59: ...the freeze function has been activated press the HOLD button twice to unfreeze the value shown 7 Decrease the voltage until drop out takes place U OFF whereupon the TRIP indicator will be extinguished 8 Read the U OFF value from the display window Finishing the test 1 Enter the values read from the display into the test report 2 Turn off power to Sverker using the mains switch 3 Disconnect the equ...

Page 60: ...hen set the voltage 7 Move the ammeter test point to the desired current output or to the separate ammeter panel input This can be done step by step with the A button located to the right of the display window When a test point is selected its indicator lamp lights Pick up and drop out functions P or Q ON and P or Q OFF 1 Turn on the Sverker current source by acti vating ON with the start switch p...

Page 61: ... relays The following functions are to be tested Pick up function U ON Drop out function U OFF Operating time U ON TIME DELAY Test hookup and initial settings 1 Connect for testing as shown in the above diagram a Connect the 0 250 V AC voltage source output to the protective relay equipment b Also connect this output to the voltmeter input c Connect the timer stop input STOP to the relay trip sign...

Page 62: ...rom the display window 5 If the freeze function has been activated press the HOLD button twice to unfreeze the value shown 6 Increase the voltage until drop out takes place U OFF whereupon the TRIP indicator will be extinguished 7 Read the U OFF value from the display window Operating time U ON TIME DELAY 1 Turn on the Sverker main source by setting the start switch to the ON position where upon t...

Page 63: ...rting permission Only for SVERKER 750 Note This connection will damage a SVERKER 760 Test equipment used for motor overload releases and overcurrent cut outs that govern the granting or denial of starting permission must be able to provide both normal operation current and fault current and it must be possible to change between them without interrupting the test Moreover time measurement must star...

Page 64: ... h T 0 t o n s i e l g n a e h t h g u o h t n i s i 4 4 b o n k t f e l t s o m e h t n o i t i s o p e v a h u o Y a d e t c e n n o c d e t s u j d a r e k r e v S z H 0 5 V 0 3 2 r o f z H 0 6 V 0 3 2 o t h c t i w s e h T 0 5 g n i t c e l e s z H 0 6 r o r e k r e v S e d i s n i e b o t s a h 0 6 7 e h t o t t e s n o i t i s o p t h g i r n o i t c e s e e s 1 0 1 e s a h p o N g n i d a e...

Page 65: ...a e p e r s u h t e h t t n e m e r u s a e m e g n a r e c n i S a t a d g n i h c t i w s a n i d e r o t s s i r u o y y r o m e m y r t d n o c e s l l e w y r e v y a m l u f s s e c c u s e b e b n a c e u l a v o N s i h T d e y a l p s i d r o f s r u c c o n i e l p m a x e h t i w n o i t c e n n o c e r a t a h t s e l c y c t s a f o o t h c u m T R A T S D A B N O I T I D N O C r e h ...

Page 66: ... t l o v C A V n i m d a o l l l u F t n e r r u c C A A x a m 0 6 0 V 0 1 f o s p e t s 0 7 0 6 5 2 0 0 2 1 0 6 V 0 1 f o s p e t s 0 3 1 0 2 1 5 2 0 0 6 7 r e k r e v S e g n a R C A V d a o l o N e g a t l o v C A V n i m d a o l l l u F e g a t l o v C A V n i m d a o l l l u F t n e r r u c C A A x a m 0 3 1 0 5 4 1 0 3 1 y l s u o u n i t n o c 5 2 0 e t u n i m 1 5 3 0 e s a h P e l g n a n...

Page 67: ...d as the temperature drops 9 3 Inputs Timer inputs These inputs are equipped with 400 V transient voltage suppressors transils at three locations Between the input contacts Between the black input contact and ground earth Between the red input contact and ground earth Potential state r e t e m a r a P n i M e p y T x a M t i n U r e v o e g n a h c h g i H C D H I V C D l e v e l 0 2 C D V r e v o...

Page 68: ... break contact is equipped with a 1 A miniature circuit breaker Make break contact 400 V transient voltage sup pressors transils are provided at three locations Between common contact and ground Between common contact and break contact Between common contact and make contact Normal use n o i t c n u F d n a t n e r r u c n e e w t e b r o r r e e m i T t c a t n o c k a e r b e k a m t r a t s t n...

Page 69: ...urement intervals Specifications for current in amperes t s e T t n i o p e g n a R n o i t u l o s e R f o y c a r u c c A A m g n i d a e r A 0 1 0 C A A 2 C A A 9 9 1 0 1 0 C A A m 0 1 A m 0 1 1 C A A 0 2 C A A 9 9 9 1 0 0 2 C A A m 0 1 A m 0 2 1 A 0 4 0 C A A 8 C A A 9 9 7 0 4 0 C A A m 0 1 A m 0 1 1 C A A 0 8 C A A 9 9 9 7 0 0 8 C A A m 0 1 A m 0 8 1 A 0 0 1 0 C A A 0 2 C A A 9 9 9 1 0 0 1 C ...

Page 70: ...m t a n o i t u l o s e R e m i t g n i t s e t s e m i t 9 4 s 9 9 9 s 1 Extra measurements Power factor and phase angle measurements The following specifications are for voltages and current readings that are higher than 10 of the selected range t i n u d n a m e t I e g n a R n o i t u l o s e R y c a r u c c A r o t c a f r e w o P s o c ϕ o t p a c 9 9 0 d n i 9 9 0 1 0 0 4 0 0 e l g n a e s ...

Page 71: ...lay 1 cycle Memories There are four memories numbered 0 through 3 Languages The menus prompts etc can be expressed in one of five languages English German French Spanish or Swedish Set of resistors e g a m h o r o t s i s e R t n e r r u c x a M 5 0 Ω A 0 1 1 Ω A 7 5 2 Ω A 2 0 0 1 Ω A 7 0 0 0 5 Ω A 3 0 k 1 Ω A 2 2 0 k 5 2 Ω A 1 1 0 Capacitor Sverker 750 Capacitance 10 μF Max voltage 450 V AC Mains...

Page 72: ...E R 0 5 A 10 Maintenance 10 1 Changing the position of the switch for mains frecuency Sverker 760 1 Disconnect Sverker 760 from the mains 2 Remove the 8 screws on the bottom of Sverker 760 3 Lift the hood about 5 cm 2 inches 4 Set the switch to the right position see picture below ...

Page 73: ...put 40 Set of resistors and capacitor 24 Setting mode 26 Setting the desired current 41 Software 38 Specifications 67 SW 38 T Test mode 32 Testing directional over current relay 57 Symbols 0 Level filter 36 A AC Voltage source 14 23 Ammeter 33 Ammeter voltmeter 13 22 Application examples 54 Automatic recloser 52 Auxiliary voltage 47 Auxiliary voltage source 14 23 B Break contact 15 24 Button funct...

Page 74: ...es 64 Testing over current relays 55 Testing power relays 60 Testing under voltage relays 62 Testing voltage relays 54 Timer 11 20 35 Start conditions 11 Stop conditions 11 Trip indicator 12 21 Trip pulse length 53 Troubleshooting 65 U Undervoltage relays 62 V Voltage relays 47 54 Voltage source 14 23 Voltmeter 13 22 33 ...

Page 75: ...7 6 S V E R K E R 7 5 0 7 6 0 P r o g r a m m a E l e c t r i c A B Z P C D 0 1 E R 0 5 A ...

Page 76: ...Subject to change without notice Printed matter ZP CD01E R05B 2007 ...

Reviews: