background image

EN

25 

Menu Item

Settings

ADVANCED SET-

TINGS

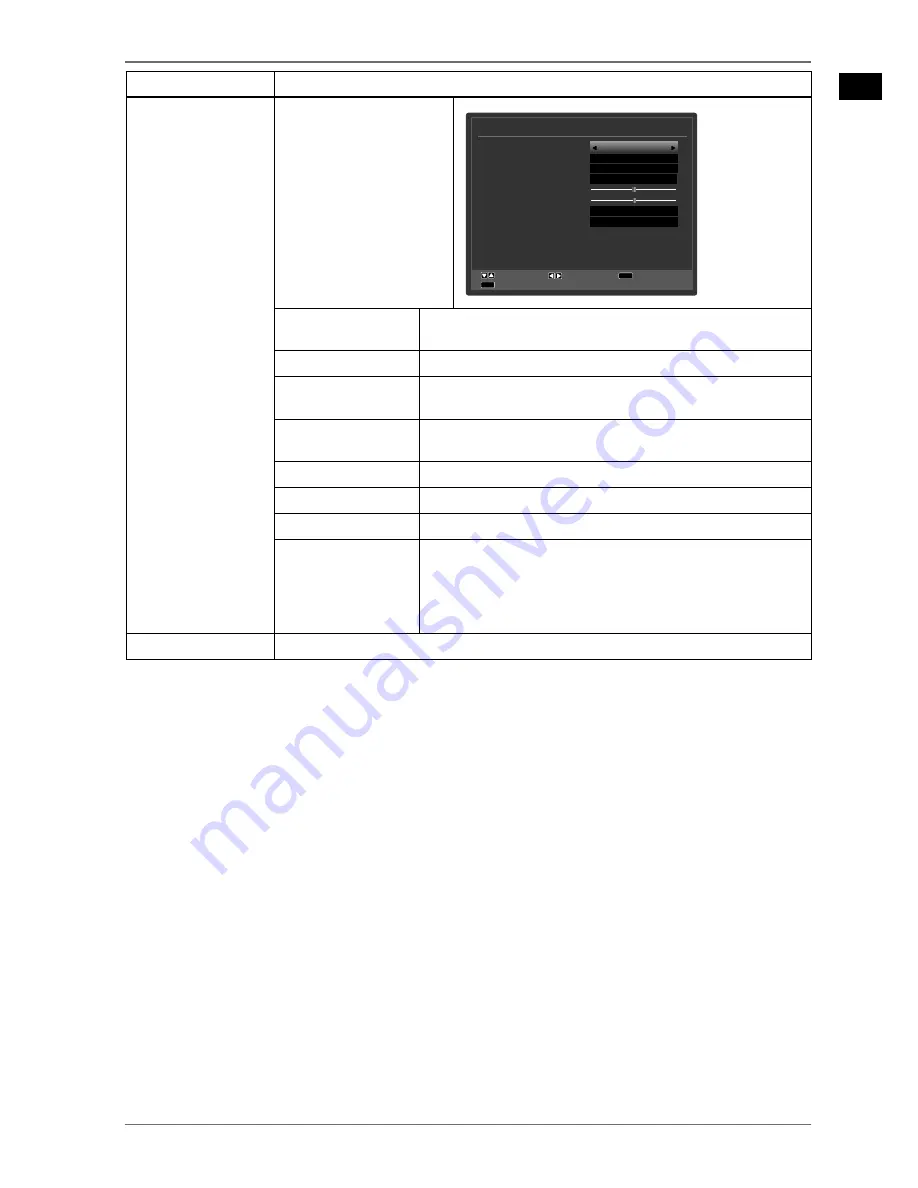
Advanced settings

Advanced Picture Settings

Dynamic Contrast

Colour Temp
Picture Zoom
Film Mode
Skin Tone
Colour Shift
RGB Gain
HDMI True Black

Medium

G

R

5

-5

Normal

Auto
Auto

OK
Off

Navigate

Back

Exit

Change Value

MENU

RETURN

DYNAMIC 

CONTRAST

Set dynamic contrast: 

LOW, MEDIUM, HIGH, OFF

.

COLOUR TEMP

Select colour tone: 

NORMAL, WARM, COOL

PICTURE ZOOM

Set the picture format here. 
This function corresponds to the 

UK\G

 button.

FILM MODE

To play back films taken on the video camera without judder, 
switch the film mode to the AUTO position.

SKIN TONE

Set skin tone

COLOUR SHIFT

Set colour shift

RGB GAIN

Set colour gain individually

HDMI TRUE 

BLACK

HDMI TRUE BLACK

 (optional): If the picture is coming in 

via an HDMI input, this option is available in the Picture Settings 
menu.
You can use this feature to boost the black of the images. You can 
set this function to “

ON

” to activate HDMI True Black mode. 

RESET

Press 

OK

 to reset all picture settings to the factory defaults.

Summary of Contents for LIFE P17102

Page 1: ...106 4 cm 42 LCD LED Backlight TV MEDION LIFE P17102 MD 30911 Instruction Manual ...

Page 2: ...ngs 16 5 3 Screen settings 16 5 4 Displaying information 17 5 5 Displaying Information 17 5 6 Opening the favourites list 17 5 7 Selecting the source 17 6 Teletext 18 6 1 Using teletext 18 7 Connecting devices 19 7 1 Connecting headphones 19 7 2 Digital amplifier via coaxial connection 19 7 3 Connecting a soundbar surround sound system 19 7 4 Connecting a DVD Blu ray player 19 7 5 Connecting a vid...

Page 3: ...App 45 15 Data protection MEDION Smart TV 45 16 Troubleshooting 46 16 1 Do You Need More Help 47 17 LED Backlight TV pixel faults 47 18 Cleaning 48 19 Disposal 48 20 Technical Data 49 20 1 Product data sheet 51 21 Legal Notice 52 22 Index 53 ...

Page 4: ...ormation on operating steps and results Tasks to be performed 1 2 Proper use This device is used to receive and play back TV programmes Thanks to its various connection options it can also be used to receive and play back media from various external sources receiver DVD player DVD recorder video record er PC etc Your device offers a number of options for usage The device is intended for private us...

Page 5: ...form us within 7 days from purchase if anything is missing Your statu tory rights are not affected WARNING Keep packaging material such as plastic film away from children There is a risk of suffocation if used improperly You should receive the following items LED backlight TV Remote control RC1208 incl 2 x 1 5 V batteries type LRO3 AAA AV adapter YUV adaptor Wi Fi dongle Wistron Vezzy 200 MSN 4004...

Page 6: ...ury if the screen is damaged Recover all broken pieces using protective gloves and send them to your Service Centre for proper waste disposal Then wash your hands with soap because chemicals may have leaked out To avoid damaging the screen do not touch it with fingers or sharp objects Contact customer services if the power cable is burnt or damaged liquid has penetrated the device the device is no...

Page 7: ...it on Large changes in temperature or fluctuations in humidity can cause moisture to build up due to condensation within the LED Backlight TV which can cause an electrical short circuit During thunderstorms or if the device is not going to be used for long periods remove the plug from the mains socket and the aerial cable from the aerial socket 2 5 Safety when connecting 2 6 Power Supply Even when...

Page 8: ...ands or fingers could get injured or battery fluids could get into your eyes or onto your skin If this should happen then rinse the af fected areas immediately with a large amount of clean water and contact your doctor im mediately Avoid heavy impacts and vibrations Always observe the correct polarity Make sure that the plus and minus poles are correctly inserted in order to avoid short circuits N...

Page 9: ...w Voltage Directive 2006 95 EC and Directive 2011 65 EU RoHS This device fulfils the basic requirements and the relevant regulation of the Ecodesign Guideline 2009 125 EG Commission Regulation 642 2009 Your device complies with the fundamental requirements and the relevant regulations of R TTE Directive 1999 5 EC Due to the 5 GHz frequency range of the supplied wireless LAN solution the device may...

Page 10: ...e Overview 3 1 Front 1 2 3 OFF ON 1 LCD screen 2 Mains switch 3 Infrared sensor Reception field for the infrared signals from the remote control Operating light Lights up blue when the appliance is in standby mode ...

Page 11: ...ces with HDMI output 7 ANT Aerial connection DVB T DVB T2 DVB C analogue 8 VGA Connection for connecting a PC 9 SCART SCART connection input output 10 SPDIF Coax OUT Digital audio output coaxial 11 LAN Network connection to connect to the Internet 12 Set the volume or navigate in the menu MENU press both buttons at the same time Call up the on screen menu to make settings on the device 13 P CH Sel...

Page 12: ...3 Switch LCD TV on off standby mode on off 4 GZKV Exit menu 5 NCPI Analogue TV stereo mono Digital TV select audio language if available 6 UK G Select screen format 7 UNGGR Activate deactivate sleep timer 8 HCX Activate favourites list 9 GRI Digital TV call up electronic programme guide 10 UQWTEG Select input signal of connected devices 11 Increase or decrease volume 12 Numeric keys TV programme s...

Page 13: ...nt channel number 22 Internet button 23 Subtitles on off if available 24 TGF DWVVQP1 QQO For teletext or menus ITGGP DWVVQP1TGRGCV For teletext or menus GNNQY DWVVQP1TQQV For teletext or menus DNWG DWVVQP1VKVNG For teletext or menus 25 Media button Fast rewind Fast forward Start recording PVR Stop playback Start playback Pause playback No function No function 26 OGFKC Call up media browser 27 Mute...

Page 14: ...t the TV WARNING Keep packaging material such as plastic film away from children There is a risk of suffocation if used improperly 4 2 Installation Attach the base stand as shown in the drawing Carry out this step before connecting the LED Backlight TV 4x SPDIF Coax OUT SCART SPDIF Coax OUT SCART 4 3 Inserting Batteries into the Remote Control Open the battery compartment cover on the back of the ...

Page 15: ...your provider into the CAM module 4 5 Connecting power supply Plug the device into an easily accessible 220 240 V 50 Hz mains socket 4 6 Switching the LCD TV on and off Set the power switch on the lower right hand side of the device to QP The device switches to standby mode and the display on the front will light up To switch the device on press on the remote control the Standby On button one of t...

Page 16: ...r buttons to enter the required IP address to connect your TV to the Internet Using the red but ton you switch between DYNAMIC and STATIC Here you specify whether the digital antenna signal is to be fed in via AERIAL DVB T or CABLE DVB C The search for digital TV channels will take place according to this setting To stop the search at any time press the OGPW button Search type setting Antenna To s...

Page 17: ...es NATURAL CINEMA GAME SPORTS DYNAM IC Depending on the programme the pictures are displayed in the formats 4 3 or 16 9 Use the UK G button to adjust the picture format AUTO The format displayed is automatically adjusted to match the input signal FULL SCREEN only in HDMI mode and for HDTV programmes received via cable or satellite Pixel exact reproduction of the image 1 1 16 9 Here you can stretch...

Page 18: ... in the programme information Use the R 1 buttons to switch between channels in the favourites list NOTE When you call up the channel list with QM the favourites list is shown automatically Alternatively use the and buttons to select your favourites and call them up with the QM button Press the HCX button again to deactivate the favourites list The icon in the programme information disappears 5 7 ...

Page 19: ...yed in the top left corner of the screen The teletext counter searches until it finds the selected page number Scrolling through pages Using the channel selector buttons or the direction buttons and you can scroll back and forth through the teletext pages Colour buttons If coloured text entries are displayed at the lower edge of the screen then you can select the contents directly by pressing the ...

Page 20: ...e to optimise the sound output by connecting a soundbar or surround sound system the following con nection types are available On the SPDIF Coax OUT connection If your soundbar surround sound system has a coaxial SPDIF connector use a cinch cable not included to connect this to the SPDIF Coax OUT connection on the LCD TV If your soundbar surround sound system has an optical SPDIF connector use an ...

Page 21: ...tenna cable between the antenna socket on the LCD TV and the output on the video recorder Connect an additional antenna cable between the antenna input on the video recorder and the antenna socket in the wall You can also use a SCART cable to connect the LCD TV and the video recorder This is recommended for high quality picture and sound quality If you wish to transfer stereo sound you will need a...

Page 22: ...eiver using a SCART cable plugged into the SCART output on the DVD recorder and the SCART input on the receiver Connect an antenna cable between the antenna socket on the LCD TV and the antenna output on the recorder Connect an additional antenna cable between the antenna input on the DVD recorder and the antenna output on the decoder Connect the SAT receiver to the LNB on the parabolic antenna 7 ...

Page 23: ...E to select PC mode The PC display appears on the LCD TV Press the SOURCE button to return to TV mode If you use the LCD TV as a second monitor for your PC you might have to change the display properties of your operat ing system To do this please read the operating instructions of your PC notebook to find out the operational require ments for using multiple monitors 7 12 Connecting a network Conn...

Page 24: ...e menu Please note that depending on the presets the menu closes automatically if no button is pressed PLEASE NOTE The OSD menu also displays the following options along the bottom You can select the following main menus PICTURE menu SOUND menu SETTINGS menu INSTALL AND RETUNE menu CHANNEL LIST menu MEDIA BROWSER menu PLEASE NOTE Due to technical changes the menus described here may differ from th...

Page 25: ...Increase or decrease sharpness on a scale of 0 31 COLOUR Increase or decrease colour saturation on a scale of 0 63 POWER SAVE MODE If you set the energy saving mode to ECO the TV switches into energy saving mode and the brightness of the TV is set to the optimum level When the energy saving mode is activated the option BACKLIGHT is not available PLEASE NOTE In the picture mode DYNAMIC it is not po...

Page 26: ...ture format here This function corresponds to the UK G button FILM MODE To play back films taken on the video camera without judder switch the film mode to the AUTO position SKIN TONE Set skin tone COLOUR SHIFT Set colour shift RGB GAIN Set colour gain individually HDMI TRUE BLACK HDMI TRUE BLACK optional If the picture is coming in via an HDMI input this option is available in the Picture Setting...

Page 27: ... in this mode BACKLIGHT Here you can use the direction buttons to set the background lighting to the levels LOW MEDIUM HIGH and AUTO ADVANCED SETTINGS Advanced settings Advanced Picture Settings Dynamic Contrast ColourTemp Picture Zoom Film Mode SkinTone RGB Gain Normal 16 9 Auto OK Off 5 5 Navigate Back Exit ChangeValue MENU RETURN DYNAMIC CONTRAST Set dynamic contrast LOW MEDIUM HIGH OFF COLOUR ...

Page 28: ... adjust the vertical position of the picture DOT CLOCK With this setting the picture signal is synchronised to match with the monitor s pixel rate This corrects errors that can appear as vertical stripes in pixel dense images like tables or text with small fonts Set the frame rate using PHASE If the PC picture is not clear you can use to adjust the pic ture signal to suit the LCD TV pixels This wi...

Page 29: ...n WARNING Using headphones earphones to listen to a device at high volumes for an extended period can damage your hearing SOUND MODE Standard setting STEREO If the current programme supports DUAL mode e g dual lan guage broadcasts you can also choose here between DUAL I and DUAL II original lan guage and dubbed language AVL This function compensates for the different volume levels between differen...

Page 30: ...llows Switch the TV off and pull out the plug Insert the CI module into the slot on the side of the LCD TV Afterwards insert the card PLEASE NOTE Please note that you should only insert or remove the CI module when the device is disconnected from power WARNING The CI module must be inserted the right way round it cannot be pushed in the wrong way round The CI module or TV set could be damaged if y...

Page 31: ...nt settings will be used AUDIO If a programme e g a film is broadcast in several languag es you can select the spoken language here e g original lan guage SUBTITLE If the programme includes subtitles for the hard of hearing you can set the preferred language here TELETEXT The default setting is WEST If you are in another lan guage region you can change the language setting WEST EAST CYRILLIC TURK ...

Page 32: ...andby on button To switch the TV back on you will need the remote control When a button is pressed the message CHILD LOCK ON appears on the screen while the menu remains hidden SET PIN Set a new PIN number Use the number buttons to add a new PIN number You must re enter the new PIN code to confirm IMPORTANT Make a note of the new PIN Otherwise the device must be reset to the factory defaults and a...

Page 33: ... If you choose the RECORD setting a hard drive or a USB stick must be connected to the USB port The programmed broadcast will then be recorded onto this medium NOTE If the USB stick malfunctions and an error message is dis played for instance insufficient memory capacity even though the stick is empty it can be formatted by the LCD TV using the menu option RECORDING CONFIGU RATION FORMAT DISK CHAN...

Page 34: ... time off set can be set here AUTO DISCARD You can set the automatic deletion of recordings with this option The fol lowing options are available DISCARD None Oldest Longest Shortest UNPLAYED Included Not included A selection is only possible if Oldest Longest or Shortest have been selected under the option DISCARD HARD DISK INFORMATION To show details about the USB hard drive select this option a...

Page 35: ...Afterwards you can then change the name using the direction buttons NETWORK SETTINGS Here you can select the network type WIRELESS DEVICE or WIRED DEVICE If you are using USB Wi Fi dongles choose the option WIRELESS DEVICE as your net work type and confirm with QM The television will scan for available wireless networks Select the desired network If this is secured you must enter the network passw...

Page 36: ...The search progress is displayed SOFTWARE VERSION Version display HARD OF HEARING If the channel broadcasts special audio signals for the hearing impaired you can change the setting to ON to receive these signals AUDIO DESCRIPTION If the channel broadcasts special audio signals for the visually impaired you can change the setting to ON to receive these signals AUTO TV OFF Here you can set the time...

Page 37: ... be saved MANUAL CHANNEL SCAN This function is used for the direct entry of channels or satellite transponders NETWORK CHANNEL SCAN Selection between digital cable and or DVB T channel groups This searches for related channels to the currently selected station The information sent in this respect is inde pendent of the selected channel and leads to different results NOTE The existing channel list ...

Page 38: ... move Use the direction buttons to select the function MOVE The MOVE function appears in the lower menu bar next to the OK entry Press QM a dialogue box will open Enter the channel number you want and press QM0 If the position is already occupied you will be asked if you want to move the channel anyway Select YES and confirm your selection with QM The channel will be entered and the other channel ...

Page 39: ...ect the channel to be locked with the direction buttons Select the LOCK option with the direction buttons Now press QM a password window appears The message ENTER PIN appears Enter the PIN number A lock icon appears behind the locked channel in the channel list PLEASE NOTE To activate the channel lock the device must first be turned off once You can now lock more channels by selecting them with th...

Page 40: ...he green button all and add them to the favourites list with the QM button Removing channels from the favourites list Use the direction buttons to select the channel with the favourite icon that you want to remove from the fa vourites list Press the QM button to remove the channel from the favourites list The favourite icon disappears Repeat the process as required for additional channels You also...

Page 41: ... Video 1 0002 Video 2 0003 Video 3 0004 Video 4 Navigate Jump Play Preview Media Browser Video 1 1 4 a0 Play PlayThis Loop Shuffle Sort By Name ToggleView Style 0001 V Vid de eo 1 Select Device 1 2 3 4 5 6 7 8 9 OK LANG PHOTOS To play back photo files Navigate 200 Jump QM View full screen Slide show ITGGP DWVVQP Preview image TGF DWVVQP Sort by date GNNQY DWVVQP Change view DNWG DWVVQP Change medi...

Page 42: ... between devices that support the DLNA function Connect the LCD TV to a network Switch on the LCD TV and open the MEDIA BROWSER via the menu Select the SETTINGS option Under VIEW STYLE select the option FOLDER Press the TGVWTP key to return to the main menu of the media browser Select the desired media type and confirm with QM All available networks are listed Select the desired media server or th...

Page 43: ...ction NAVIGATION You move through the programme guide using the direction buttons TGF DWVVQP PREV DAY Calls up the programme for the previous day This is only possible up to the current day The programme for the past will not be displayed ITGGP DWVVQP NEXT DAY Calls up the programme for the following day GNNQY DWVVQP ZOOM Shrink time window DNWG DWVVQP FILTER If you are looking for a specific prog...

Page 44: ...ADD FAVOURITE Press the green button to add the currently selected app to your favour ites PLEASE NOTE This function cannot be selected until you have registered as a user under REGISTER Yellow button TQQV SETTINGS Here you can specify which language areas the apps should be selected from In addition you can reset the portal so that the home screen of the portal is reset to the factory default Blu...

Page 45: ...cial networks and other multimedia applications HbbTV applications cannot be called up unless the broadcaster sends these signals and there is an Internet connection on the TV The scope and operation vary depending on the channel and the broadcaster Whether a broadcaster offers HbbTV applications or not is shown via a brief on screen display The exact form and the location is dependent on the indi...

Page 46: ...ew software versions are available for your device In the process your device sends out the IP address the software version and the MAC address of the de vice This data is required to make use of the software update service Access to applications in the portal or via HbbTV can depending on the provider require a registration setting up a user account and or a subscription Registration may require ...

Page 47: ... The picture is not clear The reception might be poor Check if the antenna is connected properly The picture is too bright or too dark Check the settings for contrast and brightness The picture is not sharp The reception might be poor Check if the antenna is connected properly Check the settings for sharpness and noise reduction in the PICTURE menu There is a double triple picture Check if the ant...

Page 48: ...re however For active matrix TFTs with a resolution of 1920 x 1080 pixels which are each made up of three sub pixels red green blue there are a total of approx 6 2 Mio control elements in use Occasionally one or more pixels can fail or become incorrectly con trolled because of this very high number of transistors and the associated extremely complex manufacturing processes used Pixel fault class D...

Page 49: ...or of the device Do not place the screen in strong sunlight or near ultraviolet light Store the packaging material in a safe place only use this box to transport the LED Backlight TV ATTENTION None of the parts inside the housing require cleaning or maintenance 19 Disposal Packaging Your device has been packaged to protect it against transportation damage Packaging materials are raw materials and ...

Page 50: ... K I Secam L L Programme positions 199 ATV 800 DTV Bands VHF bands I III UHF band U HYPERBAND CABLE TV S1 S20 S21 S41 HD DVB T DVB T2 HD DVB C Connections Antenna connection analogue TV DVB T DVB T2 or DVB C 2 x USB ports 1 x LAN RJ45 Video 3 x HDMI in with HDCP decoding 1 x SCART 1 x VGA 15 pin D Sub AV in 3 5 mm mini jack to cinch adapter YPbPr in YUV 3 5 mm mini jack to cinch adapter Audio Ster...

Page 51: ...imensions without stand W x H x D approx 965 x 572 x 98 mm Dimensions with stand W x H x D approx 965 x 618 x 220 mm Weight with stand approx 9 0 kg Weight without stand approx 10 0 kg Wall mounting Vesa standard hole spacing 200 x 200 mm2 5 MSN LED Backlight TV MD30911 MSN 3001 8577 Wi Fi dongle Wistron Vezzy 200 MSN 4004 4275 4 Due to the large number of different codecs it is not possible to gu...

Page 52: ...EN 51 20 1 Product data sheet As per regulation 1062 2010 Power consumption on standby 0 34 W Power consumption in the OFF mode 0 01 W Physical resolution 1920 x 1080 ...

Page 53: ...written per mission of the manufacturer Copyright is owned by the company Medion AG Am Zehnthof 77 45307 Essen Germany The operating manual can be reordered via the service hotline and is available for download via the service portal at www medion com gb service start You can also scan the QR code above and download the operating manual onto your mobile device via the service por tal ...

Page 54: ...8 Internet 44 L Language 30 Life Remote App 45 M Media browser 40 Media library 43 Media portal 43 Menu 23 N Network 22 34 O Operating safety 5 Operation 16 OSD menu 23 P Password 31 38 Pixel faults 47 Portal 43 Power supply 6 Connecting power supply 14 Product data sheet 51 PVR 33 R Receiver 20 S Safety instructions 5 Connection 6 Operating safety 5 Power supply 6 Screen settings 16 Selecting the...

Page 55: ...54 ...

Page 56: ...1 M ...

Reviews: